Do you want to segment your subscribers as soon as they sign up on your site? Learn how add tag to Mailchimp signup form.
Tagging subscribers helps you stay organized by creating different groups. This lets you easily cater to your new lead’s interests and what they signed up for.
In this post, we’ll show you how to add tag to Mailchimp signup form in WordPress. Your subscribers will automatically be added to the right group so you can target them with personalized campaigns.
Before we dive in, though, let’s get clear on why you should use Mailchimp tags in the first place.
Why Use Mailchimp Tags in Signup Forms?
Mailchimp is one of the most popular email service providers with 14+ million active users. They have a ton of cool features that you can take advantage of to improve your email marketing efforts.
Today, we’ll be focussing on tags. These simple labels can help you organize your subscriber list based on the information you have about them.
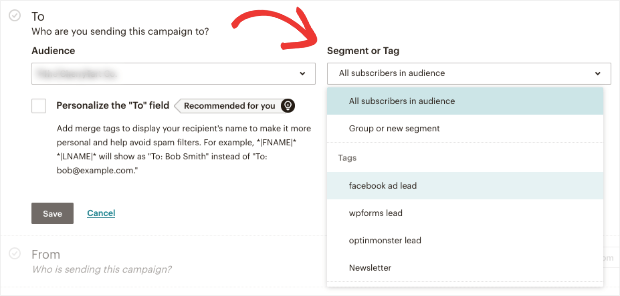
When you’re sending out a broadcast email, you can simply select the tag, and every user with that tag will receive it.
These tags are built for internal purposes, so only you and your team can see which segment they’ve been added to.
If you want your subscribers to choose their own category or interests, Mailchimp has a separate feature that lets you add leads to groups.
Having said that, tags help you:
- Organize and categorize subscribers
- Connect with customers based on interests, likes, and activity on your site
- Send personalized and targeted campaigns to maximize open and click-through rates, engagement, and conversions
- Simplify processes and save time for you and your team
While Mailchimp tags can be added automatically, it also lets you add, remove, and edit tags manually. That way, you get full control over your tags, and you can use them however you need to.
Ready to add tag to Mailchimp signup form in WordPress?
Let’s jump right into the tutorial.
In this tutorial, we’re going to show you how to create tags in Mailchimp and then add them to your signup forms and optin campaigns.
Here’s a table of contents to skip ahead to the section you want to know more about:
- Creating tags in Mailchimp
- Adding tags to WordPress Signup Forms
- Adding tags to WordPress Optin Campaigns
Creating Tags in Mailchimp
The first thing you’ll want to do is log into your Mailchimp account.
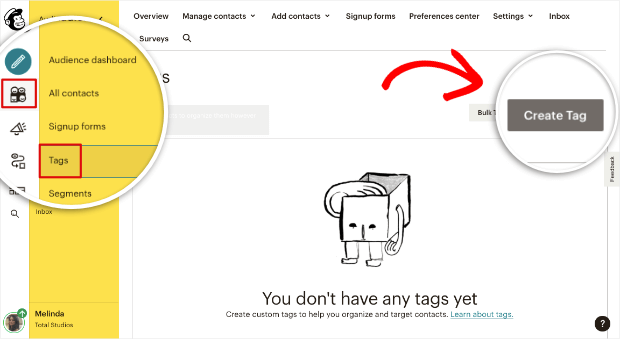
Then navigate to the Audience » Tags tab. You’ll see options for Bulk Tag Contacts or Create Tags.
Bulk Tag lets you import contacts and tag them altogether.
To create a new tag, click on the Create Tag button.
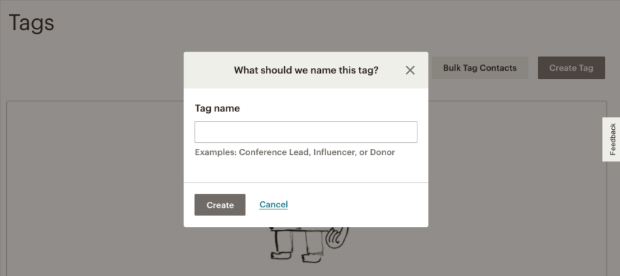
This will open a popup to enter a tag name.
Make sure you name it something you can easily identify, like ‘newsletter’ or ‘influencer.’
Then click on the ‘Create’ button to add your tag.
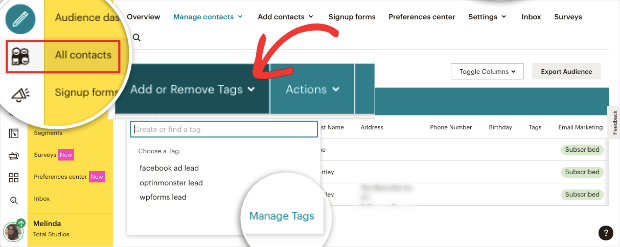
Now, head over to the Audience » All Contacts page, where you’ll see a list of your contacts. You can manually select your contacts and then use the Add or Remove Tags menu to tag them.
You can also access the Tags page using the Manage Tags link at the bottom of this menu.
Instead of tagging subscribers manually, you’ll want to automatically tag users as soon as they submit your signup form.
This will save time and make sure new subscribers are added immediately to email campaigns or weekly newsletters.
Add Tag to Mailchimp Signup Form
The easiest way to auto-tag your signup form entries is using WPForms.
WPForms is hands down the best form builder for WordPress.
It lets you create all sorts of forms for your site, including contact, sign up, registration, login, and survey forms. It has really cool features to optimize your form for conversions.
Plus, it seamlessly integrates with Mailchimp, so you can connect the 2 platforms in just a few clicks.
Step 1: Add WPForms to Your WordPress Site
To get started, install and activate WPForms on your site.
There’s a lite version available in the WordPress repository. For access to advanced features, you’ll want to sign up for the Pro version.
Never installed a plugin before? No worries. Just follow this helpful tutorial: How to Install a WordPress Plugin (3 Methods).
Step 2: Create a Signup Form
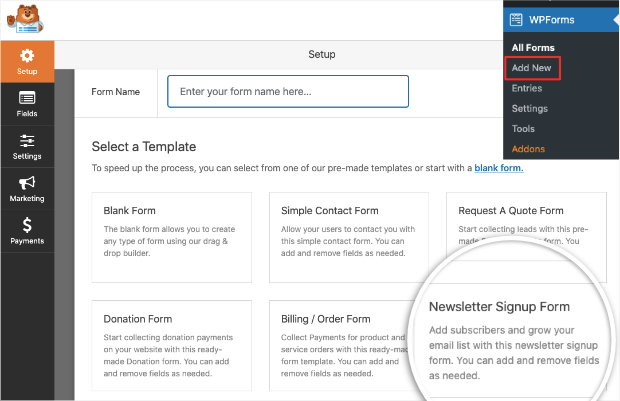
You can get started by creating a signup form. Navigate to the WPForms » Add New page. Here, you can add a name to your form and then select a template.
We’ll choose the Newsletter Signup Form. This will open up the form builder where you can customize the form.
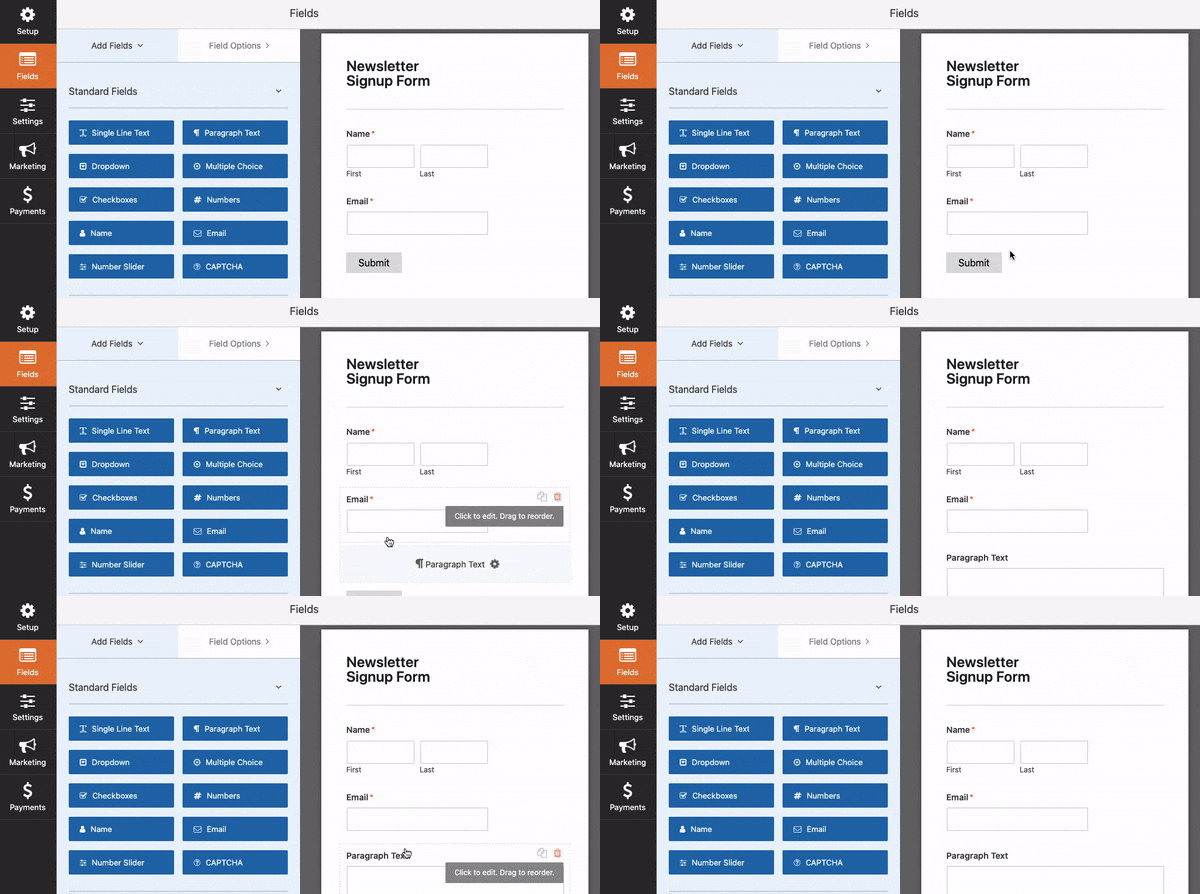
You can add fields here by dragging and dropping them from the left menu into the form.
And you can select any field to get editing options on the left. This will allow you to customize the entire form.
Step 3: Connect the Signup Form to Mailchimp
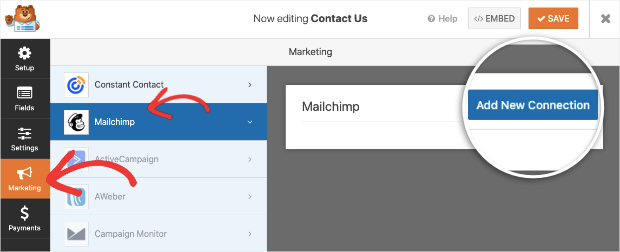
To tag subscribers on this form, switch over to the Marketing » Mailchimp tab.
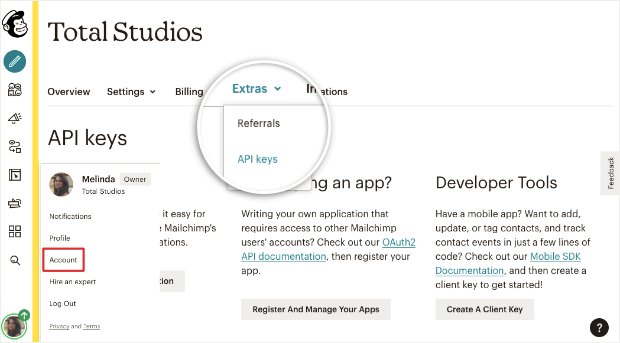
You’ll need to add your API key, which you can find in your Mailchimp account. Open your profile icon at the bottom left corner of the screen.
Select the Account » Extras » API keys tab.
You can generate a new API key and then copy and paste it into WPForms.
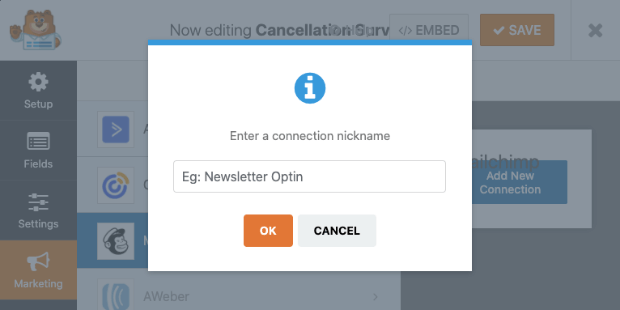
Once you’ve done that, select the Add New Connection button.
This will open up a popup to give your connection a nickname.
With that, your Mailchimp account is now integrated with your signup form.
Step 4: Add Mailchimp Tags to Signup Form
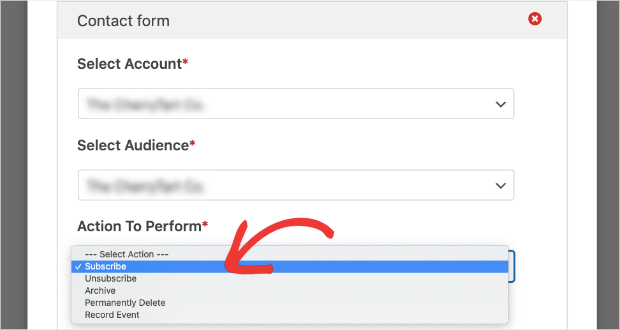
On the same page, you should see more options to select your Mailchimp account, audience, and actions to perform.
Under ‘Actions to Perform,’ from the drop-down menu, select Subscribe.
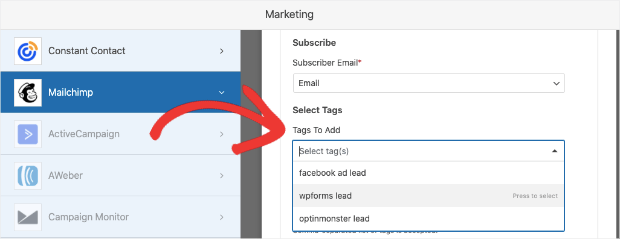
You’ll see more form fields appear to tag your subscribers. Under Select Tags, open the drop-down menu to see all the tags you’ve created with Mailchimp and select the one you want.
That’s it! You’ve successfully tagged your signup form. Anyone who fills out and submits this form will automatically be added to your Mailchimp contact list with the selected tag.
Up next, we’re going to show you how to tag subscribers in optin and lead generation campaigns on your site.
Adding Tags to WordPress Optin Campaigns
To create lead generation and optin campaigns on your site, you can use OptinMonster.
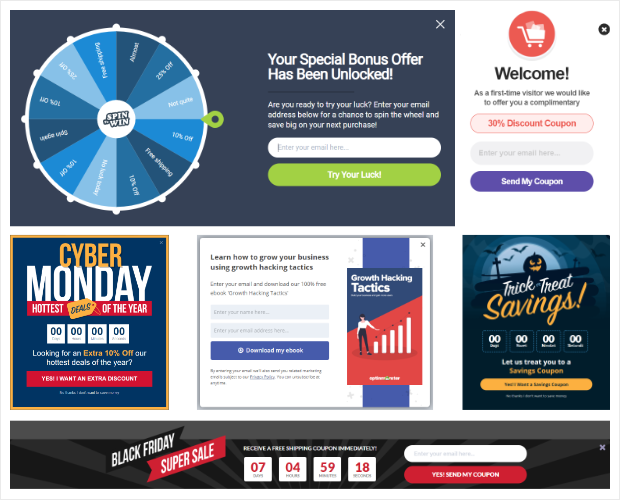
OptinMonster is the most powerful lead generation tool on the market. It lets you create all kinds of campaigns like popups, floating bars, slide-ins, fullscreen mats, gamified wheels, and more.
Plus, it comes with 50+ beautiful premade templates to choose from.
You can customize any of the designs using a beginner-friendly drag and drop builder. That way, you can set up full-fledged campaigns in minutes.
OptinMonster also comes with powerful targeting features to show your campaigns to the right people, in the right places, and at the right time in their customer journey.
You can target your audience based on where they’re coming from, their location, interests, and actions on your site.
Take OptinMonster’s powerful Exit-Intent® trigger for example. It detects when visitors are about to leave your site and shows them a campaign to try to convert them before they leave.
Exit-Intent is proven to be so powerful that it’s how Crossrope exploded their list 900% each month!
OptinMonster seamlessly integrates with all popular email marketing services, including Constant Contact, Mailchimp, Aweber, ActiveCampaign, and many more.
With OptinMonster, you can easily add Mailchimp tags to those who subscribe to campaigns on your site.
Ready to create stunning optin campaigns with tagged subscribers?
Let’s get started.
Step 1: Install and Activate OptinMonster
If you don’t have OptinMonster already, you can install and activate the OptinMonster plugin on your WordPress site. For more details, follow our guide to install OptinMonster on WordPress.
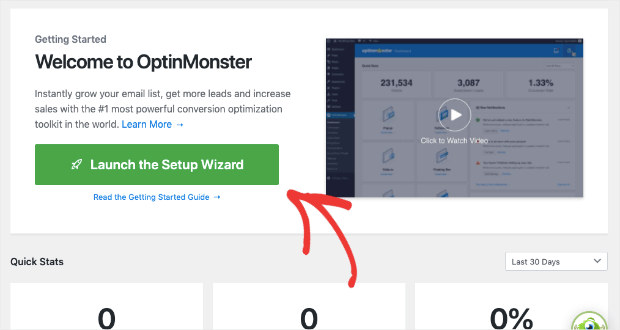
Then, from your WordPress dashboard, you can access the OptinMonster page and use the setup wizard to upgrade your account.
Follow the on-screen instructions to connect your site to OptinMonster. When that’s done, you’re ready to create a campaign.
Step 2: Create an Optin Campaign
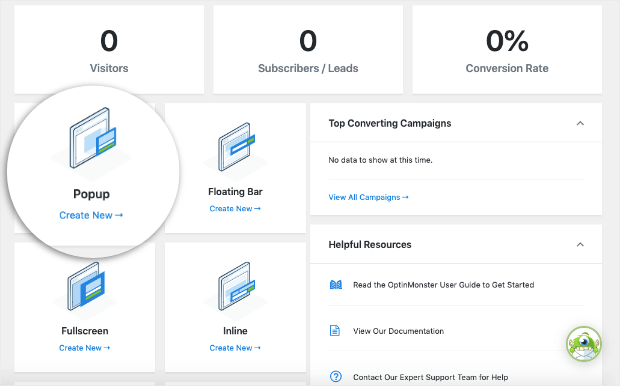
From your WordPress dashboard, open the OptinMonster page and choose a campaign type like a popup.
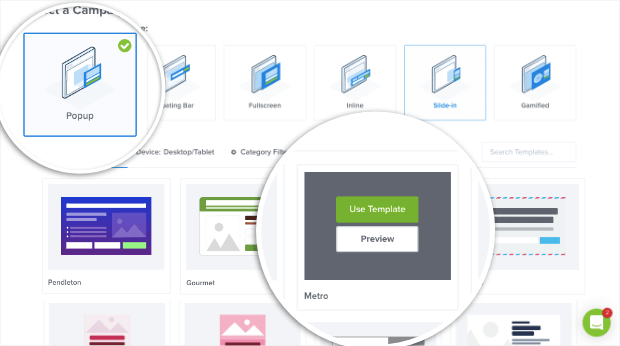
This will open up a page of templates. You can explore these templates by hovering over them to get the preview option.
When you select a template, Optinmonster’s campaign builder will open up where you can customize it.
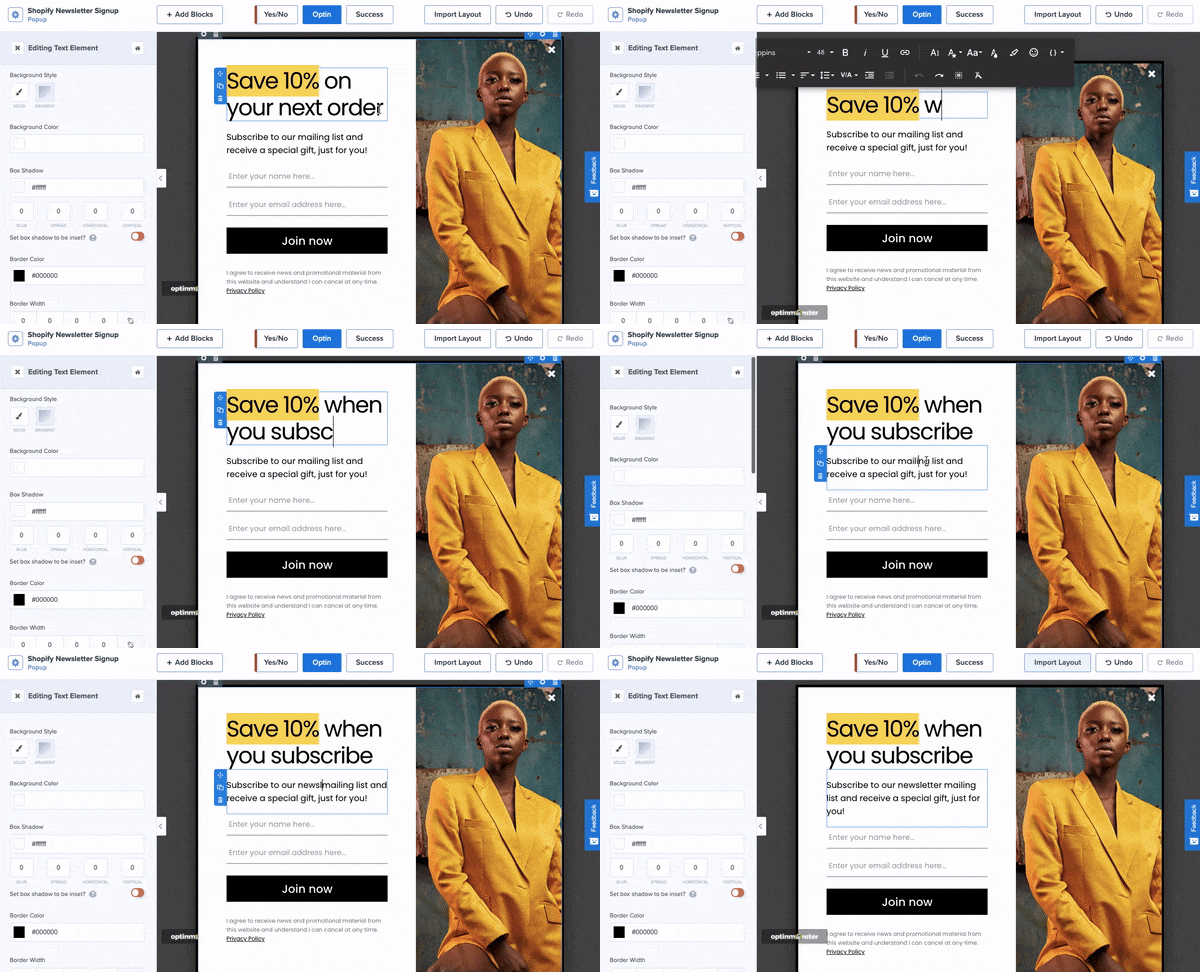
Similar to WPForms, OptinMonster has an intuitive drag and drop builder. This lets you easily add, remove, and edit any element of your campaign in minutes.
For more detailed steps, follow this guide on how to create your first OptinMonster campaign.
When you’re done designing your campaign, you can integrate it with Mailchimp.
Step 3: Connect OptinMonster to Mailchimp
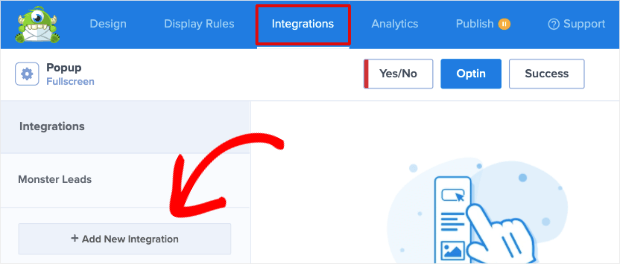
Inside the OptinMonster campaign builder, open the Integrations tab and click on the ‘Add New Integration’ button.
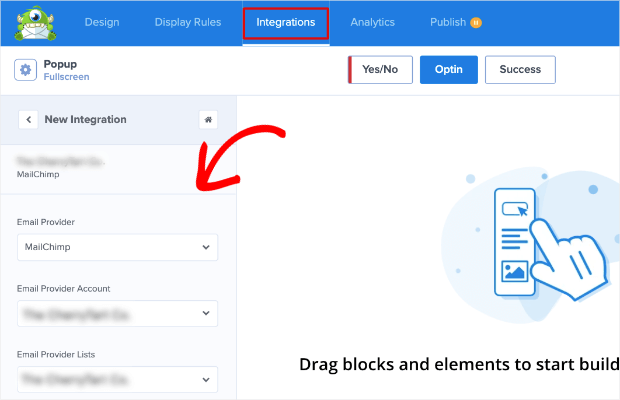
A drop-down menu will appear with the list of available email service providers. Select Mailchimp. You’ll need to add a new account and provide your Mailchimp API key.
Then you can select your Mailchimp account and email list.
Now your site is successfully connected to Mailchimp.
Step 4: Add Mailchimp Tags to OptinMonster Campaign
In the same email integration menu, scroll down to the List Tags section to tag your subscribers. Simply use the dropdown menu to select a tag from Mailchimp.
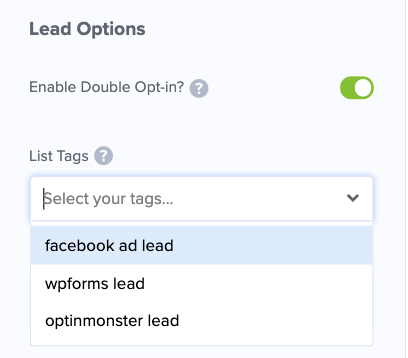
And they’ll be tagged according to the tag you selected with OptinMonster’s Mailchimp integration.
That’s all for today. You now know how to tag subscribers that sign up for any form or marketing campaign on your site.
If you haven’t signed up for OptinMonster yet, what are you waiting for? Get your 100% risk-free OptinMonster account now by clicking below:
We hope you found this tutorial helpful in tagging subscribers. For your next steps, you may want to learn how to create a Mailchimp popup to capture more email subscribers.
We also have a few other resources that you should definitely check out:
- Spam Email Signups: 3 Ways to Protect Your Email List
- 7 Best Email Verification Tools to Improve Deliverability
- 9 Best WordPress Email Subscription Plugins (Free & Paid)
These posts will help you improve your email marketing efforts and grow your Mailchimp subscriber base.





Add a Comment