Are you wondering how to turn more visitors into email subscribers on your WordPress site? Or maybe you’re wondering if you have the time or money to add a mobile marketing strategy to the mix? What if we told you that a WordPress popups (especially a WordPress popup form on click) could be the solution to both of your concerns?
In this article, we’ll show you exactly how to create two beautiful campaigns, one specifically for your mobile visitors, that will get you the conversions you need.
How to Trigger WordPress Popups On Click
Email marketing is one of the most effective ways to reach your audience, and get leads and sales. Often, website owners show subscription forms to every visitor on page load, which means that some people just ignore them.
But there’s a smarter way to grow your email list.
Instead of wasting time marketing to people who may not even care, you can use an OptinMonster MonsterLink™ to show on-click popup campaigns ONLY to visitors who are interested.
This 2-step optin process uses the powerful Zeigarnik effect. This psychological trigger means people who begin an action are more likely to finish it.
When visitors trigger your WordPress popup form on click, they’ll already have shown interest and taken the first step by clicking. That means when the form pops up, they’ll be motivated to finish the process and subscribe.
Case StudyHow Cosmetic Packaging Now Grew Their Email List by 754% with 2-Step Optins
MonsterLinks™ are ridiculously effective. CodeinWP used them to increase conversions by 1000%. And Snack Nation uses this feature to get 1200 new leads a week.
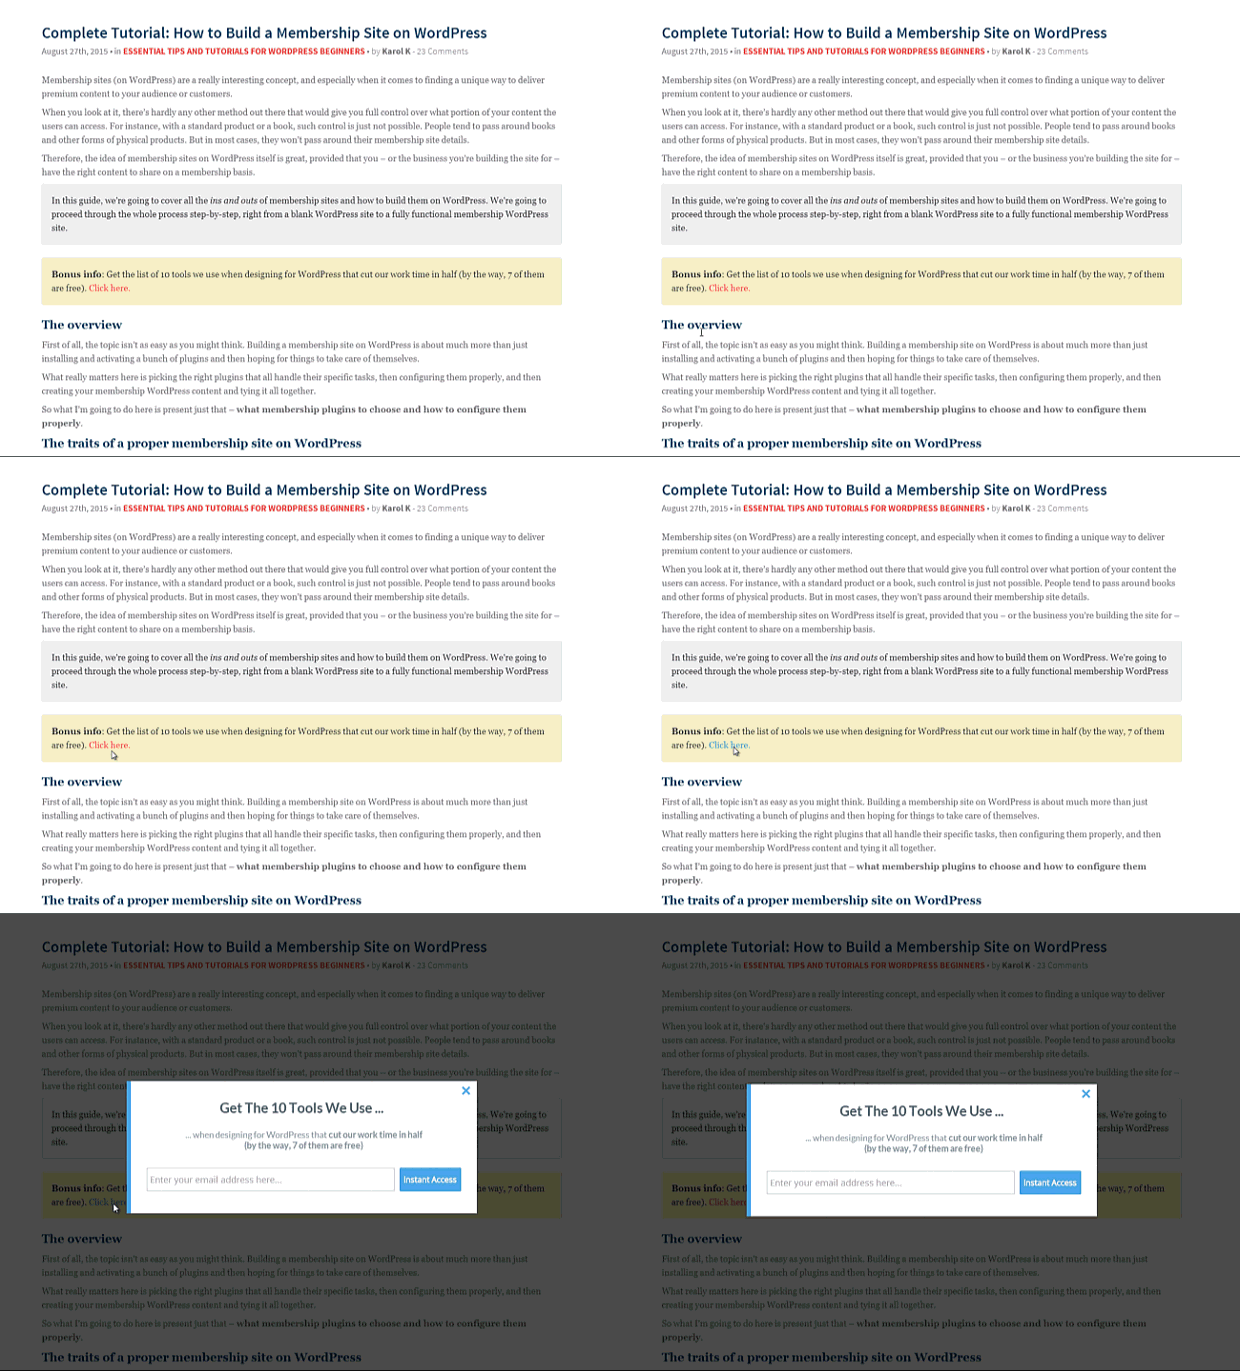
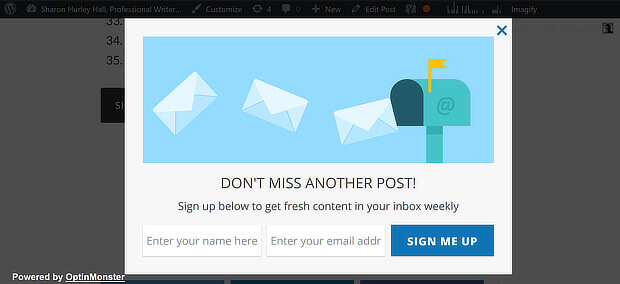
Are you ready to explode email list growth? You’ll need to get OptinMonster, the best WordPress popup plugin, to be able to create this attractive and effective campaign. Here’s how it’ll look once your visitors click.
But first, you’ll need to sync OptinMonster with WordPress. For your help, we’ve created this tutorial video:
With that out of the way, let’s get started…
1. Create Your Campaign
Login to the OptinMonster dashboard. Start building a new campaign by pressing the Create Campaign button.
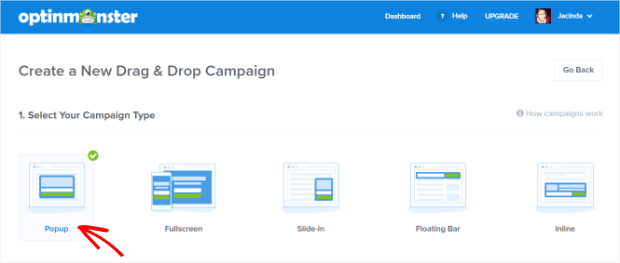
Choose a campaign type. We’ll use a Popup, which converts well for all OptinMonster customers.
Select a campaign template by hovering over a template you like and clicking the blue Use Template button that appears. We’ll use Modern.
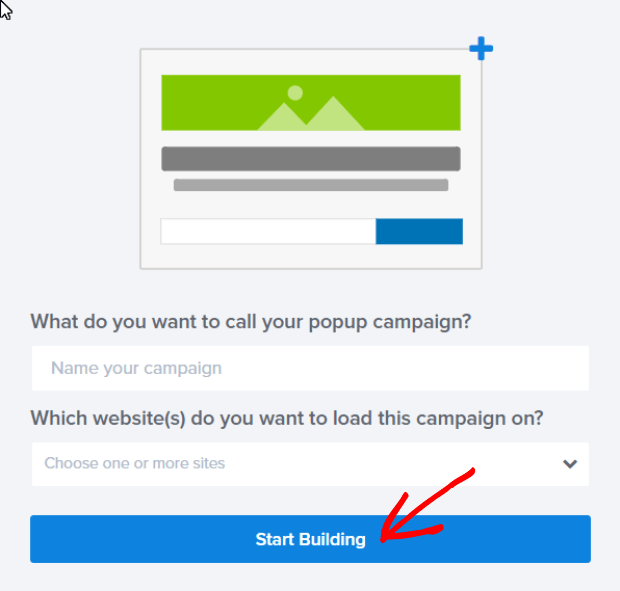
Name your campaign and decide which website you want to use it on. If you’re not ready to decide, you’ll be able to add the website later in the OptinMonster campaign builder. Click the blue Start Building button to start building.
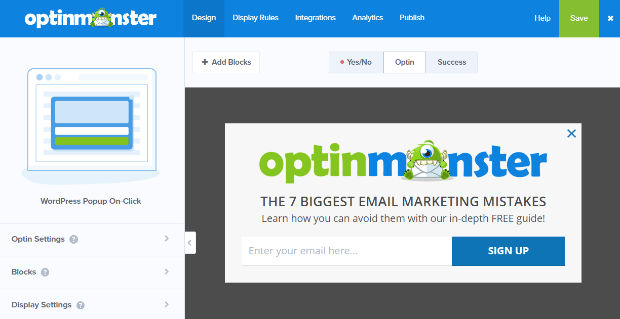
You’ll be taken to the OptinMonster campaign builder, where you’ll see the default Modern campaign.
2. Edit Your Campaign
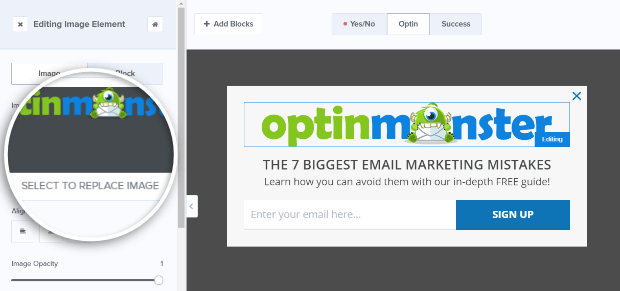
Now it’s time to edit the campaign. First, click on the image area to open up Editing Image Element in the editing tools on the left. Then, click Select to Replace Image.
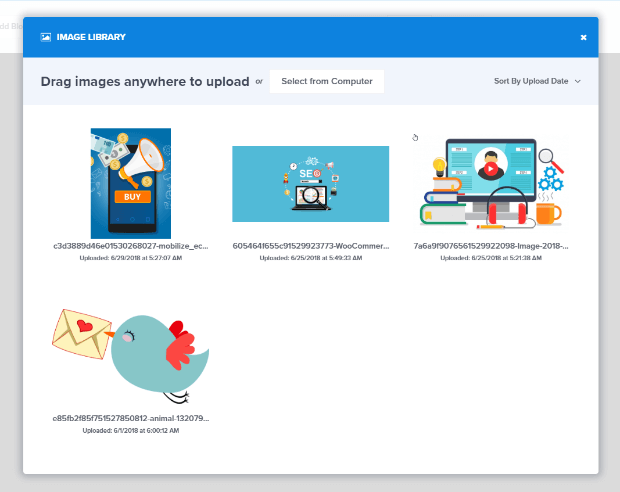
From the next screen, you’ll have access to your existing image library. You’ll also have the option to upload a new file from your computer.
Our list of free image sites can help you find a great image.
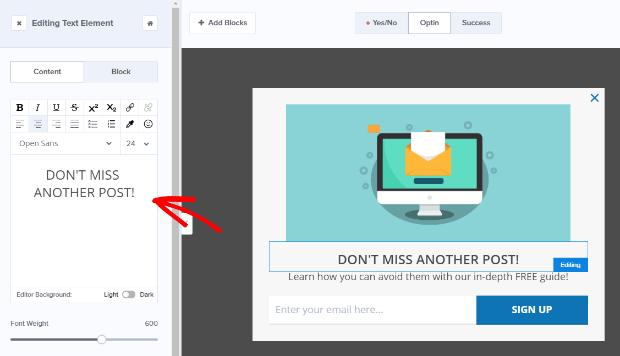
Once you’ve found an image you like it’s time to edit our headline text. To do that, click on the headline text to select it. Then type to replace it with your own headline in the editing tool that comes up on the left. You can use these formatting tools to make the text bold, add color, and more.
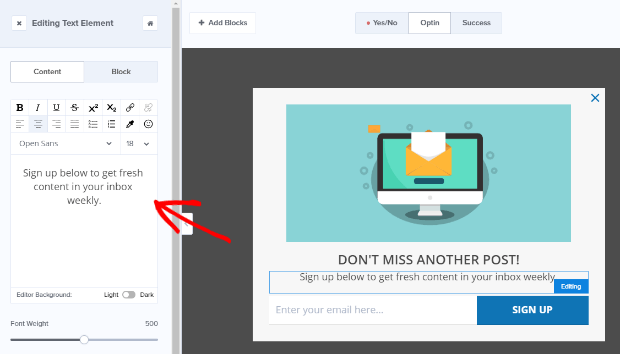
Use the same process to edit the body text.
Use the green button at the top of the campaign builder to save your campaign. Do this regularly as you build your campaign.
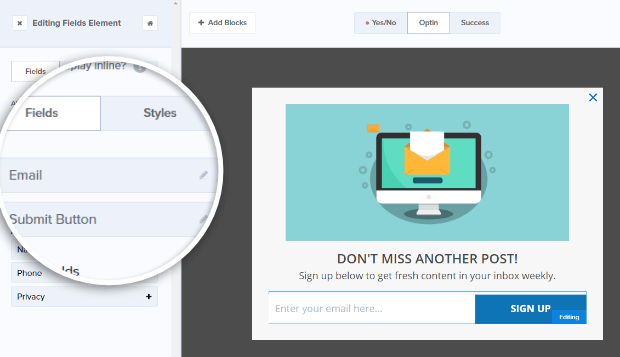
Click on the email box in your campaign. That’ll open up the Editing Fields Element on the left, where you can change the text that prompts visitors to enter their email address. We’ll leave it as is but wanted to make sure you knew where to find it.
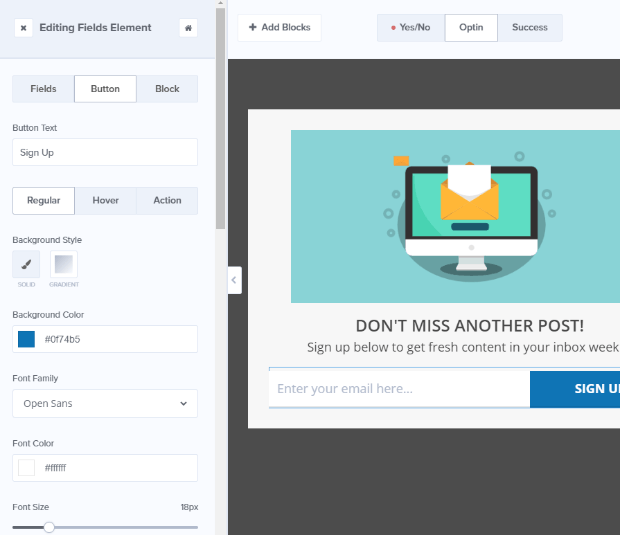
Clicking on the pencil icons will allow you to edit the appearance and actions of many elements in OptinMonster. Click on the blue Sign Up button in your campaign to open the Editing Fields Element as you did to access the email box tools. Then click the pencil icon for the Submit Button field.
You can edit the button text and color here.
Keeping the signup form short makes it more likely people will sign up. However, if you plan to personalize the emails you send, you’ll want to get subscribers’ names.
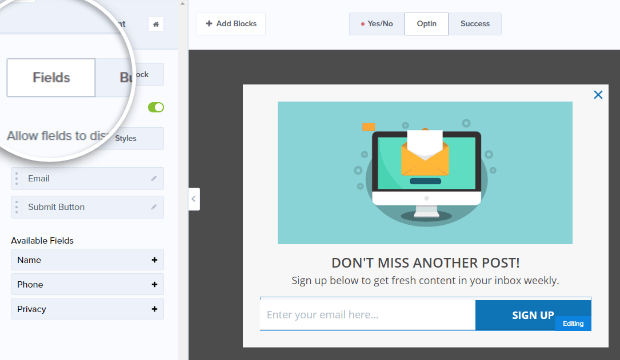
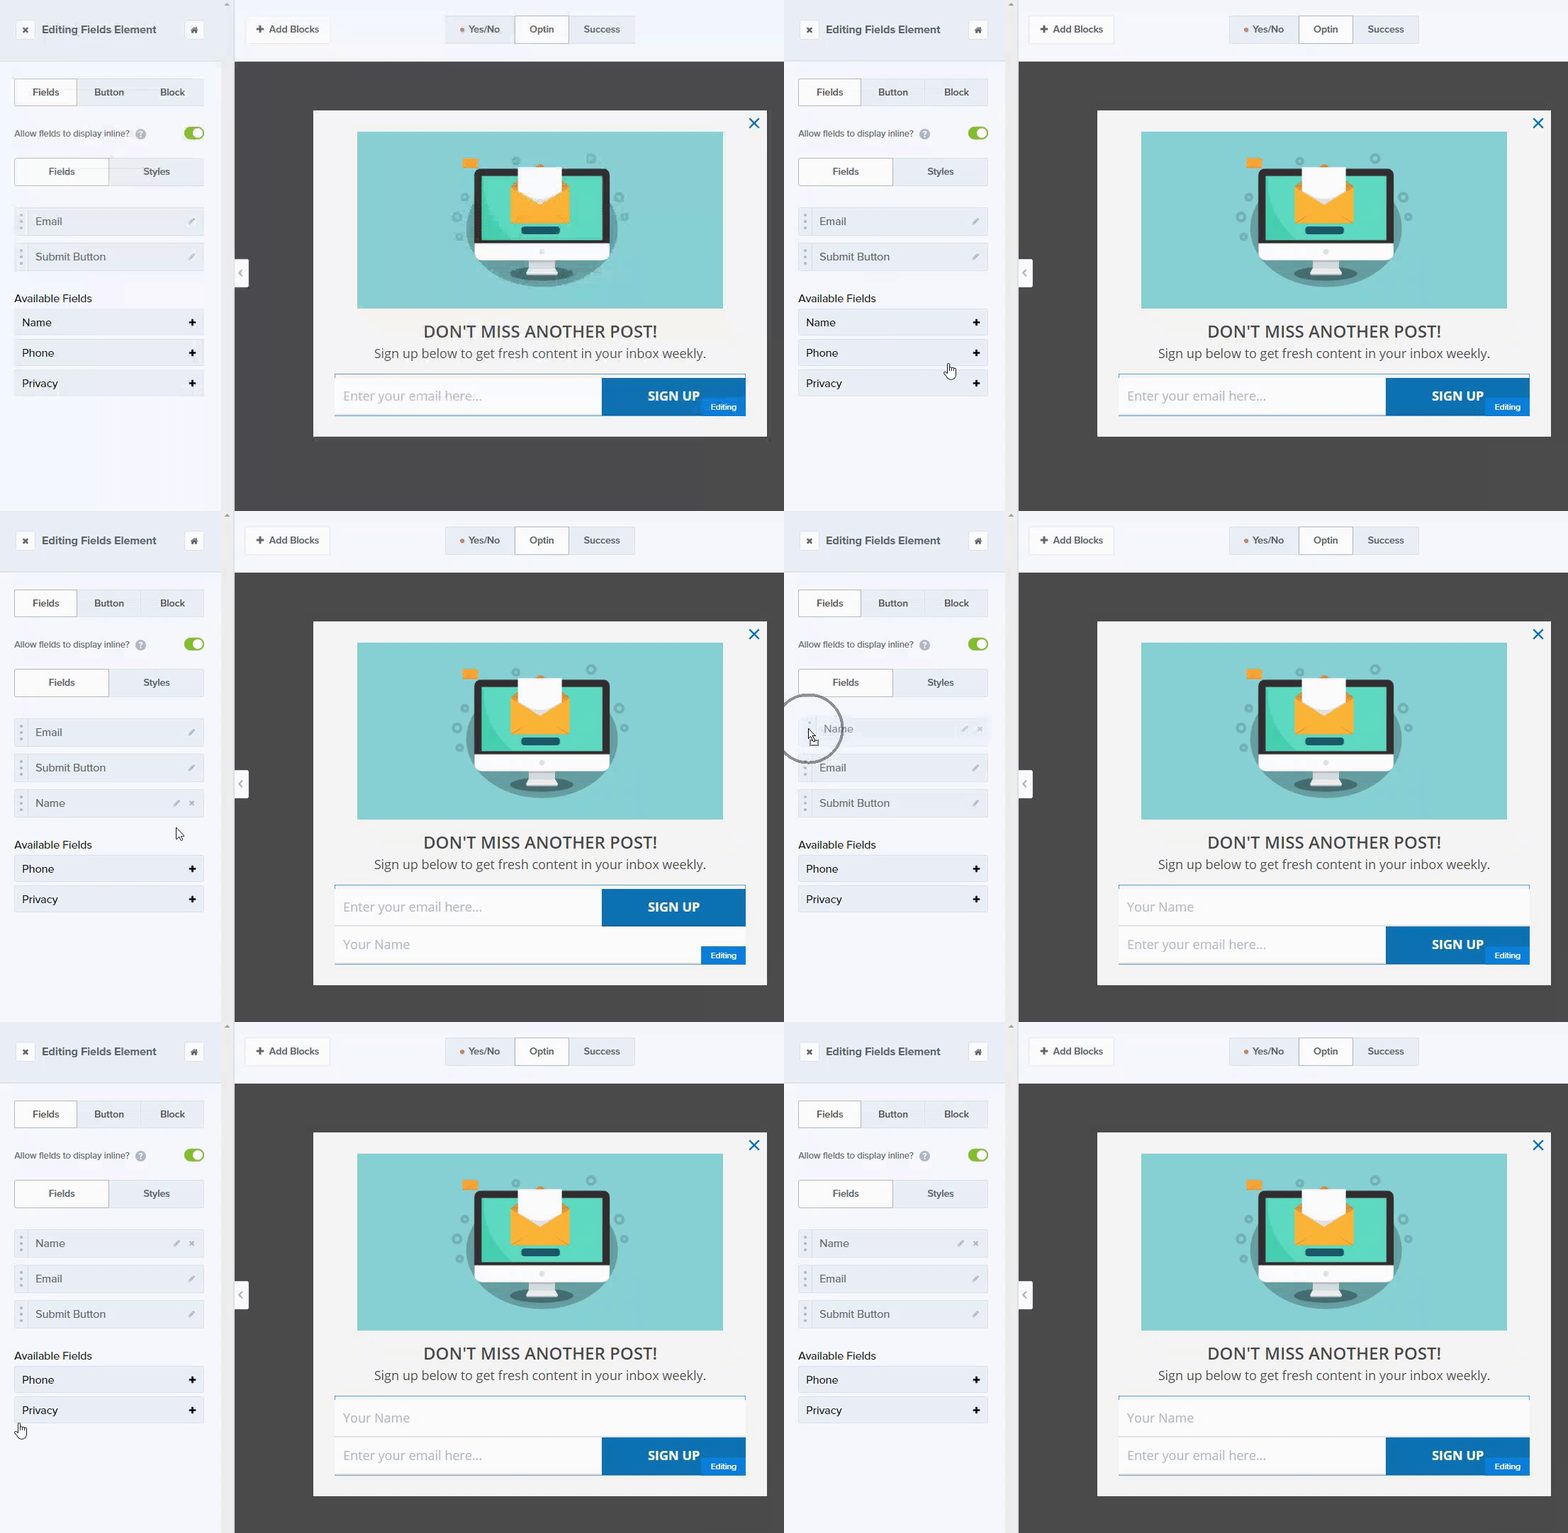
To collect this information, add a name field to your campaign. Click the email button to open the Editing Fields Element and click the Fields button.
You can then easily click the fields you want from the Available Fields list to add them to your form then drag and drop them to change the order.
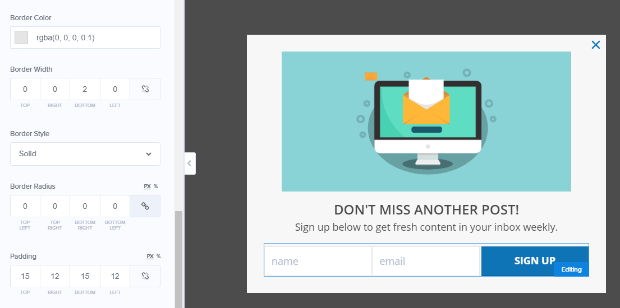
Click the pencil icons to edit your field sizes, margins, font sizes, and anything else you’d like to change. We’re going to edit ours so both fields and the signup button fit on a single line.
3. Add Your Email Provider
If you’re creating this WordPress popup form to attract new subscribers, you’ll need to enable email integration with your email service provider. OptinMonster integrates with the top email service providers. In this tutorial, we’ll show you how to enable Constant Contact.
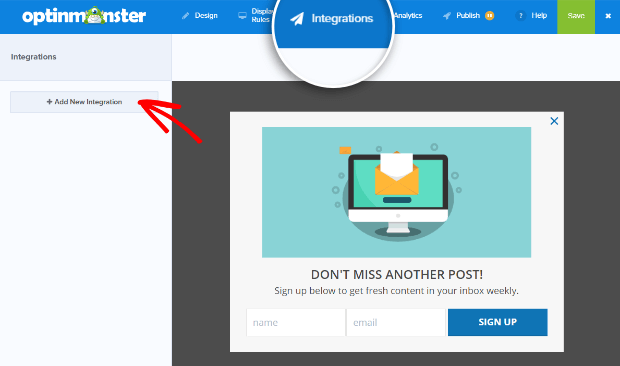
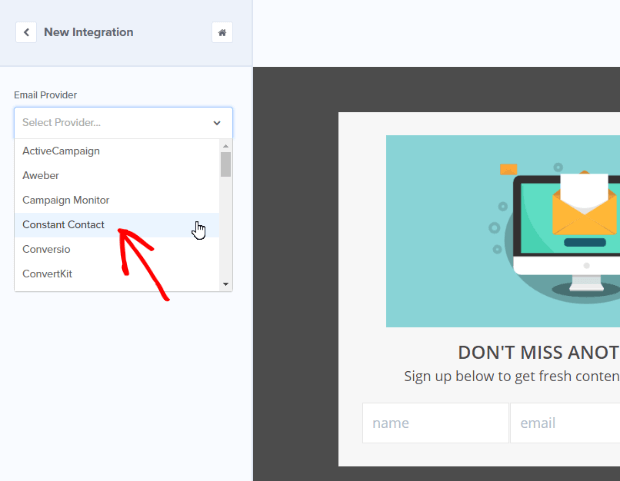
Go to the Integrations tab and click Add New Integration.
Select Constant Contact from the dropdown.
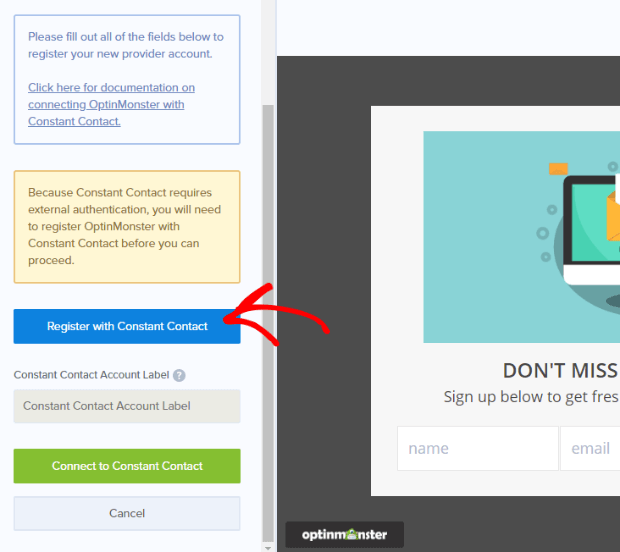
Click the blue Register with Constant Contact button.
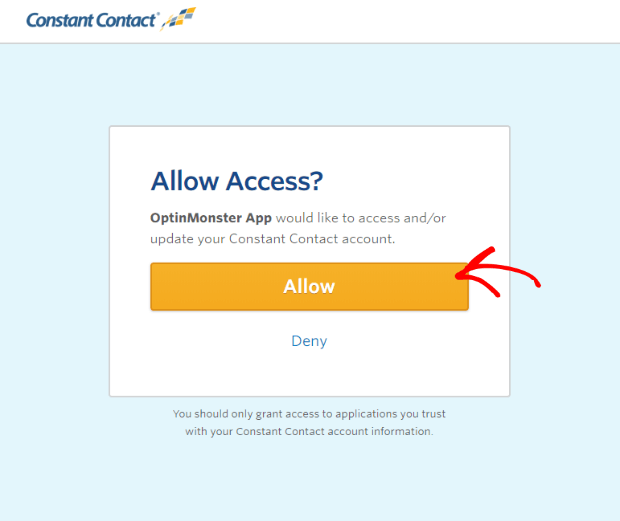
Log in to Constant Contact and then click the orange Allow button.
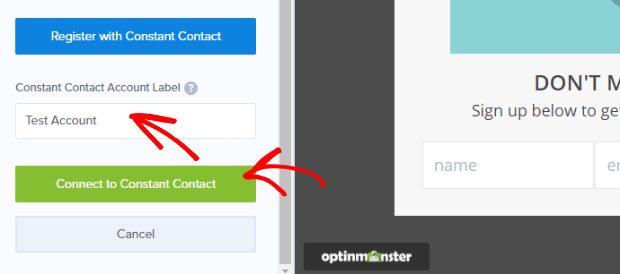
Assign a label to your Constant Contact account and click the green Connect to Constant Contact button.
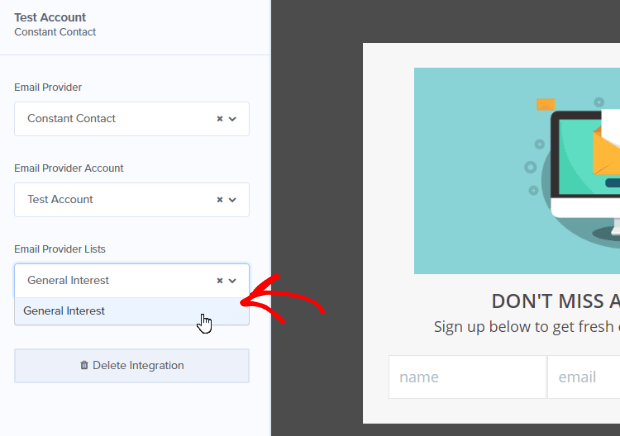
Finally, select the email provider list from the dropdown list. The default list created by Constant Contact is General Interest.
Now you can collect emails with your on-click WordPress popup form.
4. Set the Display Rules
The next step is to decide when your WordPress popup form should show. Since you want visitors to click a link or button to see it, you’ll need to enable MonsterLinks™.
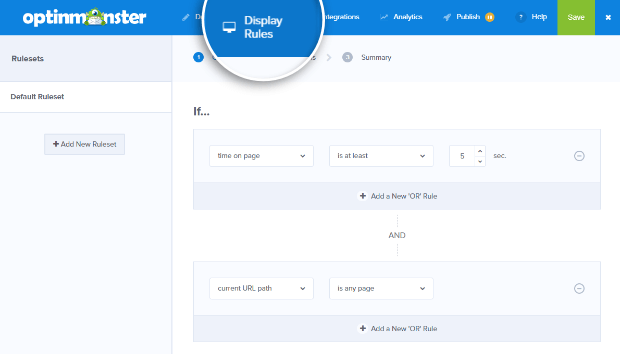
Go to the Display Rules tab. We’ll need to change this from the default ruleset.
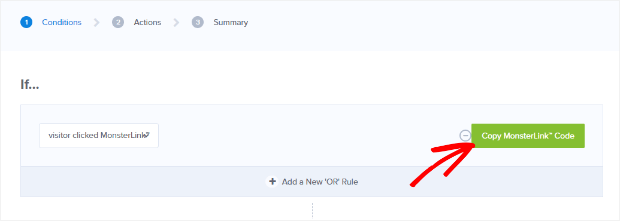
Let’s set our display rules to If visitor clicked MonsterLink™. You can add more conditions to your ruleset, but we’ll leave ours as it is. Click the green Copy MonsterLink™ Code button.
You will get a notification that the code has been copied. Keep that code handy, as you’ll need it in the next step.
Next, it’s time to make the campaign live. Click the Publish button at the top of your screen to go to the publishing options screen.
Click the toggle at the top of the screen to make the campaign live. If you haven’t previously added a website where your campaign will display, you can do it now. You’ll also need to Save your campaign using the green Save button.
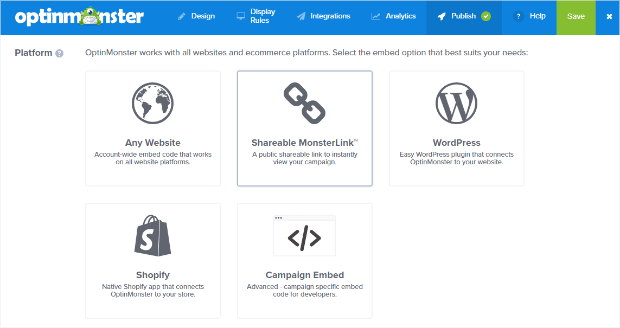
Scroll down to see the publishing options. We’ll be publishing our campaign on WordPress, but you can also publish campaigns on Shopify or on any site via Shareable MonsterLinks™ and campaign or website embed code.
5. Make the Campaign Live on WordPress
Before people can click to see your WordPress popup form, you’ll need to make the campaign live on your WordPress site. To do this, make sure you’ve connected the OptinMonster WordPress connector plugin.
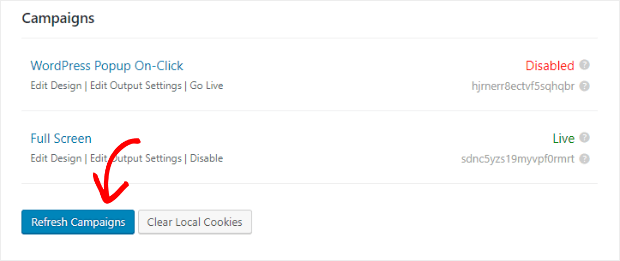
Go to your WordPress dashboard. Click on the OptinMonster icon. You should see a list of all your campaigns. If you don’t see the campaign you’ve just created, click Refresh Campaigns, and it’ll appear.
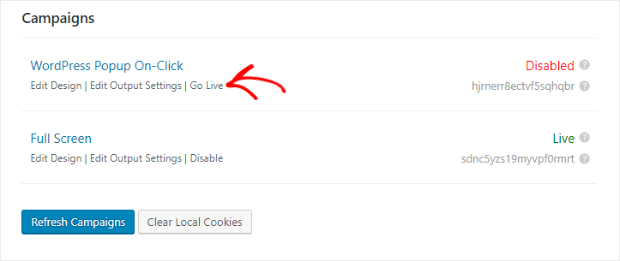
Click the Go Live button next to the campaign name to make the campaign live on your site.
Next, let’s add the link that triggers your popup on click.
6. Create Your Link
There are several options to add your link, and you won’t need a WordPress popup shortcode for any of them. Note that you will need to use the text editor, rather than the visual editor, as the MonsterLink™ code is in HTML.
Add a Text Link
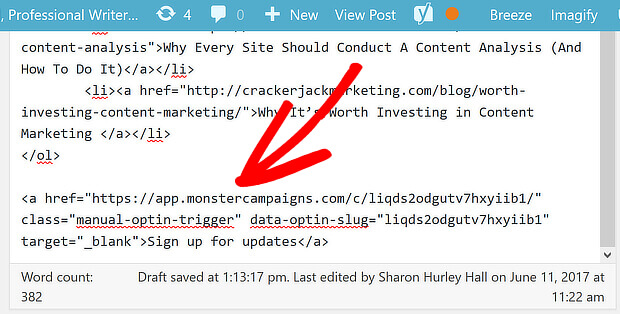
To add a text link to a page or post, go into the WordPress text editor and paste the code you copied earlier where you want it.
Edit the default “click me” text to something more appealing. Save or update your page or post. Here’s how that looks on the page.
Add a Clickable Button
To create a clickable button, you’ll need to make a small edit to the HTML code you copied. Copy it where you want it, then insert the word “button” with a space before “manual-optin-trigger”.
This will create a button, formatted to fit in with your WordPress theme. Here’s how the button looks on a website.
The appearance of your own button will depend on the WordPress theme you’re using. You can customize it with CSS, or by using a plugin like CSS Hero.
Add a Linked Image
Do you want to trigger a WordPress image popup on click? That’s easy, too.
To create a linked image, upload your image to WordPress. Then insert your image code just before the end of the MonsterLink™ code, as shown below. Add some alt text to help with accessibility.
Here’s one example of how that looks on a website. Clicking that image launches the campaign.
Learn more in our MonsterLinks™ guide, and see this tutorial if you want to add your MonsterLink™ to the WordPress menu.
Now, let’s shift our focus to your mobile visitors.
The Importance of Designing for Mobile
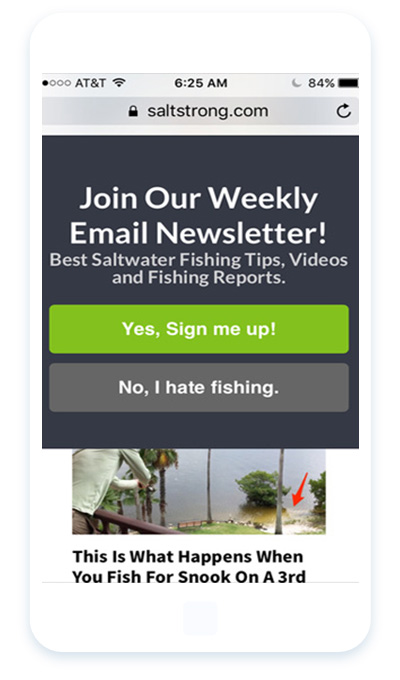
If you’re not using a mobile popup on your WordPress site, you’re missing out on leads and sales.
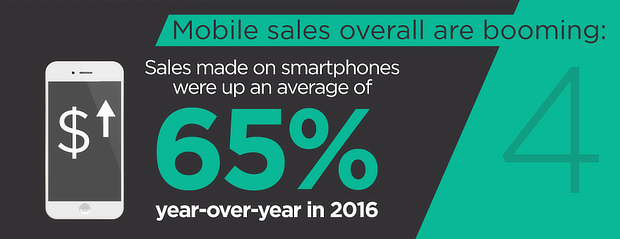
That’s not hype! More and more sales are made on mobile devices. Sales made via smartphones rose by 65% between 2015 and 2016, and are rising even more.
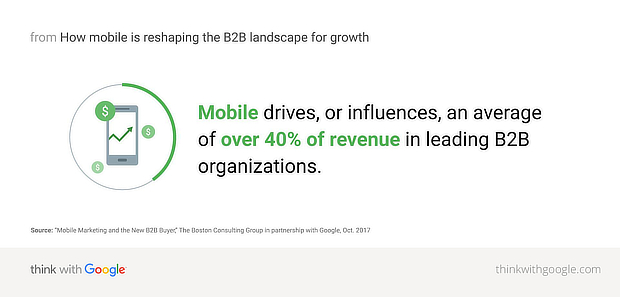
And even if your target is other businesses, rather than consumers, you can’t relax. Google says mobile drives more than 40% of revenue in the top B2B organizations.
With 11 billion mobile devices due to be in circulation by 2019, and people spending more time than ever on those devices, you can’t afford to wait to create a WordPress mobile popup to improve lead generation and boost sales.
Choosing a WordPress Mobile Popup Tool
Ever visited a website on your smartphone, and been annoyed by difficult to use navigation, content that doesn’t display well, and ads that cover the content?
We have, too, and it’s pretty frustrating.
According to Think with Google, people who have a less than stellar mobile experience won’t just leave now. They’re also 62% less likely to buy from you in the future.
That’s why it’s crucial to choose the right WordPress mobile popup builder for your email marketing campaign.
Here are some of the features you should look for in a WordPress mobile popup tool. It should:
- Automatically distinguish between desktop, tablet, and mobile visitors so you can have different marketing campaigns for each
- Include mobile-friendly templates so you can easily create responsive WordPress popups without a designer
- Benefit from the same advanced targeting you get when creating campaigns for desktop computers
OptinMonster is the best WordPress plugin for popups because it does all that, and more.
OptinMonster’s features include:
- A wide range of mobile-specific campaigns allowing you to run multiple campaign types on your site. Many of these themes mirror the desktop themes, so you can create a seamless experience across devices.
- Device-based targeting, which lets you improve the user experience no matter what device visitors use to browse your site.
- The InactivitySensor™, which allows you to mimic our advanced exit-intent technology so you can show campaigns to visitors who appear to be losing interest, and recover those conversions.
- Sound effects, to get the attention of mobile users who are accustomed to listening out for notifications.
This all adds up to being able to show the right campaigns to the right visitors at the right time, and that’s what results in more conversions, leads, and sales.
OptinMonster users have created mobile WordPress popups that:
…and much more. Here’s how you can do the same.
How to Create a WordPress Mobile Popup with OptinMonster
Fortunately, it’s just as easy to create a mobile campaign with OptinMonster as it is to create a desktop campaign.
While all popups you create with OptinMonster are responsive and will look good on any size device, you can also use advanced targeting rules to create popups that only smartphone users will see.
To create your mobile-specific campaign, your steps will be exactly the same as they were above with one small change.
Choose a Device for Your Campaign
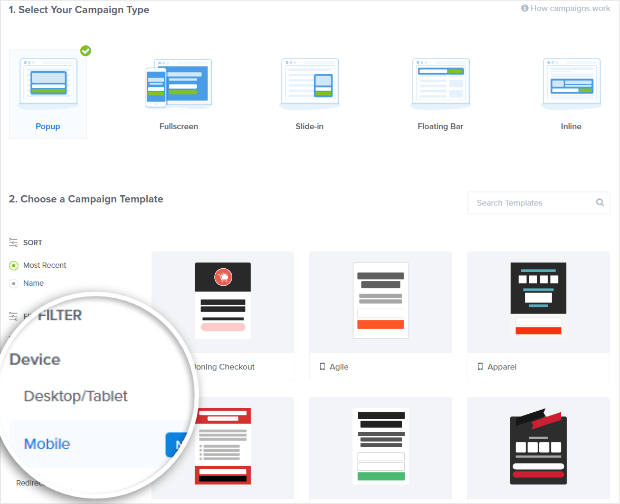
After choosing the Popup campaign type, you have the option of filtering by device when choosing your campaign template:
When you choose Mobile, the campaign template previews will change to mobile layout.
There’s no need to set up special display rules to show these campaigns only on mobile devices… they won’t show on desktops or tablets at all.
That’s it! Now you know how to create a mobile popup for WordPress that’ll help you win more conversions from your mobile visitors and how to trigger a WordPress popup form with a click.
Next, check out our email popup best practices and mobile popup examples for inspiration or see how to attract more subscribers with a gated content marketing strategy.
Ready for even more? Read our tutorials on how to boost engagement with video popups and increase sales with a coupon popup. Or, find out what visitors really want with a WordPress survey popup.
Sign up for OptinMonster today! Seriously. Just do it.










Add a Comment