
How to Create a Countdown Timer Popup in 7 Easy Steps
Last updated on
by
TL;DR
A countdown timer popup is a campaign with a visible clock on it. The clock counts down to the moment your offer ends, so a visitor who would have decided later has a reason to decide now.
There are two countdown types. Static counts down to one fixed date and time, which suits a seasonal sale or a product launch. Dynamic, also called Evergreen, gives every visitor the same preset amount of time from their own first view.
Sign up for OptinMonster Pro or Growth to use countdown timers
Do you want more sales this holiday (or ANY day)? A countdown timer popup puts a visible deadline on an offer you’re already running, like a holiday promotion or a flash sale. This can create fear of missing out (FOMO) and motivate visitors to act more quickly.
I’ll show you how to build one in OptinMonster in 7 easy steps, using a Black Friday sale as the example. I’m using a floating bar, because it sits at the top of the page without covering what your visitor came to read.
Why Use a Countdown Timer Popup?
A deadline motivates people to decide right now, and procrastinating means they could miss out on your sale or special offer.
Most visitors who like your offer don’t outright say “no” to it. Instead, they intend to come back, but then they forget. A deadline takes coming back later off the table.
Adding a countdown timer is a really effective way to do this because it shows the visitor exactly how long they have left to act. And on a floating bar, the clock travels with them from page to page, so the deadline is still in front of them when they finally decide.

And because you can set up the bar to ask for the visitor’s email address, anyone who wasn’t ready this time is someone you can reach for the next sale.
Our case study with Cracku, an online education business, reports conversions up 300% after they added countdown timers to their campaigns. Cracku ran the timer on a fullscreen campaign and a lightbox popup rather than a floating bar, so read it as evidence that the deadline itself works, and not as a number your own bar will hit.
We’ve also added an animated countdown timer on several of our own sites, including OptinMonster. The floating bar in this tutorial is that same design.
Expert Tip: Before you start, I recommend making the deadline a real one. A timer that resets every time somebody reloads the page teaches your regulars to ignore it, so when you set your end date in Step 3, pick a date you’ll actually stick to and let the timer show it. For full details on making urgency work when the deadline isn’t a date at all, read our post on creating scarcity with countdown timers.
Static or Evergreen: Which Countdown Type to Use
There are two countdown types in our campaign builder, and your choice decides whether every visitor sees the same deadline or their own.
| Countdown type | How it counts | Use it for |
|---|---|---|
| Static | Down to one date and time you set, so every visitor sees the same deadline. | A seasonal sale or a product launch, where the deadline is public and real. |
| Dynamic, sometimes called Evergreen | Down from a preset amount of time in days, hours, minutes and seconds, starting fresh for each visitor. | An offer with no fixed end date, since each visitor gets their own window. |
For a Black Friday sale, I recommend using Static because the deadline is a real date your visitors already know. I’d only use Dynamic for an offer you plan to keep running.
I suggest choosing one deliberately, because this setting is one of three dates that have to agree on a sale campaign. I cover the other two, and what goes wrong when they disagree, in Step 7 of this tutorial.
Ready to build your sale countdown?
You can build the whole campaign in the OptinMonster builder with no coding required, then decide exactly which pages your sale appears on.
How to Create a Countdown Timer Popup in OptinMonster
Before following this tutorial, you will need an OptinMonster account on the Pro plan or higher, because Basic and Plus don’t include the countdown timer block.
You will also need an email service provider that you can connect in Step 6, which is where the addresses your campaign collects end up.
Step 1: Create a Floating Bar Optin
First, you need to create a floating bar optin that will contain the countdown timer.
An optin is OptinMonster’s name for a campaign that asks a visitor for an email address. A floating bar is the type that sits across the top or bottom of your page.
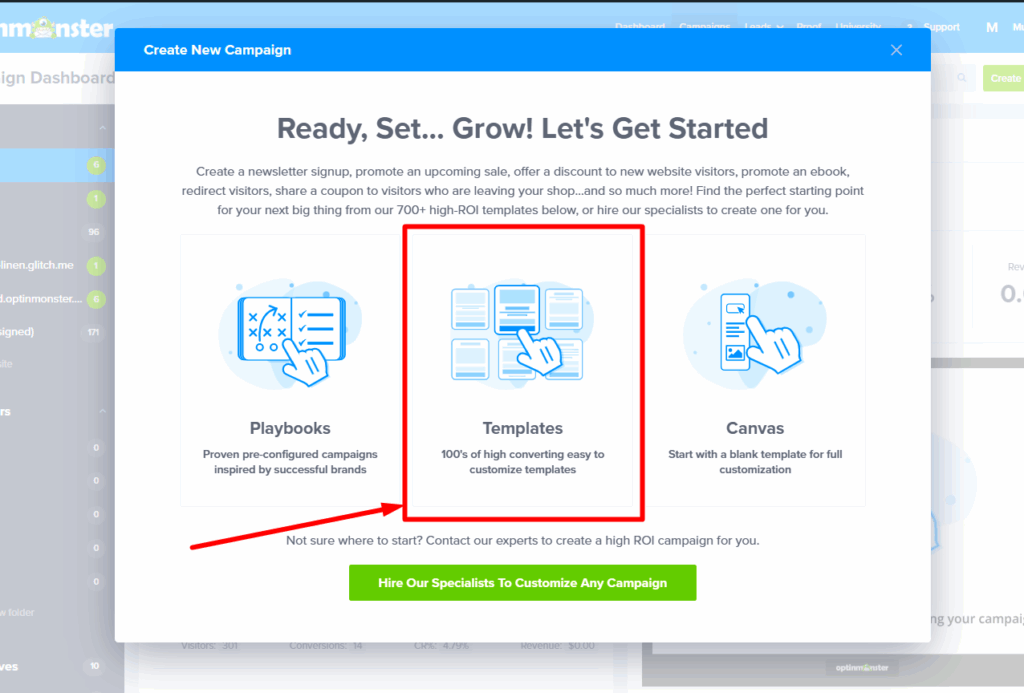
To build one, go to your OptinMonster dashboard and click the Create New Campaign button.

In the modal that appears, select Templates as the type of campaign.
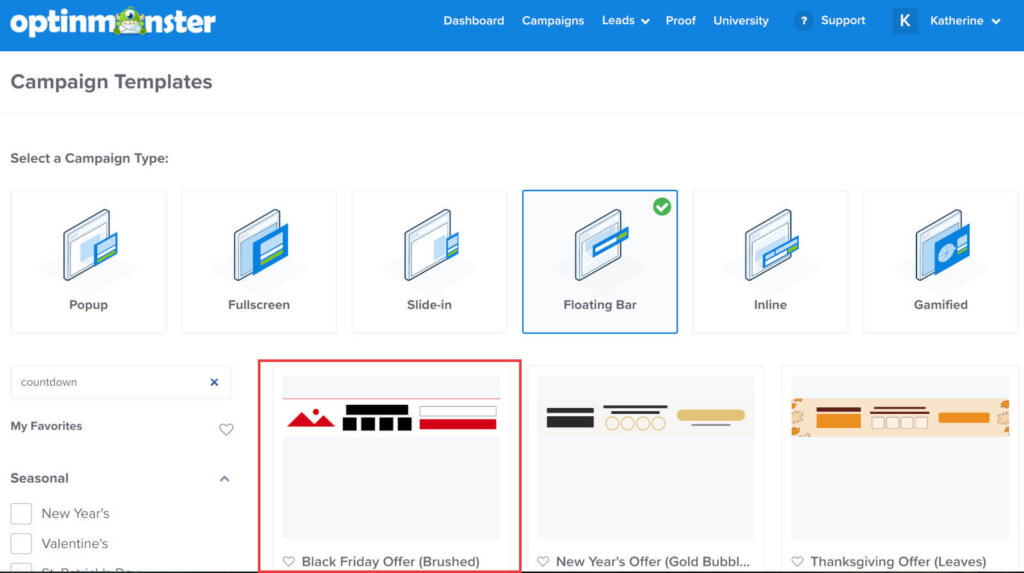
On the next screen, you need to select Floating Bar as the campaign type.
I also recommend typing “countdown” into the search bar on the left. This will filter the available campaign types to ones designed for limited-time sales like Black Friday or flash sales.
Just hover over the template you like and click the ‘Use template’ button. In my example, I’m using the “Black Friday Offer – Brushed’ template.
You can also add a countdown popup to any of OptinMonster’s campaign templates with a simple drag and drop.
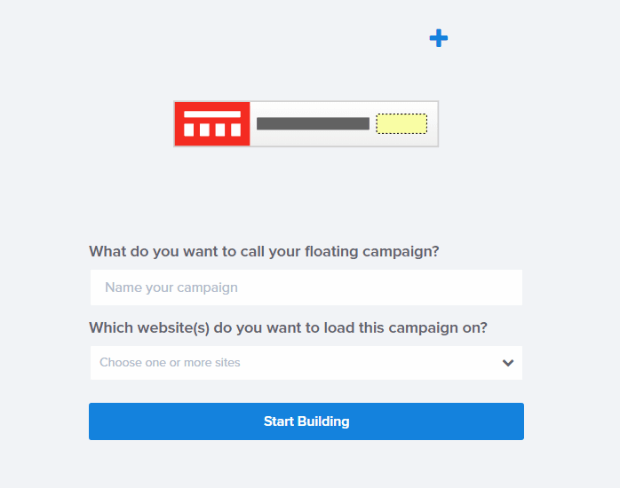
Then enter a name for your campaign and select your website from the dropdown menu. I’m creating a holiday sales timer, so I’ll call mine “Black Friday Sale Countdown.”
Next, click the Start Building button to enter the campaign builder.
Step 2: Update the Floating Settings
The default display settings for the optin have it set to show up at the bottom of your site.
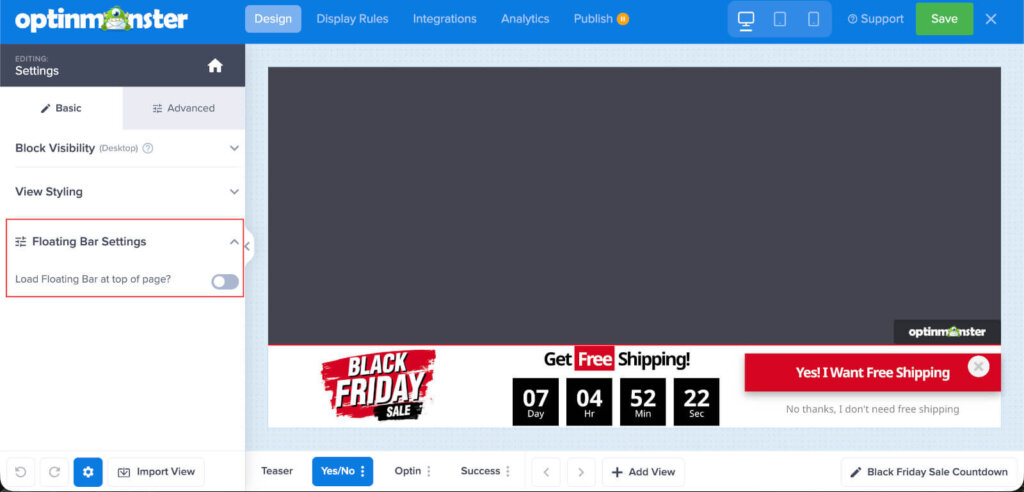
To move the campaign to the top of your site instead, select the Settings icon in the OptinMonster campaign builder.
Then, open the Basic tab and expand Floating Bar Settings. Toggle Load Floating Bar at top of page? to the On position, and the campaign will move to the top for you.
Step 3: Set the End Date/Time
The next step is to control the countdown clock. This step is very important because the countdown needs to match up exactly with the date and length of your sale or promotion.
Click the countdown clock in the live preview and the editing tools will open on the left. Make sure the Countdown Type is set to Static so every visitor will see the exact same countdown when they arrive at your site.
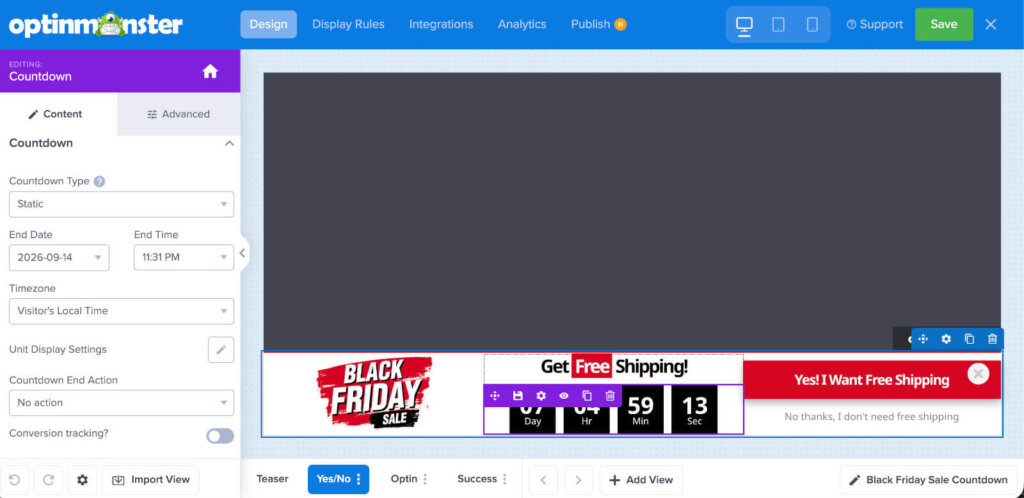
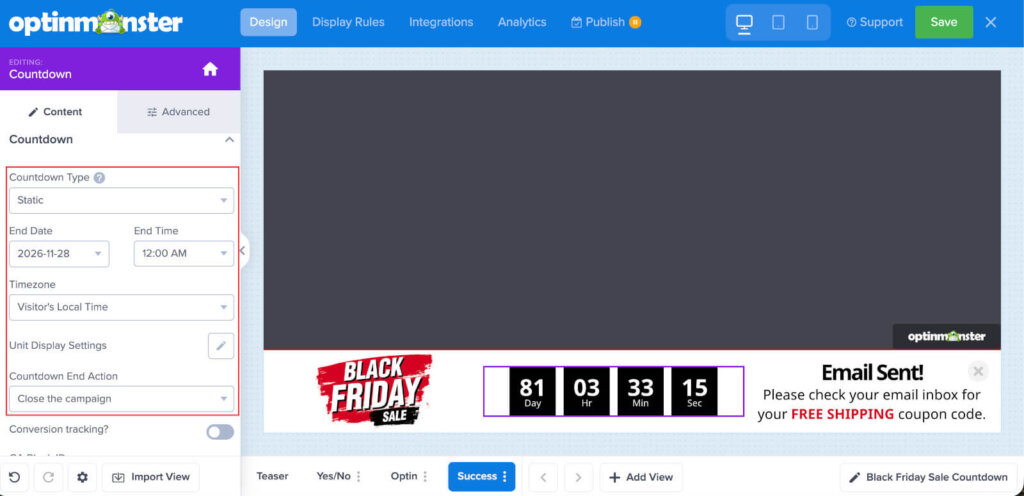
Now enter the date and time your sale ends, and choose how you want the numbers displayed. Every change shows up live in the preview as you make it.
Set the Countdown End Action while you’re in this panel, because it lives in the same place and it’s easy to leave on the default. For a Black Friday campaign, I recommend Close the campaign, so nobody who is still on the page at midnight is looking at an offer that has already expired.
Step 4: Customize the Copy & Design
The next step is to customize the copy and design of the countdown bar. For example, you might like to add your own branded logo for the sale or adjust the copy to better match your branding.
To change the logo, just click on it. In the left panel, you will see options to upload a new image and change its alignment and width.
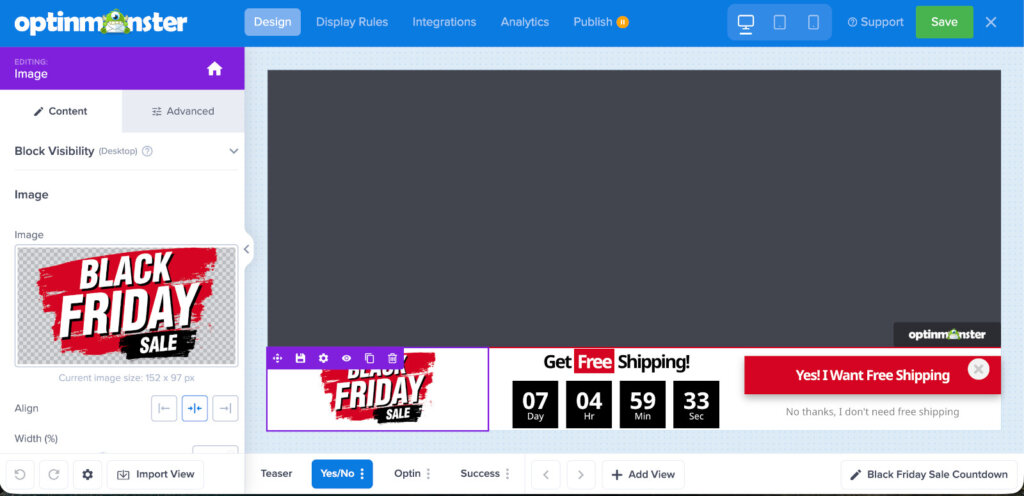
To edit the countdown timer itself or the optin button just click on it and then adjust the settings in the left as well.
If you’d like to edit any of the text, simply click on it and then start typing.
Design the Success View
Now that your visitors can sign up to get access to the free shipping coupon code for your sale, we need to set up a success view so that we can provide them the coupon code once they’ve completed their signup.
By default, the template that we’re using will send the coupon code directly to the user’s email address. But you may also like to show the coupon code directly once the user has provided their email.
Fastrack, a digital marketing agency working with hotels, built an exit-intent popup whose button applied the discount code the moment a visitor clicked. In our case study, 53% of abandoning visitors clicked that button. So, the code could be more effective when displayed within the success view.
Click on the Success tab to set one up. In my example, I’m adding the coupon code directly so the user can copy it.
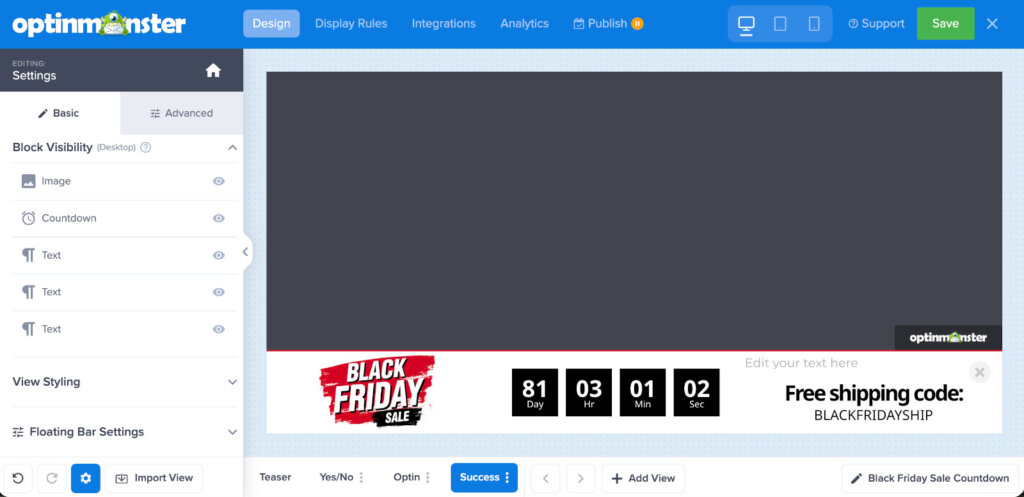
Step 5: Set Your Display Rules
Display Rules control where and how your campaign appears. By default, your countdown bar shows on every page of your website, which is usually what you want for a site-wide sale.
If you only want to display the countdown on specific pages instead, then you can set it up here as well.
For a shop page, that’s a rule for current URL path exactly matches shop. Our display rules guide covers the full set, including audience and behavior targeting.
Step 6: Connect an Email Service Provider
To collect email addresses, you’ll need to connect your optin to your email service provider.
OptinMonster integrates with 50+ platforms, including the most popular email service providers on the market. I’ll use Constant Contact as the example here.
Go to the Integrations tab and click on the logo for the integration you want to add.
For Constant Contact, you can then choose to add a new account or choose the one already linked to your OptinMonster account. Then, click the Connect to Constant Contact button and follow any on-screen prompts to log in to your account and authenticate the connection.
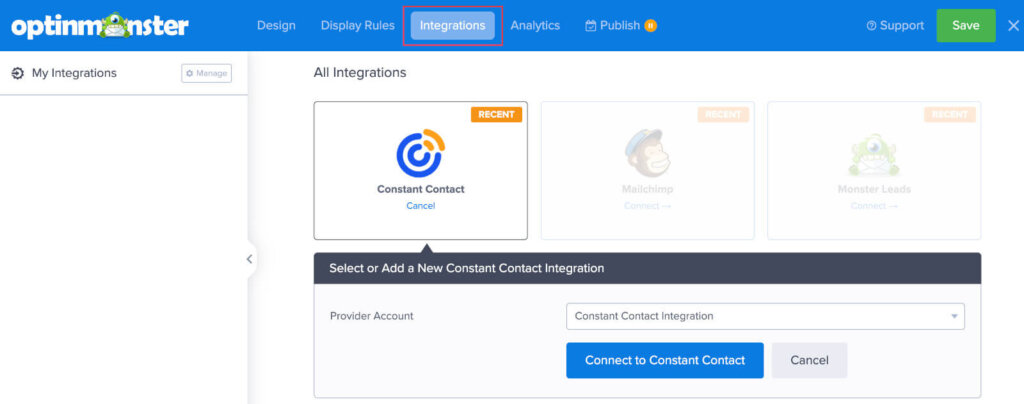
Now, you can choose the specific email list where you want to send anyone who uses your countdown timer popup.
Just pick it from the dropdown menu.
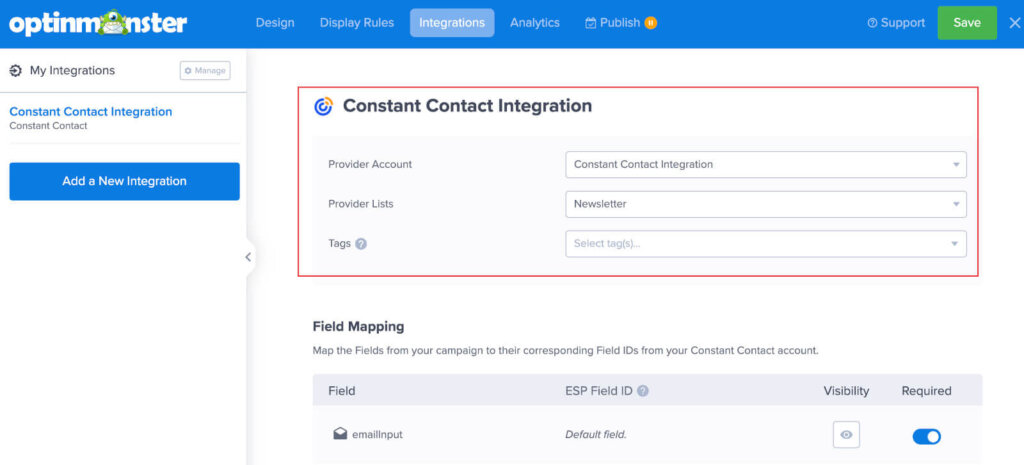
Don’t forget to Save your campaign!
Step 7: Schedule and Publish Your Countdown Timer Popup Campaign
A Black Friday sale runs over a specific window, so in this step, we will set two dates: when the campaign starts showing and when it stops.
Go to the Publish view and click the Scheduling button.
Before you change anything it reads Starts: immediately and Ends: never, which is worth noticing on a sale campaign. With no schedule set, it runs from the moment you publish until you switch it off yourself.
Click the Start Date & Time and pick when you want the campaign to begin showing. In my case, I wanted the countdown popup to run right up to Black Friday 2026, so the start is 11/26/2026, the day before.
Then set the End Date & Time to 11/28/2026 at midnight, so the campaign stops after Black Friday has finished rather than partway through it. Just make sure to use your own sale’s dates rather than copying mine.
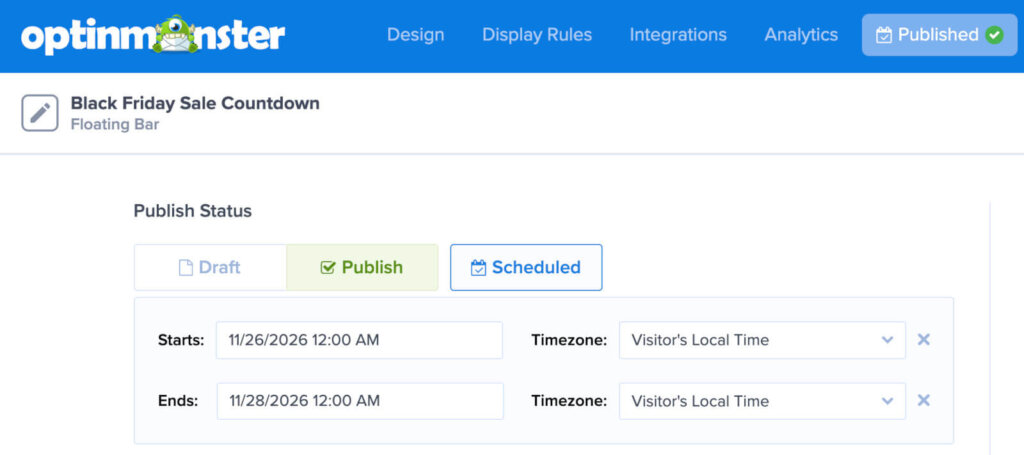
Two dates need to match, the countdown’s own end from Step 3 and the end date you just set. If the campaign is still showing after the countdown has run out, then anyone arriving sees a timer at 00, which just looks broken.
Then click the Publish button to make the campaign live, and click Save.
For the Shopify version of this walkthrough, see our guide to creating a Shopify sales countdown timer.
Countdown Timer Popup FAQs
Is there a free countdown widget?
Yes, plenty of them, but they only put a clock on a page. OptinMonster’s countdown timer isn’t one of them. It needs a Pro subscription or higher, and so does campaign scheduling. There is a free OptinMonster subscription, which comes with the WordPress plugin rather than the website, but it runs 3 campaigns and 500 impressions and doesn’t include countdown timers.
How do you create a custom countdown timer?
Drag a Countdown block into any OptinMonster campaign, then click the timer in the live preview. The panel on the left holds the countdown type, the end date or duration, the end action, and the styling. The Days, Hours, Minutes and Seconds labels are editable text, so you can shorten them or write them in another language.
There’s also a Custom CSS field under Settings, then the Advanced tab. Custom fonts go there too, and the font has to already be embedded on your website or the builder preview won’t show it.
Can I add a countdown timer to a sales page?
Yes, in two ways. Point a popup, floating bar or slide-in at that one page with a page-level display rule, or put the timer inside the page itself with an inline campaign. The countdown block works in every OptinMonster campaign type, so the only question is whether the deadline should follow the visitor or sit inside the offer.
Launch Your Countdown Campaign
Black Friday 2026 falls on November 27, so I recommend getting your campaign live before the traffic arrives. Get started with OptinMonster today to create a countdown timer for those holiday promotions that are coming up fast.
Read next: our guide to ways to make money with OptinMonster, or this post on the best WordPress countdown timer plugins.
Disclosure: Our content is reader-supported. This means if you click on some of our links, then we may earn a commission. We only recommend products that we believe will add value to our readers.
Add a Comment