
19 Easy Ways to Capture Email Leads Without Being Pushy
Last updated on
by

Are you trying to grow your email list but struggling to capture new leads?
A robust email list can be one of your greatest assets. Not only will it help you drive more sales, but an email list also lets you nurture the relationship you already have with customers.
That means less churn and, ultimately, even more profits down the road.
But how can you optimize the number of leads you get so you can grow your list faster? Today, I’ll cover 19 of the best email capture tips to help you do just that.
- Why Focus on Email Capture for Marketing?
- 19 Email Capture Strategies That Work
- 1. Verify Your Leads
- 2. Wait Until Second Pageview
- 3. Turn Off Immediate Popup for Blog Posts
- 4. Use a Polite Slide-in
- 5. Load a Floating Bar on Scroll
- 6. Use Exit-Intent®
- 7. Allow the User to Initiate
- 8. Show an Interest-Based Offer
- 9. Use Yes/No Buttons
- 10. Offer While They’re Reading
- 11. Make an Offer After They’ve Finished Reading
- 12. Wow Them With Fullscreen
- 13. Add a Feature Box
- 14. Show Each Optin at the Right Time With Multiple Triggers
- 15. Give Them a Second Chance With a Different Optin Type
- 16. Give Them Another Choice With a Backup Offer
- 17. Use Personalization
- 18. Give the Reader a Taste With Content Locks
- 19. Perfectly Time Your Optins
Why Focus on Email Capture for Marketing?
Email capture is an important part of any digital marketing strategy. That’s because email marketing is still consistently the best way for you to develop relationships with prospective clients while nurturing relationships with existing ones.
In other words, email marketing remains one of the best ways to drive revenue for your business.
Here are a few advantages of having a large email list:
- Stop worrying about your platform or account getting shut down (unlike with social media)
- Reach out directly to a large audience on a daily, weekly, or monthly basis
- Nurture relationships for better customer retention
- Drive more revenue with promotional campaigns
And so much more.
Not sold on the benefits of email marketing? Just check out this post: Email Marketing vs. Social Media: Is There a Clear Winner?
This post goes into more detail on the advantages of email marketing and while it’s still the best platform to grow your business today.
But now for the real question: How do you consistently get more high-quality leads added to your list?
To answer that, let’s turn to our 19 email capture tips.
19 Email Capture Strategies That Work
Like any task, having the right tool for the job can make or break your success. That’s why we’ll be looking at email capture tips using OptinMonster:

OptinMonster is the world’s #1 lead generation tool and is your BEST resource for collecting more email addresses.
This software lets you create powerful optin campaigns like popups, floating bars, sidebar widgets, and many more. These campaigns are designed to get users to enter their email addresses and get seamlessly added to your contact list.
Plus, with our easy-to-use drag and drop builder, creating your campaigns takes only a few minutes and requires zero coding skills.
Ready to test it out? Click below to start your risk-free OptinMonster account today!
1. Verify Your Leads
Before anything, you want to make sure that you’re setting yourself up for success. That means not just focusing on the number of emails you capture.
Instead, you want to make sure you’re getting the right kind of email addresses.
For that, you there’s simply no better tool than TruLead®.
TruLead® is OptinMonster’s original Lead Verification algorithm that ensures you’re filling your list with your target audience. It also helps keep spambots from submitting fake addresses to your contact list.
And this has 3 major advantages for you:
- Save Money: Email service providers (ESP) charge you for contacts on your list. By reducing spambot submissions or “bad leads,” you can reduce your ESP’s monthly or yearly costs.
- Protect Your Email Reputation: By sending emails to better leads, you’ll get higher engagement. This will help your email IP reputation and lead to higher deliverability rates. That means more of your emails go to your audience’s inbox, not spam folder.
- Drive More Sales: Since your deliverability rates have increased, more of your emails are being seen by your target audience. This leads to more sales from your email marketing strategy.
In the end, Lead Verification has no downsides. And with TruLead®, you can filter your leads by blocking:
- IP addresses
- Strings, patterns, or characters
- Free email addresses like Gmail, Yahoo, Hotmail, or more
- Temporary email addresses
- Role-based email addresses like help@, info@, contact@, and more
Plus, OptinMonster’s Lead Verification tool will autocorrect misspellings for common email providers like Gmail, Yahoo, and Hotmail.
If a lead is rejected, the user will get a small error message directly on the campaign:

This will help real users enter the right contact information and get you better leads.
Finally, you can review any rejected leads for up to 30 days. If you see ones that you want on your list, you can manually approve them.
This gives you 100% control over your email list and ensures that your email capture strategy is working the way you want it to.
Ready to give it a shot? Sign up for OptinMonster and try out TruLead® for 30 days FREE of charge.
For more information, check out this helpful post: How to Verify an Email Address With TruLead®.
2. Wait Until Second Pageview
One of the biggest complaints that people have about lightbox popups is when they appear the instant that you visit a website for the first time. And for a good reason.
In many cases, first-time visitors are coming from Google search. In other words, they are looking to get some specific information from a blog post or another piece of content.
This is not the time to interrupt them with an email capture popup! They just want to get the answer that they were searching for, and aren’t looking to join your email list. At least not yet!
And not unless you have a very compelling offer that is tailored specifically to them.
Fortunately, there’s a speedy and straightforward fix for this. Simply set your popup or optin so that it shows up only after the second pageview. That way, you don’t disturb visitors when they first discover your site.
How to Wait Until Second Pageview with OptinMonster
With OptinMonster, you can set this up in a matter of seconds.
- Go to the Display Rules tab for your optin and select the pages viewed condition
- Choose the operator you want from the dropdown (equals, more/less than, at least/no more than)
- Select the number of pages you want

Now you won’t disturb visitors who are just landing on your site.
3. Turn Off Immediate Popup for Blog Posts
In some cases, popups that appear immediately on the first pageview convert well. For example, if you’re an eCommerce site, and your popup offers a coupon code, you may want to test an immediate trigger.
The reason this works is that the people visiting your eCommerce site are usually going there with the intent to buy. They would love to see your coupon code right away because that’s perfectly aligned with their immediate goals.
However, if you also have a blog on your eCommerce site, you should turn off the immediate popup for those blog posts. That way, it won’t disturb visitors who just want to read and aren’t ready to buy.
How to Turn Off Immediate Popups for Blog Posts With OptinMonster
Turning off an immediate popup on all your blog posts is easy. All you have to do is:
- Go to the Display Rules for your popup and set a condition that current URL path
- Set it to show when the URL path does not contain “blog” (or whatever slug you use for your blog post pages).
This way, your popup will not be displayed on any pages that contain “http://www.yourdomain.com/blog” in the URL.

Now you can still leverage the power of immediate email capture popup without annoying your blog readers.
4. Use a Polite Slide-in
Boxes that appear in the bottom corner of the screen as the user scrolls down are some of the politest optin forms you can use.
Slide-in optins don’t appear until the user has already consumed some of your content. And when they do appear, they don’t take over the screen. That way, the reader has an uninterrupted experience.
There’s no reason not to leverage this type of optin form! Particularly if you have a lot of content on your site.

Here are some ways to use slide-in optins to boost conversions.
How to Set Up Slide-ins With OptinMonster
OptinMonster has several beautiful themes that you can choose from. All you have to do is go to create a new optin and then select the Slide-in type.

Then, go to the Display Rules » If… distance scrolled, and enter a percentage or the number of pixels. That’s how far the user will scroll before they see the slide-in.

Now you can politely capture email addresses of your readers without interrupting them.
5. Load a Floating Bar on Scroll
Floating bars are highly visible email capture tools that “stick” to the top or the bottom of the user’s screen, and scroll along with them. This keeps your optin offer in view without obstructing the reader’s experience.

But what if you want to be unobtrusive?
To make your floating bars polite, set them to appear only after the user scrolls down a certain length of the page.
How to Load a Floating Bar on Scroll with OptinMonster
To load a scrolling floating bar, choose from one of our floating bar themes.

Then go to the Display Rules tab and set up your distance scrolled display rule.
6. Use Exit-Intent®
Exit-Intent® is when a lightbox popup appears at the precise moment that a user is about to abandon your site. This is a no-brainer optin type to use, and every site should have one!

Remember, this is your last chance to capture email addresses before visitors try exiting the page. Take this opportunity to present them with your best offer.
If they don’t like it, they probably weren’t your target customer anyway, so you have nothing to lose. However, you have everything to gain.
Our publishers see an average 200-600% increase in email signups when using Exit-Intent®, along with their content marketing efforts!
How to Use OptinMonster’s Exit-Intent® Technology
To set this up with OptinMonster, simply:
- Create a lightbox optin form.
- Go to the Display Rules tab and add the exit detected condition.
From there, you can also adjust the sensitivity to low, medium, or high.

You can even use exit intent on mobile devices!
7. Allow the User to Initiate
Want to know one of the most effective email capture techniques that will keep your users happy? Allow them to initiate the registration process.
This is a psychological principle known as the Zeigarnik Effect, which states that those who initiate are more likely to finish the process.
So how do you allow the user to initiate optins? Simple! Don’t show the optin form until after they click on a link or an image. Once they do, they will be much more likely to complete their actions.
If you want to boost your conversions more, use this 2-step optin process in combination with a content upgrade.
Here’s an example from one of our blog posts on Google Search Operators.

After the user clicks on the link, they will see a lightbox popup with the optin form.

Because this is a particular offer to this specific blog post, and we’ve used a 2-step optin, it converts well.
You can also use 2-step optins to increase conversions on your landing pages. Here’s an example from ActiveGrowth:

When you click on the Click Here to Get Started button, a lightbox with the optin form pops up.

How to Set Up 2-Step Optins with OptinMonster
Setting this up in OptinMonster is simple with our MonsterLinks™. All you have to do is:
- Go to the Display Rules for your lightbox optin form and add the visitor clicked MonsterLink™ condition.
- Copy the MonsterLink™ code to embed it on your site.

We have a complete tutorial on boosting optins with content upgrades here.
8. Show an Interest-Based Offer
Creating an excellent user experience is all about showing the right thing, to the right people, at the right time. Unfortunately, this is where most websites fall short.
To make your optin better for your users, display a specific offer based on their interest.
For example, the CountryLiving website displays different fullscreen optins with Exit-Intent®. Which popup you see is based on the pages you’re browsing.
If you were reading a blog post from the Home Design category, then you would see an optin related to home decorating.

However, if you were reading “Food & Drinks,” then you’d see a cooking-related optin.

How to Show Interest-Based Offers with OptinMonster
To show optins based on the page your visitor is viewing or abandoning, go to Display Rules and add the current URL path condition.
If you want the optin to display on any blog post in a particular category, set it to show when the URL path contains combined with your category slug.

Now, anyone who visits blog posts that contain the “food-drink” slug will see your optin.
9. Use Yes/No Buttons
A great way to give the user more control over their experience is by using Yes/No buttons on your optin.
With Yes/No buttons, the user won’t see the actual optin form until after they hit the “yes” button. Of course, they also have the choice to select the “no” button, which will close out the optin. This allows the user to self-identify as being interested in your offer or not.
Here’s an example of a Yes/No optin on Social Media Examiner:

How to Set Up Yes /No Buttons in OptinMonster
To set up Yes/No buttons in OptinMonster:
- In the campaign builder, select the Yes/No view.
- Click the Activate View button.

10. Offer While They’re Reading
Showing your optin form at the right time is crucial. If the reader isn’t ready for your offer yet, it may annoy them.
A perfect time to present a lead magnet offer is while the user is reading a blog post. By reading your post, they have expressed an interest in what you have to say. As such, they’re probably open to learning more.
However, you don’t want the offer to disrupt their reading. To avoid this, you can place the offer within the blog post itself or in your sidebar. Here’s an example from WPBeginner:

Although each of these ads is slightly different, they’re all linked to the same optin landing page. This way, a reader will have multiple opportunities to subscribe, whenever they are ready.
Also, WPBeginner doesn’t ask for the email address right away. This means they can take advantage of the Zeigarnik effect by asking for a lower commitment first. This is something small, like asking the reader to click on the “Learn More” button.
Once the user goes to their landing page, they have a better chance of converting them.
How to Set Up Inline Optins in OptinMonster
Want to set up an inline optin like WPBeginner’s? With OptinMonster, you can!
Create a new optin and select the Inline optin type. Then choose from any of our inline themes. We’re using Metro in this example.

To create a “Learn More” button, add a new button block to your optin by click Add Blocks and clicking and dragging the Button Element to where you want it to appear on your campaign.
You’re also going to want to delete the optin field, so your inline campaign just has the Learn More button available.

- Type “Learn More” into the Button text.
- Set the Button Action to Redirect to a url.
- Type the address of your optin landing page in the Redirect URL box.

Once you’re finished with that, it’s time to customize. Feel free to adjust your copy, colors, and anything else to suit your needs preferred style.

That’s it! Now you can make offers while the user is reading a blog post. Even better, you can use the Zeigarnik effect to capture email addresses of website visitors.
11. Make an Offer After They’ve Finished Reading
Generally speaking, visitors who’ve read an entire blog post are more interested. For this reason, we don’t want to annoy them with popups as they’re reading our content. Instead, make your offer at the end of your page! That way, they’ll come across it after they’ve finished reading.
The bottom of your post is a great place to offer things like content upgrades. You can use it to offer any additional perks that keep the reader engaged.
Here’s an example you’ll see on OptinMonster’s blog:

Great, but how does a “Download Now” button help with email capture?
Surprise! When the reader clicks the image, they immediately see a lightbox optin.

Note: We also included content upgrade optins above, in point number 6 of this post. We recommend doing content upgrades near the beginning of the post and at the very end.
12. Wow Them With Fullscreen
Fullscreen optins give you a lot of flexibility in your design. You can use that space to really wow your visitors with your offer.
For example, say you have several benefits to your offer. Try using a fullscreen offer to show more. This is a great time to improve scanability and list them as bullet points.
Check out this example from Mariah Coz. Here, she uses a fullscreen welcome gate to ask visitors whether they would like to enter her giveaway, or just read the blog.

How to Use Fullscreen Optins With OptinMonster
OptinMonster has a variety of fullscreen themes for you to choose from. Or you can choose a blank canvas and create your design from scratch.

To give users 2 choices, simply:
- Enable the Yes/No view.
- Set the No Action to Redirect to a new page.
- Enter the No Redirect URL for your second choice (e.g., your blog).

Now you have plenty of space to really wow visitors with your offer, and they can either optin or read your blog instead.

13. Add a Feature Box
Feature boxes are prominent optins embedded inside in your header area. They’re a great way to make sure your optin offer gets seen without at all interrupting your visitors.
Here’s an example from Michael Hyatt:

And another example from Backlinko:

How to Create a Feature Box With OptinMonster
To learn how to set this up with OptinMonster, check out our step-by-step feature box tutorial here.
14. Show Each Optin at the Right Time With Multiple Triggers
Let’s face it. Not every user is going to browse your website in the same way.
One person may browse long enough to see a timed lightbox popup. Another may abandon your site before it’s had a chance to trigger. So, how do you make sure to set up your site with every user in mind?
It’s a lot easier than you think. You utilize multiple triggers for a single optin.
Wait! What does that mean? Well, let’s say your OptinMonster popup shows up on the second pageview, or with Exit-Intent®. If a user browses your site long enough, they will see the popup on their second pageview, and they won’t see that same popup again. However, if they start to abandon your site before the second pageview trigger, then they’ll see your popup at that moment.
This way, users will only see your optin once, at the perfect moment for them.
How to Set Up Multiple Triggers in OptinMonster
Setting up multiple triggers in OptinMonster is easy. Go to the Display Rules tab to set your first trigger.
We’ll set our popup to appear when the user has scrolled down 70% of the page.
- Add a second ruleset by clicking on the Add New Ruleset.
- You’ll then need to give this new ruleset a name. Let’s call ours, “Exit-Intent.”
- Hit the Save button to add your new ruleset.

From here, enable Exit-Intent® by adding a new condition for exit intent.

Hit the Save button at the top of the screen to save your new settings.
Now, when a reader scrolls more than halfway down the site, your popup will appear. And the popup will also appear when they try to leave your site without scrolling.
15. Give Them a Second Chance With a Different Optin Type
You need to prepare for the fact that not all users are interested in your offer. Not the first time they see it, at least.
However, they might still convert later on if given a chance. So, don’t be pushy.
Instead, give your readers a second chance to subscribe by switching up the optin type. Make it something different than before.
Here’s an excellent example from SEJ:

The first engagement is a timed popup with the offer to join their next webinar. You can set it to choose popups based on the reader’s browsing behavior.
If they exit the popup without opting in but continue to browse the site, they receive a slide-in optin.

If they still haven’t opted in, but haven’t bounced yet, it’s time for stage three, the inline ad.

While not for every lead generation campaign, some readers need several optins before converting.
How to Set Up “Second Chances” With OptinMonster
- Create the first optin type. For this example, we’ll create a popup using one of our lightbox templates.
- Go to the Display Rules tab and add a condition of time on page.
- Choose how long you want to wait before the reader is engaged. The default is 5 seconds.

- Create a second optin using another template, like a slide-in or a floating bar.
- Go to the Display Rules tab for your second optin and add the visitor has closed condition.
- Choose the campaign you’re targeting in the dropdown.

- Then add the pages viewed condition and set the number of pages viewed to is at least 2. This way, the reader won’t see 2 optins on the same pageview. After all, you only want the second chance offer to appear once they navigate to the next page on your site.
Now you can give visitors a second chance to convert, without showing them the same ad over and over again.
16. Give Them Another Choice With a Backup Offer
Here’s another scenario you should prepare for. What if the reader doesn’t want your offer? Then what?
You need a backup optin.
Let’s say you’re in the fitness industry and offering a 30-day weight loss challenge. What if someone simply isn’t interested in that because they want to build muscle?
Here’s what you do: Build a second challenge tailored towards the demographic wanting to build muscle. Let’s look at how.
How to Create “Backup” Optins With OptinMonster
Creating “backup” optins is easy with OptinMonster.
- Go to the Display Rules for your second optin
- Add the visitor has closed condition.
- Choose the campaign you’re targeting in the dropdown.
You’ll also need to add the pages viewed condition and set the number of pages viewed to is at least 2.
Just like the last example, we don’t want visitors to see 2 optins on the same pageview.
This strategy is particularly useful if your first optin uses yes/no buttons. When someone actively says “no thanks” to your first offer, you’ll know that it’s an excellent time to offer the backup.
17. Use Personalization
As you have seen from the above strategies, creating an exceptional user experience is all about customization.
We’ve customized our timing and our offers by presenting specific offers at specific times to specific people. But what about getting personal? Let’s look at how you can personalize your optins.
By detecting where a user is coming from, you can customize the copy of your offer specifically to those users. Here’s an example of a personalized offer tailored to visitors referred by WPBeginner.

Personally welcoming visitors will impress them. And impressed people are more likely to convert.
How to Personalize Offers in OptinMonster
To personalize your offer based on where the user is coming from:
- Create an optin specifically for the reader.
- Go to the Display Rules tab, and add the referrer URL condition.
From there, you can adjust the settings to detect specific sources of traffic.
For this example, let’s set ours to show when the referrer URL contains the WPBeginner domain.

Now users will feel extra special when they see your personalized offers.
Cool, isn’t it?
18. Give the Reader a Taste With Content Locks
It may sound cliche, but the best email capture technique is good content. Create something visitors want to read and draw them in. Then, once they reach the good part, hit them with your optin.
Except, this isn’t an ordinary optin. It’s a content lock. That means visitors have to optin if they want to continue reading.
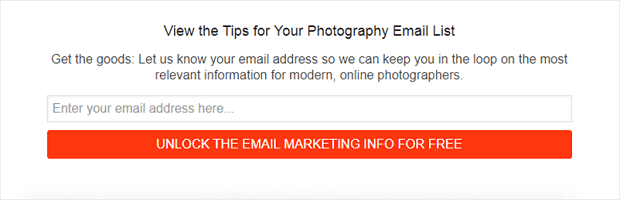
Here’s an example of a content lock on Photowebo’s website:
How to Create a Content Lock in OptinMonster
Content Lock is a cool feature and a great way to increase optins. And best of all, you can gate off your content in seconds with OptinMonster.
- Choose Inline Campaign from the Create a New Campaign menu.
- Once you’ve begun your Inline Campaign, click the Inline Settings panel.
- Switch on Lock Content Below Campaign? setting.
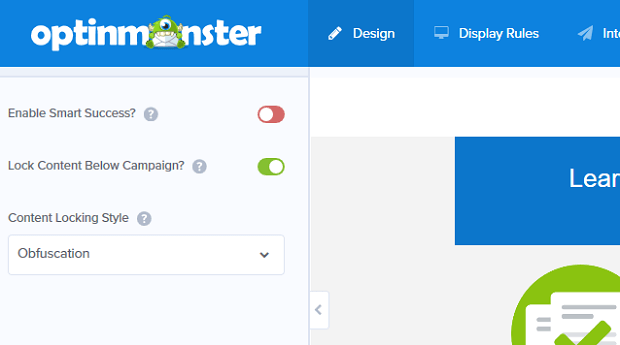
You’ll notice there are two selections under the “Content Locking Style” menu:
- Obfuscation: Blurs out the locked text.
- Removal: Hides the locked text.
Both of them lock away your gated content. Choose the one that goes best with your style.
You can also use gated content to create a paywall. This reserves your premium content for paying subscribers at a small fee and helps generate more income for your business.
19. Perfectly Time Your Optins
Visitors don’t like being annoyed. You don’t like losing conversions. Is there a solution where everyone wins?
Believe it or not, yes, there is. That solution is timed optins. This gives your readers a chance to take in some of your content before getting bombarded with optins. And by the time you deliver your popup, they’re already engaged. And engaged readers are more likely to convert.
Let’s look at how you can capture email leads using a timer.
Creating Timed Display Controls With OptinMonster
Guess what. If you’ve made it this far down the list, you probably already know how to create timers. We covered a similar process using time delays earlier in this list. Nevertheless, here’s how you can add a delay to a new popup:
- Choose Popup from the Create a New Drag & Drop Campaign menu.
- Select the Display Rules tab.
You’ll see a menu under the Conditions tab.
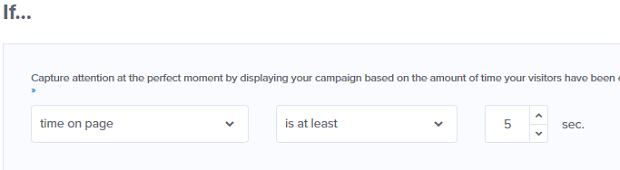
- Select time on page for the first box.
- Select is at least for the second box.
- On the third box, choose how long you want the delay to be. If you choose 5 seconds, the reader will see your optin after being on your page for 5 seconds.
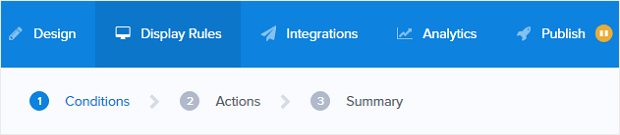
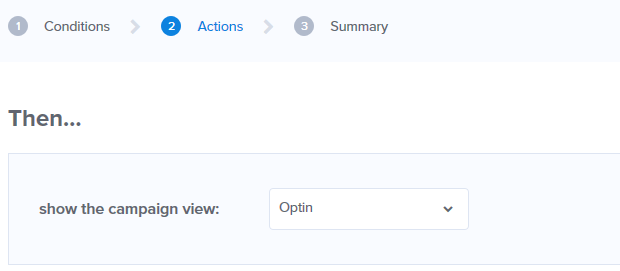
Once you’ve set conditions, hit the blue Next Step button below. You’ll go to step 2, the actions tab.
In the show the campaign view box, choose Optin, then hit the Next Step button.
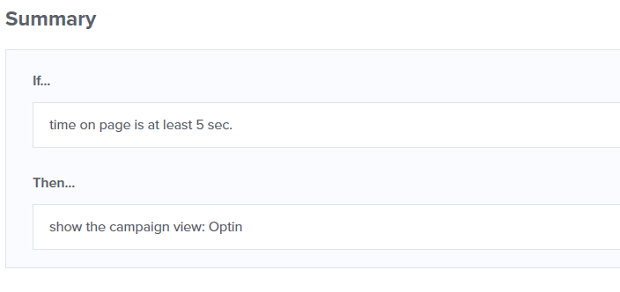
You’ll then be taken to the third and final step, the summary. It’s just a page that shows you what rule you created. For us, that rule is a 5-second delay on showing optins.
That’s it! These have been the 19 best email capture tips that actually work.
We hope you found this article helpful. If so, you’re likely interested in improving your email marketing game. We highly recommend checking out the following articles:
- How to Run a Successful Email Marketing Campaign
- Email Marketing for Beginners: A Step by Step Guide
- How to Create an Effective Email Autoresponder Series
These resources will have everything you need to help you grow your email list and drive more revenue with your email campaigns.
Ready to get started? Sign up for your risk-free OptinMonster account today!
Disclosure: Our content is reader-supported. This means if you click on some of our links, then we may earn a commission. We only recommend products that we believe will add value to our readers.
One response to “19 Easy Ways to Capture Email Leads Without Being Pushy”
-

Sharing this with colleagues.

-01 - OptinMonster")


Add a Comment