Do you struggle with visitors browsing your site on mobile devices but leaving before taking any action? If so, you need to leverage the power of mobile exit-intent popups.
With exit-intent mobile popups, you can engage, recapture, and convert mobile visitors as they’re trying to leave your site forever.
That’s why, in this article, we’re going to teach you everything you need to know to create an exit popup on mobile.
- What is a Mobile Exit Popup?
- How to Create Exit-Intent Popups on Mobile
- Are Exit Intent Popups Effective on Mobile?
But before we get into the tutorial, let’s get clear on what a mobile exit-intent popup is in the first place.
What Is a Mobile Exit-Intent Popup?
Mobile exit-intent popups or mobile exit modal popups are notifications designed to recapture your visitor’s attention on mobile devices when they’re actively leaving your site.
Exit-Intent Technology® has been traditionally limited to desktop browsers. But, recently, we changed all that.
For the longest time, one of OptinMonster’s most requested features was to have exit-intent popups work on mobile screens. Why was this feature in such high demand?
Because exit-intent campaigns work so freakin’ well, and, secondly, mobile traffic has increased exponentially.
Not familiar with exit-intent popups?: Check out some of our best exit-intent popup examples.
The biggest challenge in creating mobile exit-intent popups is that tracking a user’s behavior on the phone is harder than from their desktop.
When someone visits a site on a computer, we can track mouse movements to understand when people are trying to leave the page.
This is much more difficult on mobile devices since we navigate smartphones with fingers instead of a cursor.
But as they say, “Where there’s a will, there’s a way.” And at OptinMonster, we always find a way.
So, do exit intent popups work on mobile? When you use OptinMonster, the answer is yes. We have developed mobile-specific exit-intent technology so that your popups are triggered when mobile users try to leave your site.
How To Create Mobile Exit-Intent Popups
First, we understand that everyone learns a little differently. If you’re more of a visual learner, here’s a video tutorial to help you out:
But if you’d prefer the written instructions, we’ve covered them in detail below.
Let’s get started.
Building a New Exit-Intent Mobile Campaign
Setting up exit-intent mobile popup campaigns is incredibly easy. First, log into your OptinMonster account.
Don’t have an account yet? Sign up for OptinMonster today. It’s 100% risk-free.
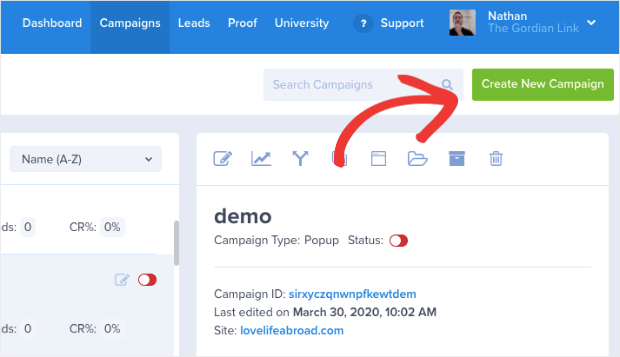
Then go to the upper right-hand corner of your dashboard and click Create New Campaign:
Choose which type of campaign you would like. For today’s tutorial, we’ll choose Popup:
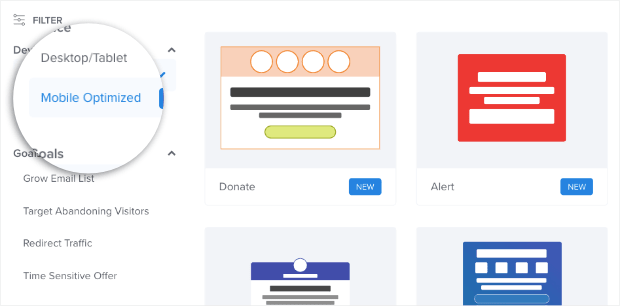
Now we need to select a template. One of the best features of OptinMonster’s template selection is that you can filter your choices on the left-hand side menu.
By clicking Mobile Optimized, you’ll bring up all the popup templates that are best suited for smartphones:
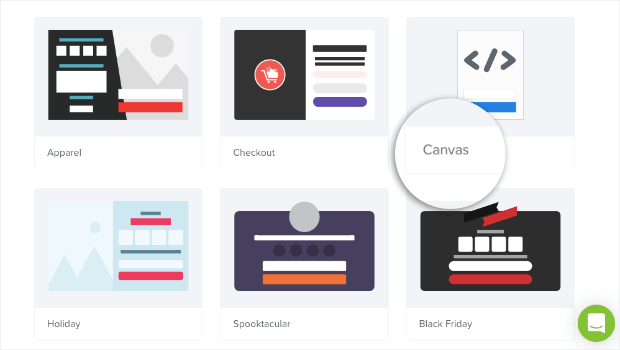
You can also choose to create a mobile campaign from scratch with our Canvas template:
Today, we’ll go with Magnet:
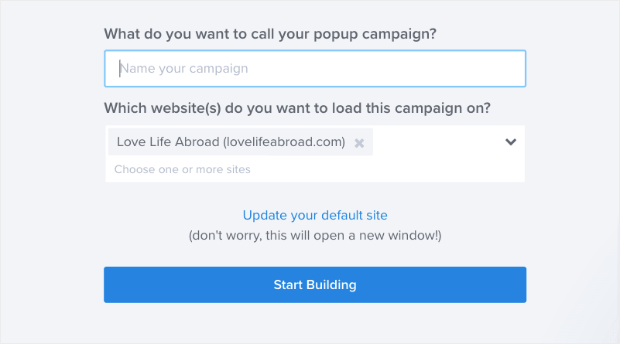
Name your campaign and assign it to your website:
And now we’re ready to modify the campaign. We won’t talk too much about how to customize your campaign in this tutorial.
But rest assured that our easy drag-and-drop editor makes everything simple.
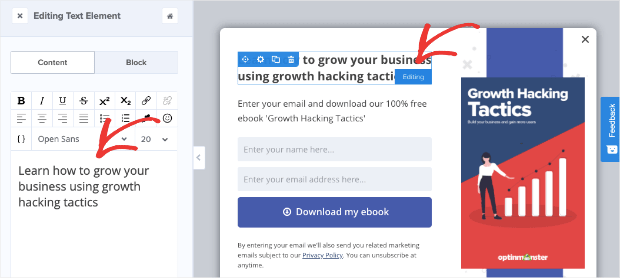
Just click on the elements you’d like to change to pull up the editing tools in the left-hand side menu:
From there, you can personalize every aspect of your campaign to suit your voice, message, and brand.
If you need help with designing your campaign, check out this resource on how to create your first campaign.
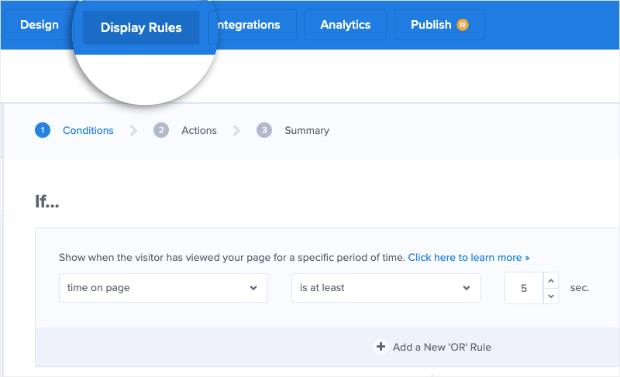
You really need to know how to set up exit-intent mobile triggers. For that, click Display Rules at the top of your editor:
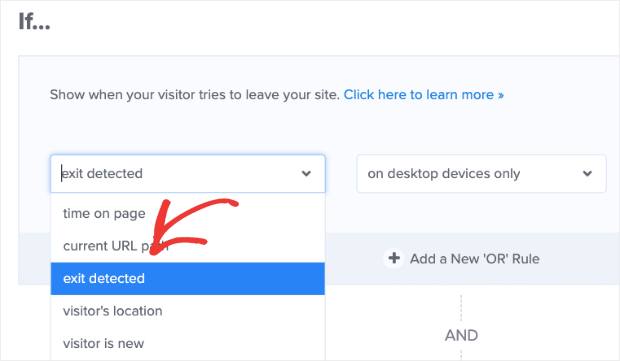
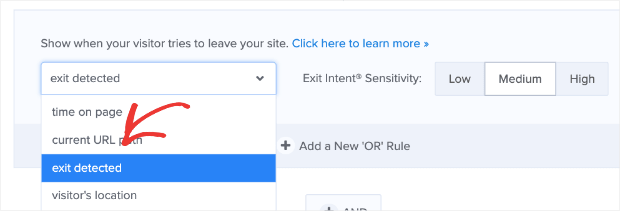
Change your first condition from Time on page to exit detected:
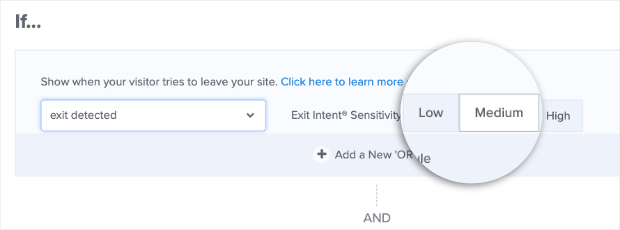
Then choose between Low, Medium, and High sensitivity. For scrolling up exit-intent triggers, choose Low or Medium:
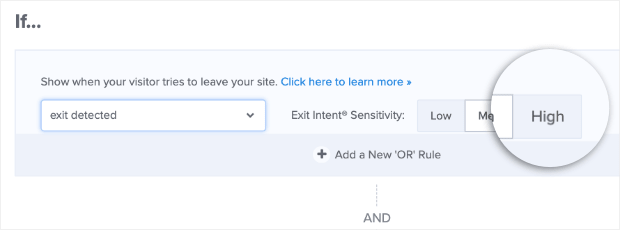
To target users hitting the back button, select High sensitivity:
But sometimes, when you’re given a choice between two things, it’s fun to choose both.
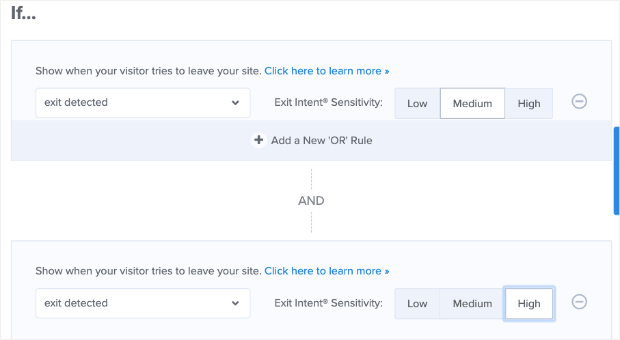
If you want to use a scrolling up and back button exit-intent trigger together, that’s no problem.
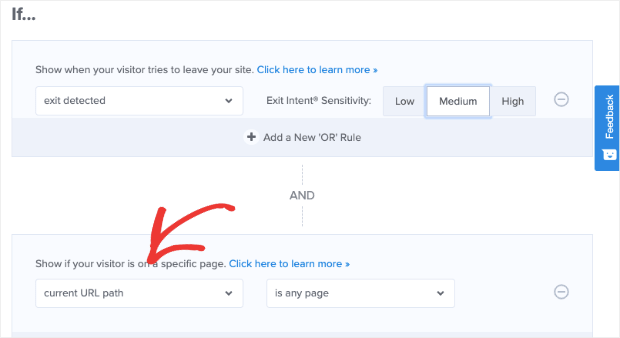
Set your first condition to Low or Medium for the scrolling up trigger. Then modify the second condition in the field just below the first:
Change Current URL path to exit detected:
And select High sensitivity to create a back button exit-intent trigger:
Now you have your two mobile exit-intent triggers set as distinct conditions:
That’s it! You now have your exit-intent mobile popup targeting set up.
By default, this campaign will appear on every page of your site. You can add a new display rule if you want to customize your display settings further. Click +And to add a new condition:
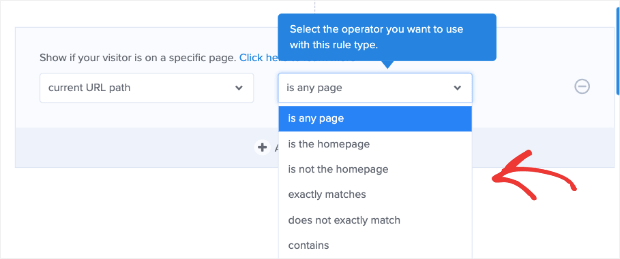
Then change Time on page to current URL path:
This allows you to set your campaign to specific pages of your site, such as:
- The homepage
- All pages except the homepage
- Exact URLs
- URLs, including specific words
- URLs beginning with specific words
And much more.
Now let’s focus on updating an existing campaign to include mobile exit-intent functionality.
Adding Mobile Exit Popups to Existing Campaigns
So far, we have built a mobile exit-intent campaign for a mobile-optimized template. But, in some cases, you may already have campaigns that you’ve made with an exit-intent trigger for the desktop.
Because of that, many clients had asked whether they could add mobile exit-intent triggers for campaigns they built before the mobile feature existed.
The answer: Absolutely.
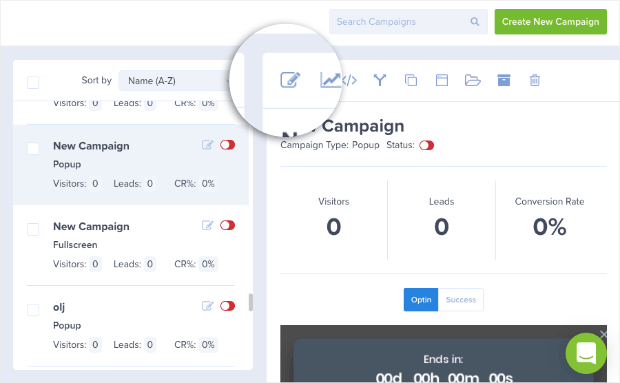
To make sure you have an exit-intent mobile popup for campaigns you’ve already created, click on the campaign you want to edit in your OptinMonster dashboard. Then click on the edit icon to go to the editor:
Go to Display Rules:
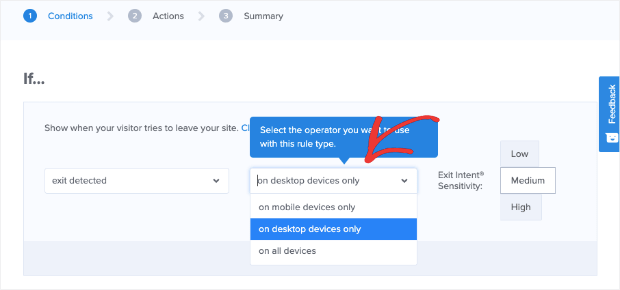
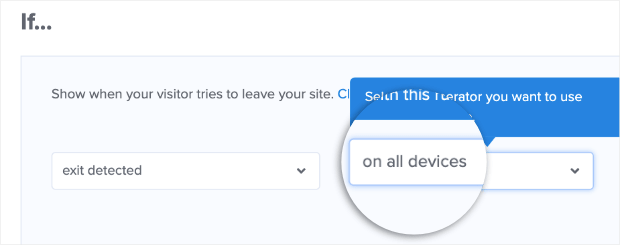
Check your settings for exit detected. You can choose to have your exit-intent trigger set for:
- Mobile-only
- Desktop only
- Both
For most use cases, you’ll want to set your exit-intent trigger for both desktop and mobile:
But this is only sometimes the case.
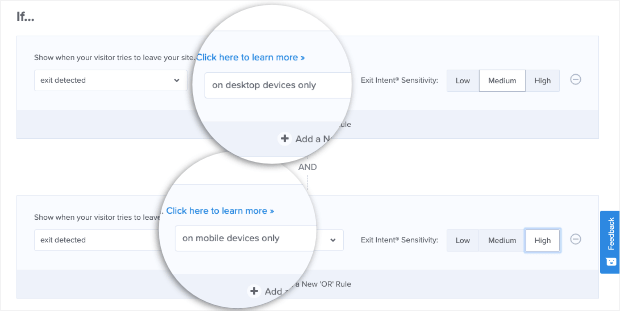
Remember that the exit-intent trigger for mobile phone popups will change according to the sensitivity you set. Low and Medium sensitivity will create a scroll-up trigger, whereas High sensitivity will create a back button trigger.
If you want to have Medium sensitivity for desktop but a back button exit-intent trigger for mobile, you’ll need to create two distinct conditions: one for desktop set to Medium and one for mobile set to High:
With OptinMonster, everything is fully customizable to make sure you’re getting the right message in front of the right people at exactly the right time.
Once you have your user’s attention, you can show them promotions, grow your email list, or directly increase sales.
Are Exit Intent Popups Effective on Mobile?
Exit-intent mobile popups are incredibly effective, but with OptinMonster, they can truly excel at recapturing your users’ attention when they’re leaving your site.
Let’s check out how this works more specifically.
Our mobile exit-intent trigger works in two ways. When users:
- Scroll up on their mobile screen
- Hit the back button on their mobile browser
We found that these were the two most significant indicators of a user’s intent to leave your site. Let’s quickly look at both.
Scrolling Up Trigger
When users start scrolling up on their phone screen, that’s a good sign that they’ve stopped engaging with the content on your site. Usually, they’re trying to bring the URL drop-down field to type in another site’s web address.
Hitting the Back Button
Another common signal that people are leaving your site is when users click the back button to return to where they previously came from. This is the perfect time to show visitors a popup of a special promotional offer to entice them to stick around.
That’s because, most of the time, your users aren’t leaving because they haven’t found the information useful. They’re leaving because they think they’ve gotten everything they can out of your content.
But you can keep them on your site by adding a mobile exit-intent popup that is triggered by hitting a phone’s back button. That way, you’ll show users exactly how much more you have to offer.
Often, it will be enough to convince casual browsers to stick around.
You can create stunning Exit-Intent popups in minutes with OptinMonster.
OptinMonster is the best lead generation tool in the world, making it easy for you to grow your email list exponentially. Our popup campaigns let your turn site visitors into subscribers and customers.
With its drag-and-drop builder, you can create eye-catching Exit-Intent® popups optimized to increase conversion rates.
These stunning campaigns will help your calls to action (CTAs) stand out at a critical moment in your visitor’s customer journey.
OptinMonster comes with 50+ beautiful prebuilt templates and lets you choose from six campaign types, like lightbox popup, floating bar, full-screen welcome mat, and more.
OptinMonster has powerful targeting rules so you can show your exit-intent popups to visitors based on what they like, their behavior and actions on your site, where they’re located, and even what items they have in their shopping cart.
This helps you personalize your lead magnets, such as special offers or free ebooks, to specific parts of your audience who’ll most likely convert.
To make any lead generation campaign an exit intent popup, you must add a targeting rule. OptinMonster will automatically detect when a visitor is about to leave your site and trigger the popup.
Skyrocket Conversions Today with Mobile Exit Popups
OptinMonster’s Exit-Intent® popups allow you to collect more leads than ever before. But that’s not all you can accomplish with our technology. You can also:
- Recover abandoning visitors and reduce cart abandonment
- Distribute discount codes and coupon codes for a better UX at checkout
- Overcome sales objections and address concerns
- Push a demo or free trial offer for your online store with call-to-action popups
- Boost SEO efforts by redirecting users to popular content or landing pages
- Reduce bounce rates by encouraging longer user sessions
- Incentivize your website visitors to sign up for newsletters
- Grow your social media following by sending mobile users to your favorite social platform
- Gather valuable feedback on user experience from your eCommerce store
- Drive more sales from your eCommerce store
In short, OptinMonster’s Exit-Intent® technology is a powerful tool for website optimization.
And you can do all this without using any code, making OptinMonster the most beginner-friendly popup tool.
It also comes as a convenient plugin for WordPress users and is one of Shopify’s top lead-generation apps.
Our mobile campaigns are proven to boost sales and conversions. Check out this case study on how White River increased mobile conversions by 150% with OptinMonster.
Okay, now we know what you’re thinking: “What about pricing?”
You can get started with OptinMonster for as little as $9/month with a 14-day money-back guarantee. You’ll want to start with the Pro plan (at only $29/month) to use mobile exit-intent.
Are you ready to get the same results as the world’s top 1% marketers? Sign up for your 100% risk-free OptinMonster account below:
Get Started With OptinMonster Today!









Add a Comment