In this article, you’re going to learn how to do an SEO audit of your website in 17 easy steps.
Finding SEO mistakes and performing an SEO audit can help you dramatically improve your website’s search engine rankings. That leads to higher traffic, sales, and revenue.
Without wasting any time, let’s get to it!
How to Do an SEO Audit: Summary Table of the 17 Steps
Use the following links to jump around.
| Step | Action | Purpose |
|---|---|---|
| 1 | Crawl your website | Identify technical SEO issues like broken links, crawlability, and site structure problems. |
| 2 | Check for Duplicate Versions of Your Website | Ensure all versions (HTTP, HTTPS, www, non-www) redirect to a single, canonical version. |
| 3 | Secure your website with HTTPS | Improve website security and rankings by implementing HTTPS with an SSL certificate. |
| 4 | Check for Crawling Issues | Ensure Google can discover all pages on your website by fixing orphan pages, server errors, and crawl budget issues. |
| 5 | Check for Indexing Issues | Confirm Google can index your pages by resolving noindex tags and indexing restrictions. |
| 6 | Test Website Speed and Performance | Improve page load times and Core Web Vitals for better rankings and user experience. |
| 7 | Test for Mobile-Friendliness | Ensure your site is optimized for mobile users to align with Google’s mobile-first indexing policy. |
| 8 | Check and Fix Redirect Errors | Address redirect chains, loops, and unnecessary 302 redirects to enhance crawling and user experience. |
| 9 | Fix Internal and External Broken Links | Repair broken links to improve navigation, user experience, and search engine indexing. |
| 10 | Fix Duplicate Content Issues | Eliminate duplicate content by consolidating pages, adding unique content, or using canonical tags. |
| 11 | Identify and Fix Thin Content | Expand and improve low-quality pages to align with Google’s Helpful Content update. |
| 12 | Fix Meta Titles and Descriptions | Optimize meta titles and descriptions to improve click-through rates (CTR) and search visibility. |
| 13 | Fix Page Titles (H1 Tags) | Ensure H1 tags are engaging, unique, and relevant, containing the primary keyword for the page. |
| 14 | Add Missing Image Alt Text | Provide descriptive alt text for images to improve accessibility and image search rankings. |
| 15 | Check for Structured Data Errors | Fix structured data errors to qualify for rich search results and enhance CTR. |
| 16 | Analyze Your Backlink Profile | Monitor backlinks for quality, remove toxic links, and build a diverse and authoritative link profile. |
| 17 | Check for Manual Actions and Penalties by Google | Resolve manual penalties by following Google’s Webmaster Guidelines to regain ranking potential. |
What Is an SEO Audit?
An SEO audit is a process of reviewing your website and analyzing how well it follows the best SEO practices. An SEO audit usually includes:
- Reviewing website content
- Identifying areas of improvement and opportunities
- Finding technical SEO mistakes
- On-page SEO optimization issues
- Off-page SEO problems
- User experience issues
- Problems and shortcomings with the site architecture
- Competitor insights
A good SEO audit covers all these items and more. It gives you a comprehensive SEO report of your website that covers every base.
We recommend auditing your website for SEO at the start of each quarter.
10 SEO Audit Tools to Help You
It’s nearly impossible to do an SEO audit without SEO tools. So here is a list of the 10 best SEO audit tools to help you do an SEO audit easily.
Note: You don’t need to use all these tools, but using most of them would make the SEO audit process easier.
- All in One SEO: All in One SEO is hands down one of the best WordPress SEO plugins for optimizing your on-page, off-page, and technical SEO. It offers a full suite of SEO features to help you with your SEO audit and a built-in SEO audit checklist to make sure you stay on top of everything.
- SEMRush: SEMRush is a powerful search engine marketing software with many important features. The Site Audit feature in SEMRush can help you discover SEO issues and mistakes on your website and share actionable tips on how to fix them.
- Ahrefs: Although SEMRush is our #1 recommendation for SEO audits, Ahrefs is an alternative that you can use.
- ScreamingFrog: ScreamingFrog is a website crawling tool that you can use to audit your website and identify on-page and technical SEO issues. You can use its free version to crawl up to 500 web pages. ScreamingFrog can be a good alternative if you do not have access to SEMRush.
- Google Analytics: Google Analytics is a web analytics tool that tracks, monitors, and measures website traffic. You can see organic traffic on your website, monitor user engagement, identify the most popular pages, and more with Google Analytics.
- Google Search Console: Google Search Console is another free tool offered by Google. It helps you identify and troubleshoot several SEO issues. You can use Google Search Console to submit sitemaps, identify top search queries, find crawling errors, monitor organic click-through rate (CTR), and more.
- Google PageSpeed Insights: Google PageSpeed Insights is another free service by Google. Using this tool, you can measure a web page’s performance on both desktop and mobile devices. Based on how fast the page loads, Google PageSpeed Insights produces a report that shares actionable suggestions for improving its performance.
- GTMetrix: GTMetrix is another tool that helps you monitor and improve the performance of your web pages. GTMetrix offers a few more features and uses a slightly different methodology than Google PageSpeed Insights.
- Google’s Schema Markup Testing Tool: This free tool by Google will check the structured data on your web pages for errors.
- SERP Snippet Optimization Tool: The SERP Snippet Optimization tool displays how your web page would appear in Google search results. You can use this free tool to optimize the meta tags on your page.
Now you know which tools you may need while performing an SEO audit, let’s go through a step-by-step guide on how to do an SEO audit.
How to Do an SEO Audit
Here is a step-by-step guide on how to do an SEO audit in 2025.
Step 1: Crawl Your Website
The first step is to crawl your website with a tool like SEMRush.
When you crawl a website, SEMRush will crawl your website the same way as Google bots do. It will produce an SEO audit report at the end of the crawl. That report will have valuable information about your site architecture, crawlability, indexability, and more.
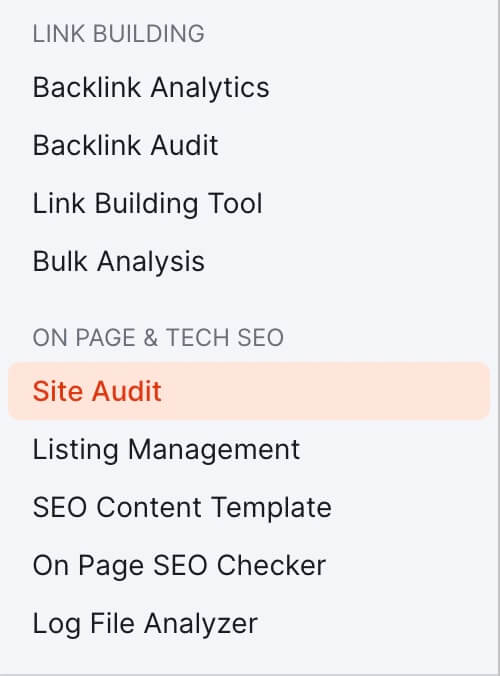
Log in to your SEMRush account and click on Site Audit in the left sidebar menu.
To perform an SEO audit, you must add your website as a project in SEMRush. To do that, click on Add new project button in the top-right corner.
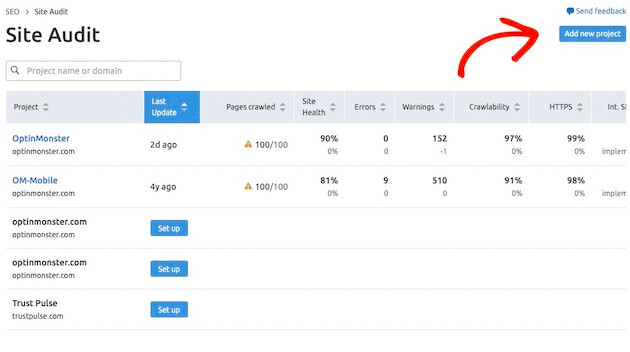
Follow the on-screen instructions to add your website as a new project.
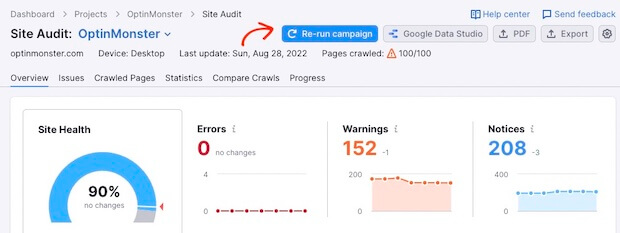
If you already have a project, click on it, and click on the blue Re-run campaign button near the top of the screen.
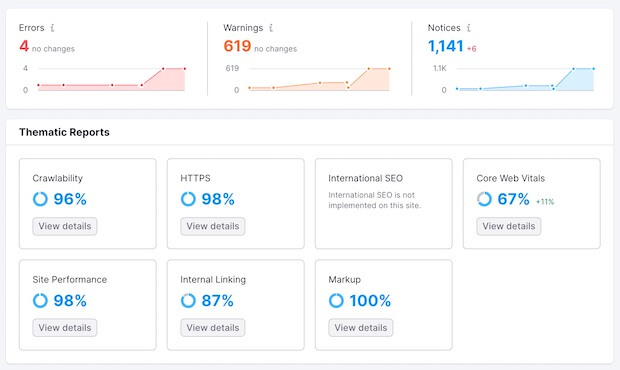
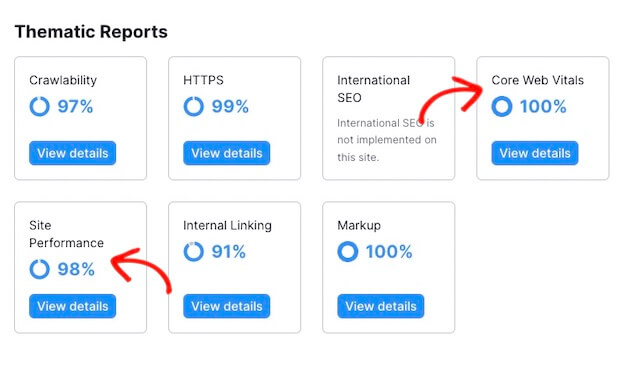
It may take a few minutes for SEMRush to crawl your website. Once it’s done, you will see multiple thematic reports like this.
Step 2. Check for Duplicate Versions of Your Website
Do you know the difference between these variations?
- http://yourwebsite.com
- https://yourwebsite.com
- http://www.yourwebsite.com
- https://www.yourwebsite.com
To you, all these may look the same. Even your website visitors may not be able to tell the difference. However, for Google, these are all different versions of your website that would be fighting against each other.
You should have only one version of your website, and only that version should be indexed by search engines.
There are 2 ways to check if your website has multiple versions:
- Use each of these 4 variations in your Internet browser and see where it leads. If all 4 links redirect to 1 version, then you’re good to go. For example, http://yourwebsite.com should redirect you to https://yourwebsite.com. If all 4 versions do not redirect you to a single version, you should set up 301-redirects to fix that.
- Use the site:yoursite.com search operator to see how Google views your website and how many versions it indexes. Here is an example.
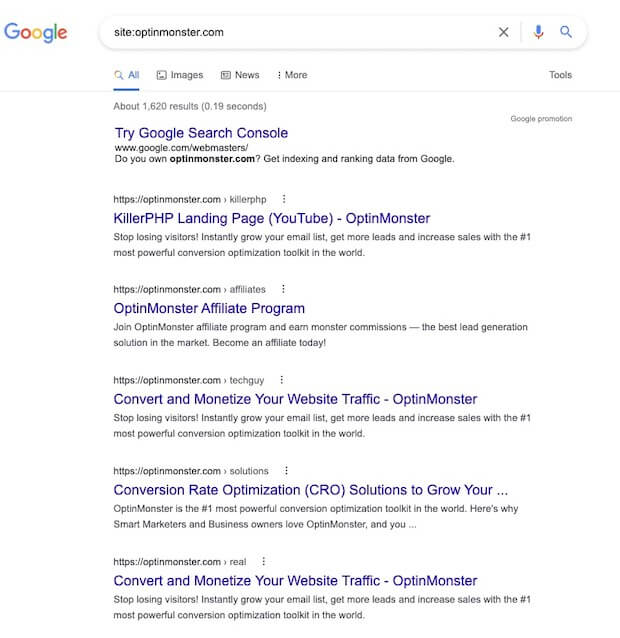
As you can see, Google does not detect any HTTP or www versions when crawling optinmonster.com. That’s because all the different variations have been 301-redirected to https://optinmonster.com.
Step 3. Make Sure That Your Website Uses HTTPS
Did you notice that all the variations of the OptinMonster domain redirect to https://optinmonster.com instead of http://optinmonster.com?
It’s important that your website uses HTTPS.
The extra “S” stands for Transport Layer Security and adds an additional layer of security to your website.
You will experience 2 problems if your website uses HTTP instead of HTTPS.
First, visitors may see warnings when they visit your HTTP website.
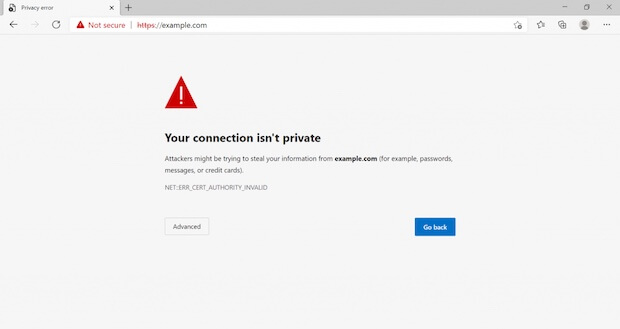
This is a warning by Google Chrome, but almost all Internet browsers show some kind of alert to users. As you can imagine, a warning like this can negatively affect your website’s authority, credibility, and revenue potential.
Second, Google may demote your website in search rankings, which will directly affect your website’s organic traffic and revenue. Remember that Google has been using HTTPS as a ranking signal since 2014.
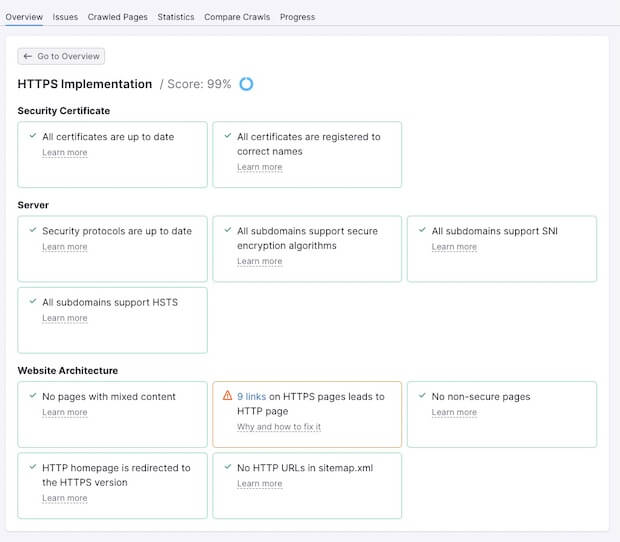
In the SEMRush Site Audit Overview, you can find more information about your website’s HTTPS status.
Go to Site Audit > Overview > HTTPS.
Pro Tip: You can get a free SSL certificate and make your website secure (HTTPS) with Let’s Encrypt.
Step 4. Check for Crawling Issues
Crawling is the discovery process. During this process, Google sends its robots to scour the Internet for content.
You want Google to be able to crawl all the publicly available pages on your website. If Google cannot crawl a web page, it won’t be able to index it. If a page is not indexed, it won’t appear in search rankings. We’ll talk more about indexing in the next step.
Here are a few common reasons why Google is sometimes unable to crawl web pages:
- NoFollow Internal Links: The “rel=nofollow” tag asks Google to ignore that link. The NoFollow attribute is a hint rather than a directive. However, Google sometimes doesn’t even crawl NoFollow links.
- Broken Internal Links: Internal linking is the main way Google crawlers find pages on your website to crawl. If internal links are broken, it is harder for Google bots to crawl your website.
- Orphan Pages: Orphan pages are pages that do not have any links pointing to them. Because they don’t have internal links, orphan pages are easy to miss by Google crawlers.
- Slow Loading Speed: Google has a limited crawl budget, which means Google crawlers will spend a limited time on your website before leaving. The faster your pages load, the more pages Googlebot will be able to crawl before the time runs out.
- High Page Depth: Page depth is the number of clicks that a page is away from a website’s homepage. Google crawlers go to a certain depth before turning back. Generally, pages with a depth of more than 3 may do poorly in search results. That’s because Google crawlers may find it tough to reach and crawl them.
Here are a few ways to fix crawlability issues on your website.
- Create a Sitemap
A sitemap is a map for search engine crawlers that guide them where to go. Here is a step-by-step guide on how to create an XML sitemap.
Once you have it, you can easily submit your sitemap in Google Search Console.
- Fix Broken Internal Links
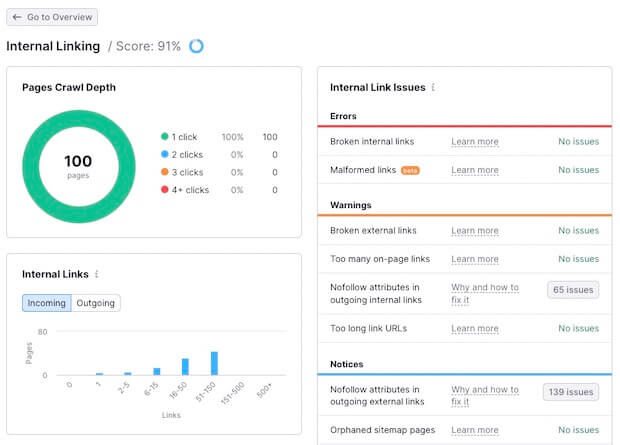
In SEMRush, click the Internal Linking report to see all the broken links on your website.
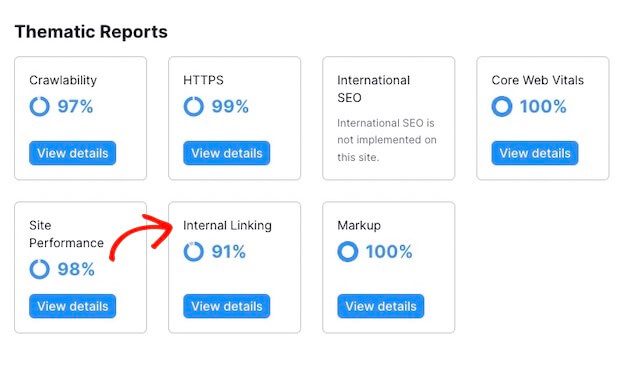
If your site has any broken links, you can find them here.
- Fix Server Errors
Server errors are 5xx errors. A server returns a 5xx error if it cannot finish a client’s request.
A 5xx error means that neither searchers nor search engine crawlers can reach your website. So server errors affect your website’s traffic, search engine rankings, and user experience.
Talk to the person who is responsible for the development and maintenance of your website. They should be able to fix the configuration issues causing server errors.
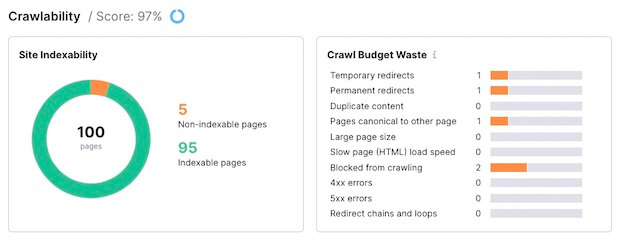
You can also find how many server errors you have if you go to the Crawlability Report in SEMRush.
- Improve the Loading Speed of Your Website
To use Google’s crawl budget most effectively, you will need to improve the loading speed of your website.
We’ll talk about how to improve site speed and performance later in this article.
- Fix Orphan Pages
An orphan page is a page that has zero internal links pointing to them. Because search engine crawlers rely on links to find and crawl pages, they usually cannot find and crawl orphan pages.
If you have SEMRush, you can find orphan pages easily.
- Go to Site Audit.
- Select the right project.
- Click on the Issues tab.
- In the search bar, type “orphan.”
You can find all the orphan pages on your site here. The next step is to build contextually relevant and helpful internal links to these pages.
Note: Remember how to use this search function in SEMRush. You will need to use it multiple times throughout this SEO audit.
Step 5. Check for Indexing Issues
After crawling comes the indexing of a website.
Indexing is Google storing and organizing the content that it finds during crawling. A web page can be ranked for relevant search queries once it has been indexed. Or it has no chance of ranking and driving organic traffic to your website.
Therefore, you want Google to crawl and index your pages successfully. However, Google sometimes can’t index all the pages on a website.
As part of your SEO audit, you need to identify all such pages and remove the roadblocks for Google.
There are 2 easy ways you can identify if your website has indexation issues:
Method #1: Use the Site: Search Operator
Use the site:yourwebsite.com search operator to see how many pages Google indexes from your website.
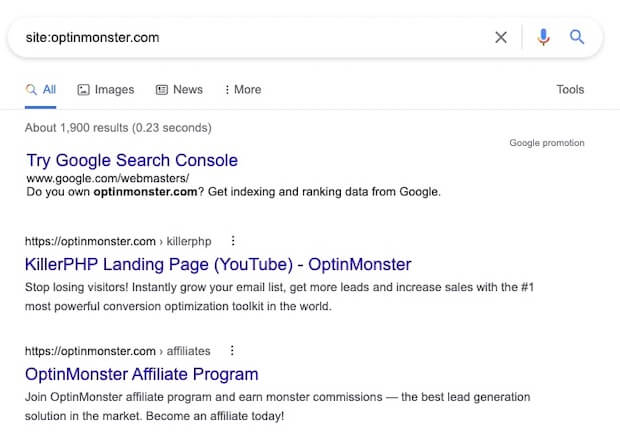
Suppose this number is drastically lower than the total number of pages you have. In that case, there is likely some problem preventing Google from indexing the rest of the web pages.
But this method doesn’t give you very actionable results. The next method does.
Method #2: Use Google Search Console
Google Search Console has an excellent report that tells you exactly how many pages Google indexes.
- Log in to your Google Search Console account.
- Under the Index tab in the left sidebar menu, click on Pages.
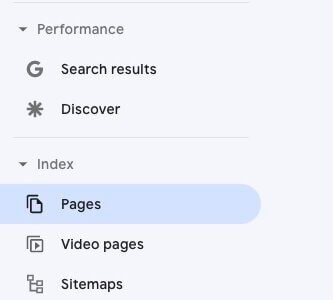
You will see a summary of how many pages Google indexes from your website and how many it doesn’t.
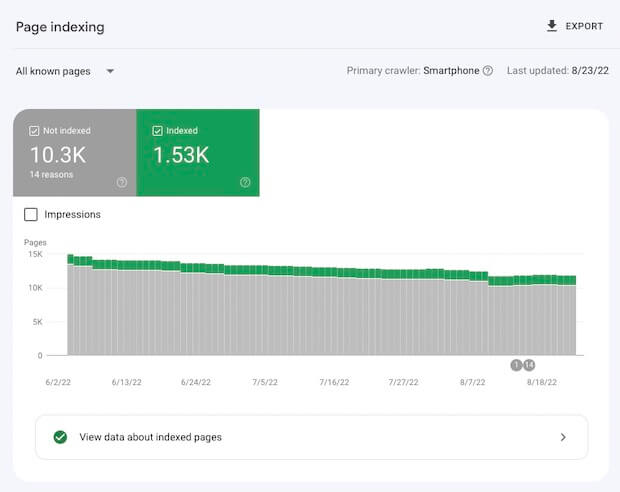
If you scroll down, you can also find more details on why Google isn’t indexing web pages on your website.
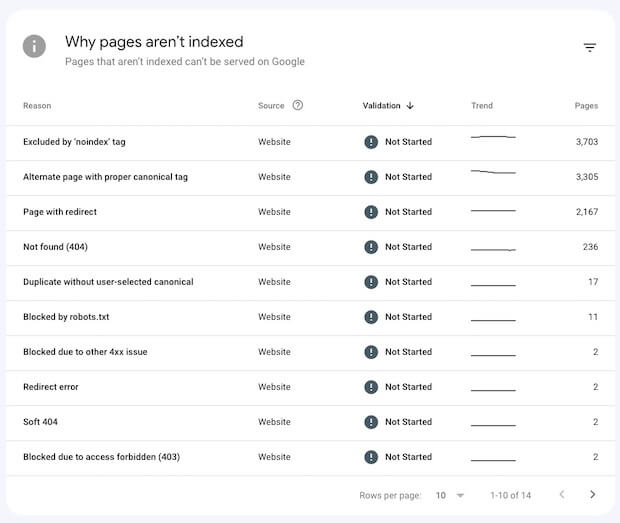
You can click on each of these reports to see the exact URLs of the pages that might need a fix.
Note that sometimes you want Google not to index certain pages on your website. For example, the /thank-you page that customers land on your website when they finish a transaction.
It’s a common practice to use the /thank-you page to record website conversions. If people could find that page in search results and visit it, your conversion data would become unreliable and inaccurate. Therefore, you should prevent Google from indexing that page. Such pages can be blocked by the robots.txt file or a noindex tag.
As you can see in the above image, we have intentionally blocked over 3,700 pages. That’s not a mistake that needs to be fixed.
Therefore, go through the list of non-indexed pages and manually analyze each page that should be or shouldn’t be indexed.
Step 6: Test Your Website’s Loading Speed and Performance
How fast your website loads is an important search engine ranking factor. Apart from search rankings, your website’s loading speed can also directly affect your site’s engagement and conversion rates.
Vodafone increased sales by 8% last year by improving website speed, while Agrofy cut the abandonment rate by 76% on product detail pages.
You can use these 3 site audit tools to test and improve your website’s performance:
- Google PageSpeed Insights
- GTMetrix
- SEMRush
We recommend using all 3 tools to produce a comprehensive set of reports. However, SEMRush shares more actionable information that is easy to understand and use.
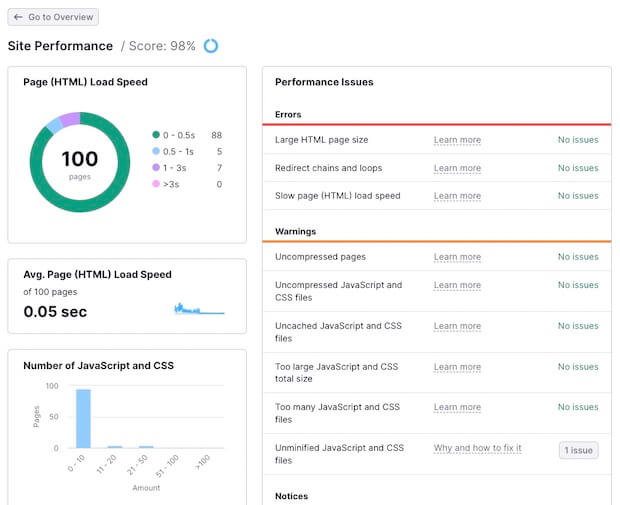
For example, SEMRush shares 2 reports you can use to improve your site’s performance and page experience. Those two reports are Site Performance and Core Web Vitals.
The Site Performance report gives an excellent overview of the average load speed. It also collects all the potential issues responsible for slowing down your website, so you can take action.
When improving site performance, do not forget about Core Web Vitals.
Core Web Vitals is a relatively new search engine ranking factor. It’s based on 3 metrics:
- LCP or Largest Contentful Paint: LCP measures how quickly the main contents of your page load from an actual user’s point of view. It should be less than 4.0 seconds.
- FID or First Input Delay: FID measures the time it takes for a user to be able to interact with your page. FID should be less than 300 ms.
- CLS or Cumulative Layout Shift: CLS measures how stable a page is as it loads. You’ll have a poor CLS score if the elements on your page move around as the page loads. CLS should have a score of less than 0.25.

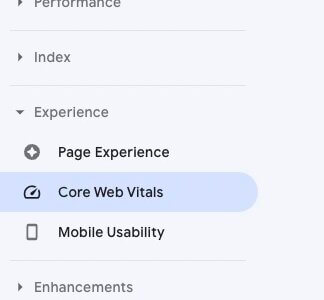
Google Search Console has a useful Core Web Vitals report which you can find under the Experience section in the left navigation bar.
Step 7: Test Your Website’s Mobile-Friendliness
62% of website traffic comes from mobile devices. If your website is not mobile-friendly, you miss out on that traffic.
Google also recently adopted the mobile-first indexing strategy, which means Google now primarily uses the mobile version of the website for search engine indexing and ranking.
Therefore, if your website performs poorly on mobile, it will have a harder time doing well in Google search results.
During this SEO audit, check if your website is mobile-friendly. You can start by using Google’s free Mobile-Friendly Test tool.
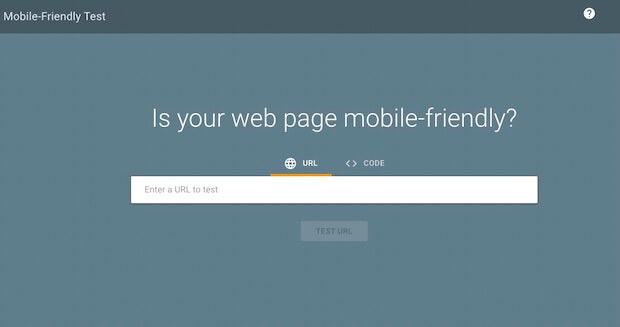
Enter your website’s URL and check the results.
We recommend using Google Search Console for more in-depth information about your website’s mobile usability.
- Log in to your Google Search Console account.
- Under the Experience tab in the left navigation menu, click on Mobile Usability.
You will find a quick summary of how many pages are usable on mobile devices.
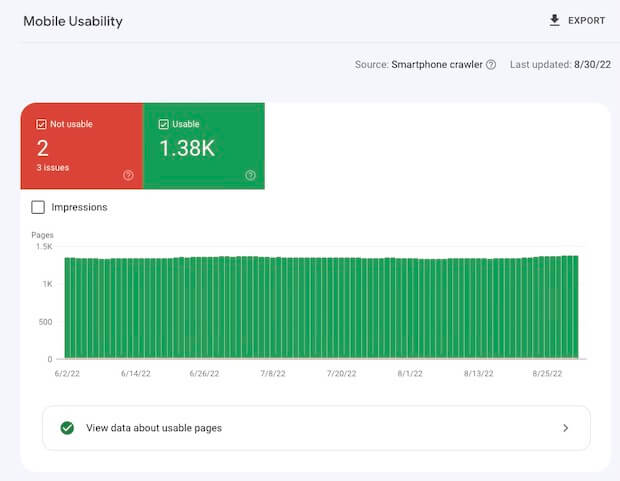
If you scroll down, you can also see the specific problems that some of your web pages may have.
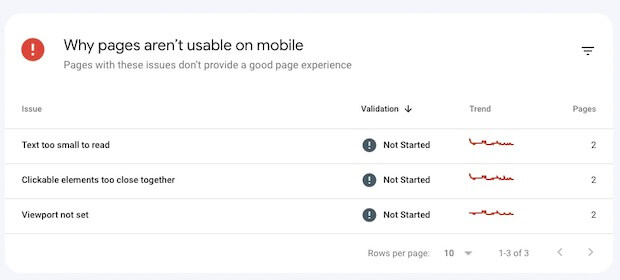
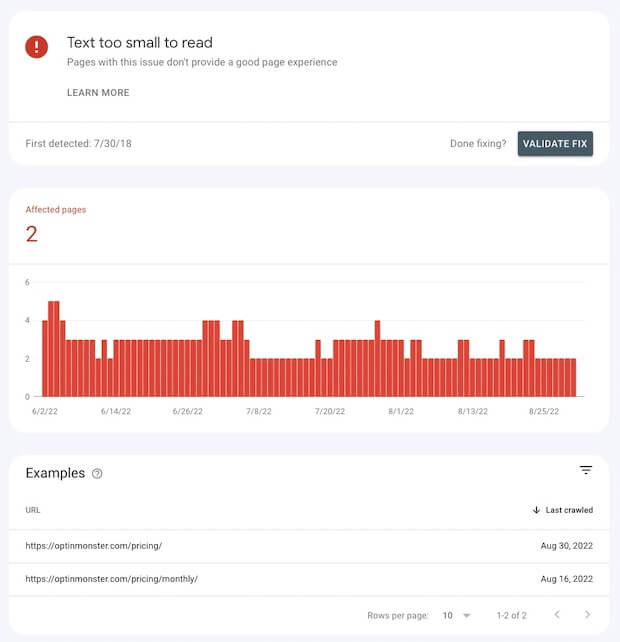
If you click on an issue, you can find the exact URLs with a particular problem. In the following example, the following 2 pages have a very small text size on mobile devices.
Step 8: Check and Fix Redirect Errors
When you perform an SEO audit, it is common to see issues related to redirects.
A few common issues that you may find are:
- Redirect chains
- Redirect loops
- Temporary redirects
Let’s talk about each of these.
- Redirect Chains
A redirect chain happens when a redirect points to a target URL that itself redirects to another URL.
For example, page A redirects to page B, but page B itself redirects to page C.
As you can see, it has become a chain. As a result, it takes longer for search engine crawlers and visitors to get to page C.
Besides increased page load time, redirect chains can cause delayed crawling and lost link equity.
The good news is that redirect chains are easy to fix.
How to Fix Redirect Chains?
A user who visits page A is finally redirected to page C. The redirect from page A to Page B is unnecessary in this case and should be removed.
A new redirect that sends visitors directly from page A to page C should be created to fix redirect chains.
- Redirect Loops
Redirect loops are more dangerous than redirect chains.
Redirect chains at least have a working target destination. Yes, it takes longer for the user to reach page C, but they do utlimately reach their destination.
However, redirect loops are closed redirect chains. In other words, they lead to an infinite cycle of redirects. As a result, the user never reaches their destination.
In a redirect loop, a URL is redirected to another URL, which redirects back to the original URL, initiating an infinite cycle of redirects.
For example, page A redirects to page B; page B redirects to page C; page C redirects to page A. And this goes on and on and on.
The solution? Break the loop.
- Temporary Redirects
Unlike redirect loops or chains, temporary redirects are not that big of an issue. But you should still fix it during SEO audits if you can.
There are 2 common types of redirects:
- 301 or permanent redirects
- 302 or temporary redirects
A 301 redirect is used when a page has permanently changed location. A 302 redirect is used when you want to redirect users temporarily without affecting the old page’s rankings.
You should look at all 302-redirects to make sure that the temporary redirects are justified and still valid. That’s because 302-redirects do not pass link juice and, therefore, can damage your page’s search rankings if used unintentionally.
If a page has been moved permanently, you should replace the 302-redirect with a 301-redirect.
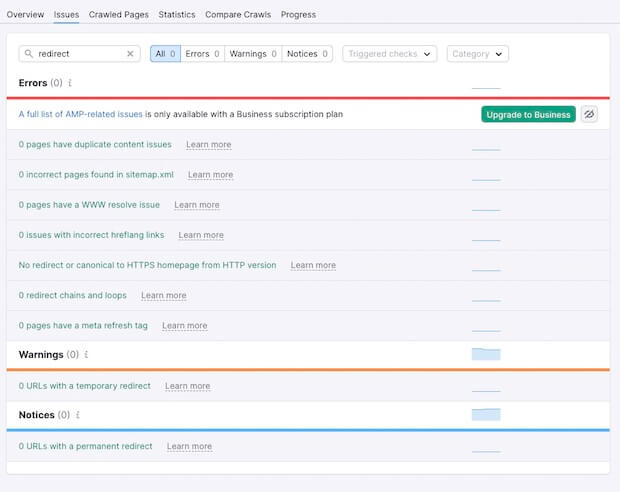
In SEMRush, you can identify all these issues. If you search for “redirects” in the Issues search bar, you will get a list of all the redirect-related problems you should fix.
Step 9: Fix Internal and External Broken Links
Earlier in this article, we briefly talked about fixing broken internal links, which may help with crawlability issues.
But in the end, you need to fix all broken links to and from your website.
You see, there are 2 types of links:
- Internal links: Hyperlinks that direct users from one page of your website to another page of your website.
- External links: Hyperlinks that direct users from a page on your website to a page on another website on the Internet.
In SEMRush, you can quickly find all the internal and external broken links on your website.
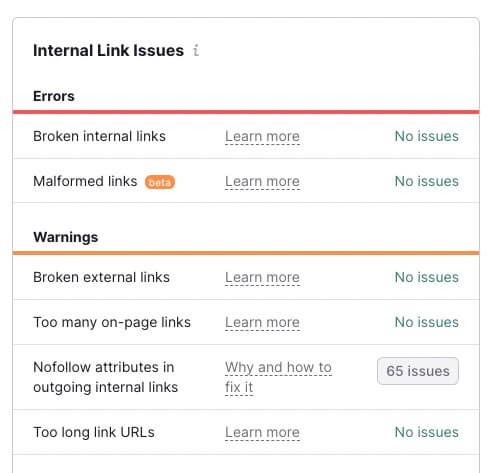
Go to Site Audit and click on the Internal Linking report to find the broken links.
Step 10: Fix Duplicate Content Issues
Duplicate content can cause a lot of problems for your website. As part of your SEO audit, make sure to identify and fix all pages with duplicate content on your site.
You can use tools like Copyscape to find duplicate content on your site, but it can be expensive if you have many pages. If you already have SEMRush, you don’t need to spend money on another tool.
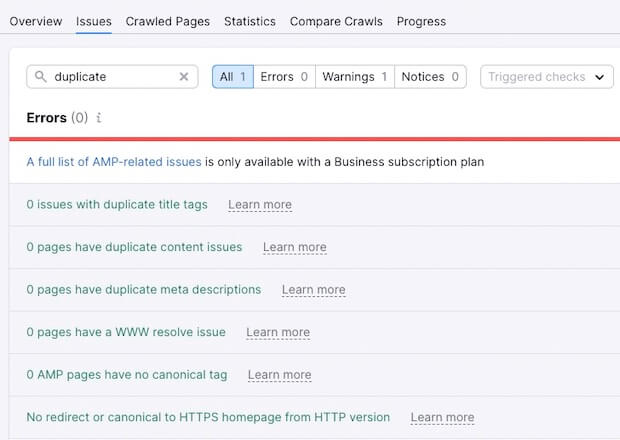
Go to Site Audit > Issues and search for “duplicate” in the search box. SEMRush will list all the duplicate pages it found during the site audit.
There are a few different ways you can fix duplicate content.
- If 2 pages use similar content, you can add unique content to one of the pages to make it different than the other.
- If you want to keep only one page, you can consolidate the content and set up a 301 redirect. The redirect should be set up from the page you want to remove to the page you want to keep.
- If you want to keep both pages for some reason but want search engines to only prioritize and index one of them, you can use a rel=canonical tag. A rel=canonical tag informs search engines which page is the original version and should be ranked. Learn how to set up canonical URLs.
Step 11: Identify and Fix Thin Content Pages
Like duplicate pages, thin content pages can hurt your site’s credibility, authority, and search rankings.
Thin content pages are pages with very little content that doesn’t help readers in any meaningful way.
One way to identify thin content is by lower word count. You can use a tool like Word Counter to find out how many words each page on your site has. But using a word count checker can be a long and ineffective process if your site has hundreds of pages.
The easiest way to automate this process is using a tool like SEMRush, Moz, or Ahrefs.
In SEMRush, go to Site Audit and select Issues. In the search box, search for “count,” and you will find a list of pages with a low word count.
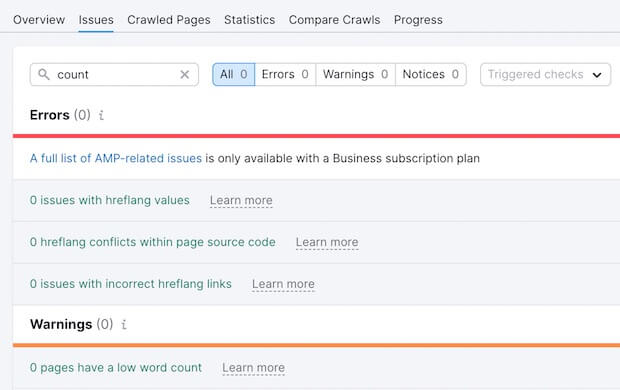
Low word count is usually a good indicator of thin content, but that’s not always the case. Besides, other factors beyond just low word count can help decide if a page is thin or not.
In the end, it all comes down to how useful and helpful it is. You should always aim to create high-quality and helpful content that helps your business grow.
This is especially important now after Google’s latest Helpful Content update. The Helpful Content is a sitewide Google algorithm that rewards people-first content.
Suppose your content isn’t helpful, neglects the overall user experience, or doesn’t provide sufficient answers to the searcher’s questions. In that case, the rankings for your entire website can be affected because of this algorithm.
The best way to find out the usefulness of your content is by manually reviewing the top pages ranked on Google’s 1st page.
Pick the main keyword that your web page is targeting based on your keyword research. Use that keyword to search on Google and go through the top 10 pages in Google’s search results.
Here are a few things to look out for:
- The average word count of the top 10 pages
- The subtopics that the headings and subheadings on those pages cover
- The use of custom images, GIFs, screenshots, infographics
- The LSI keywords that those pages use.
Your web page should match the top 10 search results pages in all these ways.
Step 12: Fix Meta Titles and Meta Descriptions
Meta titles or title tags are the titles that appear on the search engine results page.

It’s an important search engine ranking factor. Therefore, fix all SEO issues related to meta titles that you find during an SEO audit.
Some of the common issues related to meta titles are:
- Missing meta titles
- Duplicate meta titles
- Short meta titles
- Long meta titles
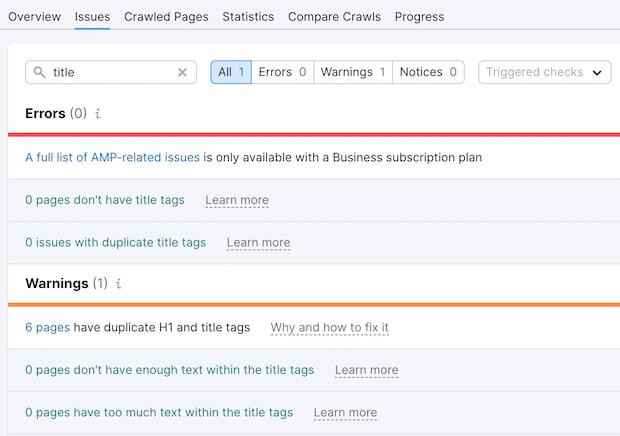
You can find all the meta-title-related issues in SEMRush.
Go to Site Audit > Issues. In the search box, search for “title,” and SEMRush will present a list of all the issues related to meta titles.
The next step is to search for issues related to meta descriptions.
Meta descriptions are the descriptions you see on search results pages.
While meta description is not a direct search engine ranking factor, optimizing it can help increase the click-through rate (CTR).
Higher CTR directly translates into higher search engine traffic and can help with improved search engine rankings.
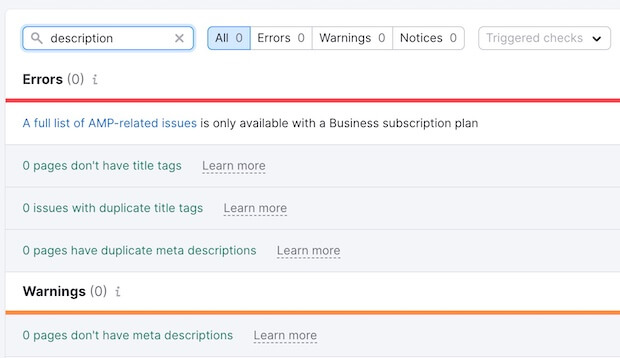
Search for “description” in the Issues search box in SEMRush, and you will find issues related to meta descriptions.
Keeping meta titles less than 60 characters and meta descriptions less than 155 characters is recommended. That’s the common practice that people follow.
However, it’s not the characters that matter. The actual width of the meta title and meta description matters more.
You can use a free SERP Snippet Optimization Tool to help you see how your web page would appear on the search result. Then you can create your meta titles and descriptions so that they don’t get truncated by Google.
Step 13: Fix Page Titles [H1 Heading Tags]
Just like meta titles, the page title is another search engine ranking factor. While meta titles are primarily for search engines, a page title (H1 tag) is primarily for website visitors who land on a page.
H1 is the main heading or title you usually see at the top of a page. According to best practices, an H1 should:
- Be engaging and relevant to the contents of the page,
- Be unique, and
- Contain the primary keyword you’re trying to optimize your page for.
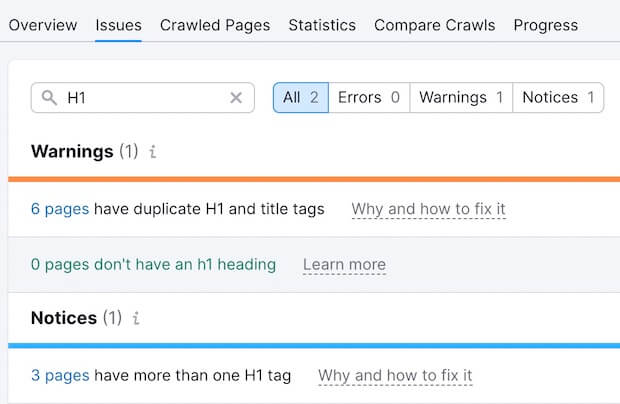
In SEMRush, search for “H1” in the Issues tab, and you will be presented with any H1-related issues found during the crawl.
Step 14: Add Missing Image Alt Text
Search engines cannot read images. That’s why they depend on alt text that helps search engines understand what an image is about.
Note that the image alt text is different from the image title.
Search for “image” in the Issues search box in SEMRush, and you can easily find all the uploaded images on your site that are missing alt text.
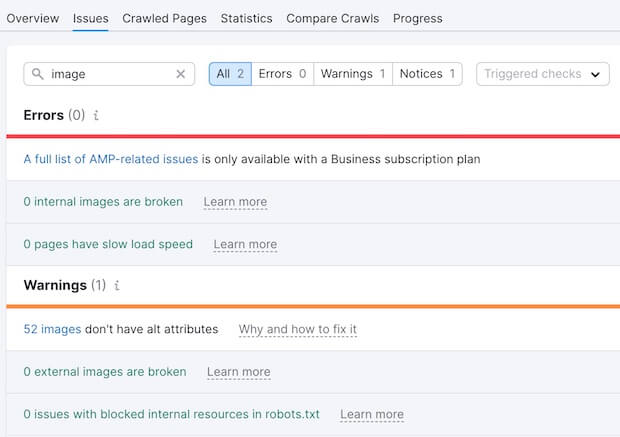
Here is a step-by-step guide on easily adding alt text to images in WordPress.
Step 15: Check for Structured Data Errors
During your SEO audit, you should also check for any structured metadata errors that your website may have.
Structured data can help Google understand the different elements of your page. It can also make your page qualified for rich results.
This is how rich results may appear in search results.
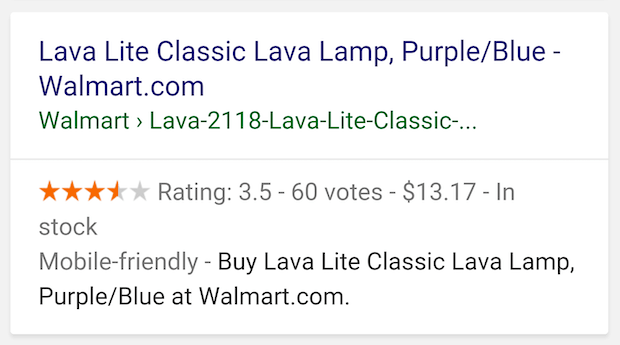
Studies have proven that rich results can drive a higher click-through rate (CTR). According to a study by Milestone Research, rich results have an above-average CTR (58%) than non-rich search results (41%).
And as we know, a higher click-through rate leads to more organic traffic and better search engine rankings.
You can learn more about structured data here.
In SEMRush, search for “structured,” and SEMRush will present a list of all invalid structured data items for you.
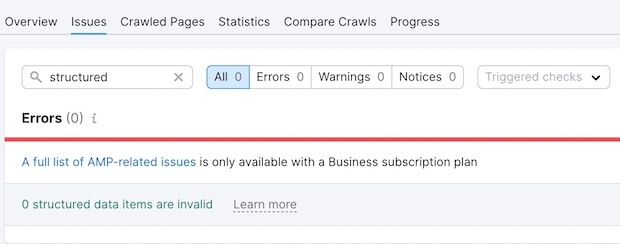
If you want more information, you can find it by clicking on the Markup report in the Site Audit’s Overview section.
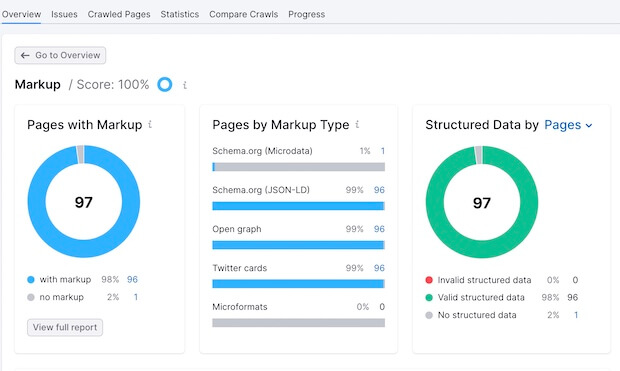
Once you have a list of all the pages and errors, use Google’s Schema Markup Testing Tool to test the existing structured data on the pages and fix the issues.
Step 16: Check Your Website’s Backlink Profile
So far, we have mostly talked about the technical SEO audit and on-page SEO audit. Now it’s time to look at the off-page SEO audit by checking your website’s backlink profile.
SEMRush is fully able to do off-page SEO audits, but we’ll use Ahrefs for this example.
- Login to Ahrefs
- Click on Site Explorer in the top menu bar
- Paste your website’s domain address and hit the search button
Click on the ‘Overview’ tab in the left navigation bar, and you will see an overview of referring domains.
Here is a snapshot of OptinMonster’s referring domains report.
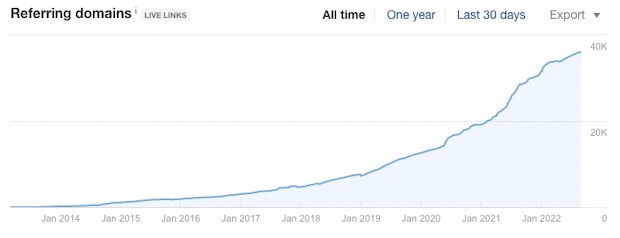
Referring domains are the number of unique websites that link to your site. The more unique referring domains that link to your website, the better it is for your site’s search engine rankings.
- If the number of referring domains is increasing, congratulations!
- If it’s flatlining or decreasing, you should look into link-building strategies.
Also, you should look out for potential toxicity in your backlink profile because not all backlinks help. Lower-quality spam backlinks from sketchy websites can do more harm than good.
Click on Referring domains in the left navigation bar to find potential spam links. Then sort by DR (Domain Rating) so that domains with the lowest domain authority appear at the top.
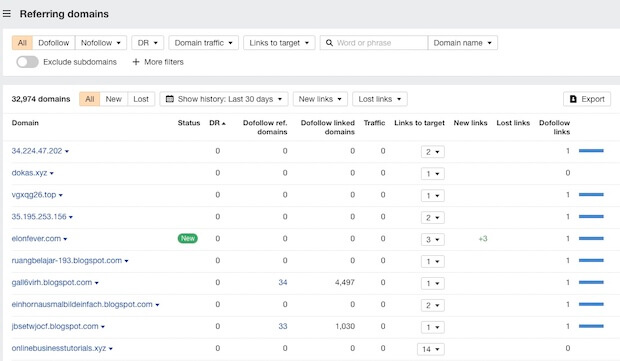
These websites have the lowest Domain Rating. If your site has spam links, they’re more likely to be in this group.
Go through this list. If anything seems suspicious, click on the Links to target to see the exact page they’re linking to and from and the anchor text they’re using to create those links.
You can then decide if it’s spam or a legitimate backlink.
Step 17: Check for Manual Actions and Penalties by Google
Google may also issue a manual penalty against your website if it violates Google’s Webmaster Quality Guidelines.
A manual penalty against your website means that your site’s search engine rankings will suffer unless Google revokes that penalty. Depending on the significance of the issue, the manual action could be at the page level or sitewide.
The first step is to find out if you even have a manual penalty.
You can easily find that out in Google Search Console.
- Log in to Google Search Console
- In the left sidebar, look for Security & Manual Actions.
- Under that tab, click on Manual actions.
Hopefully, you will see a green tick that says No issues detected.
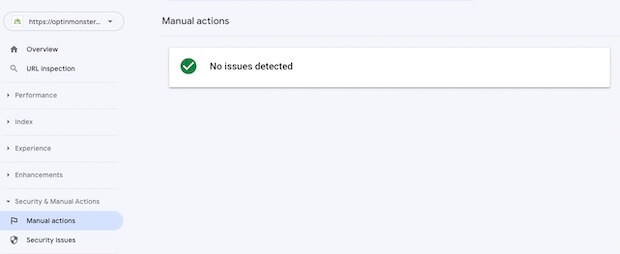
If you do have a manual action against your website, here is a helpful guide by Google on what to do. This guide lists a bunch of manual actions that can be applied by Google and explains how to fix each issue.
A 17-Point SEO Audit Checklist
Now you know how to do an SEO audit. We hope you found this guide helpful.
Here is a 17-point SEO audit checklist you can always use for your SEO audits.
- Crawl your website
- Check for duplicate versions of your website
- Make sure that your website uses HTTPS
- Check for crawling issues
- Check for indexing issues
- Test your website’s loading speed and performance
- Test if your site is mobile friendly
- Check and fix redirect errors
- Fix internal and external broken links
- Fix duplicate content issues
- Identify and fix thin content
- Fix meta titles and meta descriptions
- Fix page titles [H1 heading tags]
- Add missing image alt text
- Check for structured data errors
- Analyze your website’s backlink profile
- Check for manual actions and penalties by Google
What Comes After an SEO Audit?
There you have it! That’s how you perform an SEO audit.
Next, check out these expert SEO strategy tips to boost your search traffic even more.
But make sure that you are converting all that traffic, or it’s all a waste. Did you know that 70% of website visitors who leave a website never return?
If you’re serious about growing your business and revenue, convert website visitors before they leave. OptinMonster can help, as we helped Shotkit get 40+ additional leads a day.
Get started with OptinMonster today! So when you drive more traffic to your website after an SEO audit, it all adds to your revenue.
FAQ – How to Do an SEO Audit
1. How Long Does an SEO Audit Take?
A comprehensive SEO audit can take anywhere from 2 to 6 weeks. The time it requires usually depends on how big and complex your website is.
There are many free and paid SEO audit tools that can produce an audit report within a few hours. However, it takes time to analyze that report, interpret the information, prioritize the SEO problems that need to be fixed, and fix the SEO errors.
2. How Much Does an SEO Audit Cost?
The SEO audit costs can vary significantly.
It’s relatively easier to estimate the cost of an SEO if the audit is done in-house. Assuming 1 employee will spend 30 days performing the SEO audit and fixing the issues, the estimated cost will be equal to that employee’s monthly salary.
On the other hand, if you’re hiring an external digital marketing agency or SEO firm, the cost may vary based on 2 factors:
- How big and complex your website is, and
- How much the SEO agency usually charges for SEO audits
For example, Impact, a digital marketing agency, charges between $3,000 and $30,000 for a technical SEO audit. That actual cost depends on the size and depth of the website.
Other SEO agencies may have different price points.
3. Why is SEO Audit Important?
The reason why an SEO audit is important is that Search Engine Optimization can be very competitive and complex. You must always be at the top of your game to survive, compete, and thrive in search results.
It’s therefore suggested to find and fix your SEO mistakes regularly. Otherwise, smaller SEO problems may snowball and lead to lower search rankings, organic search traffic, and revenue.



Add a Comment