Do you want to prevent spam from getting on your email list but not sure where to start?
Growing your contact list can be tough. And one of the biggest challenges is making sure your list contains only qualified leads. That way, you can avoid paying your email service provider for contacts that will never become customers.
Plus, your email campaigns will have higher deliverability rates, and you can drive more profit through email marketing best practices.
But how do you keep spambots from filling out your optin forms?
Today, we’re going to teach you how to block spam email signups in 3 ways, including:
- The Honeypot technique
- reCaptcha
- TruLead®
Before we get started, though, let’s take a deeper dive into the advantages of preventing spam email signups before they cause a problem.
Why Spam Email Signups Are So Harmful
A lot of online business owners think of spambots as an annoying and unavoidable part of email marketing. They believe that you’re simply bound to have a few spam email submissions any time you create a form on your website.
But there are 2 key components to spam that they don’t realize:
- Spambots cost businesses loads of money
- There ARE ways to prevent spam from getting onto email lists
Let’s start by addressing that first point.
When it comes to spam getting on your email list, you may think it’s relatively harmless. After all, you’ll send out email campaigns, and your “real leads” will still get all the information they need.
There are a few problems with this thinking, though, which need to be addressed. Here are a few ways that spambot form submissions are costing you money:
- You’re paying too much for your email service provider (ESP): Most ESPs charge you for each email address on your list, even if it’s spam. That means you’ll pay more each month to hold those spambot submissions.
- Your deliverability rates are low: If even a fraction of your contact list isn’t real, it will hurt your email IP reputation because your engagement will be low. When that happens, your deliverability rates suffer, and your email campaigns go to your audience’s spam folder.
- You aren’t driving as much profit with emails: As your deliverability rates get lower, fewer people see your promotional emails since they go to the spam folder. Then your email campaigns end up bringing in less revenue.
At the end of the day, you’ll not only pay more if you let spam email signups go through, but you’ll even earn less.
But the good news is that there are ways to combat spam from filling out your site’s optin forms. And today, we’re going to show you 3 different ways using OptinMonster:
OptinMonster is the world’s #1 lead generation software that lets you prevent spam from getting on your list. We let you create highly targeted optin campaigns (like popups, floating bars, sidebar widgets, and more) that bring in the right leads.
And not only do we help you attract your target audience, but we also give you the right tools to combat spam.
Want to see for yourself? Click below to start using OptinMonster risk-free today:
Now, let’s check out 3 specific ways you can combat spam using OptinMonster.
Prevent Spam Email Signups: 3 Tricks
Method #1: Prevent Spam With the Honeypot Technique
If you’ve been researching “how to combat spam email signups,” then you’ve likely come across something called the “Honeypot” technique.
This is an advanced way for business owners to use HTML, CSS, and JavaScript to prevent spam from making submissions. Here’s how it works:
Spambots fill out every field on your form like name, email address, phone number, and so on. But spambots don’t interact with your form’s CSS.
This means you can create an extra field box on your sign-up form and hide it with CSS. This empty field is called the “honeypot” field.
And because the CSS is hiding your honeypot field, your visitors won’t see it.
Then you simply add some JavaScript to verify that the honeypot field is empty before the form is submitted. If it is empty, you know it was filled out by a real person, and your new contact gets added to your list.
But if the honeypot field is filled out, your JavaScript will prevent the form from being submitted. That’s because, again, only spambots have the ability to fill out this form field.
Sound complicated? Don’t worry.
Because with OptinMonster, a honeypot field is already set up and working behind the scenes for you.
That’s right, OptinMonster natively uses the honeypot technique to help prevent spambots from submitting email addresses to your contact list.
Want to give it a shot? Sign up for your risk-free OptinMonster account today!
Method #2: Combat Spam With reCAPTCHA
If you’ve been trying to prevent spam email signups, then you’ve likely heard about using reCAPTCHA.
reCaptcha is a free service provided by Google that uses a “CAPTCHA” test to tell the difference between spambots and humans.
And when you’re using OptinMonster, adding reCAPTCHA couldn’t be easier. Here’s how it works:
Step 1: Sign up for Google’s reCAPTCHA
First, you need to sign up for Google’s reCAPTCHA. That way, you can get your Site Key and Secret Key, which you’ll need later.
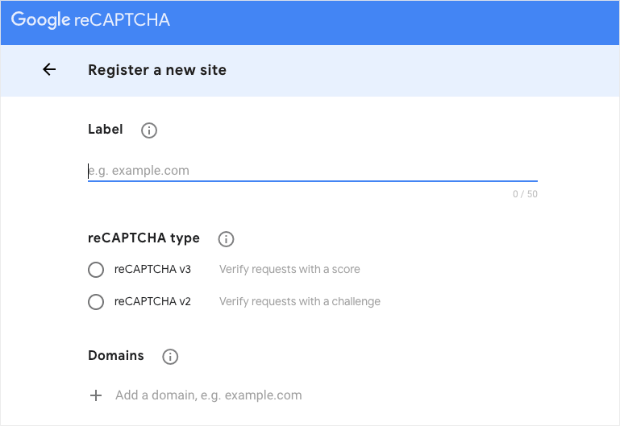
Head over to Google’s reCAPTCHA sign-up page to get started. You’ll need to fill out a few fields, such as:
- Label
- reCAPTCHA v2 (to verify a request with a score) or v3 (to verify a request with a challenge)
- Domains
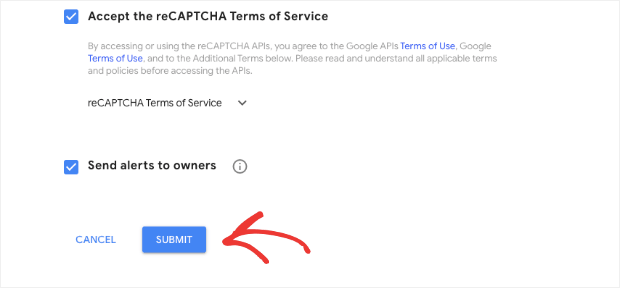
Then, you’ll accept reCAPTCHA’s Terms of Service and click Submit:
This will generate your Site Key and your Secret Key:
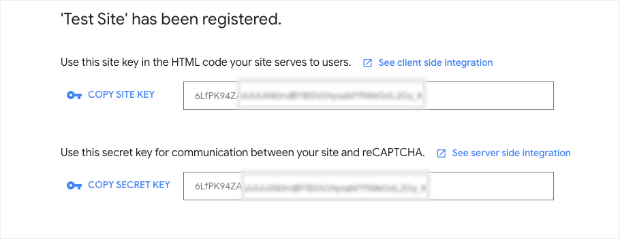
Keep this tab open so you can access both keys in a moment. Then head over to your OptinMonster dashboard.
Step 2: Integrate reCAPTCHA With Your Site
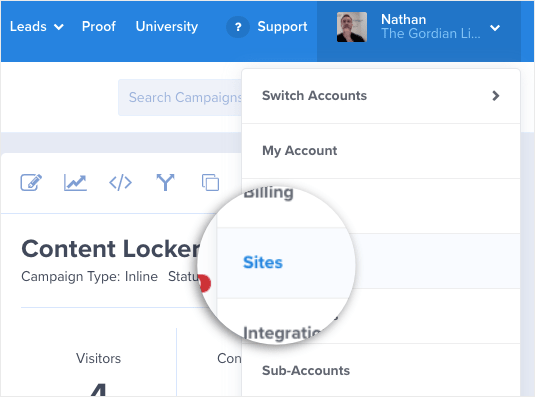
In your OptinMonster dashboard, go to your account’s drop-down menu in the upper right-hand corner and click Sites:
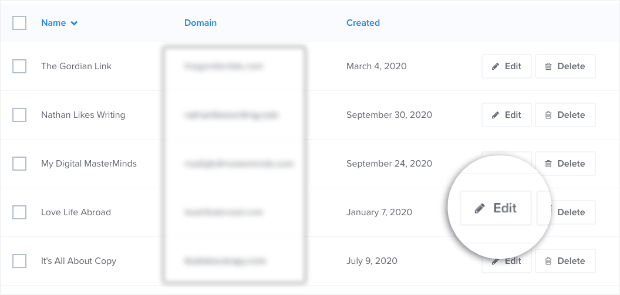
Then locate the domain for which you just created reCAPTCHA with Google. Click Edit next to that domain:
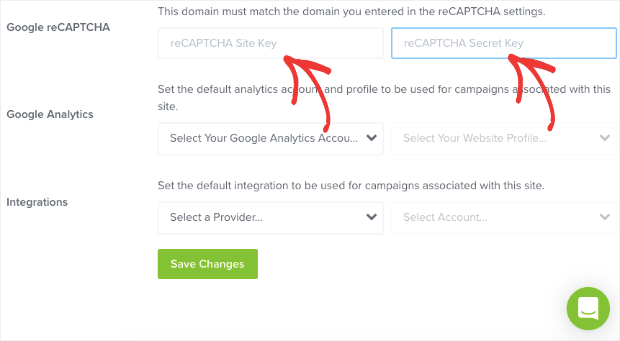
Scroll down to the Google reCAPTCHA fields where you can enter your Site Key and your Secret Key:
When you’re done, click Save Changes.
Now, you’ll return to your dashboard, look at your campaigns, and make sure reCAPTCHA is enabled.
Step 3: Activate reCAPTCHA on Your Campaign
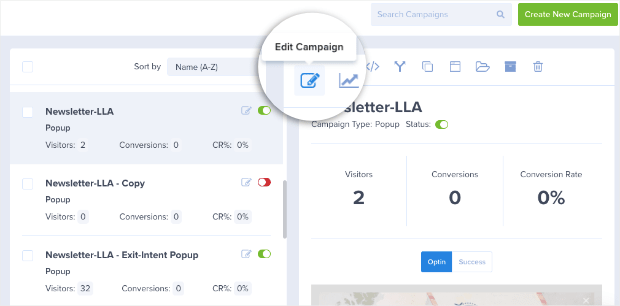
In your OptinMonster dashboard, select the campaign that you want to add reCAPTCHA to and pull it up in your editor by clicking the Edit Campaign icon:
If you don’t have a campaign built already, no problem. Check out this helpful post on creating your first campaign with OptinMonster.
In your editor, click on the campaign’s submission button to pull up the editing tools for your optin block on the left-hand side:
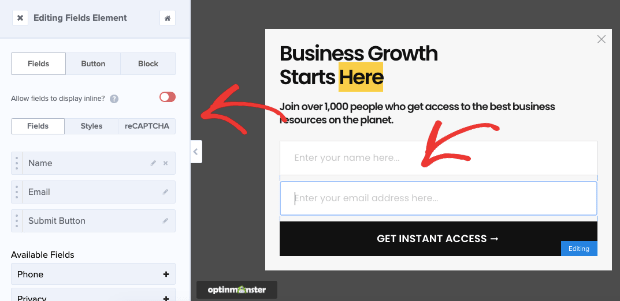
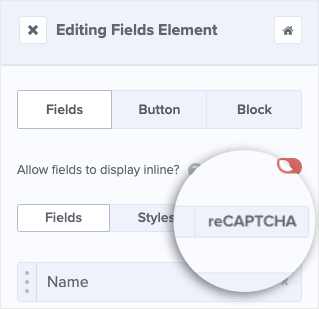
Then, click reCAPTCHA from the left-hand side menu:
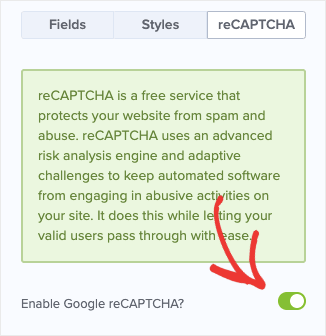
And you’ll see a toggle switch that is turned ON, showing that reCAPTCHA is enabled:
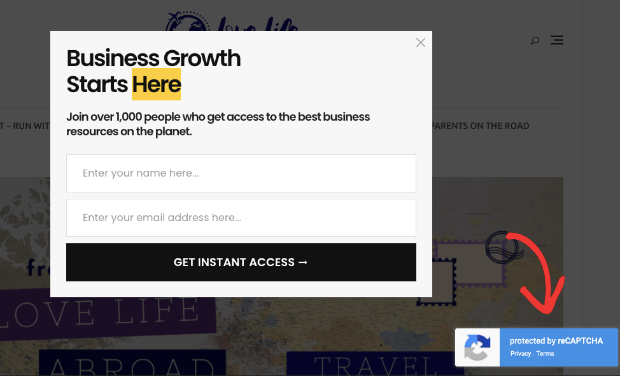
Now you’ll see that your campaigns have reCAPTCHA added when published:
And that’s it! You are now using reCAPTCHA to combat spambots from filling out your optin forms.
For a more detailed guide, check out this post on how to add reCAPTCHA to your OptinMonster campaigns.
Finally, let’s look at one more method you can use.
Method #3: Block Spam Email Signups With TruLead®
Another way you can block spam is with OptinMonster’s unique Lead Verification feature called TruLead®.
TruLead® is an original algorithm that verifies your leads before they’re submitted to your email contact list. It allows you to block:
- IP addresses
- Temporary emails
- Free emails
- Strings, patterns, and characters in email addresses
- Role-based emails (help@, support@, info@)
And more. It even autocorrects typical misspellings from popular email service providers like Gmail, Yahoo, Hotmail, and others.
TruLead® is hands down the best way to prevent spam email signups from happening. That’s because you can create unique filters with specific criteria for someone to submit leads to your contact list.
Then you can rest assured that all your leads will be qualified. And the best part is that TruLead® is ridiculously easy to set up. Let’s see how you can get started today.
Step 1: Activate Lead Verification With TruLead®
In the upper menu of your OptinMonster dashboard, click Leads » Lead Verification:
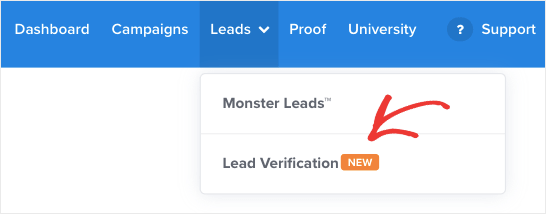
Then you’ll be taken to a sign-up page. This page will tell you about the benefits of TruLead® and give you some information on how the algorithm helps businesses save and earn more money.
At the bottom of the page, hit Click Here to Enroll:
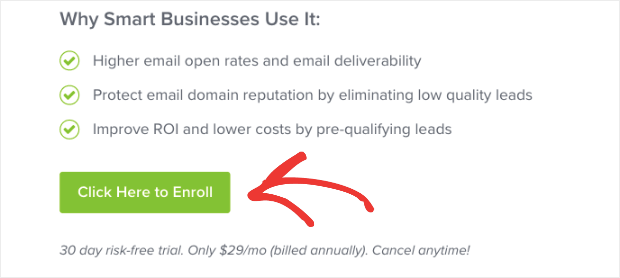
You can start a 30-day risk-free trial. Then, we’ll notify you when your trial is about to expire so you can test our TruLead® with zero risk.
Once you’ve enrolled, you’ll be taken to your Lead Verification dashboard:
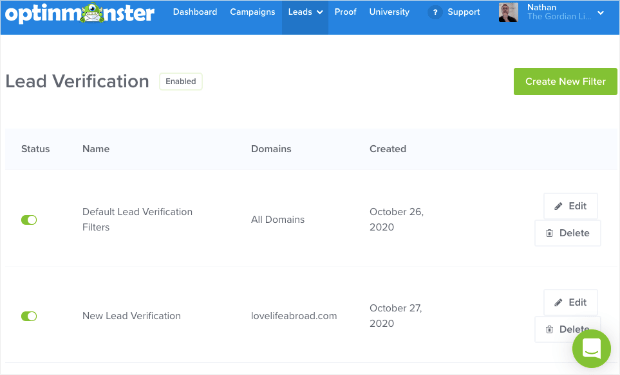
Then you’ll need to create a filter.
Step 2: Create a Filter
In the upper right-hand corner of your Lead Verification dashboard, click Create New Filter:
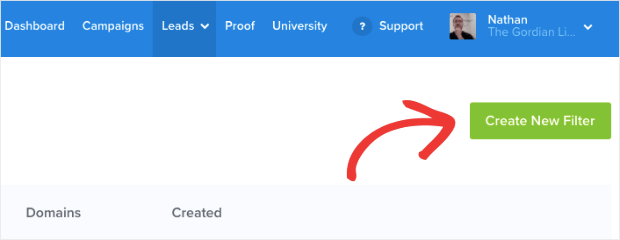
Then you’ll be taken to your filter configuration settings where you can:
- Give your filter a name
- Connect it to a domain
- Block IP addresses
- Block strings and characters
- And much more
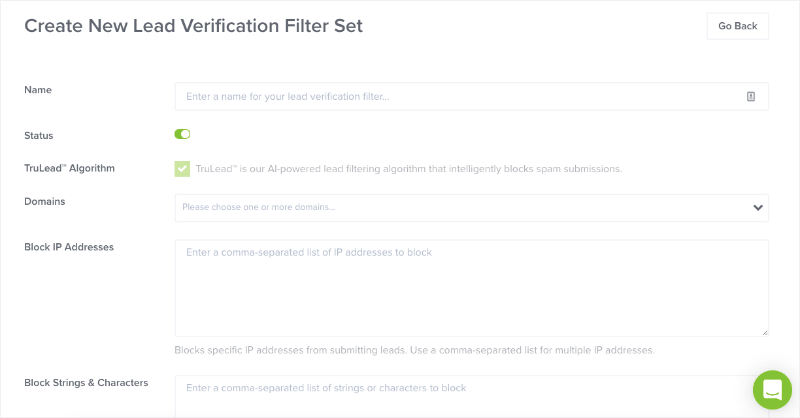
As you scroll down, you’ll see even more options for setting up your Lead Verification feature, such as:
- Autocorrect emails (this is activated by default)
- Block temporary emails
- Block role-based emails
- And much more
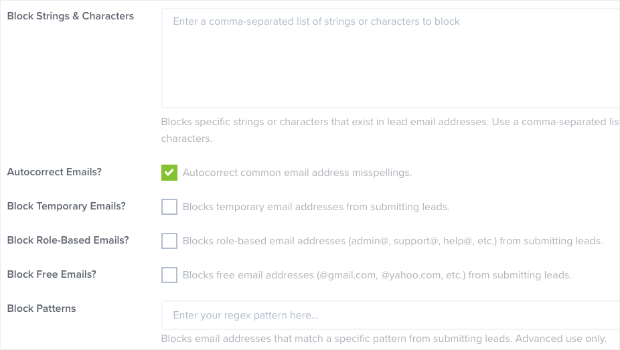
All of these settings are designed to make sure your leads are properly verified. That way, you can drive more revenue from your email marketing campaigns.
When you’ve finished setting up your filter, click Create Filter:

Now your Lead Verification filter is ready to go. So let’s say you created a filter to block free email addresses from providers like Gmail, Hotmail, Yahoo, and so on.
When your visitors try to enter a free email address (instead of their professional one), they’ll get an error message from your optin form:
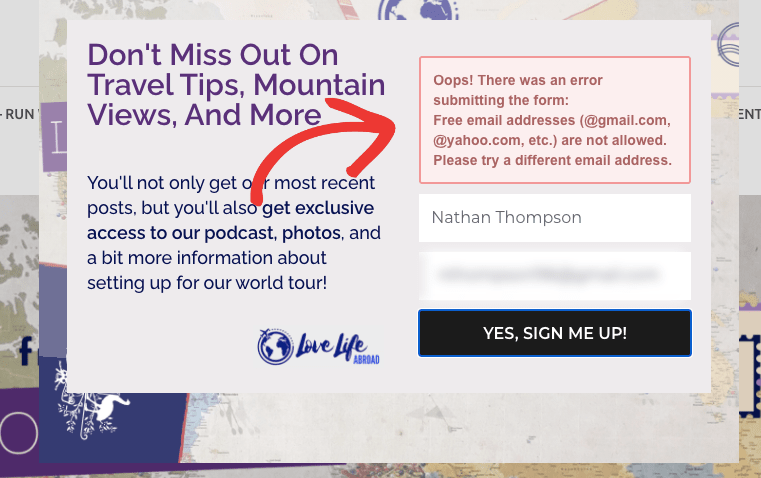
This lets them know why the form won’t be submitted and how they can fix it.
The next step is to review your rejected leads to make sure the filter works how you want it to.
Step 3: Review Your Rejected Leads
One of the best features of TruLead® is that it stores your rejected leads for 30 days. That means you can manually review rejected submissions and delete them or add them to your list.
Go back to Leads » Lead Verification:

Scroll down until you see the list of rejected leads:
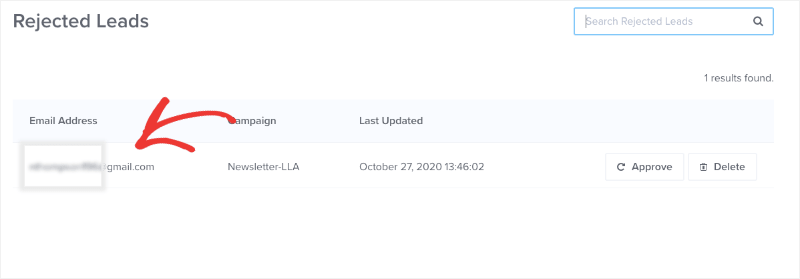
Once you’ve determined if this is spam or not, then you can manually approve or delete the new lead:
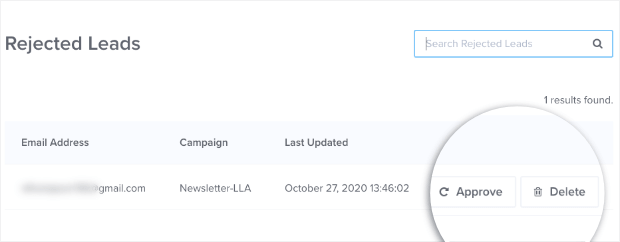
This gives you 100% control over your Lead Verification process. It ensures that you’re only filling your list with the highest quality leads.
If you need more help getting started, read this in-depth guide with step-by-step instructions on how to get started with OptinMonster’s TruLead® Lead Verification system.
Want to give it a shot? Sign up for your risk-free OptinMonster account by clicking below and get started with TruLead® FREE for 30 days:
And that’s it! These are 3 concrete ways you can prevent spam email signups from interfering with your email marketing straegy.
If you use the methods covered in this post, we guarantee you’ll save money through your ESP, improve your deliverability rates, and drastically increase profits.
We hope you found this article helpful. If so, you may also want to read the following resources:
- How to Run a Successful Email Marketing Campaign
- Email Marketing for Beginners: A Step by Step Guide
- How to Create an Effective Email Autoresponder Series
- Why Are My Emails Going to Spam?
These posts will have everything you need to grow and monetize your email list.
Ready to get started? Sign up for OptinMonster today!



Add a Comment