Looking to create an email signup popup that connects to Salesforce Marketing Cloud Account Engagement (MCAE)?
MCAE, formerly known as Pardot, is a powerful B2B marketing automation tool by Salesforce. By using a popup with MCAE, you can quickly grow your leads, sales, and revenue.
Today, we’ll teach you how to build a MCAE popup that converts your visitors into leads and customers.
What is an MCAE Popup?
Salesforce’s Marketing Cloud Account Engagement is a marketing automation software for B2B companies.
One of the services they provide is email marketing, an integral tool for B2B lead generation.
MCAE makes it incredibly easy to run effective email campaigns. It lets you
- Build beautiful emails with an easy-to-use editor
- Personalize campaigns based on how your subscribers interact with your business
- Split test emails to identify the best messages and offers
With MCAE, you can send bulk emails about sales, product launches, and new content.
In short, MCAE gives you everything you need to run successful email campaigns. Well, almost everything.
Before you can have a successful email campaign, you first need subscribers.
That’s where an MCAE popup fits in.
An MCAE popup is an email signup form that’s linked to your MCAE account. It appears on your website and covers your content to grab your visitor’s attention. So, when your site visitor completes your optin form, those leads are automatically sent to your MCAE database.
Do popups work?
Smart popups fill your list with the kinds of subscribers who are more likely to turn into paying customers.
OptinMonster is the easiest way to build an MCAE popup that will increase your conversions. It allows you to quickly design popups with a drag-and-drop builder and eye-catching templates.
With Optinmonster, you get multiple campaign options, like lightbox popups, floating bars, fullscreen mats, and slide-in scroll boxes.
It’s incredibly easy to use. And it works!
Reliablesoft.net, which provides digital marketing services to companies, used OptinMonster’s prebuilt templates to increase conversions by 300%.
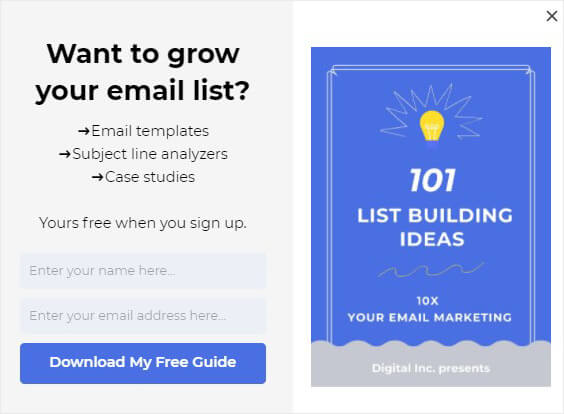
Today, we’ll create an MCAE popup like this:
And you’ll be able to do it in just 20 minutes! Let’s get started.
Design Your Popup With OptinMonster
You’ll need an OptinMonster account for this tutorial.
It’s 100% risk-free because you’ll get a 14-day money-back guarantee. Ready? Sign up for your OptinMonster account below.
Let’s dive into the tutorial!
Step 1: Create an OptinMonster Campaign
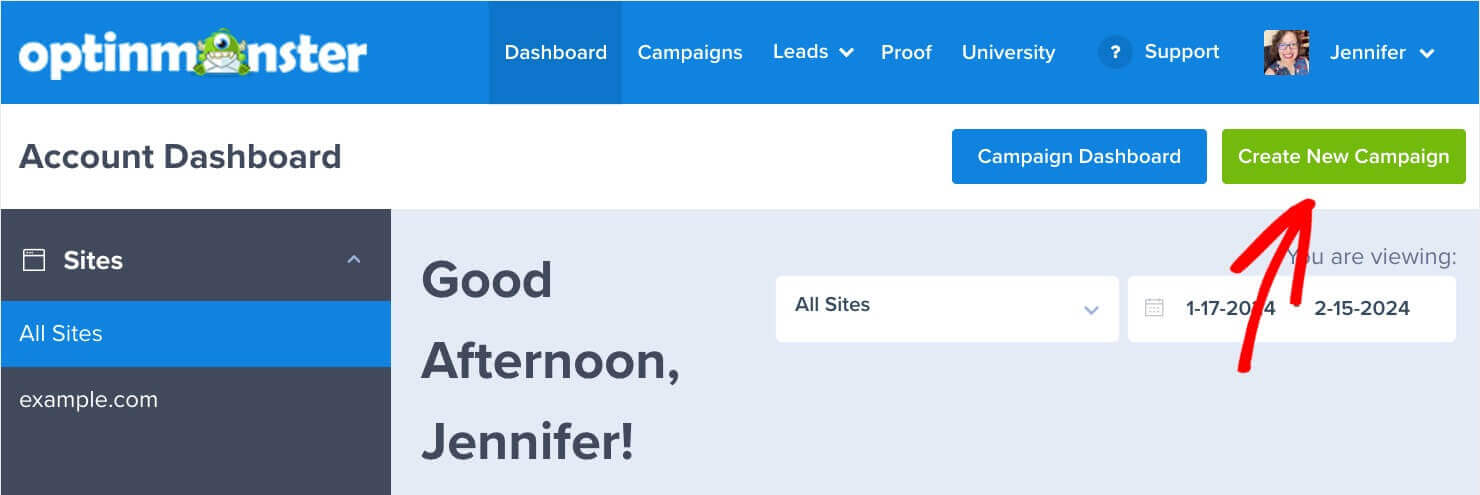
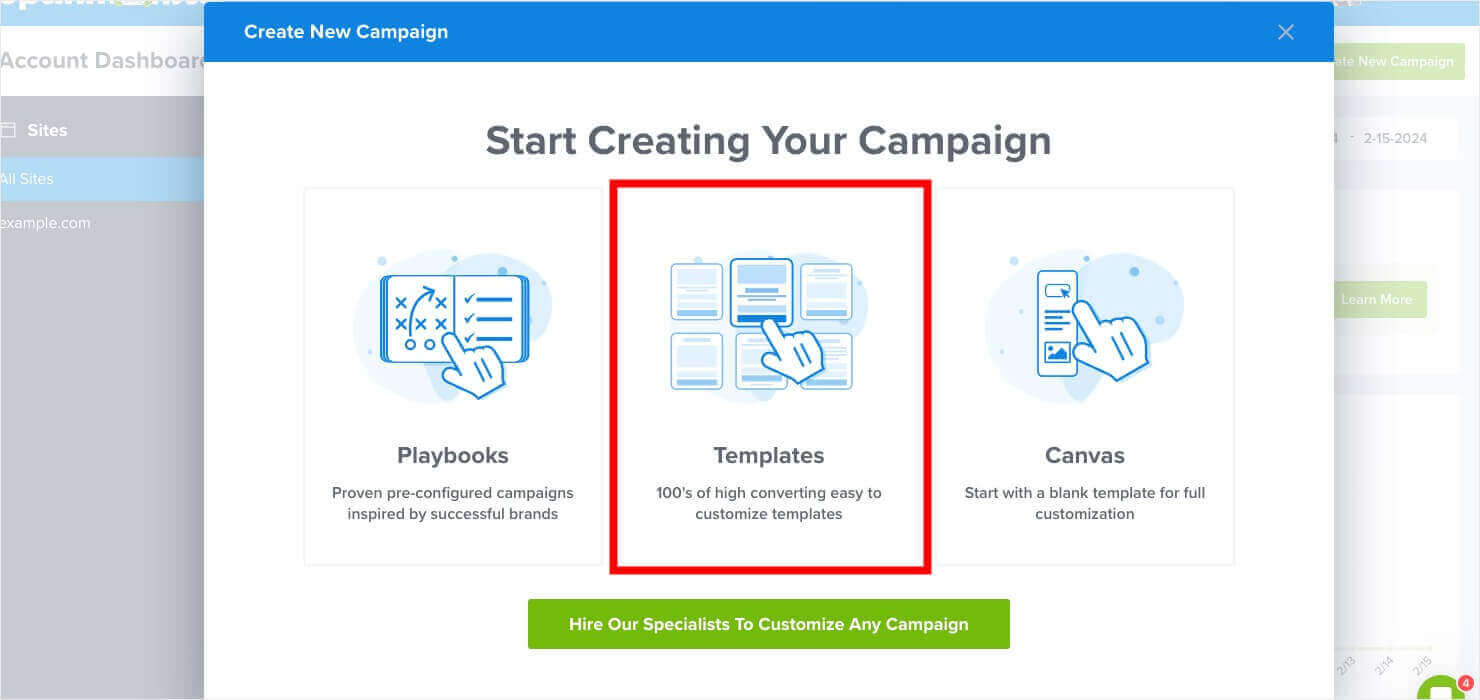
After you’ve logged into your account, the first thing you need to do is click Create New Campaign.
With OptinMonster, you can start with one of our 100+ premade templates, or you can design your own campaign from scratch. Today, we’re going to select Templates.
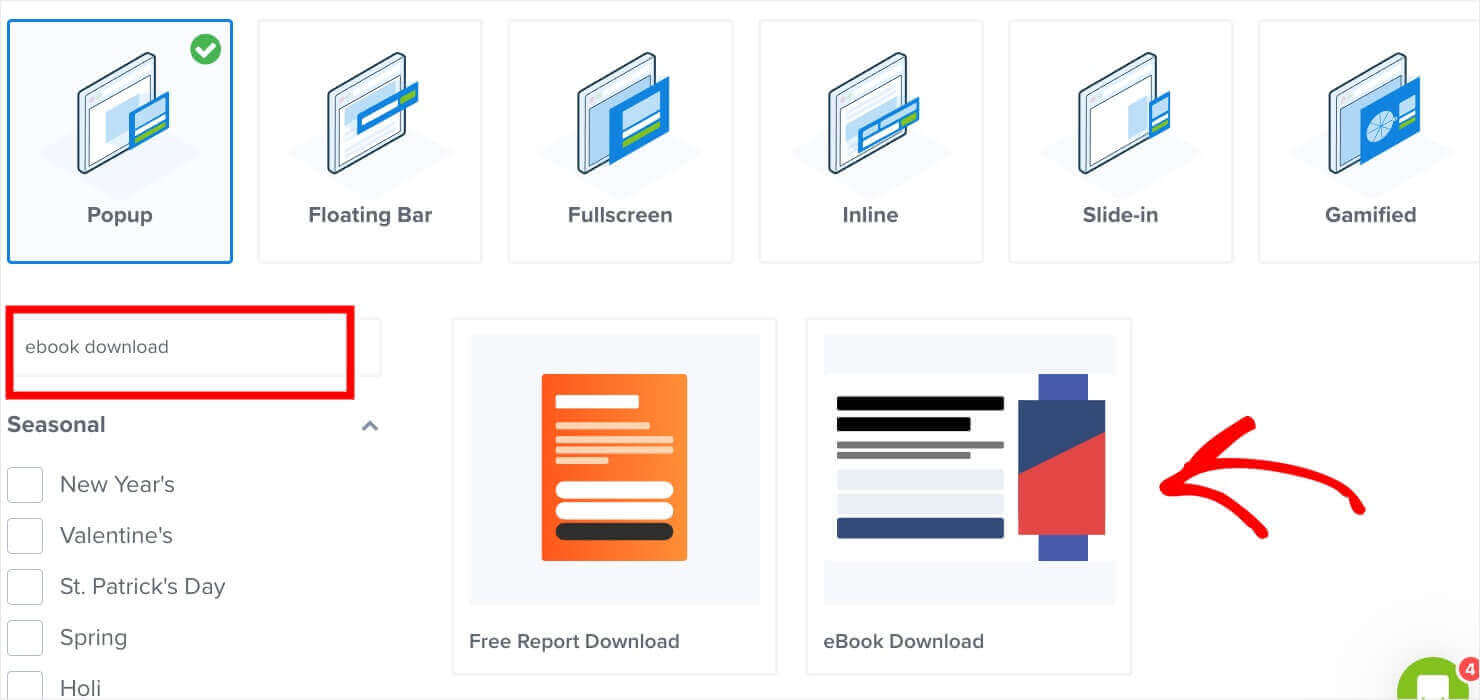
Now, you’ll need to choose the Popup campaign type, which should be the default.
In the Search Templates search box, type in “ebook download.” Then choose the eBook Download template.
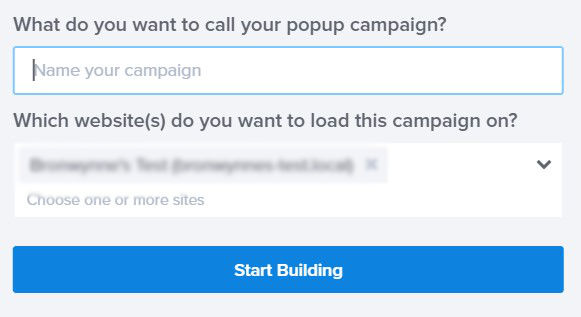
After this, you’ll be prompted to name your campaign and choose which website you want it displayed on.
Click Start Building to enter the OptinMonster editor.
The next step is to customize your popup.
Step 2: Design Your Popup
It’s really simple to design your popup in OptinMonster’s campaign builder, even if you have no design experience.
You can easily customize the colors, fonts, images, and anything else about the popup campaign.
You’ll spend minutes instead of hours building the perfect MCAE popup.
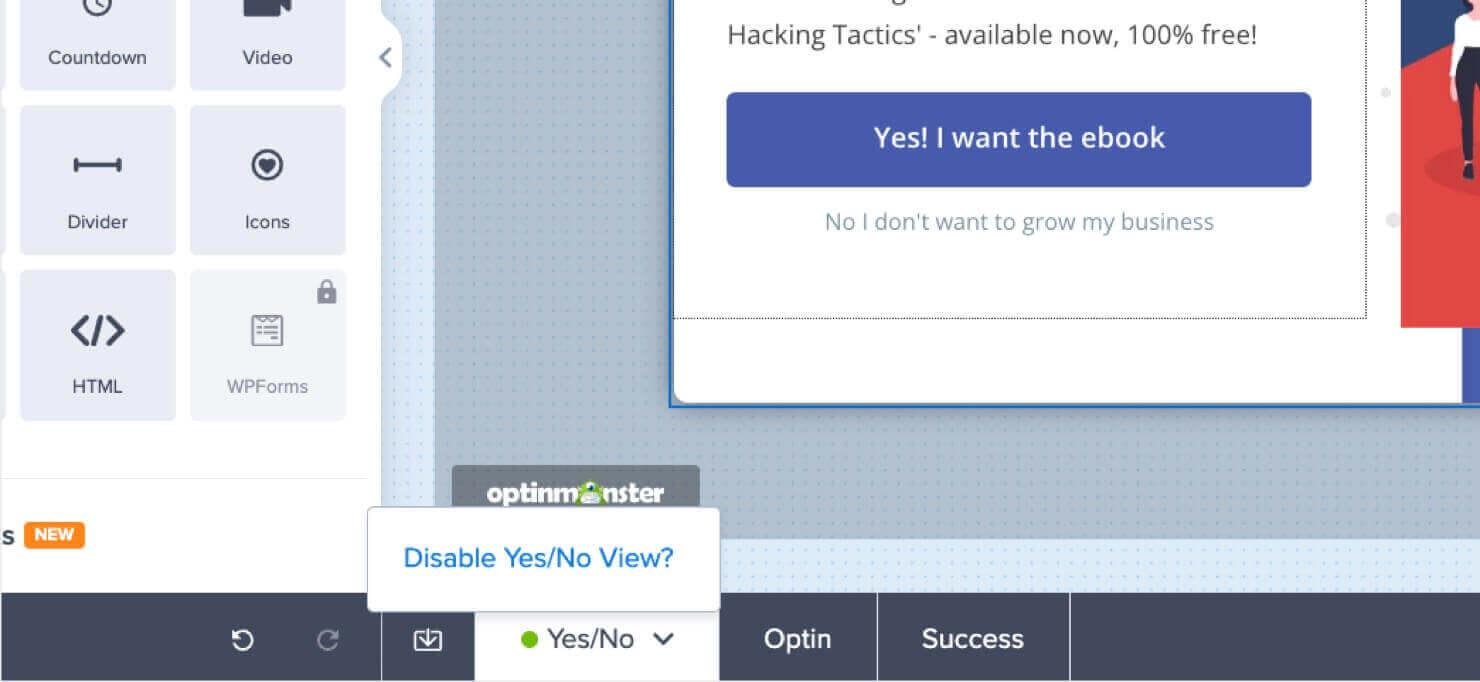
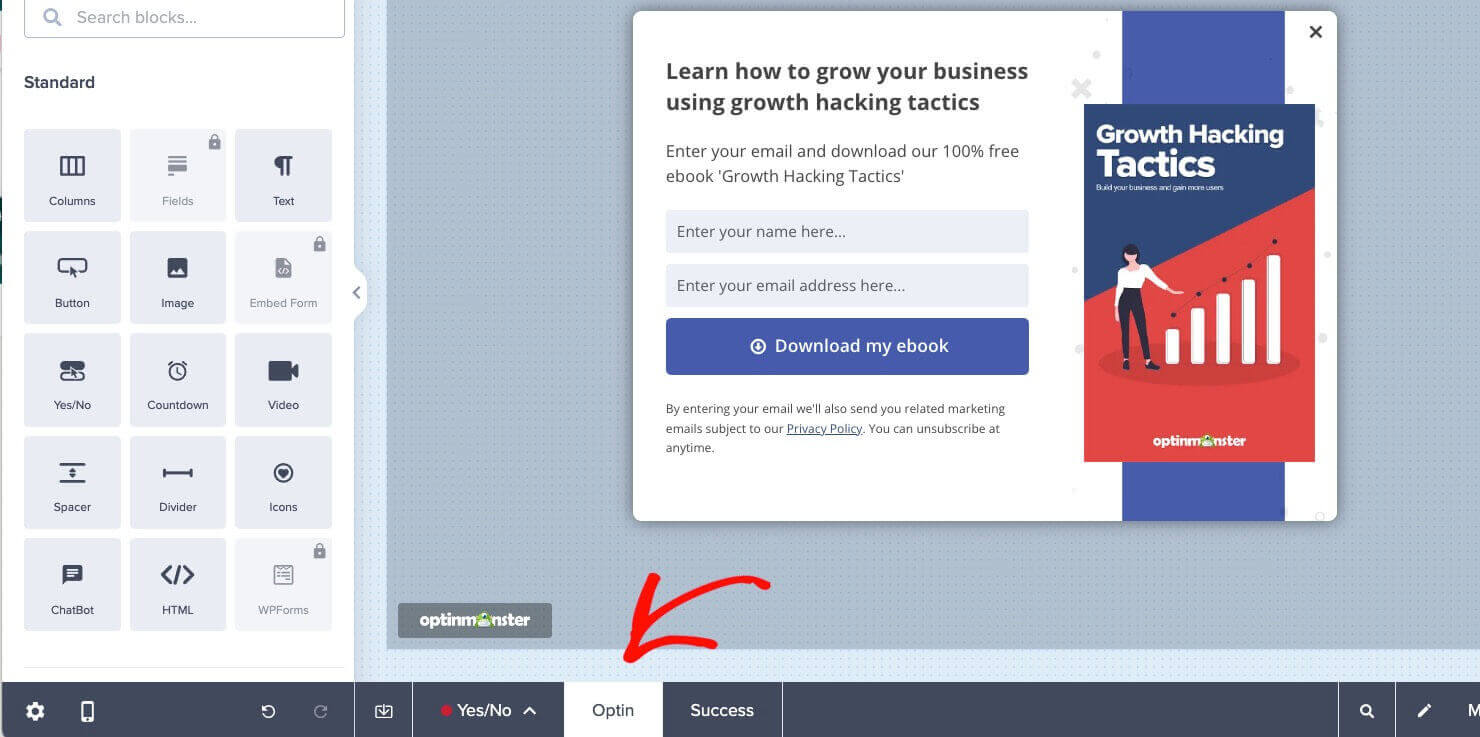
For the popup we’re making today, click on the arrow in the Yes/No tab at the bottom of the campaign builder. Then select Disable Yes/No View.
Now, click the Optin tab to edit your popup. For this campaign, we want to start out with the view where we ask for a name and email address.
Simply click on any part of your popup to change it. That will pull up the editing tools on the left.
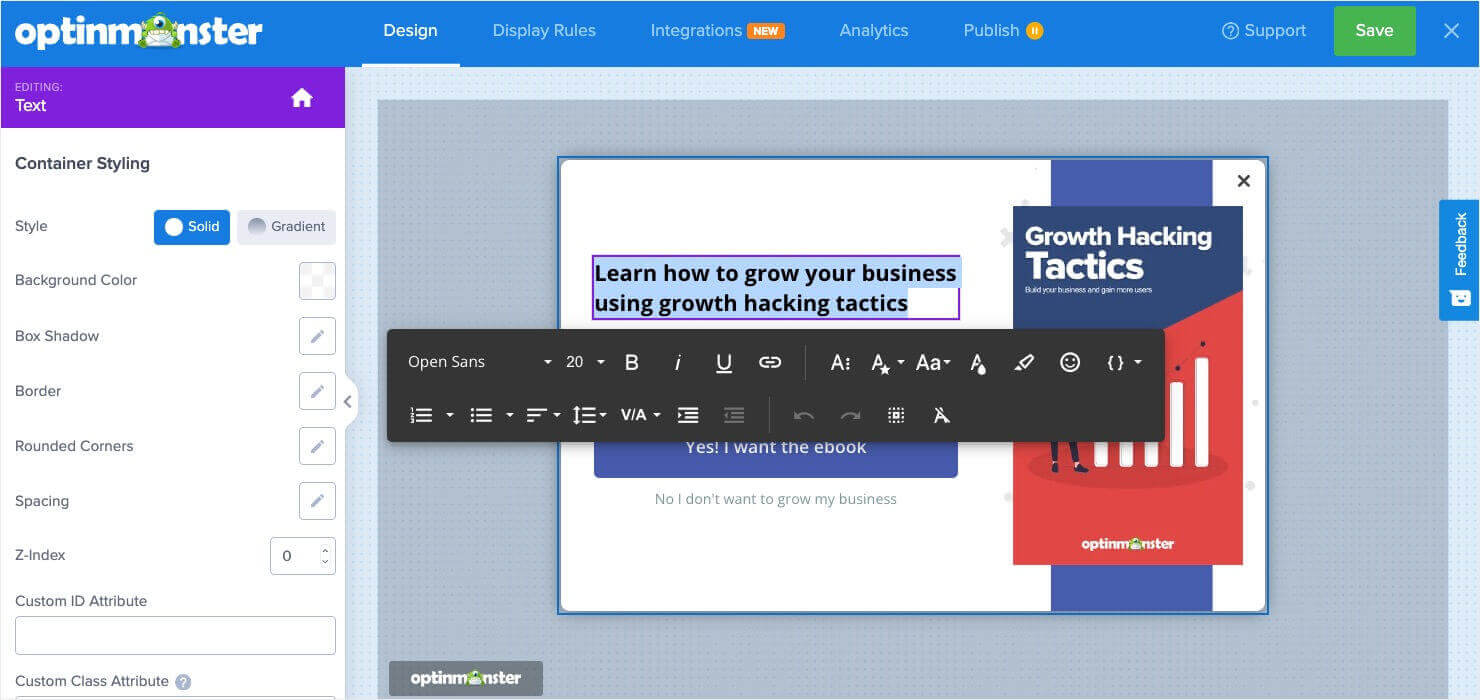
So, to change the text, just click on the text block. Highlighting the text will bring up even more options in the text editing toolbar.
Using the editing tools, you’ll be able to change the font, color, size, and alignment of the text.
Keep in mind you want to grab the reader’s attention with the right headline and call to action.
Understanding your audience is key.
Your site visitors will want your lead magnet if it helps them solve a problem or achieve a quick win.
Crafting concrete buyer personas is a good way to focus on your content for the needs of your target audience.
Along with great copy, you want to add an image.
To change the image, click on the image block in your campaign. Then click on the image in the left sidebar.
You’ll then be prompted to upload a new image.
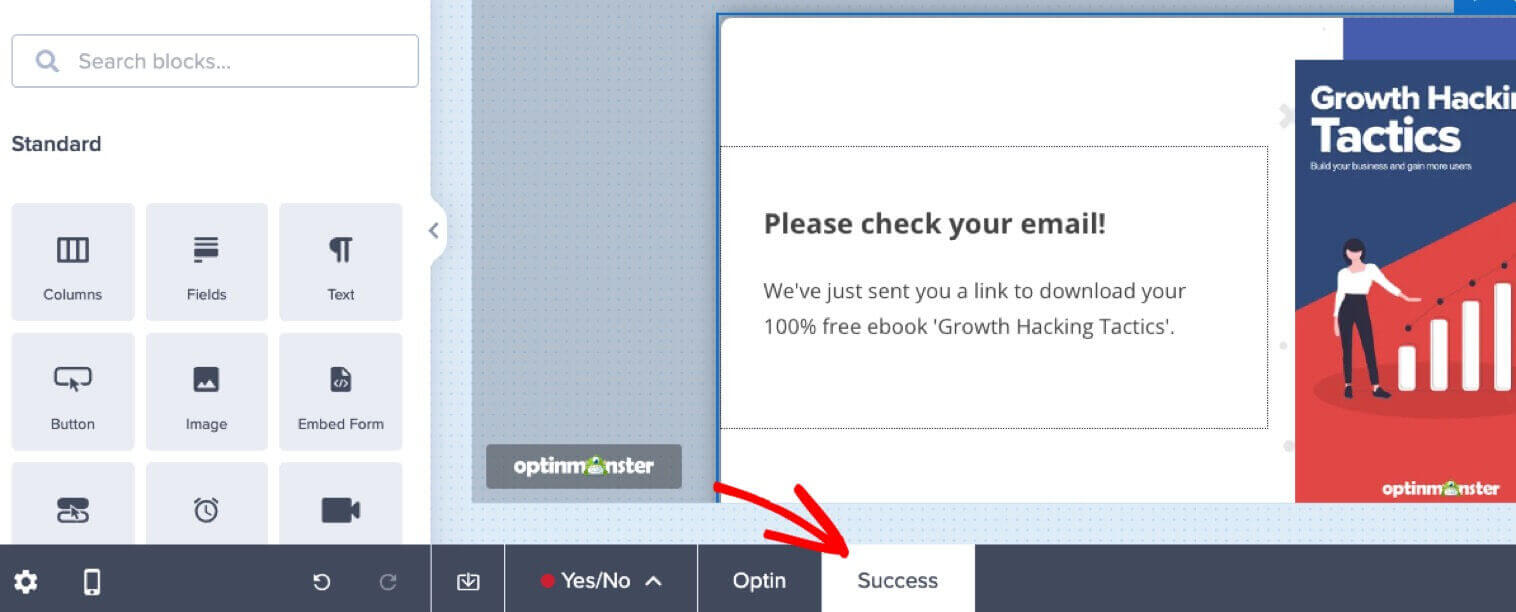
Once you have the image and text in the Optin View designed to your liking, then go to the Success View to customize what your visitors will see after entering their information.
You can edit the Success view in the same way you edited the Optin view.
If you need help, check out these articles:
- Popup Design Inspiration: 10 Beautiful and High-Converting Email Popups
- 63-Point Checklist for Creating the Ultimate Optin Form (with Examples)
Once you’re happy with the design of your popup, click Save.
Now you’re ready to decide where and when to display your popup.
Step 3: Display Your Popup
Even if you’re marketing to other businesses, you’re still targeting real people.
So, a generic popup campaign isn’t going to deliver the results you want.
What you want is to show the right offer to the right person at the right time.
One of the advantages of OptinMonster is that it gives you total control over where and when you display your popup.
This is possible with triggers and targeting rules.
Targeting lets you display campaigns based on your visitor’s:
- Physical location
- Device they’re using to browse
- Referring site
Triggers use your site visitor’s behavior to show popups:
- When they’re about to leave your site
- After they’ve spent a certain amount of time on your site
- Once they click a link or image
In this tutorial, we’ll be using 2 different targeting rules: Exit Intent and Page Level Targeting.
Exit Intent®
Exit intent triggers a popup as your visitor is about to leave your site.
It’s a great way to show your visitor a targeted offer one last time before they leave your site.
IMSource increased their list by 4,250% using exit intent popups!
Head over to Display Rules.
Select Exit Intent®.
Exit popups are one of the most powerful ways to increase your conversions.
For more, check out this article: 40 Exit Popup Hacks That Will Grow Your Subscribers and Revenue
Page Level Targeting
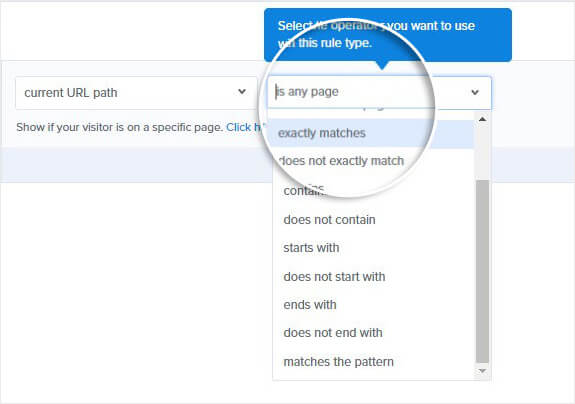
You’ll also need to select which page you want to display your popup.
You could use Page Targeting to only show your popup on certain pages. For instance, you might want to display your popup on pages about email list building.
Save your campaign again once you have the display rules set to your liking. Now it’s time to integrate OptinMonster with Salesforce Marketing Cloud Account Engagement.
Note: Leave your OptinMonter campaign open in a tab or window. You’ll need to come back to it later. If you lose track of your campaign, you can navigate back to it in the Campaign Dashboard.
Integrate Salesforce Marketing Cloud Account Engagement with OptinMonster
Syncing OptinMonster with MCAE requires a few steps, but it’s fairly simple.
Step 1: Retrieve Your Business Unit ID in MCAE
First, you’ll need to sign in to your Salesforce MCAE account. Click the Cog Icon in the upper right corner and select Setup. We’ll remain in the Setup section throughout this part of the tutorial.
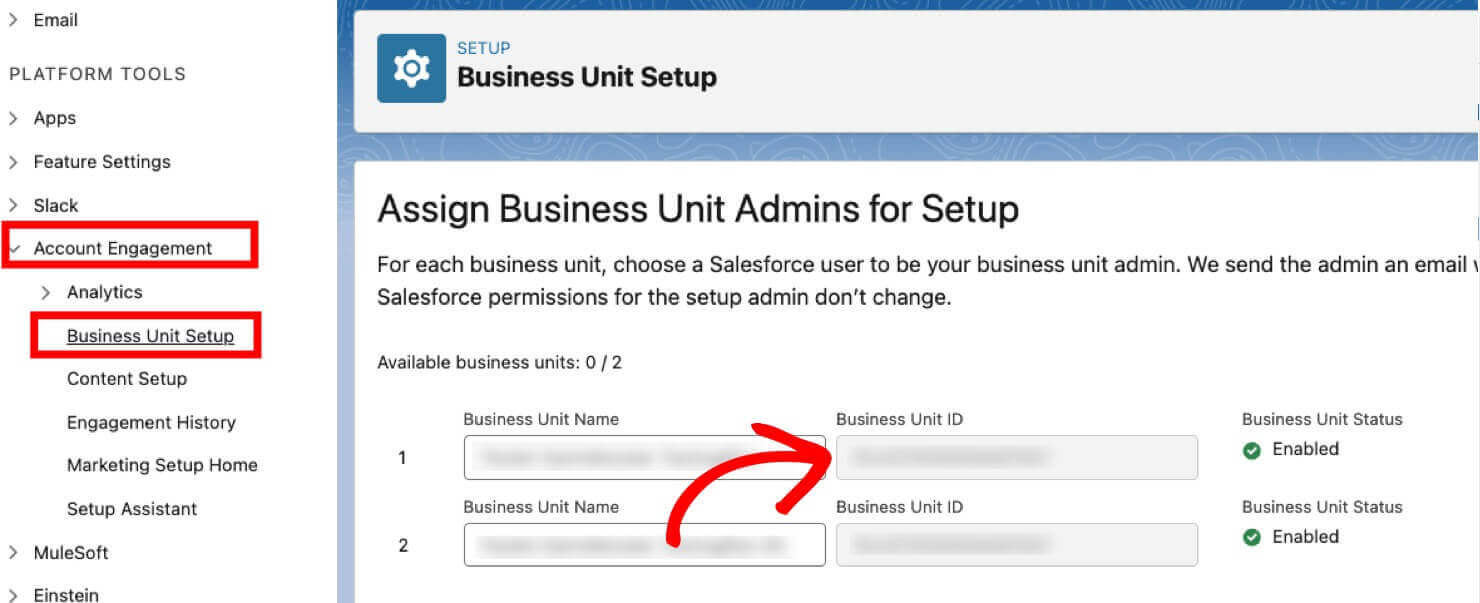
Next, you’ll want to retrieve your Business Unit ID.
To find it, click Account Engagement>Business Unit Setup. Copy your Business Unit ID and save it for later.
Step 2. Create Connected App
Still in the Setup section, click on Apps>App Manager in the left sidebar.
Next, click the New Connected App button in the upper right corner.
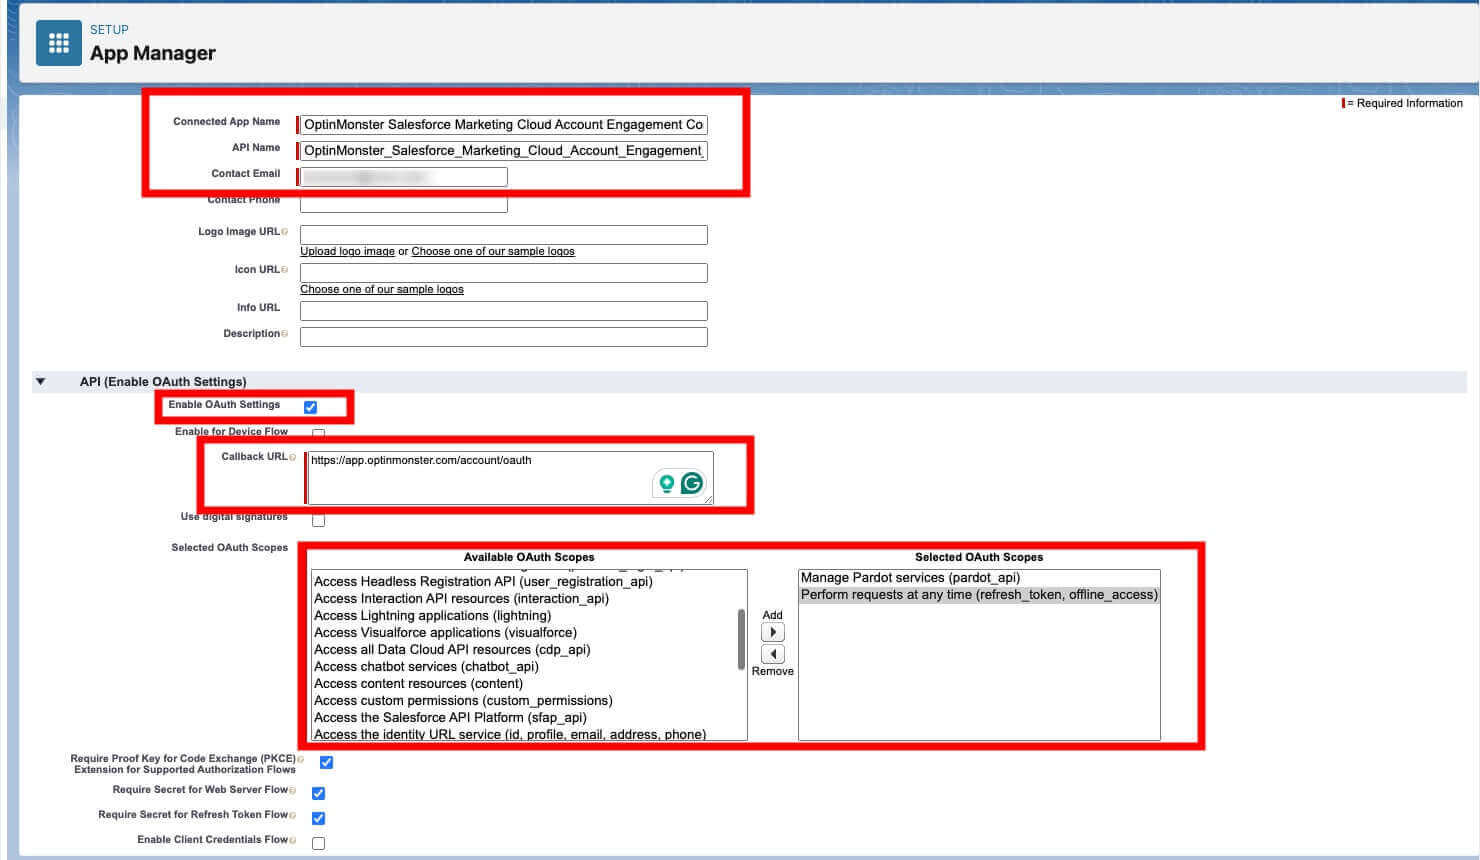
While creating the new connected app, follow these steps:
- Connected App Name: We recommend using “OptinMonster Salesforce Marketing Cloud Account Engagement Connect“
- API Name: This field will be automatically populated
- Contact Email: This field is required for any app you create in Salesforce
- Enable OAuth Settings: This checkbox must be enabled
- Callback URL: Enter this URL: https://app.optinmonster.com/account/oauth
- Selected OAuth Scopes: Add the following scopes (highlight each scope, then click the “Add” arrow):
- Manage Pardot services (pardot_api): Allows OptinMonster to connect to the Pardot/MCAE API.
- Perform requests at any time (refresh_token, offline_access): Allows OptinMonster to fetch a new access token when it expires. Without this, the OptinMonster integration will fail after the token expires.
Now, click Save at the top of the page. You will likely see a message indicating that it may take 2-10 minutes for your changes to take effect.
Step 3. Retrieve Client Key and Client Secret
Next, you’ll need to retrieve your Client Key and Client Secret before you can integrate with OptinMonster. For this step, you’ll navigate back to the Apps>App Manager in the Setup section.
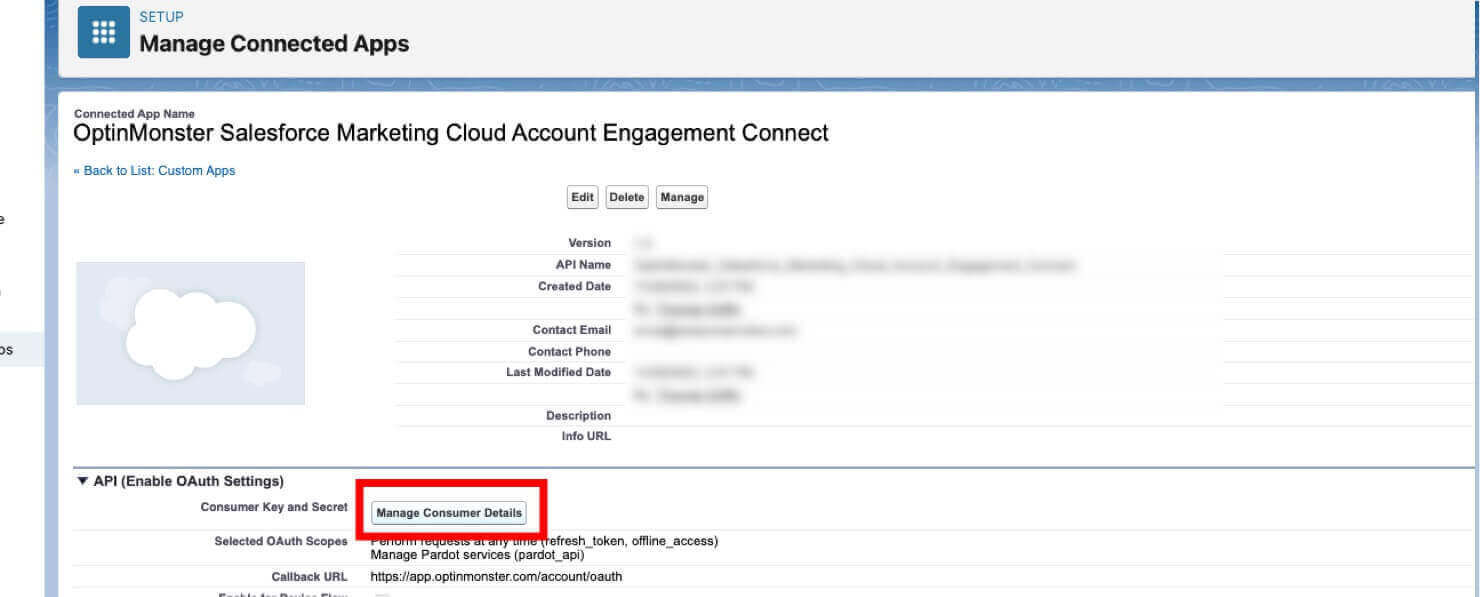
You should see your new connected app in your list of apps. Click the Drop-Down Arrow to the right of your app, and select View.
Under API (Enable OAuth Setting), click the Manage Consumer Details button.
Here, you’ll see the Consumer Key and Consumer Secret. You’ll need these in the next section, along with the Business Unit ID you retrieved earlier.
Step 4. Integrate With OptinMonster
You’ve created your connected app in Salesforce MCAE, and you’ve retrieved the necessary codes. Now, you’ll go back to your OptinMonster campaign to complete your integration.
Head over to the Integrations tab at the top of your editor.
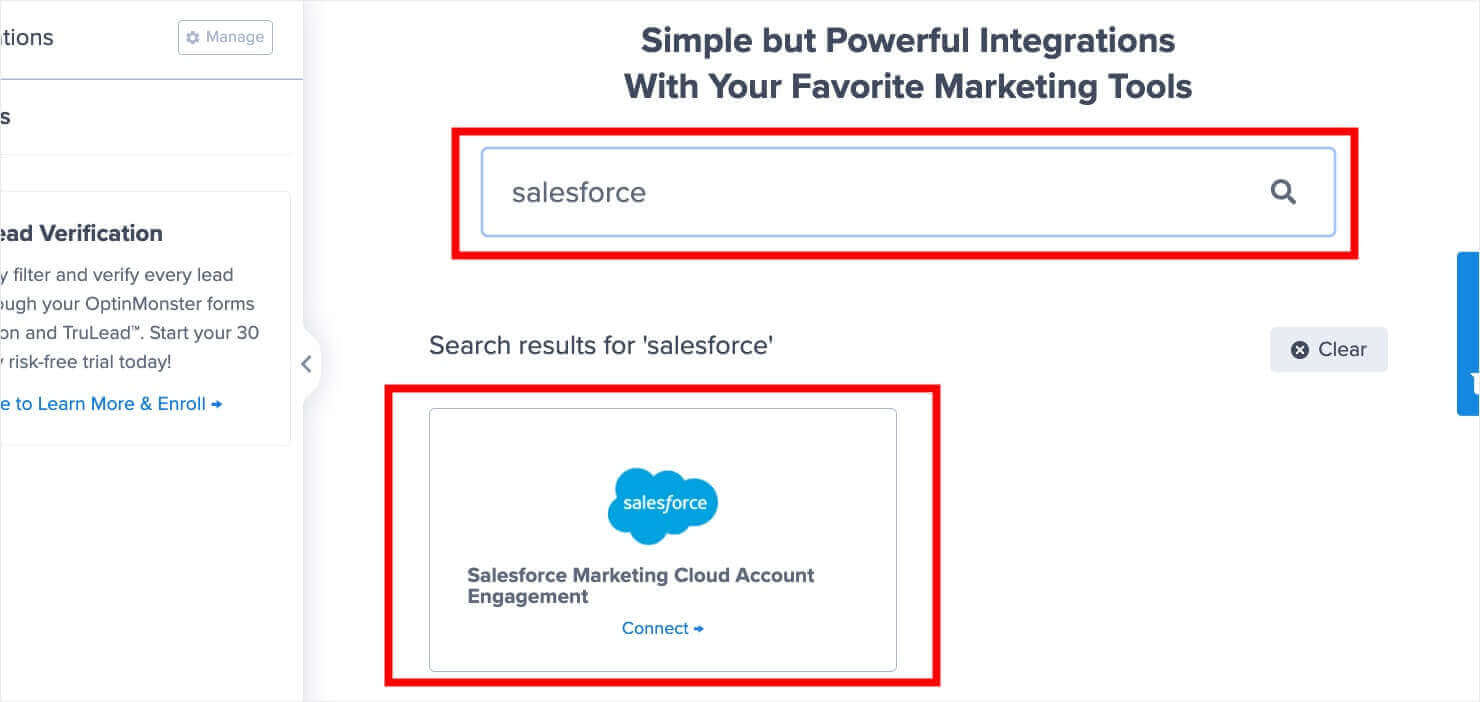
Click the Add a New Integration button in the left sidebar.
Type “salesforce” into the search box, and select Salesforce Marketing Cloud Account Engagement.
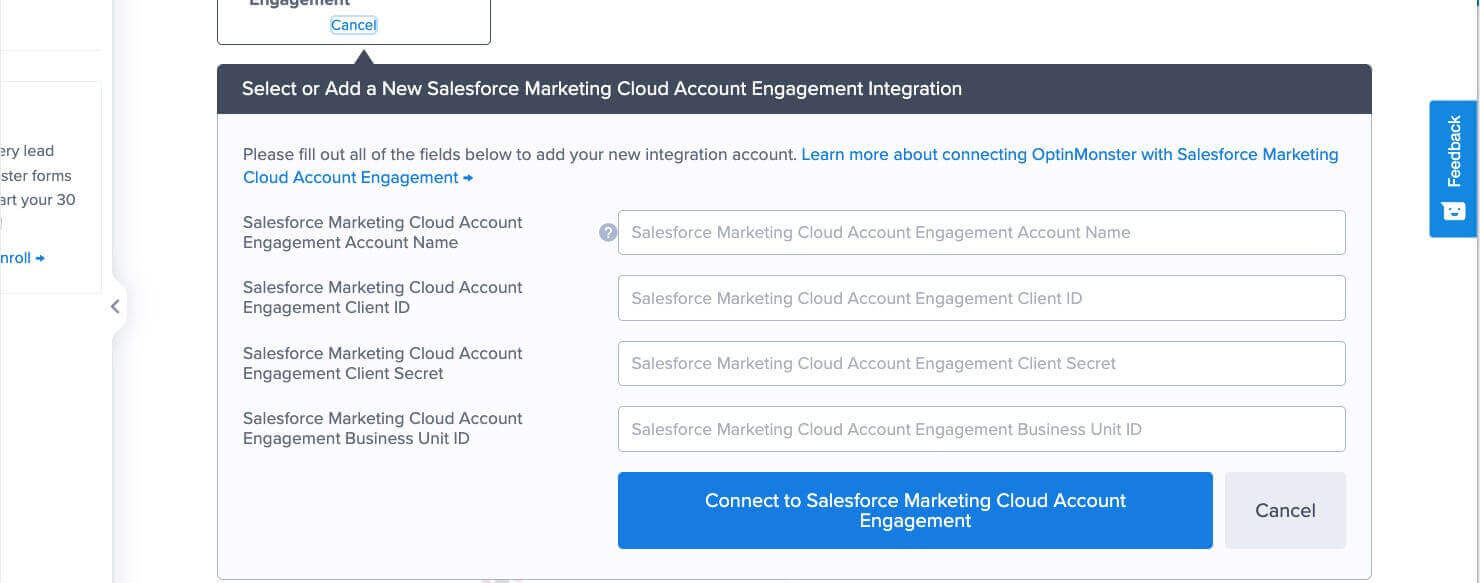
Now, you’ll need to pull up the codes that you retrieved from your MCAE account and enter them into the integration form:
- Salesforce Marketing Cloud Account Engagement Account Name: This can be anything that helps you identify the specific integration within OptinMonster. It’s possible to add more than one Salesforce Marketing Cloud Account Engagement integration to your account and this is an easy way to differentiate between them when assigning integrations to individual campaigns.
- Salesforce Marketing Cloud Account Engagement Client ID: This is where you enter the Consumer Key.
- Salesforce Marketing Cloud Account Engagement Client Secret: This is where you enter the Consumer Secret.
- Salesforce Marketing Cloud Account Engagement Business Unit ID: This is where you enter the Business Unit ID.
Once you’ve filled out these fields, click the Connect to Salesforce Marketing Cloud Account Engagement button.
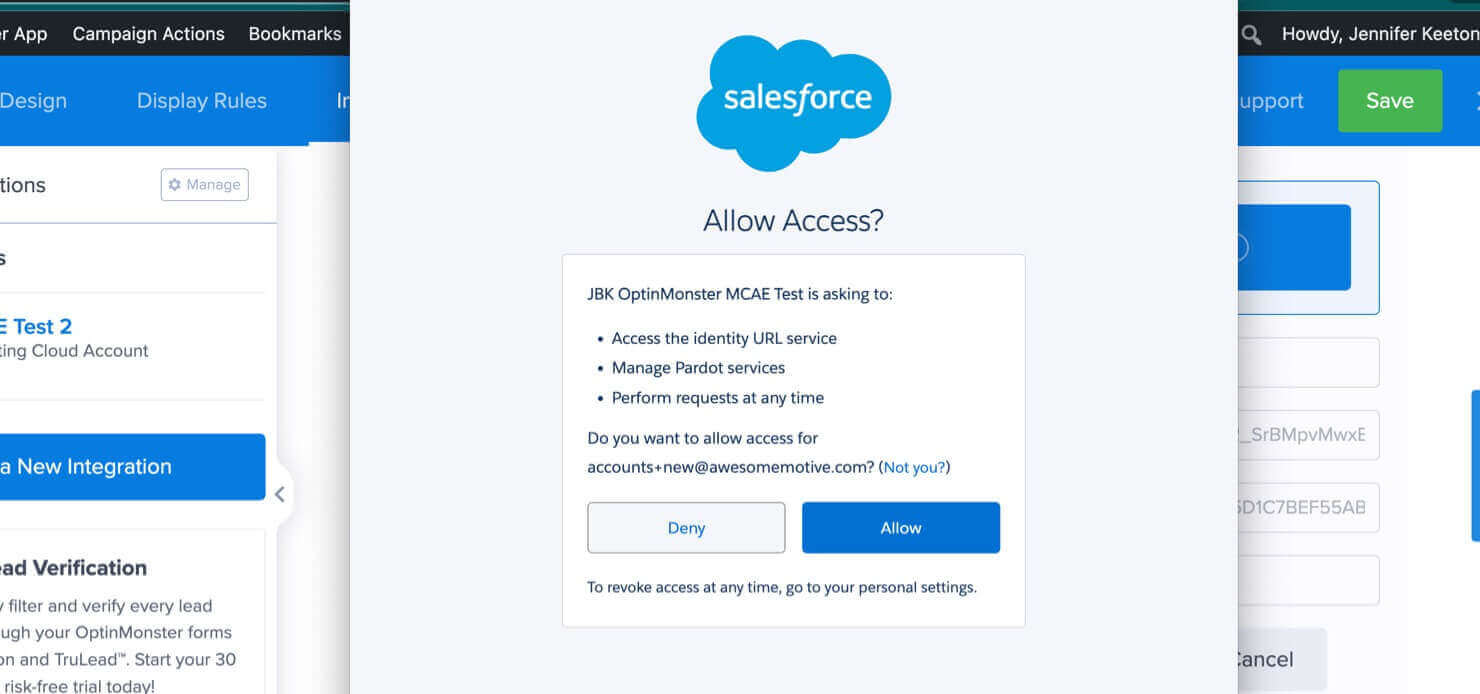
Next, you’ll see a popup asking you to allow access. Click the Allow button
Publish Your OptinMonster/MCAE Popup
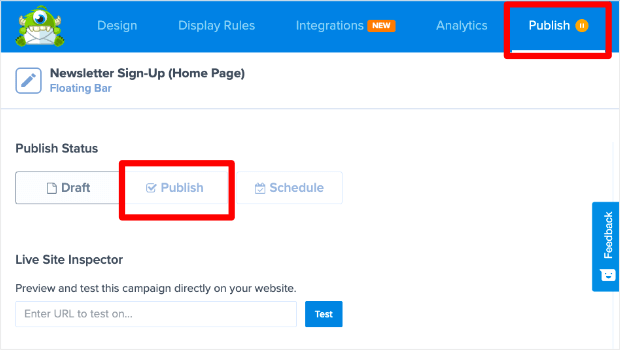
To publish your campaign, click the Publish tab at the top of the campaign builder. Then, select Publish under the “Publish Status” heading. Click Save.
The rest of the publishing process depends on your website platform or CMS. Follow our campaign publishing guide here.
Is your site on WordPress? Here’s a simple guide for connecting OptinMonster to your WordPress site.
If you’re not using WordPress, it’s just as easy to sync your site. Check out this article: How to Add OptinMonster to Any Website
How to Connect OptinMonster with Salesforce Marketing Cloud Account Engagement (formerly Pardot)
Get Started With a Popup Today!
We hope you enjoyed this article.
If you’re ready to boost your list, you might want to read these resources:
- 15 Email Popup Best Practices To Skyrocket Your List
- 50 Email Segmentation Tips You Need to Use Now
- 30 Best Email Marketing Automation Tools to Transform Your Business
Ready to turn more site visitors into leads and subscribers? Get OptinMonster today.















Add a Comment