OptinMonster offers seamless integration with Salesforce Marketing Cloud Account Engagement (formerly Pardot) email marketing service. Connecting OptinMonster to your Salesforce Marketing Cloud Account Engagement email list is very easy.
In this article, you’ll learn how to connect Salesforce Marketing Cloud Account Engagement with OptinMonster.
Before you start, this integration is available with a Pro and higher subscription.
All subscription plans can add custom forms using the Form Embed block.
As a best practice, we recommend you also connect your campaigns to Monster Leads as a backup.
Our Salesforce Marketing Cloud Account Engagement integration requires that your account have access to Version 4 of the API.
Connect Salesforce Marketing Cloud Account Engagement
When you create a campaign in OptinMonster that you intend to collect leads with, you’ll want to integrate with one or more services to send those leads to.
To send leads to Salesforce Marketing Cloud Account Engagement, follow these steps:
Business Unit ID
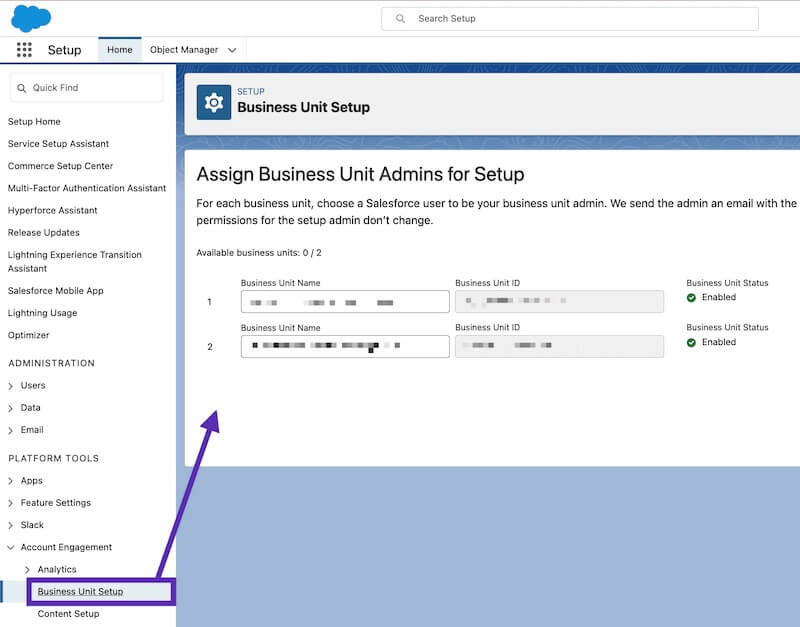
You’ll need the Business Unit ID from Salesforce Marketing Cloud Account Engagement when connecting OptinMonster.
This identifier can be found in the Account Engagement > Business Unit Setup screen.
Create Connected App
Before you can connect Salesforce Marketing Cloud Account Engagement with OptinMonster you will need to create a Connected App in your Salesforce Marketing Cloud Account Engagement account.
To create a Connected App, follow these steps:
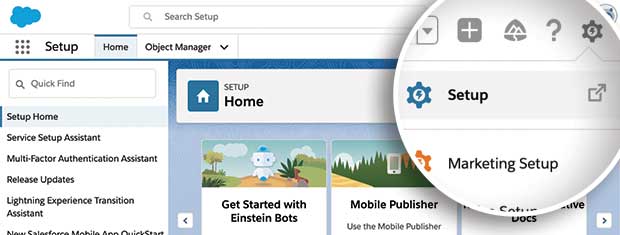
- Log into your Salesforce account and navigate to the Setup page by selecting the gear icon in the top-right corner of the browser window.
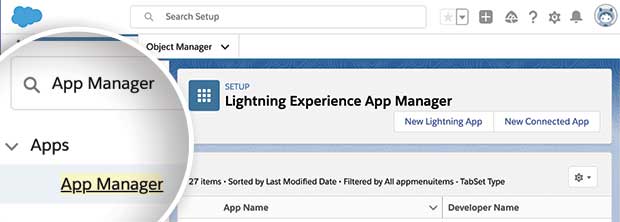
- Enter “App Manager” in the search bar that appears in the top-left corner of the Setup page and select the App Manager link from the search results.
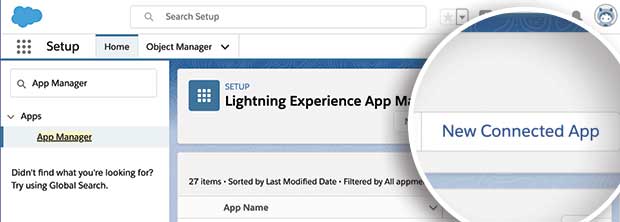
- From the App Manager screen select the New Connected App button.
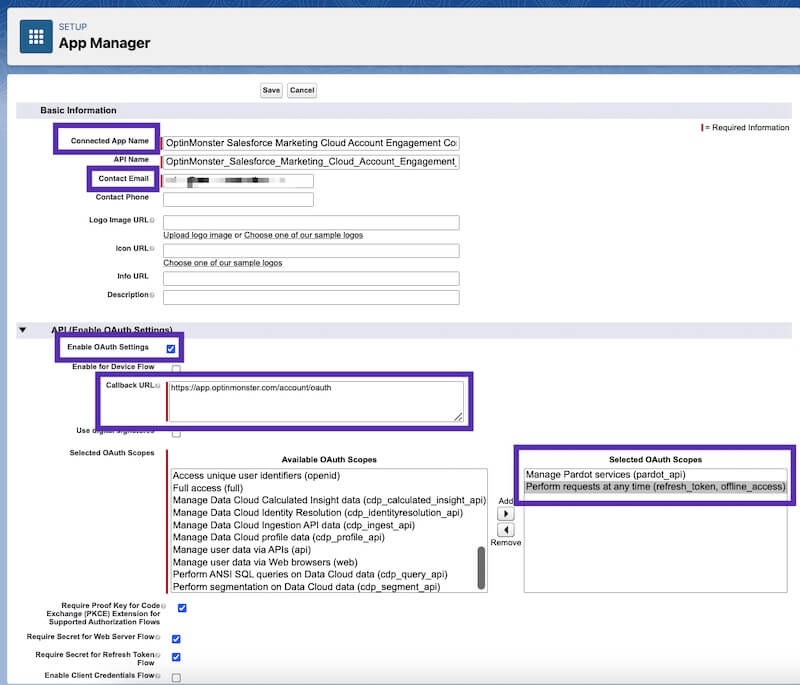
- When creating your app, the following details are required for the app to function properly with OptinMonster:
- Connected App Name — we recommend using “OptinMonster Salesforce Marketing Cloud Account Engagement Connect”
- API Name — this field will be automatically populated
- Contact Email — this field is required for any app you create in Salesforce
- Enable OAuth Settings — this checkbox must be enabled
- Callback URL — enter this URL:
https://app.optinmonster.com/account/oauth - Selected OAuth Scopes — Add the following scopes (highlight each scope, then click the “Add” arrow):
- Manage Pardot services (pardot_api) — Allows OptinMonster to connect to the Pardot API.
- Perform requests at any time (refresh_token, offline_access) — Allows us to fetch a new accesss token when it expires. Without this, the OptinMonster integration will fail after the token expires.
- When you are finished configuring the App, click Save.
- You will likely be shown the following message indicating it may take 2-10 minutes for your changes to be reflected.
Retrieve Client Keys
Once you’ve created a Connected App in Salesforce Marketing Cloud Account Engagement, you’ll need to retrieve the Client Keys before integrating OptinMonster.
To retrieve the Client Keys for your Connected App, follow these steps:
- Log into your Salesforce account and navigate to the Setup page by selecting the gear icon in the top-right corner of the browser window.
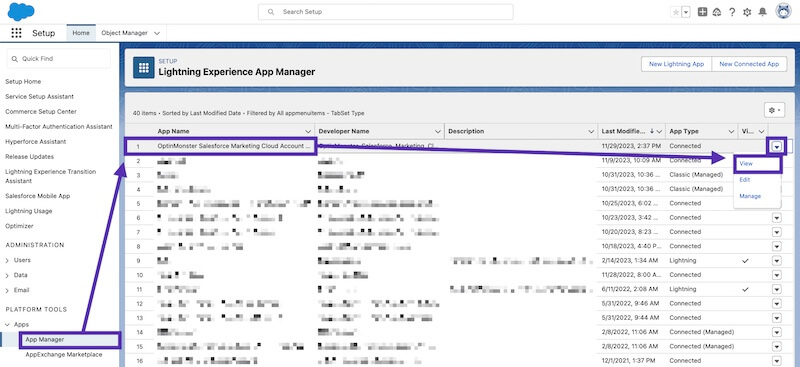
- Navigate to the Apps > App Manager screen, locate the Connected App you created in the previous section, and select the View option from the dropdown menu.
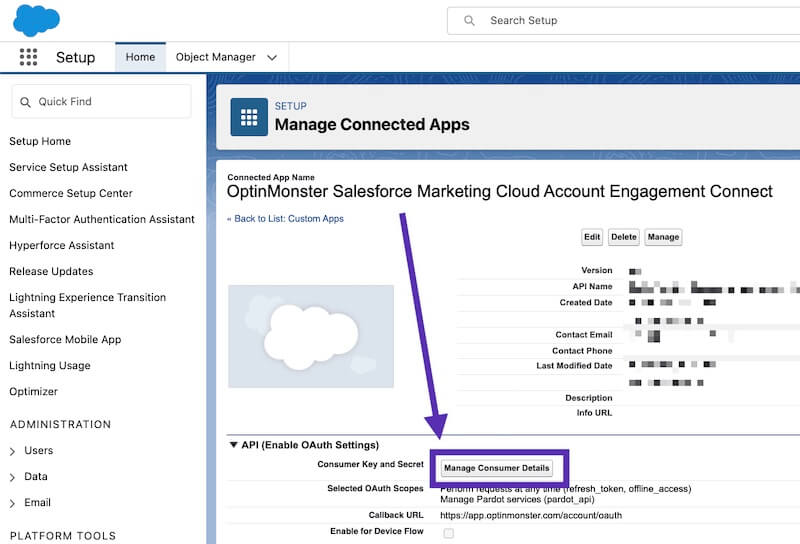
- From the API (Enable OAuth Settings) section, select the Manage Consumer Details button, a new tab/window will open.
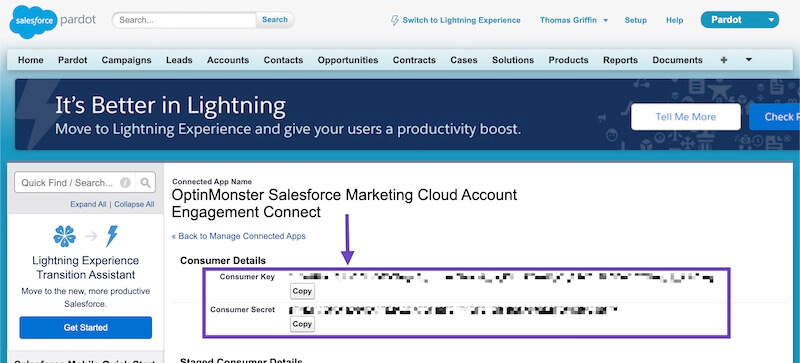
- Under the API (Enable OAuth Settings) section, retrieve the Consumer Key and Consumer Secret to use in the next section when connecting with OptinMonster.
OptinMonster Integration
Once you have finished creating a Connected App and retrieved the Client Keys in Salesforce Marketing Cloud Account Engagement, you can connect OptinMonster following these steps:
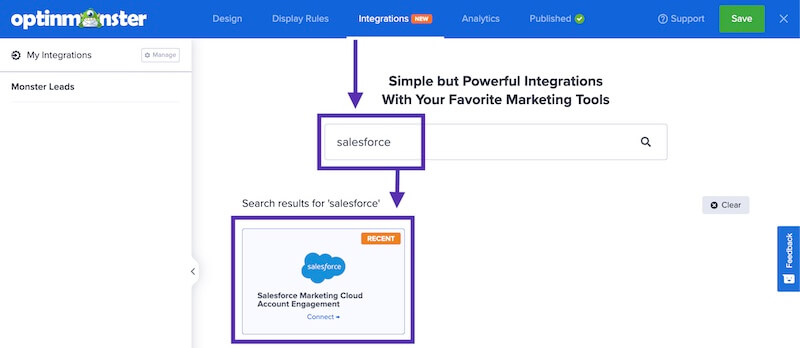
- Navigate to the Integrations view in the campaign builder, search for and select Salesforce Marketing Cloud Account Engagement.
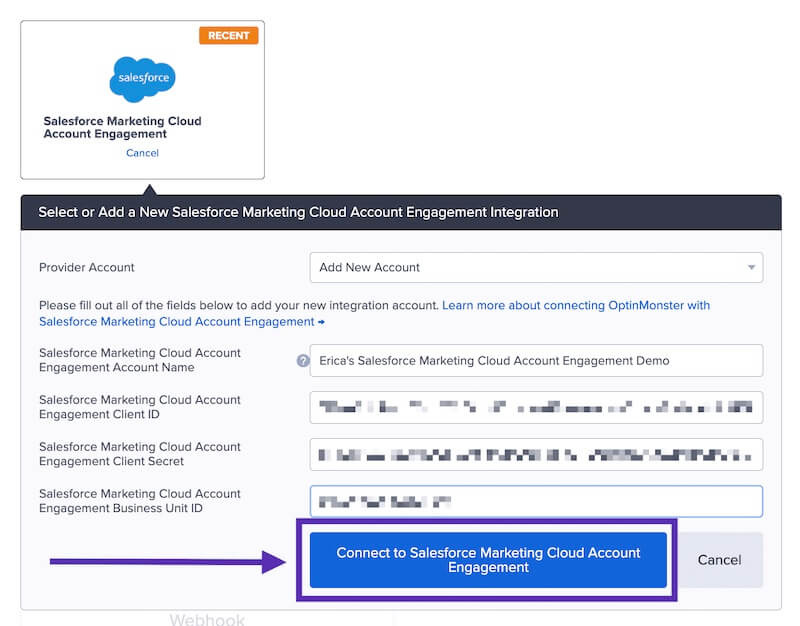
- Enter a Salesforce Marketing Cloud Account Engagement Account Name (*internal use only), your Salesforce Marketing Cloud Account Engagement Client ID, Salesforce Marketing Cloud Account Engagement Client Secret, and Salesforce Marketing Cloud Account Engagement Business Unit ID in the appropriate fields, then select the Connect to Salesforce Marketing Cloud Account Engagement button.
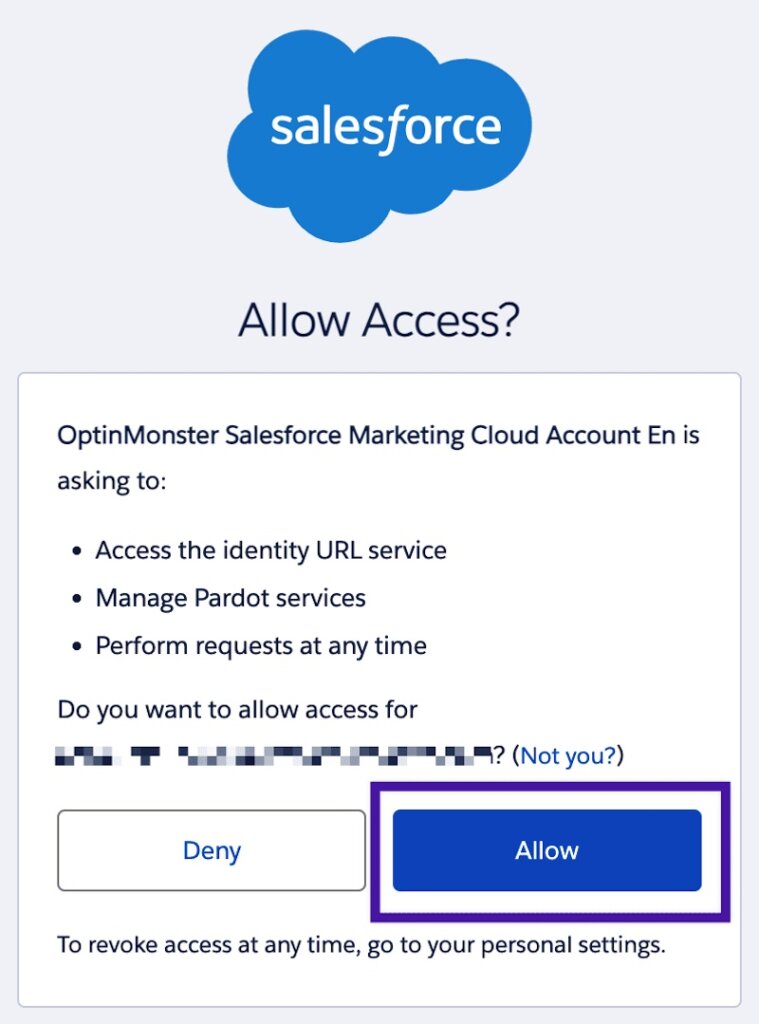
*The Salesforce Marketing Cloud Account Engagement Account Name can be anything that helps you identify the specific integration within OptinMonster. It’s possible to add more than one Salesforce Marketing Cloud Account Engagement integration to your account and this is an easy way to differentiate between them when assigning integrations to individual campaigns. - A popup window will open and ask you to securely log into your Salesforce account. Enter your Salesforce credentials and after logging in select the Allow button to grant OAuth access.
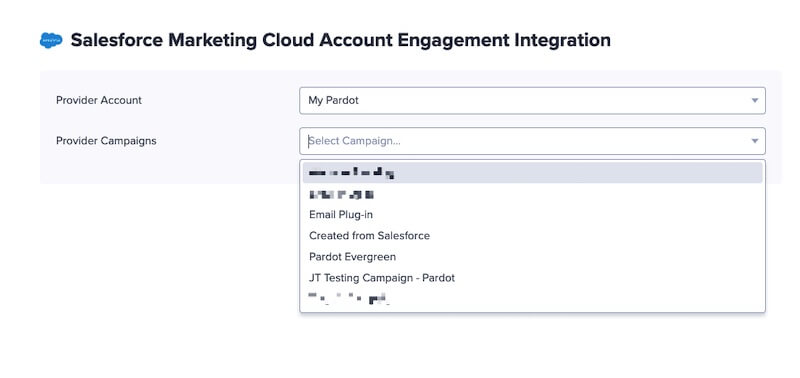
- Required: Once the Salesforce Marketing Cloud Account Engagement integration has been connected select the Salesforce Marketing Cloud Account Engagement Campaign you wish to send leads to from the Provider Campaigns field.
- Optional: You can also assign Lists and configure the Allow duplicate email addresses? option.
- When you’re finished, Save your campaign.
Add Extra Fields
This integration supports Field Mapping, so you can easily add radio buttons, phone fields, text areas, number fields, lists, and more!
Before you begin using Field Mapping with Salesforce Marketing Cloud Account Engagement, please consider the following:
- The following custom fields are reserved in Salesforce Marketing Cloud Account Engagement and cannot be mapped to:
first_namelast_namephone(use the Phone field to send data to this Field)om_coupon_code,{branding}_coupon_code(the Coupon Code won when creating a Gamified spin-to-win campaign)om_coupon_label,{branding}_coupon_label(the Coupon Label when creating a Gamified spin-to-win campaign)campaign_lead_sourceom_campaign_namecampaign_idprivacy_consent(when using the Privacy Consent checkbox)sourcecomments
- Automatically created custom fields are added as text fields in Salesforce Marketing Cloud Account Engagement. This can be avoided by manually creating your custom fields in Salesforce Marketing Cloud Account Engagement before mapping to them in OptinMonster.
- You can manage your custom fields in Salesforce Marketing Cloud Account Engagement following this guide.
Email Automations
To send emails automatically to new leads you’ll want to configure email automations within your Salesforce Marketing Cloud Account Engagement account.
The following guides from Salesforce Marketing Cloud Account Engagement may be helpful to get started:
Testing
We strongly recommend you test the optin form before publishing your campaign to ensure it is working as you expect.
Before you begin, please be aware of the following details when testing Salesforce Marketing Cloud Account Engagement integrations:
- Previously submitted or already subscribed leads may be treated differently by Salesforce Marketing Cloud Account Engagement than new leads. For this reason, we recommend using a completely unique email address each time you test submit your campaign’s form. You can use a free tool like TempMail.io or learn how to create unlimited unique email addresses from a single Gmail account.
- If the lead is captured in Salesforce Marketing Cloud Account Engagement but you do not receive any automated emails it indicates the integration from OptinMonster to Salesforce Marketing Cloud Account Engagement is correct, and the issue is with the automated email configuration. Salesforce Marketing Cloud Account Engagement controls email automation exclusively. If you require assistance in troubleshooting email automations we recommend reaching out to Salesforce Marketing Cloud Account Engagement support directly.
Get started testing with the Live Site Inspector tool explained in our guide on how to test an OptinMonster campaign.
Spin-a-Wheel Support
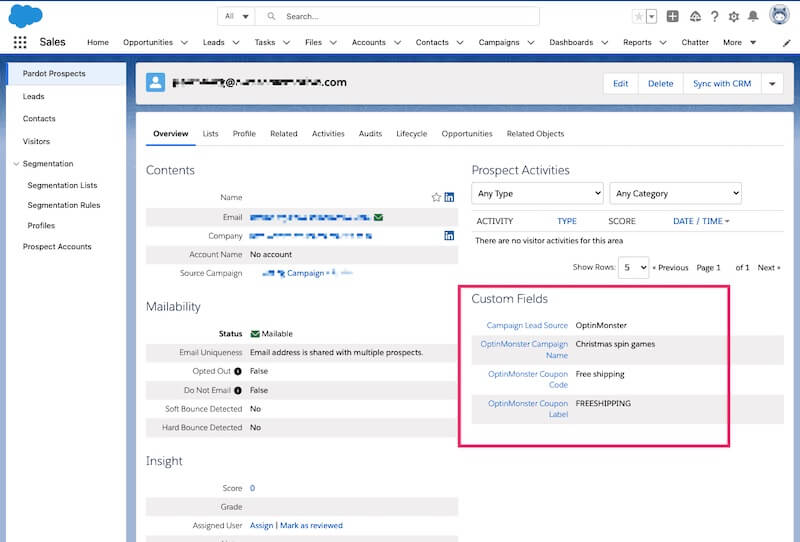
If you are configuring a Gamified spin-to-win campaign, spin-a-wheel support is automatically enabled when using our native Salesforce Marketing Cloud Account Engagement integration. The Coupon Label and Coupon Code will be passed as custom fields with each Salesforce Marketing Cloud Account Engagement prospect, like this:
- Campaign Lead Source: OptinMonster
- OptinMonster Campaign Name: CAMPAIGN_NAME
- OptinMonster Coupon Code: COUPON_CODE
- OptinMonster Coupon Label: COUPON_LABEL
FAQs
Can I send leads to more than one Campaign?
Yes! See our Lead Sharing guide to accomplish this.
How do I configure single or double opt-in?
See our guide on single vs. double opt-in.
Is it possible for me to add a phone field to my campaign?
Yes! You can add a phone field. Learn how to capture phone numbers with OptinMonster.
Do I need to add OptinMonster to the Allowed IP List?
This step is optional — if you are using the IP allowlist for Account Engagement, you will need to add our IP addresses in order for lead data to be passed along. Our IP addresses are as follows:
- 50.19.60.226
- 50.17.52.222
- 54.147.244.173
- 35.153.24.227
- 50.19.138.155
- 50.19.173.212
- 52.44.205.147
- 34.198.233.235
- 50.16.98.100
Do I need to install a Connected App in SalesForce Marketing Cloud Account Engagement for each site we are running campaigns on and want to integrate with?
If the Salesforce Marketing Cloud Account Engagement account belongs to you directly and not individual sites, you can use the same Salesforce Marketing Cloud Account Engagement connection and use Lists to differentiate the leads coming from different sites.
If you’re serious about jumpstarting your website business growth, then get started with OptinMonster today!
Get Started With OptinMonster Today!BONUS: Done-For-You Campaign Setup ($297 value)
Our conversion experts will design 1 free campaign for you to get maximum results – absolutely FREE!
Click here to get started →
Troubleshooting
The campaign is capturing leads but shows 0 conversions in analytics.
Confirm that conversion tracking is turned on for the submit button in your campaign. See our guide on How to Enable Conversion Tracking.
There was a problem retrieving your campaigns. Your account is unable to use Version 4 of the API.
Our Salesforce Marketing Cloud Account Engagement integration requires that your account have access to their Version 4 API.
This specific error indicates your Salesforce Marketing Cloud Account Engagement account does not have this access. You’ll want to reach out to Salesforce support directly so they can add Version 4 API access to your account.
Error: There was a problem retrieving your campaigns. Business Unit specified in SalesForce Pardot-Business-Unit-Id header not found or inactive.
This error may occur if:
- you’ve entered an incorrect or invalid Business Unit ID for your Salesforce Marketing Cloud Account Engagement integration; or
- you do not have the correct Pardot API Domain assigned to your Salesforce Marketing Cloud Account Engagement account
To check your Salesforce Marketing Cloud Account Engagement API domain, follow these steps:
- In Salesforce, click the gear icon to access Setup.
- From Setup, enter Installed Packages in the Quick Find box, and then select Installed Packages.
- Find the package b2bmaIntegration.
- If the namespace prefix is “b2bma”, you can set up the OptinMonster integration,
- If the namespace prefix is “pi3″, you are on the demo account (‘pi.demo.pardot.com’), and the OptinMonster integration will not work for you.
See more details in Salesforce Marketing Cloud Account Engagement’s official documentation.
You’ll want to reach out to Salesforce Marketing Cloud Account Engagement support directly to ensure your account has the API domain necessary to connect with OptinMonster.

