If you run a WordPress website, you’ll occasionally need to redirect a page to a different URL. Whether you’re updating outdated links, reorganizing your site, or switching domains, WordPress redirects help maintain a seamless user experience and preserve your SEO rankings.
I work on the content team here at OptinMonster. As part of my job, I identify when blog posts need to be redirected to a different URL. I’m going to share what I’ve learned about both the technical and strategic aspects of WordPress redirects.
In this guide, I’ll explore the different types of redirects, explain when and why to use them, and provide step-by-step instructions on setting up redirects using the AIOSEO plugin. Let’s dive into how you can effectively manage redirects to keep your site running smoothly.
- What Is a WordPress Page Redirect?
- Types of URL Redirects
- When and Why to Use Redirects
- How to Redirect a WordPress Page
- FAQs
What Is a WordPress Page Redirect?
A WordPress page redirect is a method for forwarding visitors and search engines from one URL to another. In other words, redirection tells the browser that the requested URL has moved to another place. It prevents visitors from landing on a 404 error page and instead forwards them to the page you want them to see.
When you set up the right redirects on your WordPress site, you can ensure that users reach the intended content even if the original URL has changed, preventing broken links and maintaining SEO value.
Types of URL Redirects
There are several types of redirects, each serving a specific purpose:
301 Redirects
A 301 Redirect (Permanent) signifies that a page has permanently moved to a new URL. It is by far the most commonly used redirect.
Example: Let’s say I have an old blog post on a topic that’s now irrelevant. I decide to redirect any traffic coming to that post to a different post that focuses on a related topic that’s still useful. For instance, I might have written a review of a piece of software that no longer exists. I could redirect that URL to a post about a current piece of software that has similar functionality.
To accomplish this, I can set up a 301 redirect from “old-page.html” to “new-page.html.” The 301 will tell both users and search engines that the old page now forwards to a new location. Not only does the 301 send visitors to a better post, but it also preserves SEO value, user bookmarks, and the validity of any links to the original post.
302 Redirects
A 302 Redirect (Temporary) indicates a temporary move to a different URL. 302s are useful for website maintenance, seasonal promotions, or other short-term changes when you need to redirect URLs temporarily.
Example: If you create a special page for a holiday sale, you can use a 302 to temporarily redirect certain pages to your holiday sale page. For instance, you might want to redirect “featured-products.html” and “promotions.html” to “holiday-sale.html.” With a 302, visitors are temporarily directed to the new page, but search engines know that the original pages will return.
307 Redirects
A 307 Redirect (Temporary) is similar to a 302 redirect but is used specifically for HTTP/1.1 protocol.
For a more thorough explanation of the technical difference, see AIOSEO’s definition of 307 temporary redirects.
Meta Refresh
A Meta Refresh is a client-level, as opposed to server-level, redirect with a delay. It usually refreshes the page or redirects after a short wait. This method can be slow and disorienting for users and isn’t ideal for SEO.
Example: You’ve probably seen a meta refresh in action. It’s when you visit a website and see a message like, “This page has moved. You will be redirected in 5 seconds…”
HTTP to HTTPS Redirects
An HTTP to HTTPS Redirect ensures all traffic is directed to the secure HTTPS version of a website.
Example: Redirecting “http://example.com” to “https://example.com” enhances site security, builds user trust, and can improve search engine rankings by ensuring secure connections.
When and Why to Use Redirects
So far, I’ve covered the technical basics of what redirects are and how they work. But how can you know when you need to set up a redirect?
Here are a few scenarios where you’ll likely want to forward a WordPress page to a different URL:
- Replacing Outdated Content: As a content writer, I encounter this scenario the most often. Our OptinMonster blog has been publishing for nearly 10 years, so some of our oldest posts just aren’t relevant anymore. With a 301 permanent redirect, I can forward users to a recent post on a more timely topic.
- Removing Pages: Avoid 404 errors by redirecting outdated pages. For instance, you might have pages for products you no longer offer or for events that have already occurred. Redirect those pages to URLS for similar products, upcoming events, or simply your homepage.
- Changing Website Structure: You sometimes need to restructure the pages on your WordPress website, especially if your site has grown significantly in scope. For instance, you might adjust your content categories or create subdomains. Redirects help you make sure all your visitors end up on the right pages.
- Changing Permalinks/URLS: You might change a page’s permalink for SEO purposes or to describe the content more accurately. If you want to change a page’s URL, a redirect can make sure everyone ends up at the new destination URL.
- Changing Domain Names: What if your company rebrands or is bought by another company? A 301 lets you forward all visitors to your new domain. That way, everyone lands on your new site rather than seeing an error.
- Consolidating Multiple Domains: Similarly, what if you need to merge multiple websites? You can set up 301 redirects to forward all of the websites to the primary domain.
- Fixing Broken Links in Campaigns: We all make mistakes sometimes. In my 15 years working in email marketing and social media, I’ve definitely put the wrong link in a campaign before. With a quick redirect, no one will ever have to know. And your campaign will still funnel leads to the right page. Plus, when you’re conscientious about redirecting all old pages, you can make sure no one gets a 404 when clicking a link in an older campaign.
How to Redirect a WordPress Page
The easiest way to create a redirect is to use a WordPress plugin. Many plugins are available for setting up a URL redirection and even entire website redirects.
In this tutorial, we’ll use the All in One SEO plugin for creating easy URL redirects without writing a single line of code.
All in One SEO

All in One SEO (AIOSEO) is the #1 WordPress SEO plugin with over 3 million active installations. It offers advanced SEO features and settings to make your website search engine friendly.
With AIOSEO’s Redirect feature, you can redirect your posts and pages to another URL in just a few seconds.
But before we jump into the actual steps, let’s have a quick look at AIOSEO’s amazing features:
- TruSEO: All in One TruSEO lets you easily optimize your posts or pages. After adding the target keyword, you can follow a simple checklist of SEO suggestions and improve the overall SEO performance of your content.
- Local SEO: Local SEO helps you add your business name, address, and contact details that appear in the top local pack search results.
- Link Assistant: With the Link Assistant feature, you can quickly get insights into your website’s internal and external links. A good analysis of this data can help you improve the internal links.
- Schema Markup: You can assign schema types to posts, products, and other essential pages on your website. This way, search engines can understand your content better and help you rank higher in search engine results.
And many more.
Let’s start with our steps for redirecting your pages to another URL.
Step 1: Install the All in One SEO Plugin
Our first step is to install the All in One SEO plugin. To use the Redirection feature, you’ll need the plugin’s Pro plan or higher. I went ahead with the Elite plan.
Once you’ve completed your purchase, click View License Key, Details, and Downloads.

Copy the License Key and save it for later. Click Download AIOSEO.

Log into your WordPress Dashboard. Navigate to Plugin > Add New Plugin. Click the Upload Plugin button and upload the AIOSEO zip file that you just downloaded. Click Install Now. Once AIOSEO is installed, click Activate Now.
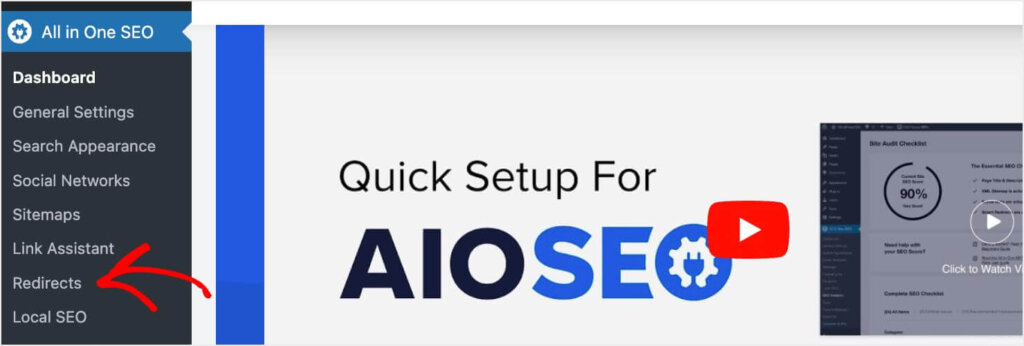
Now, you’ll see All in One SEO listed in the left panel of your WordPress dashboard.
Hover over All in One SEO and click Add License Key.

Scroll down the page until you find the License Key. Paste in the AIOSEO license key you copied earlier and click Connect.

Now, you have AIOSEO fully installed and activated on your website.
Step 2: Activate Redirection Manager
Next, navigate to All in One SEO > Redirects from your WordPress dashboard.

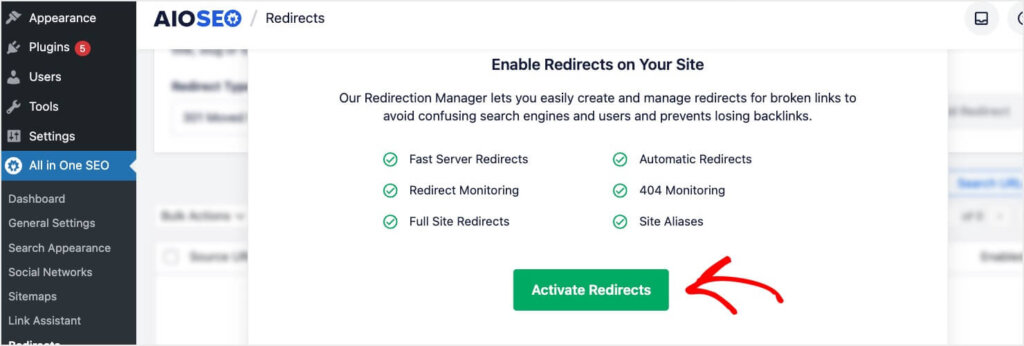
You’ll be prompted to activate the Redirect Manager feature by clicking the Activate Redirects button. You may have to scroll down a bit to see this button.

Step 3: Add Redirect
Now, setting up a redirect is a breeze. In fact, you can set up a redirect in under 1 minute
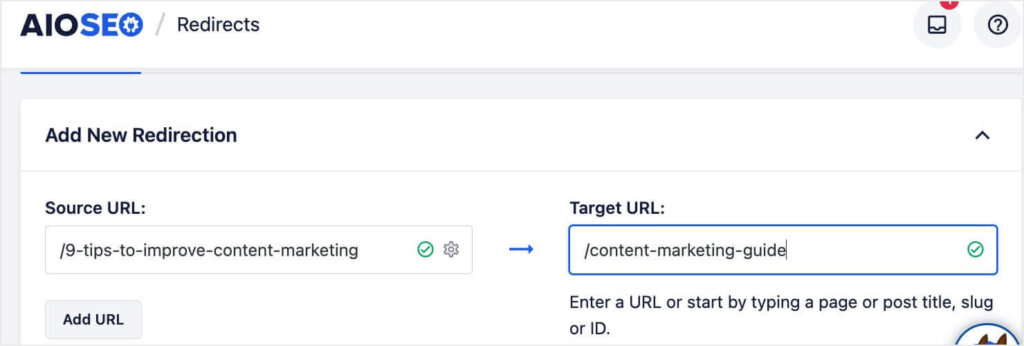
In the Redirects section, you’ll see Add New Redirection. This is where you’ll enter both your old and new URLs for your redirect.
In the Source URL field, enter the relative URL for the WordPress page or post that you want to redirect to a different URL. The relative URL is what comes after your domain.
In the Target URL field, enter the relative or complete URL for the web page you want to redirect to. You’ll need the complete URL if you’re redirecting to a different domain.
For my example, I’m redirecting the URL path “/9-tips-to-improve-content-marketing” to “/content-marketing-guide.”

Scroll down to choose your Redirect Type. The default is 301 Moved Permanently, but you can change it using the dropdown menu.

Once you’ve selected your redirect type, scroll back up and click Add URL

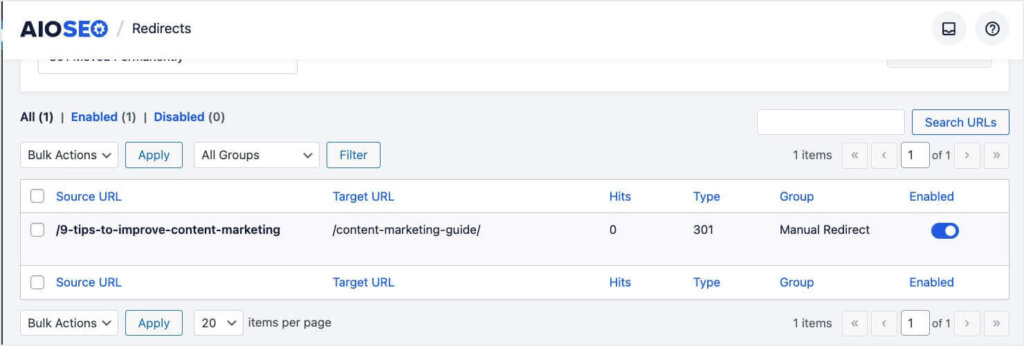
Now, your redirect is active! You’ll see it listed in the table near the bottom of the Redirects page:

Here, you can monitor the number of visitors who have been redirected under the Hits column. You can also choose to disable the redirect at any time.
Now that you have everything installed and activated, you’ll only need to repeat Step 3 to set up more redirects for your WordPress site.
Alternative Plugin: If AIOSEO isn’t in your budget right now, you can try the Redirection plugin for WordPress. It’s free to install and use, but it also limits you to only 301 redirects. It also doesn’t include any SEO features.
FAQS
1. Can I set up redirects without using a plugin?
Yes, you can manually set up redirects by editing the .htaccess file in your site’s root directory. However, this method is more technical and requires careful handling to avoid breaking your site.
2: How do I check if my redirects are working correctly?
You can test your redirects by entering the old URL in your browser and verifying it redirects to the new page’s URL. Additionally, tools like AIOSEO and Redirection provide logs to monitor redirect activity.
3: Will setting up redirects affect my site’s performance?
Redirects can have a minor impact on site performance as they introduce an additional step in loading a page. Using a reliable plugin and minimizing the number of redirects can help mitigate performance issues.
4: Are there any SEO considerations when setting up redirects?
Yes, using 301 redirects helps preserve SEO value by transferring link equity from the old URL to the new one. It’s important to ensure that redirects are set up correctly to avoid issues with search engine indexing.
5. Can I redirect multiple URLs to a single URL?
Yes, you can redirect multiple old URLs to a single new URL. This is often done to consolidate content or direct traffic from outdated pages to a more relevant one. Using a plugin like AIOSEO makes managing these redirects easier.
Manage Your WordPress Site Traffic with Page Redirects
I hope this article helped you better understand what redirects are and how you can set them up in WordPress. I recommend the All in One SEO plugin for your WP redirects. In addition to its easy-to-use redirect manager, it lets you optimize your pages for search right in your WordPress dashboard.
Want to learn more about AIOSEO, redirect plugins, and SEO? Check out these resources:
- All in One SEO (AIOSEO) Review
- 8 Best WordPress Redirect Plugins (Compared)
- 10 Crucial SEO Ranking Factors You Need to Know
Now that you’re directing all your visitors to the right pages, it’s time to convert that traffic into revenue. With OptinMonster’s onsite marketing campaigns, you can grow your email list and encourage more purchases. How? By showing your most enticing offers to the right people at just the right time.


Add a Comment