Do you want to add a countdown timer in WordPress to boost engagement and conversions? A countdown timer creates urgency and encourages visitors to take action before time runs out. Whether you’re running a flash sale, launching a new product, or promoting an event, a well-placed countdown timer can significantly increase conversions.
In this guide, I’ll show you how to easily add a countdown timer to your WordPress site using OptinMonster. You’ll learn why countdown timers work, how to create them, and the best ways to display them for maximum impact.
- Why Use a Countdown Timer in WordPress?
- OptinMonster: The Best Countdown Timer Plugin
- How to Create a Countdown Timer in WordPress
- Tips to Optimize Your WordPress Countdown Timer
Why and When You Should Use Countdown Timers on Your WordPress Site
A countdown timer lets visitors see how much time they have left to act, whether it’s making a purchase, signing up for a webinar, or claiming a discount.
Countdown timers take advantage of FOMO (fear of missing out), which encourages people to act more quickly. When used strategically, countdown timers can drive more conversions and boost sales.
Top Ways to Use Countdown Timers
Here are some practical ways to use a countdown timer on your WordPress site:
- Flash Sales & Limited-Time Offers: Encourage shoppers to buy before a deal expires.
- Webinar & Event Registrations: Remind visitors how long they have to sign up.
- Cart Abandonment Offers: Give abandoning shoppers a time limit for complete their purchase with an exclusive discount
- Product Launches: Build anticipation for an upcoming release.
- Site Maintenance Notices: Let visitors know when your site will be back online.
Case Study: Cracku Increased Conversions by 300% with Countdown Timers
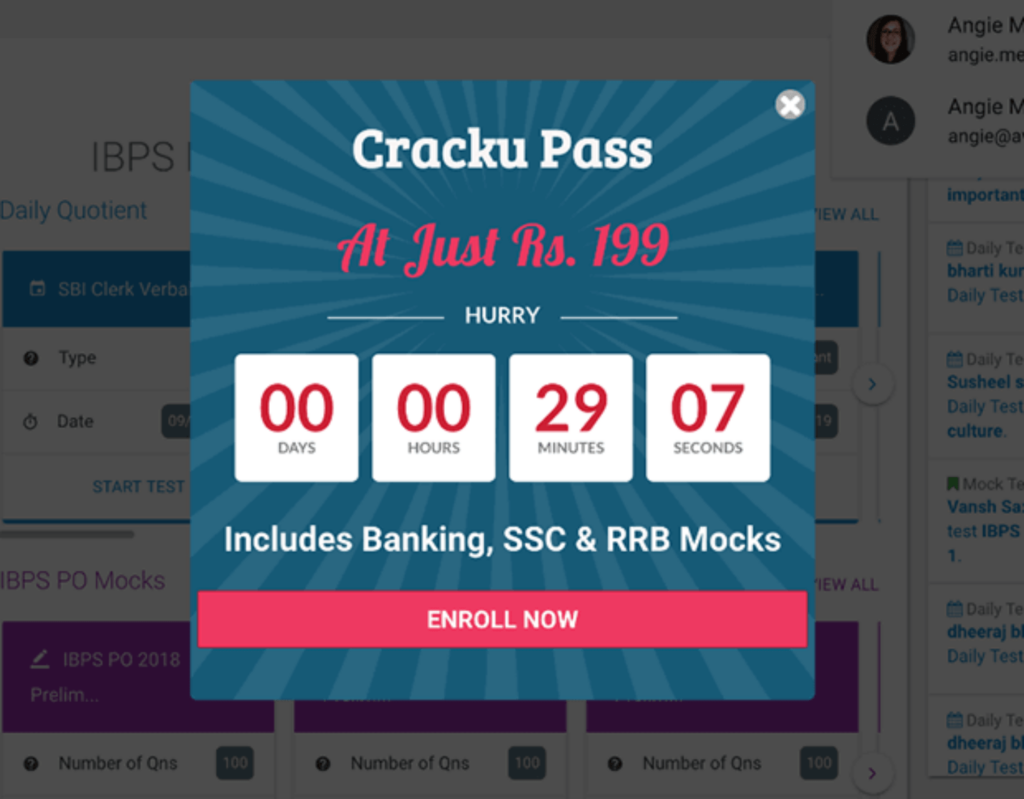
Cracku, an online exam prep platform, used OptinMonster’s countdown timers to create urgency for their course discounts. By showing a limited-time offer on specific course pages, they boosted conversions by 300%.
Read the full Cracku case study.
OptinMonster: The Best Countdown Timer Plugin for WordPress
OptinMonster is a robust lead generation and conversion optimization tool, and it makes adding countdown timers incredibly easy. While it works for any website, OptinMonster’s WordPress plugin makes is especially easy to use for WordPress sites.
With OptinMonster, you can create a wide variety of onsite campaigns, all of which can include a countdown timer:
- Popups: Grab attention with a countdown inside a lightbox popup.
- Floating Bars: Show a persistent countdown bar at the top or bottom of the page.
- Fullscreen Welcome Mats: Display a high-impact countdown overlay.
- Inline Forms: Embed a timer inside blog posts or landing pages.
- Gamified Spin Wheels: Use timers in gamified offers.
- Slide-Ins Boxes: Add a subtle countdown that slides into view.
- Sidebar Forms: Place timers inside your sidebar for high visibility.
For example, you can make a popup for a flash sale and let visitors know that time is running out:

I also recommend using countdown timer floating bars. Floating bars stay in place as the visitor browses, serving as a steady reminder of the urgency of the deal you’re offering. Here’s the same basic campaign in a floating bar format:

But do countdown timers like these make a difference? Just see these results from another real OptinMonster customer.
Case Study: Cosmetic Capital Collected 18,000 Leads with a Floating Bar Countdown

Cosmetic Capital, an eCommerce beauty retailer, used an OptinMonster Floating Bar countdown timer to promote a limited-time offer for free shipping. By combining urgency with a signup form, they collected over 18,000 new leads for their email marketing list.
Because of this success, Cosmetic Capital called OptinMonster “a tool that will change your eCommerce store overnight.”
Read the full Cosmetic Capital case study.
How to Create a WordPress Countdown Timer with OptinMonster
Before You Start. . .
Sign up for OptinMonster at the Pro level or higher and install the OptinMonster WordPress plugin.
- Step 1: Create a Countdown Timer Campaign
- Step 2: Customize Your Countdown Timer
- Step 3: Set Display Rules to Target the Right Audience
- Step 4: Publish Your Countdown Timer in WordPress
Step 1: Create a Countdown Timer Campaign
OptinMonster gives you two easy ways to create a countdown timer in WordPress:
Option 1: Use a Countdown Timer Template

OptinMonster offers 700+ pre-made templates, and over 180 of them already include a countdown timer.
- Log into OptinMonster and click Create New Campaign.
- Choose to start your campaign from a Template.
- Select a Campaign Type (such as Popup, Floating Bar, or Fullscreen).
- Scroll down until you see the Features filter in the left menu.
- Check the box for Countdown timer. This will show you only templates that include countdown timers.
- Choose a template and click Use Template.
This method is quick and beginner-friendly, perfect for launching a countdown in minutes!
Option 2: Add a Countdown Timer to Any Campaign
You’re not limited to using templates that already include a countdown timer. With the Countdown Timer Block in OptinMonster’s drag-and-drop builder, you can add a timer to any campaign in seconds:
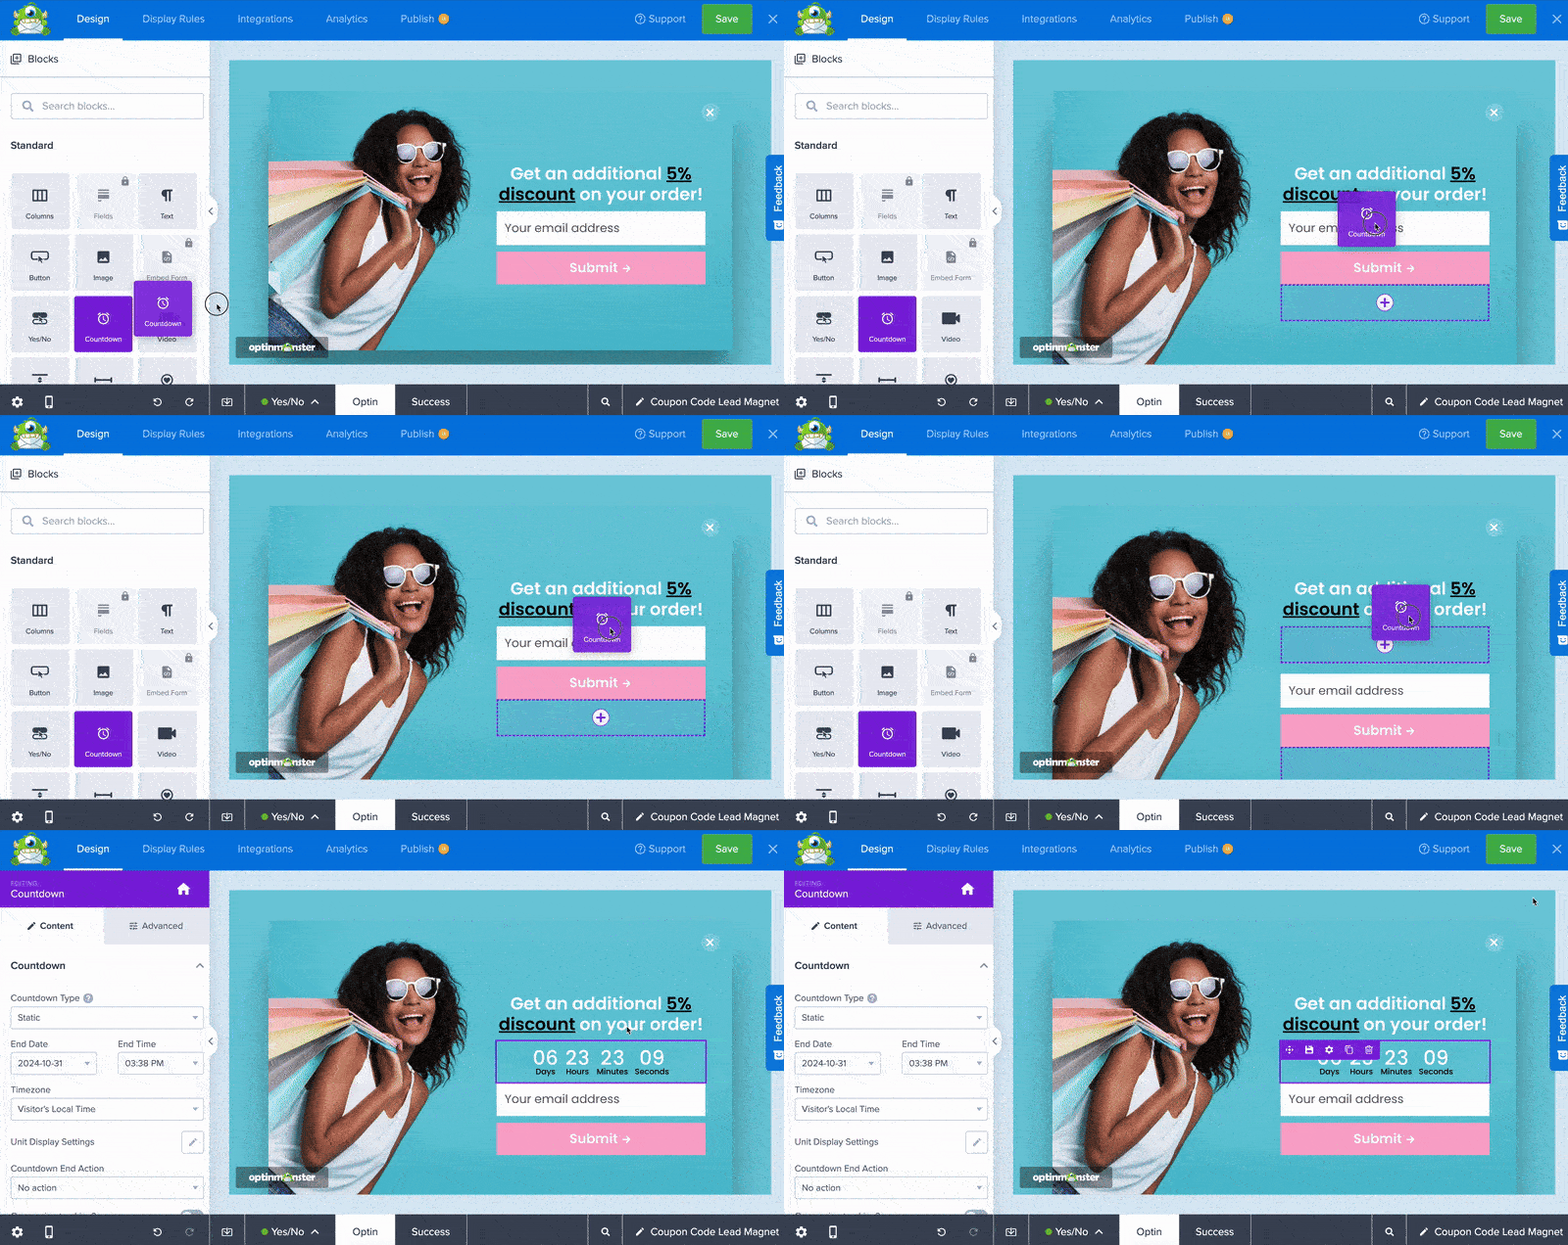
- Start with any template or design a campaign from scratch with the Canvas template.
- Drag and drop the Countdown Timer Block into the design.
- Customize the timer to match your campaign (We’ll cover this step next.)
This option gives you the flexibility to add a countdown timer anywhere on your site.
Step 2: Customize Your Countdown Timer Campaign

Once you’ve created your countdown timer campaign, the next step is to customize its design and settings. With OptinMonster’s drag-and-drop builder, you can edit every element of your campaign, including:
- Text
- Fonts
- Colors
- Images
- Buttons
- Fields
- And of course, the countdown timer itself.
Every element in your campaign is editable by following either within the template preview or in the left settings menu. Just follow these steps:
- Click on any element to edit it.
- Edit actual text fields directly in the template.
- When you click on other elements, such as buttons or timers, you’ll see editing options in the left menu.
- Rearrange or remove elements with simple drag-and-drop controls.
Now, let’s focus on the most important part: configuring your countdown timer. You’ll start by clicking the countdown timer block to open the editing options to the left. Here, you’ll be able to change color, font, and more. You’ll also select which Countdown Type you want for your campaign.
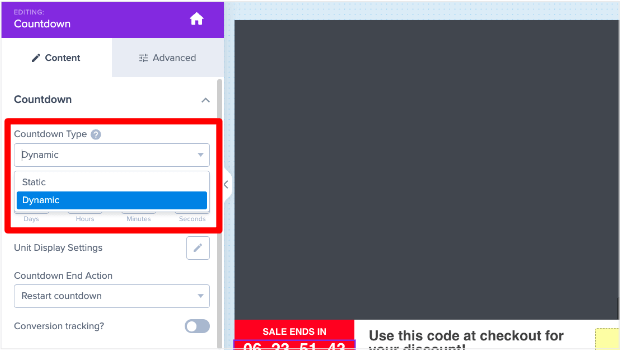
OptinMonster offers 2 types of countdown timers:
Static Countdown Timer (Fixed Deadline)
A static countdown timer shows the same deadline to every visitor. Let’s say you’re releasing a new product line on April 4 at 8 am. For every visitor, the countdown will show how much time is left until that exact day and time.
Static timers are perfect for:
- Flash sales that end at a specific date and time
- Product launches or pre-orders
- Webinar or event registrations
To set up a static timer, you just need to:
- Click on the Countdown Timer Block in the campaign editor.
- Under Countdown Type, select Static.
- Set the exact end date and time for the countdown.
- Adjust the time units ( such as showing only hours and minutes).
Once the timer expires, it will show 00:00:00 or take another action you choose.
Dynamic Countdown Timer (Personalized per Visitor)
A dynamic countdown timer (also called an evergreen timer) starts fresh for each visitor. Instead of a fixed deadline, it gives each user a personalized time limit based on when they arrive.
That is, every visitor’s countdown timer will begin with the same amount of time, regardless of when they visit your site.
Dynamic timers are ideal for:
- Personalized limited-time discounts (“Get 20% off in the next 10 minutes!”)
- Lead generation offers with urgency (“Sign up in the next 5 minutes to get a free bonus!”)
- Encouraging fast decisions without setting a public end date
You can configure a dynamic timer in a few steps:
- Click on the Countdown Timer Block in the campaign editor.
- Under Countdown Type, select Dynamic.
- Choose how long the timer should run (such as 30 minutes per visitor).
- Select what happens when the timer expires:
- Restart the countdown
- Redirect to another page
- Close the campaign
This lets you create a rolling deadline that resets for every new visitor.
Final Countdown Timer Customization Options
- Style the timer: Change colors, fonts, and layout in the Styles tab.
- Hide certain time units: Remove days or hours if they’re not needed.
- Set an expiration action: Decide what happens when time runs out.
Step 3: Set Display Rules to Target the Right Audience
Once your countdown timer is customized, the next step is to control when and where it appears. OptinMonster’s Display Rules allow you to target visitors based on their behavior, location, and more.
- Exit-Intent® Technology: Show a popup right when a visitor is about to leave your site.
- Time-Based Triggers: Show the timer after a visitor spends a certain amount of time on the page.
- New vs. Returning Visitors: Display the timer only to new visitors or repeat visitors.
- Page-Level Targeting: Show the countdown timer on specific pages, such as product pages or landing pages.
- Referral Source Targeting: Display the timer only to visitors from specific traffic sources, like social media or email campaigns.
- Geolocation Targeting: Personalize timers based on where the visitor is browsing from.
- and many more
Simply click the Display Rule tab at the top of the campaign builder:

And select your targeting and triggering rules in just a few clicks:

Setting display rules ensures your countdown timer is shown only to the right visitors at the right time, making it more effective.
Step 4: Save and Publish Your Countdown Timer to WordPress
Throughout the process of editing your countdown timer campaign, I recommend clicking the Save button at the top right frequently. Be sure to click Save again when you’re ready to publish.
OptinMonster’s integration WordPress lets you easily publish your campaigns live to your site, with no code needed.

Just click the Publish tab and select Publish to push the campaign live to your site. We recommend also going into the OptinMonster WordPress plugin to ensure it’s published there, as well.
For more details and troubleshooting, see our guide on How to Publish a Campaign.
Tips to Optimize Your WordPress Countdown Timer
A countdown timer can be a powerful tool, but to get the best results, you need to use it strategically. Here are some best practices to ensure your countdown timer drives more conversions:
1. Use a Clear and Compelling Call to Action (CTA)
Your countdown timer should be paired with a strong CTA that tells visitors exactly what to do. Examples include:
- “Claim Your 20% Discount Before Time Runs Out!”
- “Sign Up for the Webinar—Only a Few Spots Left!”
- “Pre-Order Now Before the Price Increases!”
2. Choose the Right Countdown Timer Type
- Use Static Timers for site-wide promotions, sales, and events with a fixed deadline.
- Use Dynamic Timers for personalized offers, such as limited-time discounts for new visitors.
3. Keep the Timer Highly Visible
Place the countdown timer in a floating bar, popup, or fullscreen welcome mat to grab attention. For less intrusive campaigns, consider an inline, slide-in box, or sidebar timer.
4. Use Display Rules for Better Targeting
Show your countdown timer only to the right audience by using OptinMonster’s display rules. Target visitors based on their behavior, location, or referral source.
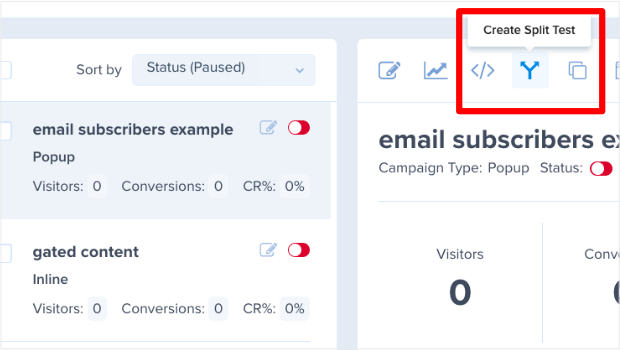
5. A/B Test Different Countdown Timer Placements
Test different positions, colors, and messages to see what works best. A small tweak, like changing the CTA wording, can make a big difference in conversions.
You can set up an A/B test in just a few clicks with OptinMonster’s built-in split testing:
Use Countdown Timers to Boost Conversions Today
A well-placed countdown timer can create urgency, increase engagement, and drive more sales. With OptinMonster, you can add countdown timers to popups, floating bars, inline forms, and more. All without needing any coding skills!
Ready to add a countdown timer to your WordPress site? Sign up for OptinMonster at the Pro level or higher and create high-converting countdown campaigns in minutes.
BONUS: Done-For-You Campaign Setup ($297 value)
Our conversion experts will design 1 free campaign for you to get maximum results – absolutely FREE!
Related Resource:



Add a Comment