

Do you want to create a ConvertKit popup to grow your subscribers?
If you’re looking for a quick, easy way to boost your email list, a popup is exactly what you need.
Fortunately, it’s easy to create a popup form with ConvertKit.
By the end of this article, you will know exactly how to create a ConvertKit popup that actually works.
Why Create a ConvertKit Popup
Before we get into the details, let’s have a quick look at what a ConvertKit popup is and why you need one.
ConvertKit is an email marketing software for bloggers and online creators. It also lets you easily set up landing pages, email marketing campaigns, and sales funnels.

So, where does a ConvertKit popup fit in?
A ConvertKit popup is a lead capture form that dims your site’s content to draw complete attention to your offer. Typically, your popup would offer your site visitors a piece of valuable content in exchange for their email addresses.
Once they complete the optin form, their email address is sent directly to your ConvertKit mailing list. From there, you can segment and personalize your email marketing campaigns.
While ConvertKit lets you create basic modal popups, your options are really limited. If you want to create a highly targeted popup form that doesn’t annoy your visitors but converts them into leads, you’ll need to use a powerful lead generation tool, like OptinMonster.
OptinMonster is the best tool for creating a ConvertKit popup. It comes with 50+ popup templates that you can easily customize with a drag and drop builder.

You’ll get to select from multiple high-converting campaign types, like popup, floating bar, content locker, and more.
On top of that, OptinMonster offers all the display options you get with ConvertKit and more, including:
- Page-Level Targeting: customize your popup based on the page your site visitor is viewing
- Referrer Detection: personalize popups based on your visitor’s referral source,
- Onsite Retargeting: display different messages to new or returning visitors
Adam Enfroy used these features to add 11,000 email subscribers. In addition, he was able to sell 75 digital products each month!
Below, we will walk through exactly how you can build a popup that grows your list.
How to Create a ConvertKit Popup
Today, we will build this ConvertKit popup in under 20 minutes.

Before we begin, you’ll need an OptinMonster account to follow along in this tutorial.
Don’t have one yet? No problem. Setting up your account is quick and easy. And, you’ll get a 14-day money-back guarantee.
Let’s begin.
Step 1: Create Your ConvertKit Popup Campaign
First, log into your OptinMonster account.
Select Create New Campaign from the dashboard.

Now, select a campaign type from the options:
- Floating bar
- Inline
- Fullscreen
- Slide-in
- Gamified
For this tutorial, we will go with Popup.

Next, we will need to choose a template.
OptinMonster comes with 50+ templates that work across all devices.

Today, we will go with Magnet because we’re going to offer our visitors a lead magnet in exchange for their email address. A lead magnet is a piece of downloadable content that solves a problem for your reader.
Now, you can give your campaign a name. Then, click Start Building.

Step 2: Design Your ConvertKit Popup
In this step, you’ll design your ConvertKit popup in the OptinMonster editor.
Customizing the prebuilt template is super easy. Even if you’ve never created a popup before, you’ll be able to change the colors, fonts, images, and more with only a few clicks.
Let’s see exactly how this works.
We’ll start with one of the most important parts of your popup, and that’s your copy.
Your copy can mean the difference between someone dismissing your popup and filling it in right away.
In this popup, we’ll make sure we include a:
- Strong headline
- Compelling description
- Clear call to action
Check out this article for detailed copywriting advice: 69+ High Quality Copywriting Templates Proven to Work
To change your text, simply click on the text.

Now, you can edit the text directly on your popup. You can easily change the font, text, and size.
Along with compelling copy, you need a striking image.
Consider adding an image of the lead magnet you’re offering.
You can design one yourself using a visual content creation tool like Canva.
Simply click on the image to add your image.

Now, we spoke about the importance of a single, clear to action. One way to let your reader know exactly what you want them to do is to make it clear on the popup’s button.
In the editor, you can easily edit the button by clicking on it.
Then, you can change the button text, color, and icons on the left.

You’ll also have the freedom to add anything to your popup.
You can add things like video, text, images, dividers, and more. In the Optinmonster editor, we call these blocks.
All you need to do is click Add Blocks from the top of your editor.

Then, drag a block onto your popup.

And to capture detailed lead information, you can also add extra fields to your popup like:
- Text areas
- Phone number fields
- Number fields
- Dropdowns
- Radio buttons
- And more!
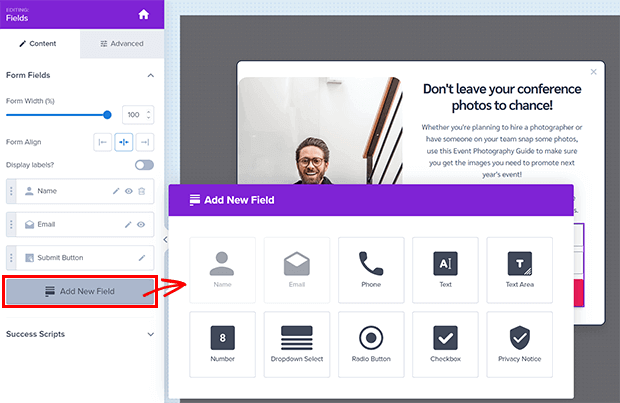
The Field Mapping feature lets you easily map any field to your ConvertKit popup.
Once your optin form is done, you might want to customize the Success screen. You can use the Success view to let your subscribers know how to access their lead magnet.

The next step is to determine when and where your ConvertKit popup will appear.
Step 3: Display Your ConvertKit Popup
It’s no surprise that the most effective popups appear at the right time and place.
Instead of interrupting your site visitors, these popups show relevant, targeted messages.
Here’s how this looks in action.
Imagine you’ve just landed on a website. The first thing that greets you is a giant popup offering you an eBook on a topic you have no interest in.
Now, let’s move to a different site.
Let’s say you’re reading an article about growing your blog traffic. As you’re scrolling down the page, a popup appears. It’s an offer to download a free guide to boosting your blog traffic.
Which popup’s you’re more likely to engage with? Of course, it’s the second one because it’s targeted based on your interest.
OptinMonster offers several such targeting options to ensure the popups are shown to the right people at the right time.

Today, we will look at three of these rules:
- Timed display control: using timing display
- Exit Intent: detect when visitors are about to leave
- Monsterlinks: Open Modal Popup on Hyperlink Click
Timed Display Control
Timing display is a great way to show your popup only to your most engaged visitors.
For example, you can show your ConvertKit popup after someone has spent 90 seconds or more on your site.
First, head to Display Rules.

Then, select Time on Page.

Now, you can set the time.

Add case study
Exit Intent®
Exit popups show an enticing offer to your reader just as they’re about to leave your site.
Do they work?
Brendan Hufford doubled conversions with exit-intent!
From the Display Rules tab, find and select Exit Intent®.

Then, you can choose whether to show on all devices.

Finally, you can target whether you only want to show the campaigns on specific pages.

Monsterlinks™
A Monsterlink is another great way to increase your list. With Monsterlinks, you can trigger a popup when someone click on a specified link.
Kindlepreneur’s Monsterlinks optin converted at 72.8%.
From Display Rules, select Monsterlinks™(On Click).

Next, copy and paste your code.

Add your code to any link or image on your site to create a popup that opens on hyperlink click.
Step 4: Integrate Your Popup With ConvertKit
Adding OptinMonster to your ConvertKit account is quick and easy.
Head over to Integrations.

Select ConvertKit from the dropdown.

Next, you need to enter an integration name and API key.
Head over to your ConvertKit account to grab your API key.
From your dashboard, click Account Settings.

On the next page, copy the API key.

Paste the API key into OptinMonster.

Click Connect to ConvertKit.
Once your ConvertKit account is connected, select the “Email Provider Form” you would like to send the leads from this campaign to.
Step 5: Publish Your ConvertKit Popup
The final step is to publish your ConvertKit popup on your website.
Now, OptinMonster connects easily with any website,
For this tutorial, we will walk through adding your ConvertKit popup form in WordPress.
But if you’re not using WordPress, don’t worry. Check out this easy guide: How to Add OptinMonster to Any Website
So, how do you embed a ConvertKit form into WordPress?
To start, log into your WordPress dashboard.
The first thing you need to do is install and activate the OptinMonster plugin. Here’s a guide for quickly installing and activating a plugin.
Now, you’ll connect your OptinMonster account.
Select Connect Your Account.

Next, select Authorize OptinMonster.

The next screen is the OptinMonster login page. Enter your details and click Login.

Finally, select Connect to WordPress.

That’s it! Now, your ConvertKit popup will appear on your website.
- Email Marketing Made Simple: A Step by Step Guide [+ Examples]
- How To Get More Email Subscribers in Less than 5 Minutes
- How to Grow Your Email List: 80+ Proven and Simple Ways
Ready to grow your list with a ConvertKit popup? Get OptinMonster today.

-01 - OptinMonster")


Add a Comment