Are you wondering whether PushEngage is the right push notification software for your business? Or maybe you’re just discovering it and want an honest review from someone who’s actually used it.
Either way, you’re in the right place.
I’ve been using PushEngage for months now, and let me tell you—it’s a game-changer. I wasn’t sure about push notifications at first, but after seeing the results firsthand, I can confidently say this tool is one of the best investments I’ve made for my business.
In this review, I’ll break down what makes PushEngage my go-to push notification software. We’ll cover:
- Ease of Use
- Platform Flexibility
- Audience Segmentation
- Campaign Scheduling & Automation
- Smart A/B Testing
- Affordability
By the end of this post, you’ll know exactly why I rely on PushEngage to drive traffic, increase conversions, and keep my audience engaged.
What Is PushEngage?

PushEngage is a push notification software that helps you connect with your audience through small, clickable pop-ups. These notifications work great for:
- Driving more traffic to blog posts
- Growing your email list
- Boosting revenue with promotions
- Reducing cart abandonment
I was skeptical at first because I thought setting up push notifications would be a hassle. But PushEngage proved me wrong—it was one of the easiest tools I’ve ever integrated into my website.
Unlike email marketing, where users have to enter personal details, PushEngage lets visitors subscribe with a single click. That meant I could grow my subscriber list fast, without asking for names or emails.
PushEngage Review: Is It Best?
For our PushEngage review, we’ll be analyzing the tool through the following categories:
- Ease of Use
- Platform Flexibility
- Audience Segmentation
- Campaign Scheduling & Automation
- Smart A/B Testing
- Affordability
Feel free to jump to the section that interests you most. Otherwise, let’s get started.
1. Ease of Use
I don’t have time to learn complicated software, and I bet you don’t either. That’s why I am a big fan of PushEngage: it makes it EASY for anyone to start using push notifications immediately.
That’s because PushEngage doesn’t require any coding or “tech skills” to set up and manage.
Instead, you’ll simply need to add a bit of code to your site. You can also use the WordPress plugin or Shopify app if you’re website was built with those platforms.
The point is that once you’ve configured PushEngage in 10 minutes or less, you’ll be able to send targeted notifications to your audience. And the user dashboard couldn’t be easier to navigate.
You’ll just need to add information to a few clearly labeled field boxes:
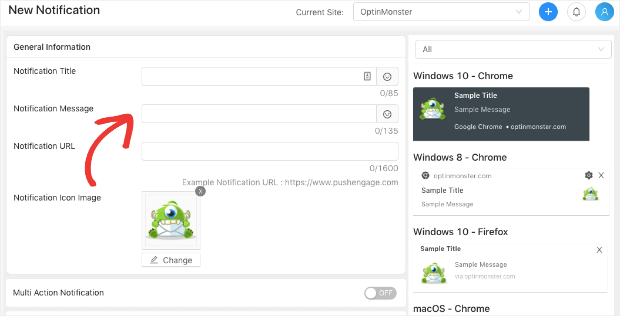
And just like that, your notification is ready to go to your pre-defined audience.
At the end of the day, if you’re concerned about push notifications being too technical for you, don’t be.
PushEngage is a tool that makes the process incredibly easy and has an impressively low learning curve.
2. Platform Flexibility
I’ve switched website platforms a couple of times, so I know the frustration of finding out a tool I love isn’t compatible with my new setup.
Let’s say you built a quick site with Wix, for example. And it was great when you were just starting out.
But now that you’re getting more traffic, you need to expand your marketing strategy with tools that aren’t as Wix-friendly.
So you decide to switch to another platform like WordPress.
That means all of your existing tools need to be WordPress compatible, or you’ll be left trying to replace that tool.
That’s why I love that PushEngage works with ANY platform. Whether you’re on WordPress, Shopify, Wix, or even a custom-built site, PushEngage integrates seamlessly.
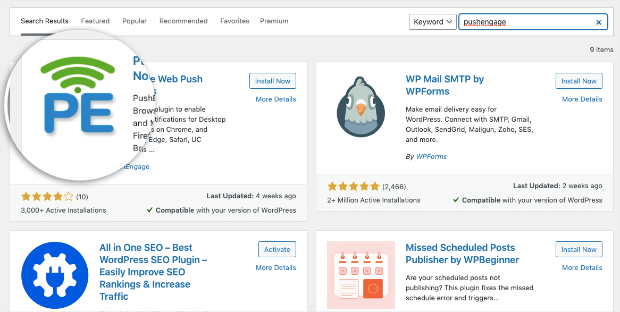
If you’re using WordPress, PushEngage comes as a convenient plugin:
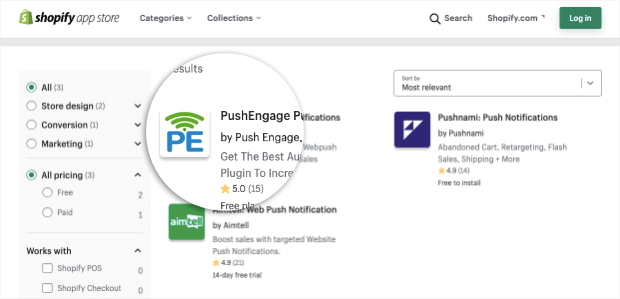
Or you can use the Shopify app to boost sales for your eCommerce store:
Using something else? That’s not a problem.
All you need to do is inject a small snippet of code into your site’s template file (like you’d do when connecting Google Analytics).
No matter which website you’re currently using or migrate to in the future, PushEngage will have you covered.
3. Audience Segmentation
One of the biggest reasons I stuck with PushEngage is its powerful audience segmentation.
“Segmenting your audience” (or “audience segmentation”) simply means organizing your target audience into smaller groups of people with similar interests or demographics.
This allows you to personalize your messaging even further and, in the end, increase conversion rates across your site.
Let’s say, for example, you sell clothing online. Your target audience consists of people in their 30’s and 40’s who value stylish clothes at affordable pricing.
You decide to run a new deal on women’s tank tops, and you want to let your audience know about it.
But sending this message to your entire audience wouldn’t be very efficient. That’s because you know that this offer wouldn’t appeal to men on your subscriber list.
If you’ve properly segmented your audience, though, this won’t be an issue. You could send this deal to women who have specifically looked at tank tops (or related products) in the past.
Then you can send other personalized offers to different segments of your audience (like men who’ve added shoes to their cart in the past, for example).
You can even take things a step further by segmenting your audience based on their purchase behavior. That would mean you’d have separate contact lists for people who like:
- T-shirts
- Jeans
- Shoes
- Sunglasses
- Sportswear
Or any other category of product you sell. When someone purchases one of these items, you can add them to that segment of your list.
When you have deals for those types of products in the future, you’ll have a highly targeted list of people to send it to.
In fact, this is the same strategy we use here with OptinMonster’s push notifications:
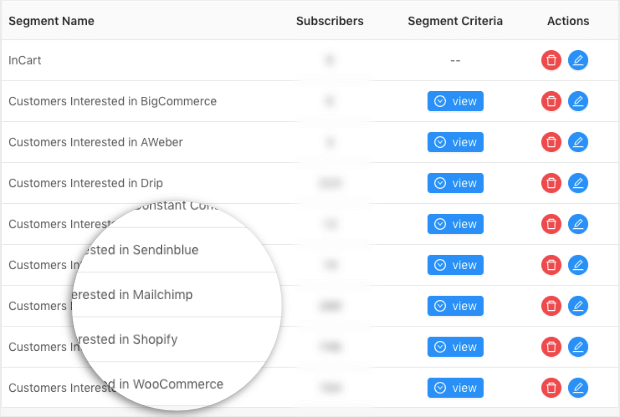
We break down the audience based on which email service provider (ESP) or eCommerce platform our subscribers use.
Why? Because we want to make sure we’re ONLY sending relevant information to our audience instead of sending out random notifications.
This not only drives more sales, but also drastically improves the user experience (UX) and creates more loyal customers along the way.
4. Campaign Scheduling & Automation
I love automation—it saves me time and keeps my business running even when I’m not actively working. PushEngage has two features I use all the time:
a) Campaign Scheduling
Scheduling my campaigns with PushEngage couldn’t be easier. From the dashboard, I am able to assign times and dates to push notifications:
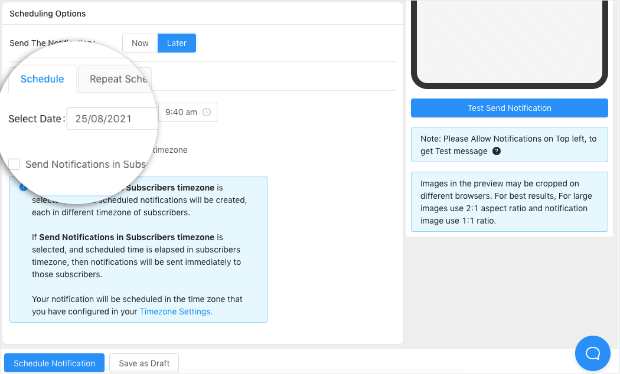
This allows me to plan out campaigns, schedule them, and go back to focusing on growing other parts of my business.
I can even adjust the sending schedule to be dynamic. That means I can send notifications when it’s a specific time zone for my audience.
If I schedule this kind of campaign for 9:00 am, for example, it would be 9:00 am local time. Someone in New York would get this at 9:00 am EST, and someone in Los Angelos would get the same message at 9:00 am PST.
This is great for figuring out the best times to send messages to my specific audience for the best results possible.
b) Automated “Drip” Series
You’ve likely heard the term “drip series” when it comes to email marketing.
This is when you have a set of automated messages that are triggered by new subscribers. The most common type is a “welcome series.”
When someone joins your mailing list, for example, they’d automatically receive a few emails over the course of a week.
These emails would give new subscribers valuable content, the information they need to start using your product, or simply guide them through your sales funnel.
And with PushEngage, I can do the same thing with push notifications:
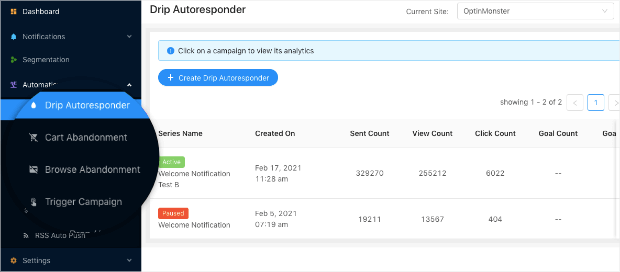
This allows me to set up automated campaigns for my new subscribers.
I set up automated sequences for new subscribers. For example, when someone allows notifications on my site, they receive a series of messages over a few days:
- A welcome notification introducing them to my best content
- A follow-up with a popular article or product recommendation
- A special offer to encourage engagement
This feature alone has helped me convert casual visitors into loyal subscribers and customers.
I can also send automated campaigns to help reduce cart and browser abandonment.
The point is that once you’ve set these automations up, you can leave them on autopilot. Then you can watch as your conversions automatically skyrocket.
5. Smart A/B Testing
In the last section, I talked about how push notification automations can boost conversions.
But here’s the question: how can you be 100% sure you’re getting the most conversions possible?
For that, you’ll need PushEngage’s powerful A/B testing features.
A/B testing is a process through which you send different messages to the same audience segment to see which is most effective.
The notifications are typically the same with ONE change to the image, heading, or message.
You might, for example, send a notification where everything is identical except the headline. So message A’s headline looks like this:
Trying to Grow Your List?
And message B’s headline looks like this:
Grow Your List FAST!
Both messages will go to a small portion of your audience to see which one gets more open and click-through rates:
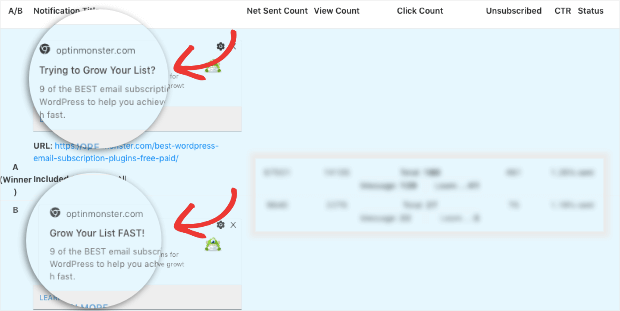
Then the winning message will automatically get sent to the rest of the subscribers on your list.
This allows you to be confident that you’re never leaving any conversions on the table.
At first, I wasn’t sure how much A/B testing would help. But once I started experimenting, I realized how much of a difference small changes can make.
For example, I once ran a test on a notification promoting a webinar:
- Version A: “Join Our Live Webinar on SEO Strategies!”
- Version B: “Boost Your Traffic with These SEO Hacks! (Live Webinar)”
Version B got 35% more clicks! Without A/B testing, I would have never known which message resonated more.
If you want to maximize your push notification performance, A/B testing is a must-have feature.
6. Affordability
I was pleasantly surprised at how affordable PushEngage is. Here’s a quick breakdown:

- Free Plan – $0/month for up to 500 subscribers
- Business Plan – $8/month for up to 50,000 subscribers
- Premium Plan – $15/month for up to 100,000 subscribers
- Growth Plan – $24/month for up to 250,000 subscribers
- Enterprise – Custom pricing for larger businesses
I started with the free plan and upgraded once I saw real results. At just $8/month, it’s a steal considering how much it boosts traffic and conversions. Plus, there’s a 14-day money-back guarantee, so there’s no risk in trying it out.
Want to see PushEngage in action for yourself? Try it out 100% risk-free today!
Final Verdict: Is PushEngage Worth It?
After using PushEngage for months, I can confidently say it’s one of the best marketing tools I’ve added to my business.
Here’s why I recommend it:
✅ Super easy to set up
✅ Works with any website platform
✅ Lets you segment your audience for better engagement
✅ Powerful automation and scheduling features
✅ A/B testing to maximize results
✅ Affordable pricing with a free plan to start
If you’re serious about increasing traffic, growing your list, and driving sales, PushEngage is a no-brainer.
I suggest you try it out for free and see the results for yourself. You’ve got nothing to lose—and if my experience is anything to go by, you’ll be hooked in no time!
👉 Sign up for PushEngage now and start sending high-converting push notifications toda
We hope you found this post helpful. If you did, you’ll definitely want to check out the following resources:
- How to Create a Push Notification in WordPress (the Easy Way)
- 9 Best Push Notification Software for WordPress (Compared)
- How to Increase Your Mobile Conversion Rates
These articles will have even more information on how you can attract new leads, grow your mailing list, and drive more revenue today!



Add a Comment