Sometimes people just need a little extra push to take you up on an offer. Even if it’s a good one that you just know they want.
In this tutorial, we’re going to show you how to create a tiered discount offer (sometimes called “nested coupons”) using a really cool OptinMonster feature called MonsterChains.
Requirements: To use MonsterChains you need a Growth subscription.
A tiered discount will give you the chance to reach out multiple times to visitors to your site who don’t take you up on your first (or even your second) offer. Think of it as onsite retargeting.
And just like retargeting ads, you can use it to achieve killer results like these OptinMonster customers:
- Podcast Insights used retargeting to achieve a 1099% increase in downloads
- DealDoktor combined retargeting with exit intent to improve conversions by 2100%
- OlyPlant used retargeting with Yes/No forms and MonsterChains to retain 5% of abandoning visitors and increase pageviews 157%
With this tutorial, you’ll have the tools you need to create a targeted tiered discount triggered by MonsterChains that will give you awesome results, too. And, we’ll walk you through the whole thing, step by step.
Let’s get going!
What Is a MonsterChain?
A MonsterChain is a special way of linking OptinMonster campaigns to show or hide campaigns based on whether a visitor has seen, closed, or converted on previous campaigns.
This is useful to provide follow up campaigns that only show when a visitor declines your initial offer or to target only the visitors who are leaving your site without subscribing.
How to Create a MonsterChain
Important: Global Cookie Settings must be set to 0 to use the MonsterChains feature.
Step. 1 Create a Campaign (or Choose One to Edit)
Creating impressive, high-converting optin campaigns is super easy with OptinMonster.
Start by logging in to your OptinMonster account and pressing the green Create Campaign button.

We’re going to use the Popup campaign type. Popups are hard to miss and convert really well.

Choose a template for your optin. We’re going with Minimal.

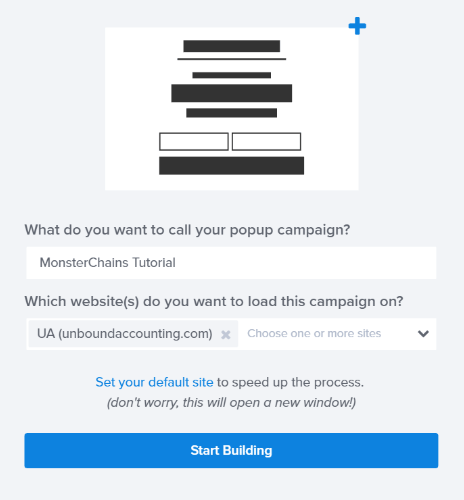
Once you choose your template, you’ll be able to name your campaign, choose the site you want it to appear on, and start building.
Step 2. Edit Your Campaign
OptinMonster’s drag and drop builder is quick and easy to work with.
To edit your campaign, just click on the item you want to edit in the live preview to bring up the editing tools on the left. Make your changes and see them in real time!
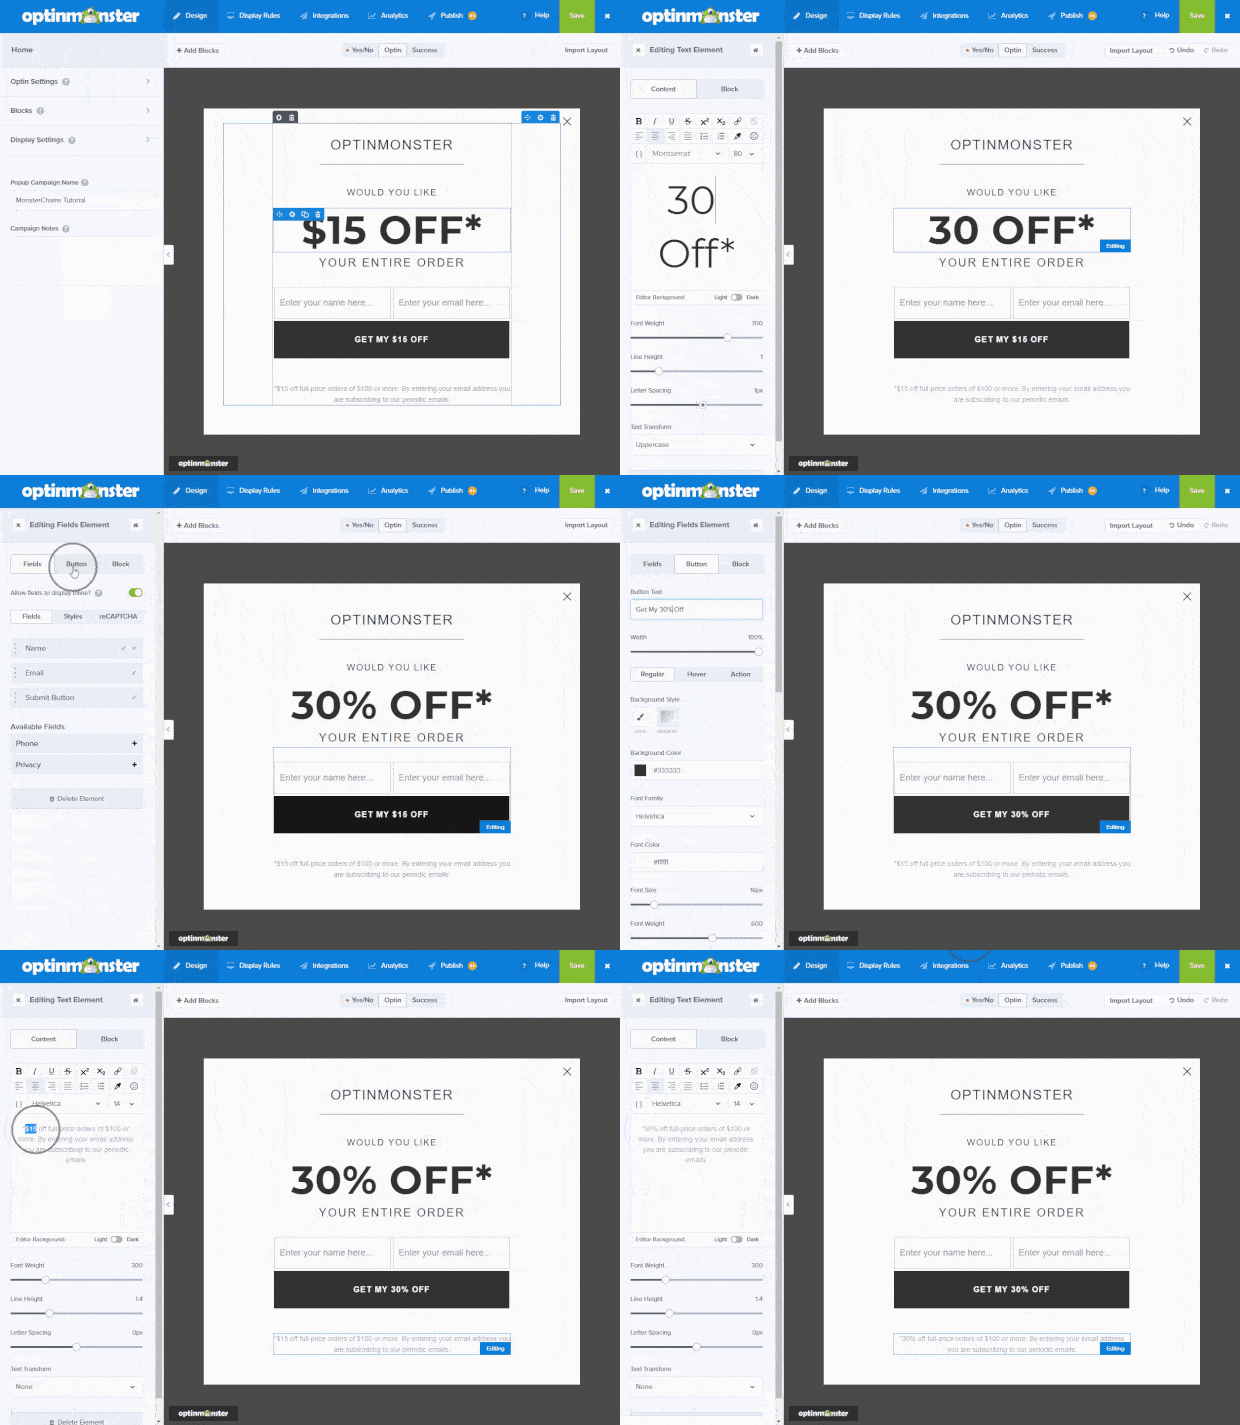
For more detail on the builder and the cool things you can do with it, check out our builder overview.
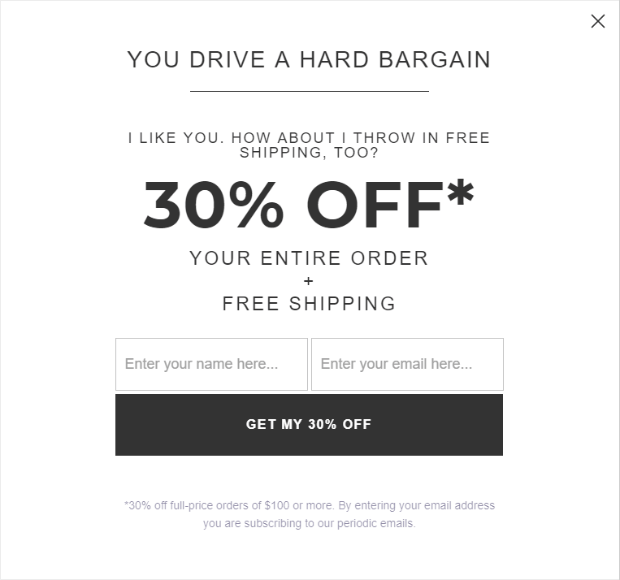
Now, use the Yes/No or Success view to create a second campaign adding free shipping to the 30% off discount we already offered.
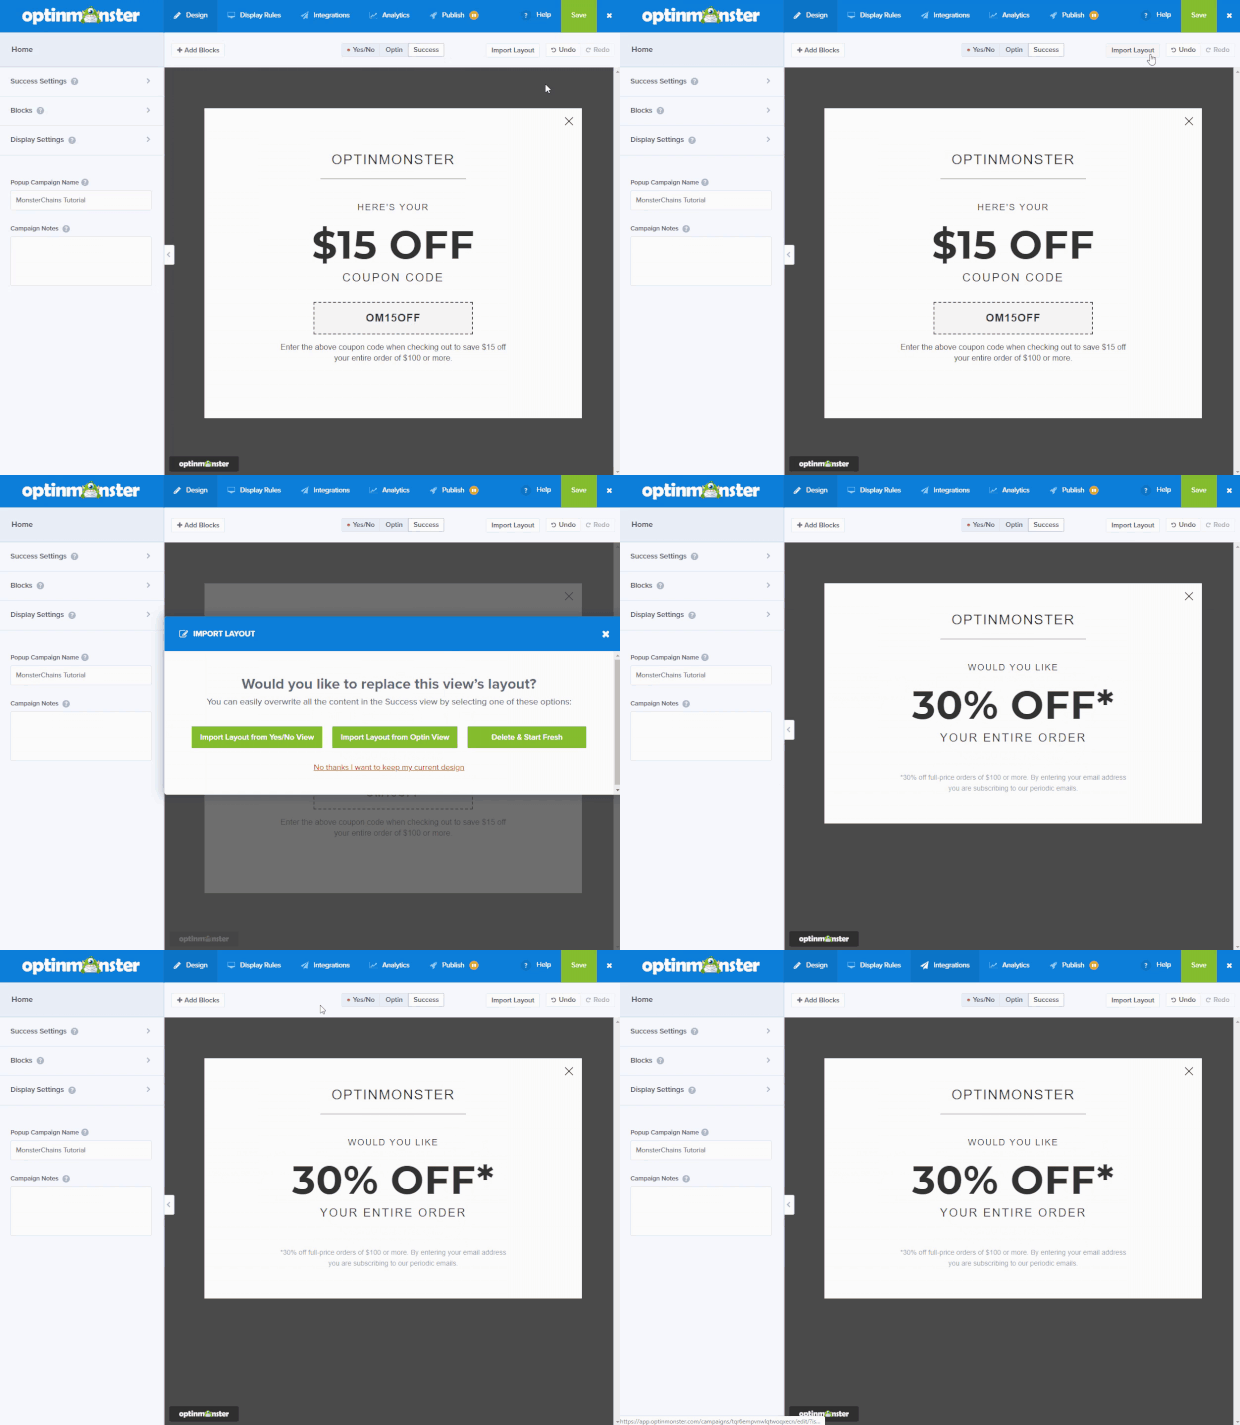
If you want to copy the layout from the Optin view to the Success view, you can do that by opening the Success view and clicking Import Layout:
Here’s what your new offer might look like:
Step 3. Set Up Your Display Rules
Now that you’ve designed your optin, it’s time to set up your Display Rules.
To do that, go to the Display Rules tab and use the conditions to set up our first interaction with visitors.
For this tutorial, we’re going to target all visitors who have visited at least 3 pages by adding a condition of If pages viewed is at least 3:
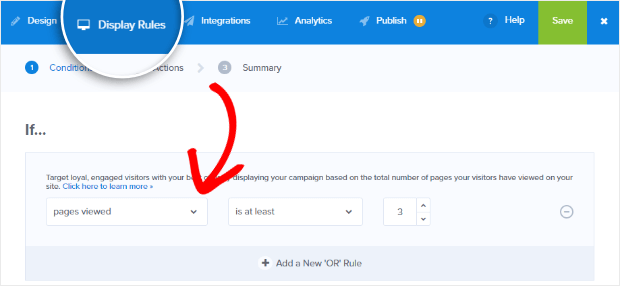
Then, click Next Step and make sure that you’re showing the Optin View and click Save. This means that our optin view will show up once visitors have seen at least 3 pages on our site.
Next, we’re going to add another ruleset for the second offer in our tiered discount. To do that, click on +Add New Ruleset (we’re going to name ours Second Offer).
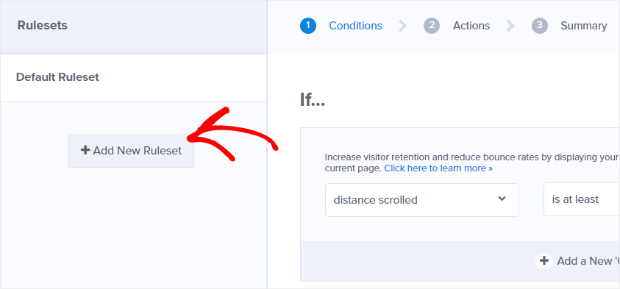
For this ruleset, we want to target visitors who are trying to exit your site but haven’t already opted into your first campaign.
We can do that by going to the condition dropdown and choosing an interaction rule.
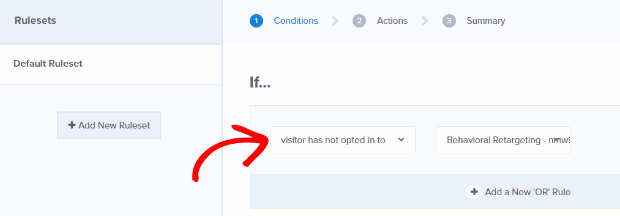
You have quite a few interaction rule options to choose from:
- Visitor has opted in to
- Visitor has not opted in to
- Visitor has closed
- Visitor has not closed
- Visitor has seen
- Visitor has not seen
After you choose the rule you want, select the campaign you want to target in the dropdown that appears.
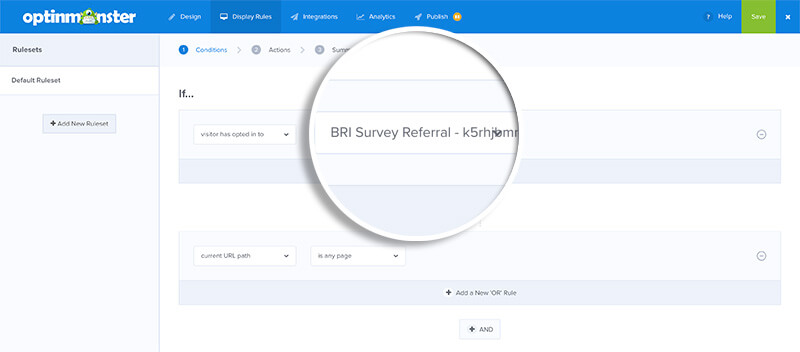
In this tutorial, we’re using the same campaign, but you can use Display Rules to show or hide completely separate campaigns! As long as the campaign is in your account, you can create a rule for it.
Once again, click Next Step to continue to the Actions. This time, instead of showing the Optin view, we want to show the Success view.
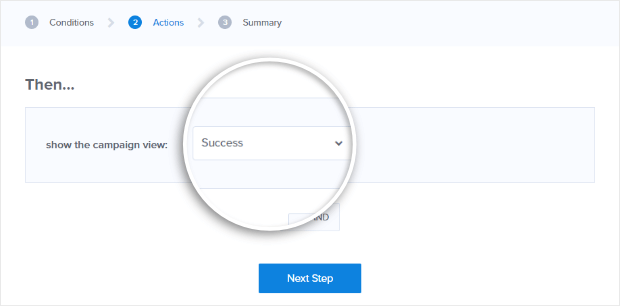
That’s all there is to it! Now you can use MonsterChains to deliver targeted, tiered discount offers to visitors and successfully counter objections.
Don’t use OptinMonster yet? What are you waiting for? Internet marketing is hard, but OptinMonster makes it easy to get leads and get them to convert! Get started with OptinMonster RIGHT NOW!

