Do you need the easiest and quickest ways to customize headers in WordPress?
When navigating your website, there is nothing more important than your header. After all, headers appear on every single page, so you need to make sure they look and work perfectly.
In order to customize your header, you obviously need a way to edit them. So, you’d think that every WordPress theme would offer that essential tool.
Well, unfortunately, they don’t.
That’s why we’ll show you a couple of quick and easy ways to customize headers in WordPress.
What is a Header in WordPress?
A header is a constant part of every website that appears at the top of every post and page.
Headers have two main features: the brand’s logo and site navigation.
For example, here’s our header here on the OptinMonster website:
You can see that we included a call to action on our header. That’s the green Get Started button.
Though, there are other things some sites will add, including a search box, contact information, and more.
What’s unfortunate is that many people overlook the header when building their websites. People crave simplicity when dealing with any website.
That’s basically the job of your header.
Why Should I Edit the WordPress Header?
A header has 2 main functions: providing a great first impression and improving your site’s user experience.
When visitors come to your site, one of the first things they’ll see is the header. So, if it looks sloppy or you don’t have one, that will speak volumes to people.
And it won’t be good.
The key with headers is finding a balance of looking good and representing your brand while also letting people easily navigate your site.
In terms of navigation, you’ll want to keep the links to the most essential pages up in your header. For instance, let’s look back at the OptinMonster header:
When people come to our website, they fall into two categories: they are interested in OptinMonster, or they already use OptinMonster.
See how the header is broken into two areas? The upper portion has links important to existing users. Then in the bottom half, you’ll find pages that the other demographic needs.
This makes the top information accessible to every user. As people move through your site, they’ll appreciate having everything readily accessible.
All in all, it’s the perfect equation to a positive user experience and leaves a warm impression of your company.
So, are you ready to edit your WordPress header?
Yes? Great! Let’s get started.
How to Customize Headers in WordPress
We’ve talked about the where and why of WordPress headers. Now, we’ll cover the how.
Today, we’ll show you two different methods. If you know which one you’d like to use, feel free to use our table of contents to jump right to it.
Table Of Contents
- Method 1: Edit the Header in the WordPress Theme
- Method 2: Change the WordPress Header with a Website Builder
Now, it’s time to start switching up your header into something spectacular (and useful)!
Method 1: Customize Headers in WordPress Theme
If your theme allows it, you can customize the header directly in WordPress.
Though, not every theme is created the same. Unfortunately, that means you may not be able to change it.
On that note, not every theme has the same options when customizing your WordPress header. Some only have some basic options. Meanwhile, some others have deep and robust editing options.
So, if you haven’t already chosen a WordPress theme or are looking for a new one, take time to find out what you can and can’t do with it.
If you already have a theme installed, go ahead and continue with this method.
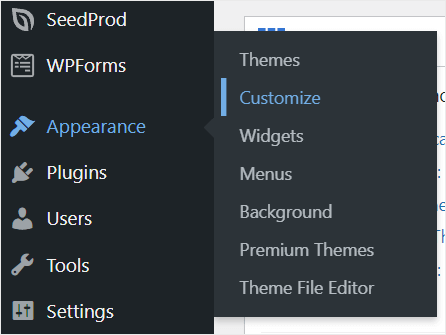
First, access your WordPress admin dashboard. Then, go to Appearance » Customize:
This will take you to your theme’s customizer. If you’ve done any design work on your site before, then you’ll already be familiar with this screen.
Pro tip: Some themes have custom designers. If your screen doesn’t match our guide, check your theme’s documentation for instructions.
For most themes, the builder is intuitive and user-friendly to use.
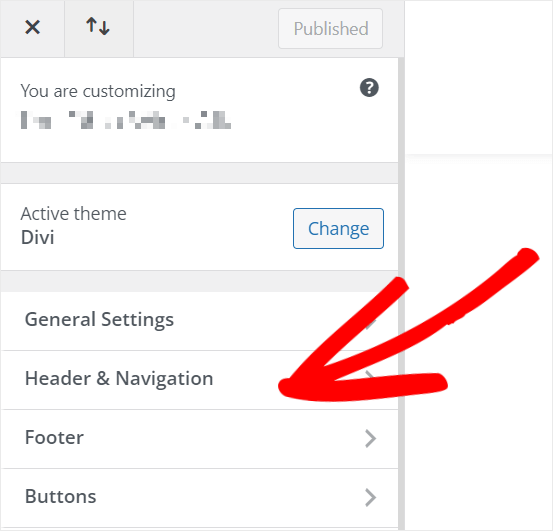
First, find the Header & Navigation tab:
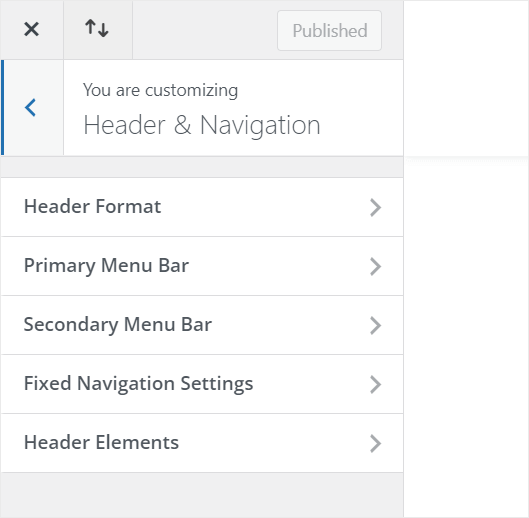
After that, you’ll now be able to start customizing your WordPress header. Again, depending on your theme, these options will be different:
As you can see, this theme will allow you to edit the header format, menu bars, settings, and elements. That includes fonts, colors, your logo, and more.
Again, these options can be vastly different depending on your WordPress theme.
Once you’re done changing your header, you can click on Publish. That will push your new header right to your live site.
Method 2: Change Headers in WordPress with a Website Builder
But what if your theme doesn’t have the options you need?
What if your header just isn’t looking or performing as you want it to?
In that case, method 2 is your ideal way to customize your WordPress header. In this method, we’ll use a WordPress site builder.
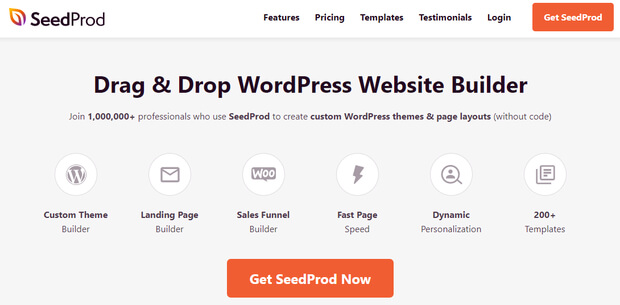
Today, we’ll use SeedProd.
SeedProd is a premium WordPress page builder where you can quickly and easily edit custom headers and footers.
In addition, SeedProd has everything you need to create your own pages and themes- all without needing a professional coder or developer.
Not familiar with SeedProd? That’s OK! We’ll walk through each step one by one.
Step 1: Install and Activate SeedProd
First, go to SeedProd and grab your own account.
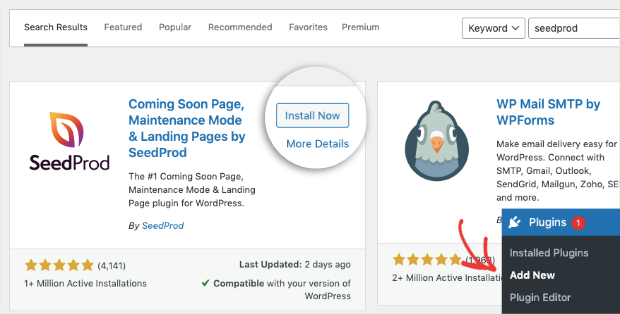
Then, sign into WordPress. From the admin dashboard, click Plugins » Add New.
Type “SeedProd” into the search bar. When you see the plugin, click Install Now:
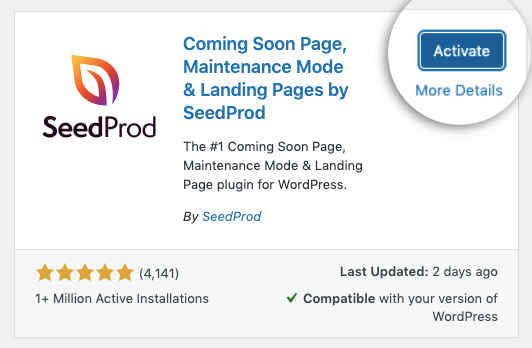
When the plugin is installed, click Activate:
After SeedProd is activated, it’s time to enter your license key. You can find this in your account information on the SeedProd website:
Copy your license key and go back to your WordPress dashboard.
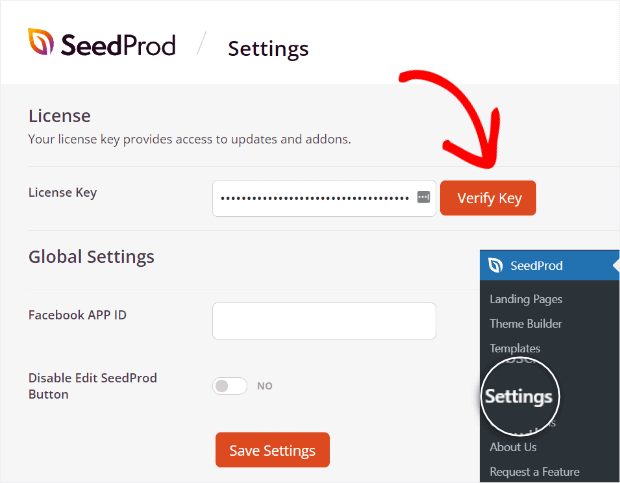
Next, go to SeedProd » Settings and paste your license key in the License Key box:
Finally, click on the Verify Key button to activate your license.
Step 2: Create Your Header
Now, it’s time for the fun part. Finally, we’re ready to start customizing your WordPress header.
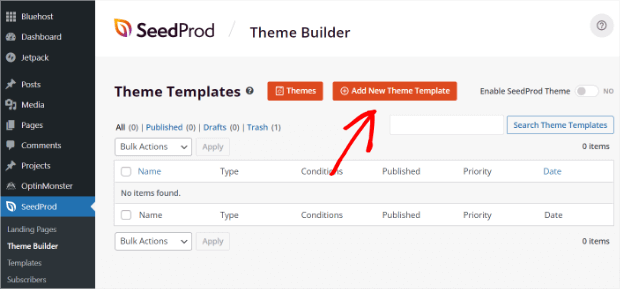
First, go to SeedProd » Theme Builder and click on Add New Theme Template:
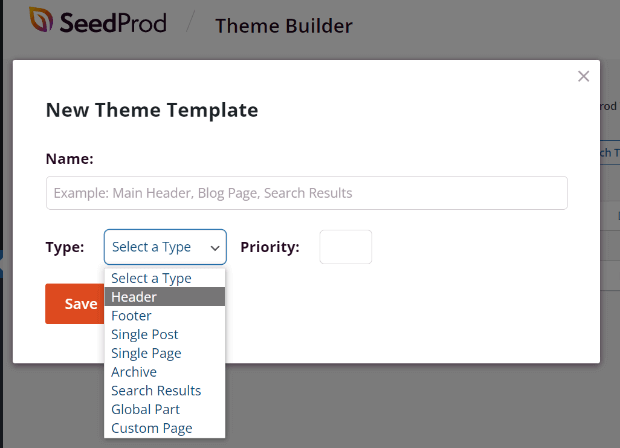
This will bring up a new screen that has a prompt to both name and select your template.
In the type drop-down menu, select Header. Then, click Save:
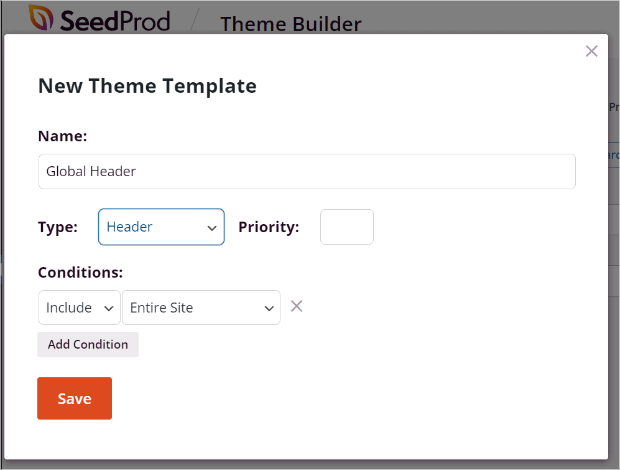
After that, you’ll see a Conditions menu. In this menu, you can name specific pages to include or exclude from your header:
The default options are perfect for global headers (a header that shows across your entire site). When you are finished, click Save.
Step 3: Customize the WordPress Header
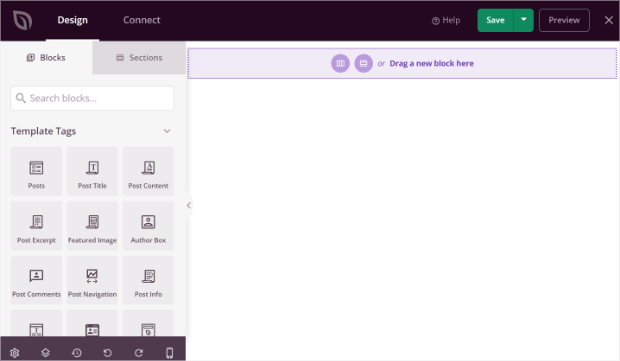
After clicking save in the last step, you’ll be taken to SeedProd’s drag and drop visual builder. At first, your screen will be blank with a settings menu on the left.
Once you’re ready to start designing, click on the Add Columns icon in the light purple bar. For this tutorial, we chose a three-column layout:
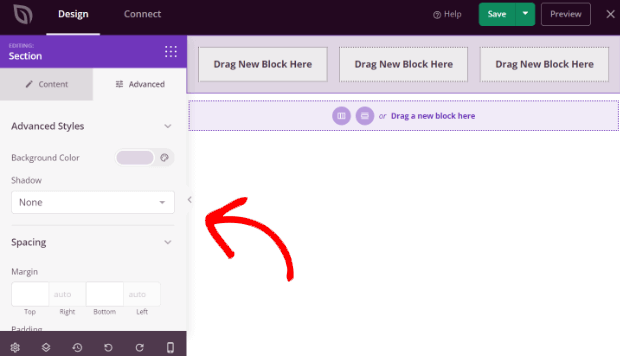
Now, the SeedProd builder will add columns to your builder. At the same time, it’ll bring up section settings.
You’ll notice that the left panel now has options to customize the background style and image, as well as the header width, spacing, and more:
Now, we are ready to add content to the WordPress header.
Step 4: Add Header Content
This step may seem daunting, but it’s actually really easy.
If you can point, click, and drag with your mouse, you are more than prepared for this.
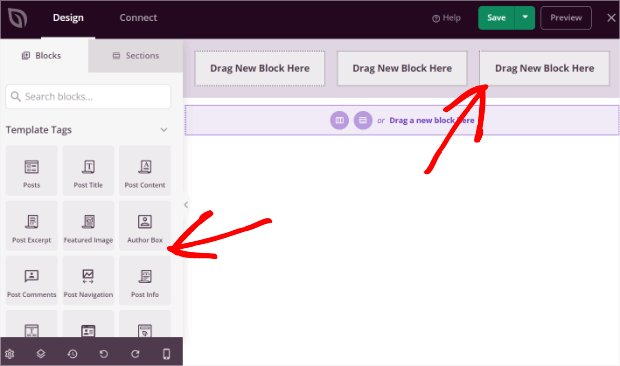
Go ahead and click on any of the header blocks. This will bring up the content block options on the left side menu. These are known as Template Tags:
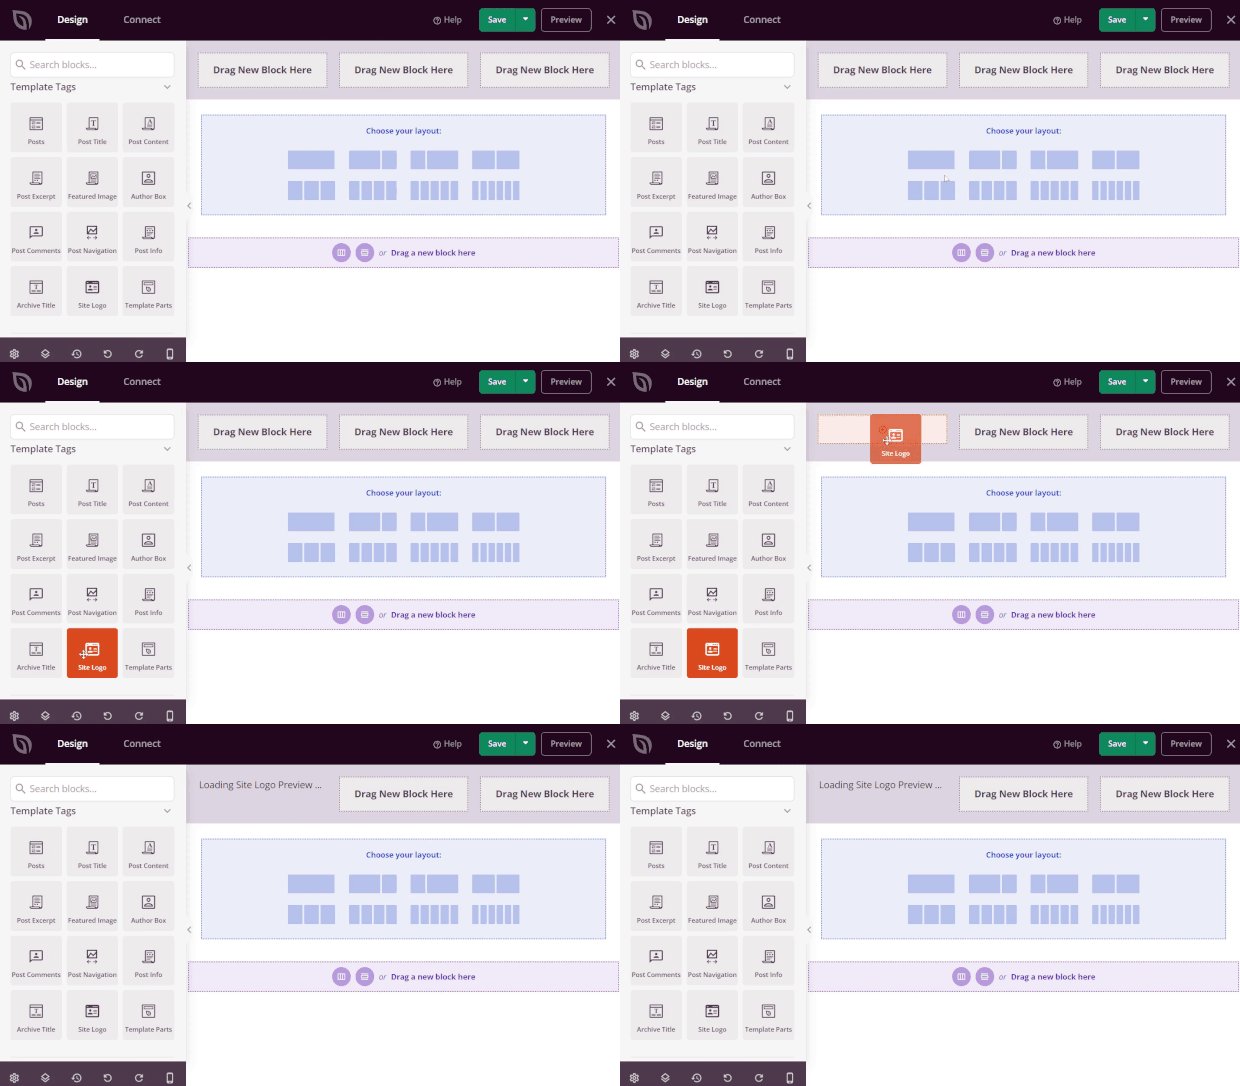
Then, scroll through the list to find the content you want to add. Click on it and drag it to where you want it to appear in the header.
Feel free to explore all of the options here. Again, you can add everything with a drag and drop.
Simple, right?
Finally, when you are completely satisfied with your header, click the drop-down arrow next to Save and click Publish.
Tip: In order for your SeedProd header to appear on your site, you’ll also need to create the rest of your theme with SeedProd. For a complete guide on this, check out SeedProd’s tutorial on creating a custom WordPress theme.
And that’s it! You now know how to customize your WordPress header.
We hope this tutorial helped you create your perfect header.
If you liked this post, then you may also want to check out:
- 17 Proven Methods to Get More Email Subscribers Today
- 11 Best WordPress Marketing Plugins (Compared)
- 9 Best Push Notification Tools for WordPress (Compared)
These articles will help you get higher conversion rates, market more efficiently, and stay in contact with your customers.
And if you’re ready to take your marketing to the next level with targeted and conversion-ready popups, check out OptinMonster!






Add a Comment