Are you using iContact as your email service provider, but you’re looking for ways to get more subscribers on your contact list?
One of the biggest problems marketers face with email marketing isn’t how to create a lead magnet or build an awesome product.
It’s how to grow their email list.
That’s why, in today’s post, we’re going to show you exactly how to create an iContact popup that grows your email list with the leads you’re looking for.
But before we do, let’s talk about what iContact is and how it can help your email marketing plan.
What Is iContact?
iContact is an email marketing solution that helps you communicate more effectively with your audience:
Put more simply, iContact is an email service provider. That means you can create email campaigns and send them directly from your iContact account.
They offer loads of helpful features get you the most value from your email marketing strategy, such as:
- Drag and drop editor for building email campaigns
- A/B split testing
- Automation
- Several helpful integrations
And more. They’re an excellent solution for marketers who are looking for an email service provider but don’t want to pay for added marketing tools they’ll never use.
Plus, they have an excellent support staff that can help when you run into any problems along the way.
But once you have the email service provider, the real challenge starts:
How do you get people on your contact list in the first place so you can send them targeted email campaigns?
For that, there’s no better tool than OptinMonster:
OptinMonster is the world’s #1 lead conversion software. That means we’re the best at getting people to take action on your website. We help you increase:
- Sitewide traffic
- Email subscribers
- Profits
How do we get you higher conversion rates from your calls to action (CTA)? By using highly targeted optin campaigns.
Optin campaigns are small messages that appear to your site’s audience, asking them to take some specific action. You may ask people to go read another article, join your email list, or check out a product related to the ones they have in their shopping cart.
Whatever your goal is, OptinMonster lets you craft the right message to the right people at just the right time in their customer journey. We have several types of optin campaigns to choose from, including:
- Lightbox popups
- Floating bars
- Slide-in scroll boxes
- Fullscreen welcome mats
And much more. Here’s an example of the iContact popup we built for today’s demo:
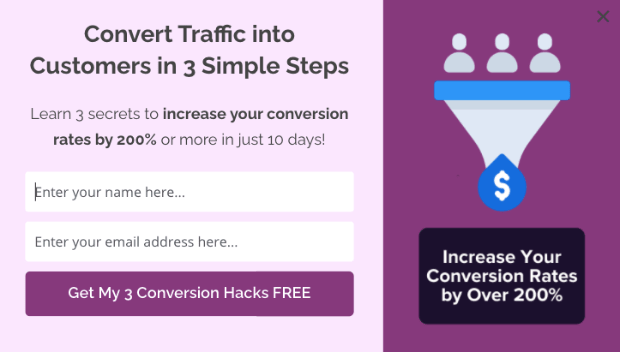
This campaign took less than 5 minutes to create. Ready to build your own?
Let’s get started!
How to Create an iContact Popup
Step 1: Select and Create Your Template
First and foremost, log into your OptinMonster account:

Then go to the upper right-hand corner of your dashboard and click Create New Campaign:
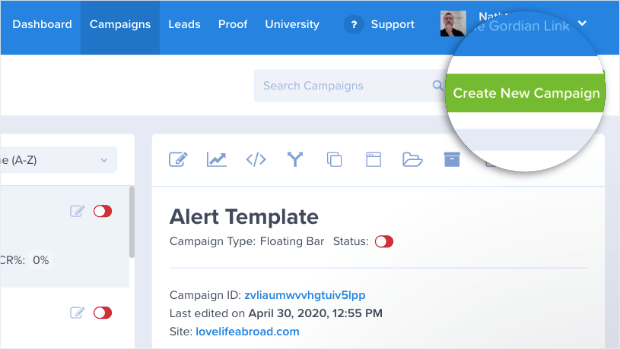
Here, you’ll need to select your campaign type. For today’s tutorial, we’ll choose a Popup campaign:

Now it’s time to decide which template you want to use:
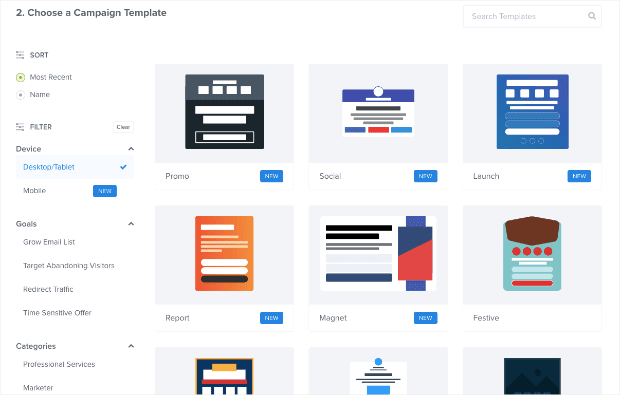
OptinMonster has over 50 pre-built templates that you can choose from. Plus, you can filter your template options by:
- Device
- Goal
- Category
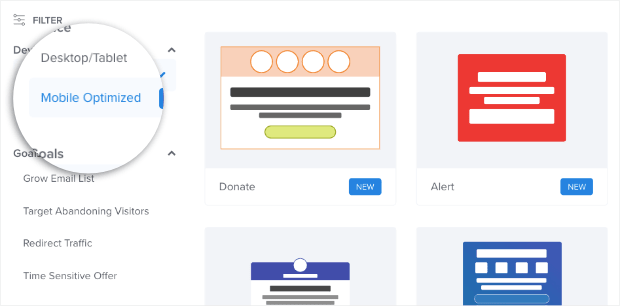
That first one is particularly useful, especially since web traffic is increasingly visiting sites from their mobile devices.
You can select Mobile Optimized templates to make sure that your iContact popup looks stunning to users coming from their smartphones:
And if you want to build your popup entirely from scratch, you can use our Canvas template:
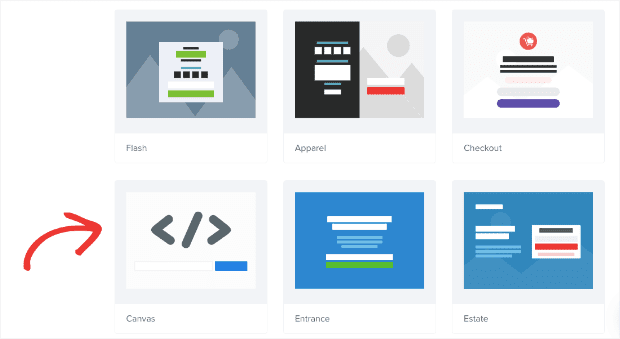
You can use our Canvas template to build a 100% unique campaign. But the best part is that there are no coding skills required.
Our drag and drop editor allows you to build beautiful popup campaigns in minutes. That way, you can save time and energy to focus on other parts of your business.
For today, we’ll choose the Magnet template:
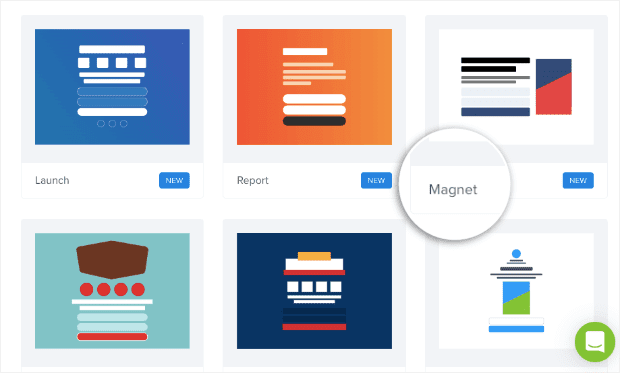
This is an excellent option for growing your email list. It has tons of room for compelling copy on the left-hand side. But, on the right, you can also add an eye-catching image of your lead magnet.
Not sure what a lead magnet is or how to make one? Check out this article on 69 lead magnet ideas you can start using today.
Once you’ve determined which campaign you’ll use, it’s time to start tailoring the template to your brand’s style, message, and audience.
Step 2: Design Your iContact Popup
OptinMonster makes it easy for you to design your campaigns. Our editor is user-friendly and highly intuitive.
We won’t get into too much detail on how to modify every aspect of your campaign in this post. There are simply too many customization options to choose from to cover in one article.
For today’s tutorial, you simply need to know that all of our campaigns are composed of “blocks.” You have text blocks, image blocks, video blocks, button blocks, and more.
If you want to edit any of these blocks, all you need to do is click on it in your OptinMonster editor. That will pull up the editing tools on the left-hand side menu.
If we wanted to change the text block on our Magnet template, for example, we would just click on the text in the editor.
We can do the same for the image block. We’d simply click on the image to change what is displayed for that block:
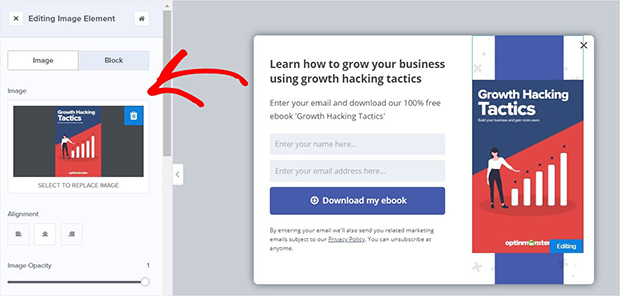
We can repeat this process for any of the blocks in our iContact popup.
And if we wanted to add a new block, that’s easy. Click +Add Blocks at the top of your OptinMonster editor:
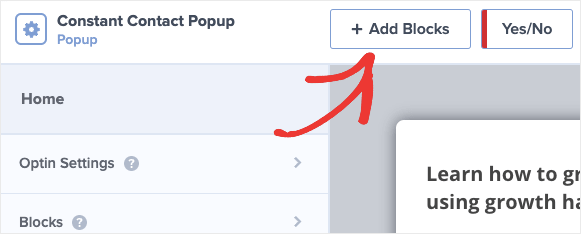
That will bring up a list of different block elements you can add to your campaign on the left-hand side. You can add:
- Text
- ChatBot
- Countdown timer
- Divider
- Image
- Video
- And more
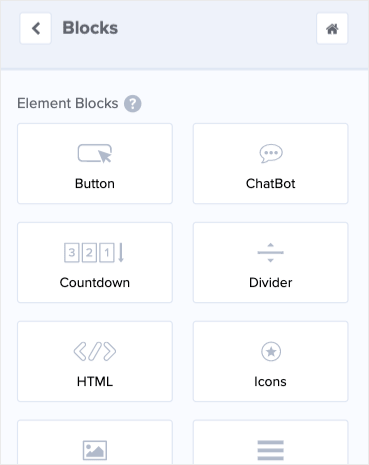
Then just drag and drop the new block into your OptinMonster campaign where you’d like it to appear:
Like we said, designing your campaign is easy with OptinMonster. Here’s the iContact popup we made specifically for this demo:

This took us less than 5 minutes to create. Once you’ve built a popup campaign that’s perfect for your brand’s style, message, and audience, it’s time to set your display rules.
Step 3: Configure Your Display Rules
When you’re deciding where, when, and to whom to show your iContact popup, there are 2 types of campaign rules you can use:
- Targets
- Triggers
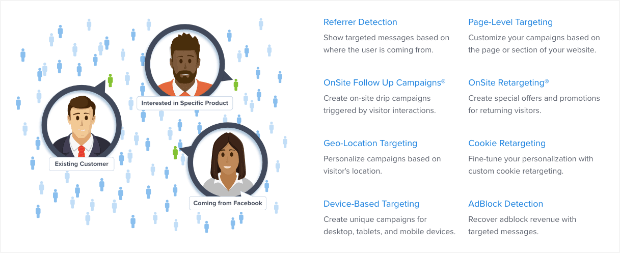
Before getting into how you can configure these rules, let’s get clear on what each means.
Targets use specific characteristics of your visitor to decide whether your popup will be shown. For example, you can display your popup depending on which:
- Device your user is coming from
- Web page your visitor is currently viewing
- Where your user is physically located
And much more. Triggers are a little different. Rather than relying on certain characteristics, triggers are based on your user’s behavior. Your popup could be displayed whenever a user is:
- No longer engaged with your content (Inactivity Sensor™)
- Actively leaving your website (Exit-Intent® Technology)
- Scrolling down a certain percentage of your page (Scroll Trigger)
And again, much more. The targets and triggers that you use will change depending on the goals of your campaign.
In this tutorial, we’ll be using an Exit-Intent® trigger. That’s because most people who are leaving your website never come back.
And exit intent popup is a great way of catching your audience’s attention and getting them to sign up to your email list.
In fact, check out some of the following examples of how exit intent popups helped real companies just like yours:
- Rich Page boosted conversions by 316%
- Crossrope exploded their list by over 900%
- Bonjour Lisbonne doubled its email subscribers
Go to the top of your OptinMonster editor menu and click Display Rules:

You have 2 default display rules set. Your iContact popup will show:
- When the time on page is at least 5 seconds
- On every page of your site.
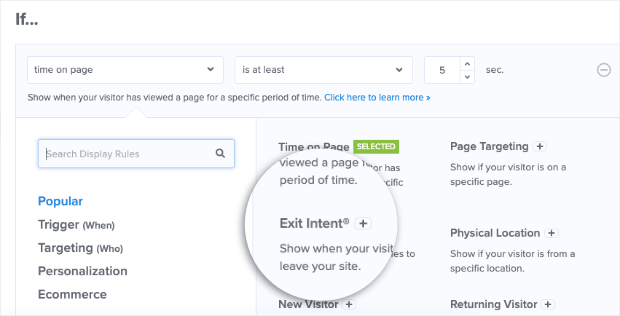
So now, you need to set your Exit Intent® trigger in place of the time on page rule.
To do so, click on the first default condition (time on page) in your display rule menu. Then find and click Exit Intent®:
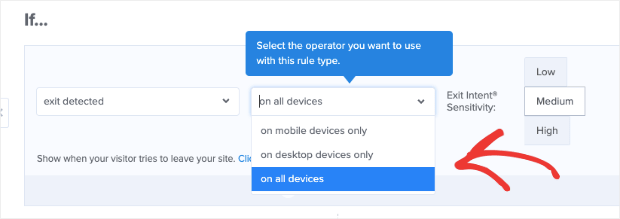
You need to choose which device you want to show your iContact popup on. Your options are:
- Desktop
- Mobile
- Both
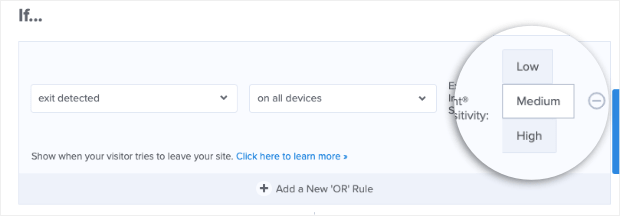
Finally, click on the sensitivity level you want for your exit intent popup. This will determine how quickly your popup appears as a user’s cursor moves toward the back button. Your level of sensitivity can be set to:
- Low
- Medium
- High
You should know that the sensitivity level will change the type of trigger created for mobile devices. That’s because there’s no mouse cursor to track on smartphones, so the trigger is designed on different patterns of behavior to detect when a user is leaving your web page.
Low and Medium sensitivity make a scroll up trigger. And High sensitivity makes a back button trigger.
To learn more about how mobile exit intent works, you can refer to this post on how to create a mobile exit intent popup that converts.
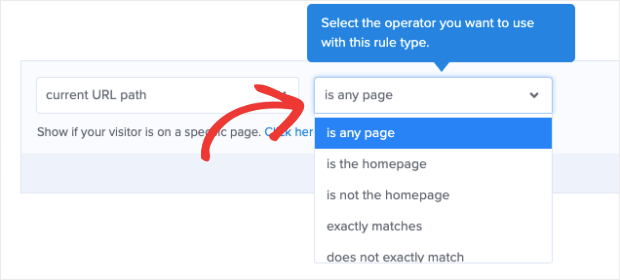
The next question will be where your iContact popup should appear on your website. As we said before, your popup will display on every page by default.
You can change this rule by clicking on the condition current URL path and designating where your popup will appear from the drop-down menu. There are many options for this, including:
- The homepage
- Specific URLs
- URL paths
- And more
Once you’ve settled on the best display rules for your popup, it’s time to integrate iContact with OptinMonster.
Step 4: Integrate iContact with OptinMonster
Now you need to integrate your iContact account with OptinMonster. Doing so is incredibly simple.
Click Integrations at the top of your editor:

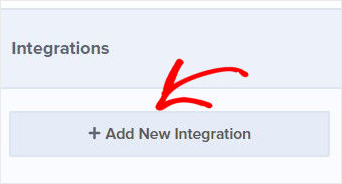
Then go to the left-hand side menu and click + Add New Integration:
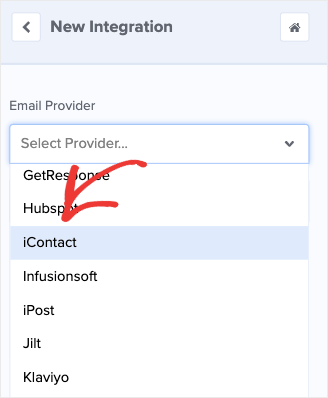
Then select iContact from the drop-down menu:
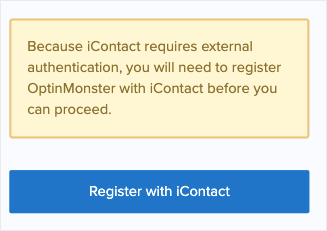
Now you’ll need to register with iContact. Click Register with iContact:
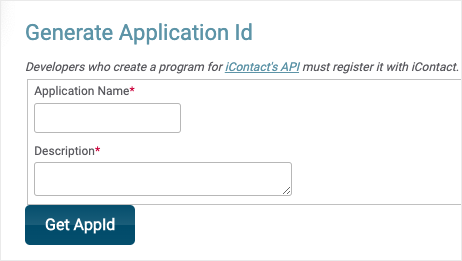
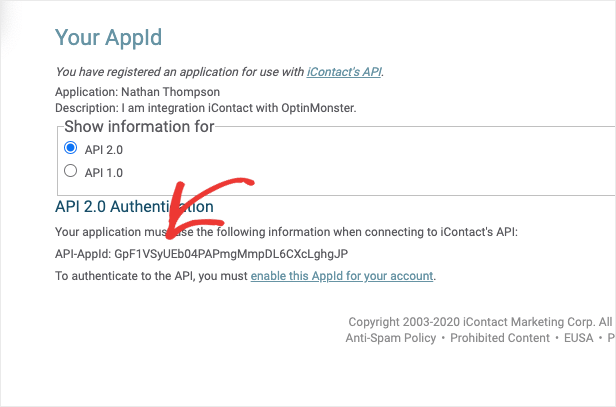
This will open up a new window to generate an Application ID. Insert your name and a small description of why you need this authentication. You can simply write something like, “I am integrating iContact with OptinMonster.” Then click Get AppID:
That will generate your iContact’s API:
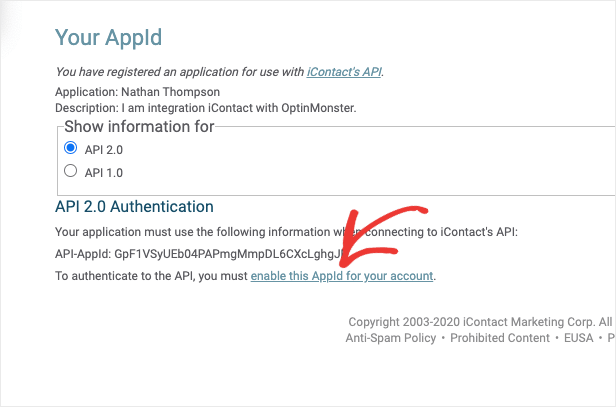
Now you need to authenticate the AppId for your account. To do so, click enable this AppId for your account:
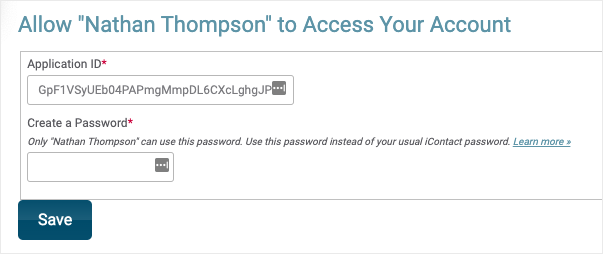
You’ll need to create a password for your account and click Save:
Now go back to your OptinMonster account and enter your:
- Account label (this can be anything to keep yourself organized and won’t be seen by other users)
- iContact username (this is typically your email address)
- Application ID (that you just created)
- Application password (for your Application ID, not your iContact profile)
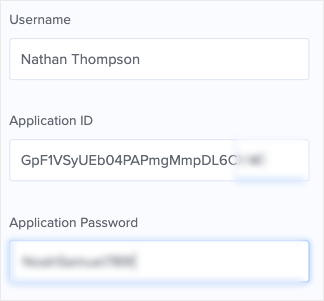
Then click Connect to iContact:
And that’s it! Your OptinMonster account is now connected to your iContact list. Now all the new leads you attract with your exit intent popup will go directly to your iContact account.
We hope you found this article helpful. If you did, it probably means you’re interested in learning how to create more revenue from email marketing.
For that, we highly recommend reading the following articles:
- Email Marketing Made Simple: A Step by Step Guide
- How to Run a Successful Email Marketing Campaign
- How to Create an Effective Autoresponder Email Series
These articles have all the information needed to get you started growing and monetizing your email list.
Ready to get started? Sign up for your risk-free OptinMonster account today!



Add a Comment