Do you want to learn how to create a discount wheel popup to gamify your website and grow your list?
Discount wheel popups are an excellent way to improve user experience (UX) and your email marketing strategy. It’s also a great way to give discounts to your site’s visitors in an engaging way.
But creating these types of popups can be difficult, especially if you don’t have lots of time or energy to put into your marketing campaigns.
So, today, we’re going to teach you how to create a discount wheel popup in less than 5 minutes. Plus, you won’t need any coding or “tech” skills to do it.
Before diving into the tutorial, though, let’s get clear on what a “discount wheel popup” is in the first place.
What Is a Discount Wheel Popup?
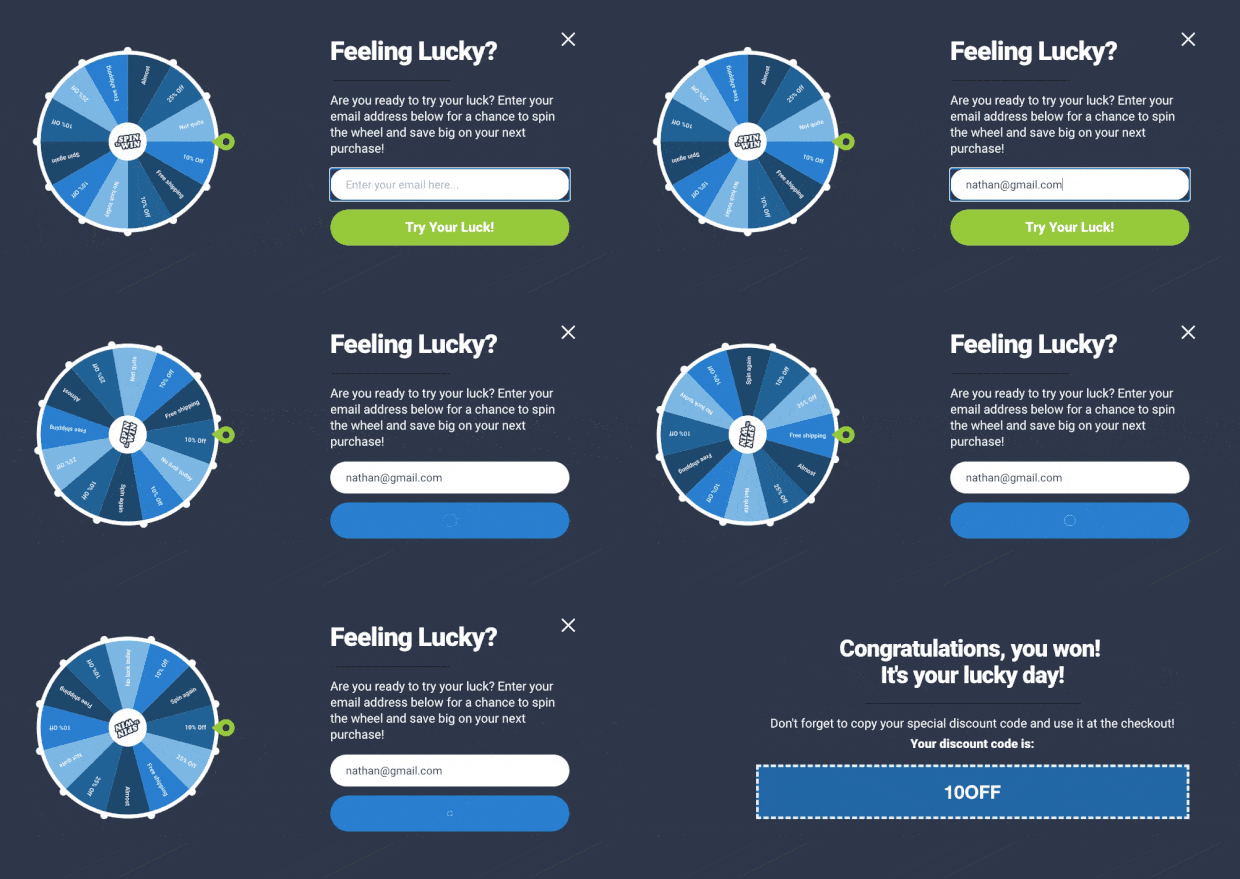
A discount wheel popup is a type of optin campaign designed to get more email subscribers. Just like you’ve seen on a TV game show, your site’s visitors can spin the wheel to randomly receive a discount or promotional offer for your online store.
You’ve probably seen–and perhaps even played with–these discount wheel popups before. They look something like this:
Discount wheel popups are incredibly effective at growing your email list to improve your email marketing strategy.
There are tons of advantages to using this kind of campaign on your website, including:
- Improve UX: Winning a coupon is always more fun than getting a coupon code.
- Stand out from your competition: Gamified popups are more fun, which also makes them more memorable to your audience.
- Drive more revenue: Distributing coupons to your product or services typically leads to more sales over time.
- Boost your email marketing: As mentioned, discount wheel popups are incredibly effective at getting you more email subscribers.
In the end, if you’re trying to add emails to your contact list and generate new leads for your business, a discount wheel popup is one of your best bets.
Now, let’s turn our attention to how to make these campaigns for your website in a matter of minutes.
How to Create a Discount Wheel Popup
For this tutorial, we’ll be using OptinMonster:
OptinMonster is the best lead generation software for creating a discount wheel popup. It comes with a prebuilt template to save you hours of time, energy, and headaches as you build your campaign.
Plus, the template is 100% customizable to your brand’s voice, style, and message. That means you can add or subtract discounts and offers without needing to know any code.
Finally, you can target new or returning users with your popup, attach the campaign to specific pages on your site, or use any of OptinMonster’s advanced targeting rules.
This allows you to show your gamified popup to the right people at just the right time in their customer journey.
Ready to get started? Click below to start your risk-free OptinMonster account today:
Now, let’s dive into the tutorial.
Step 1) Create Your Campaign
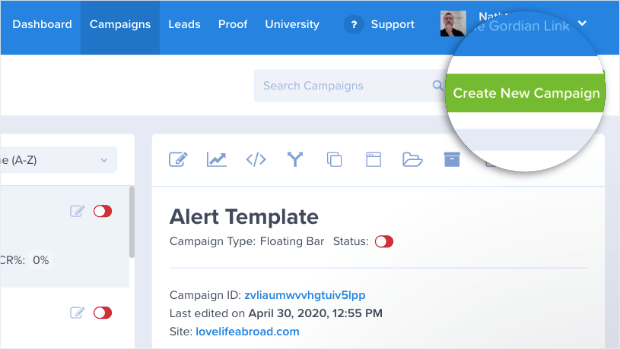
First, you’ll need to create and login into your OptinMonster account. From your account dashboard, click Create New Campaign in the upper right-hand corner:
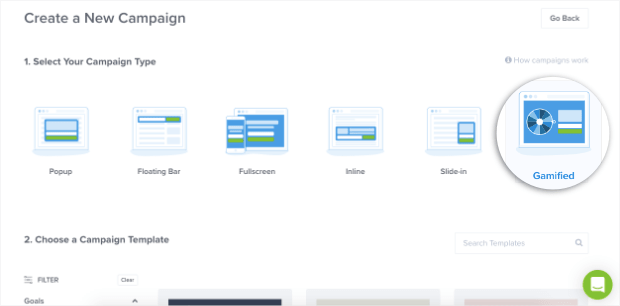
Now you’ll need to select the type of campaign you want to build. For today, select Gamified:
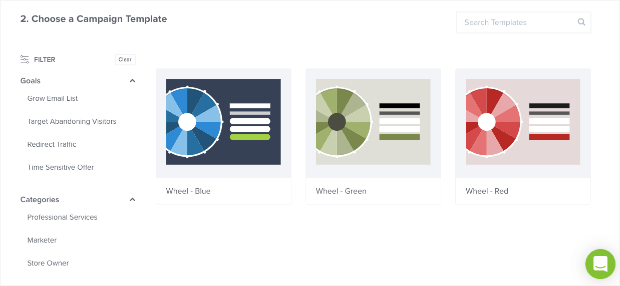
This will pull up your template option choices with a discount wheel already built-into your popup. You can choose from 3 colors:
- Blue
- Red
- Green
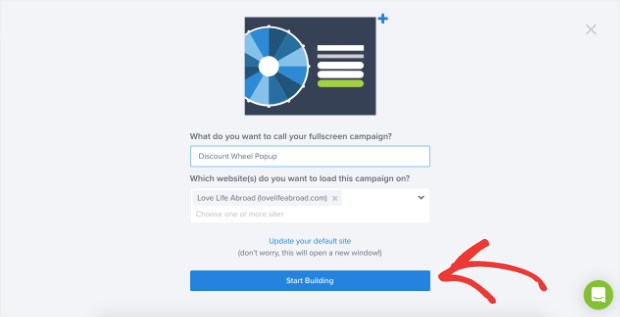
Today, we’ll select the blue template. Next, you’ll need to give your campaign a name, assign it to your website, and click Start Building:
Now you’re ready to begin customizing your discount wheel popup.
Step 2) Modify Your Popup
OptinMonster’s discount wheel popup is nearly ready out-of-the-box. That means there are only minor customizations you may choose to make.
Many companies modify the following 2 aspects to their campaign:
- Text
- Promotional prizes
Let’s look at how you can change these parts of your campaign.
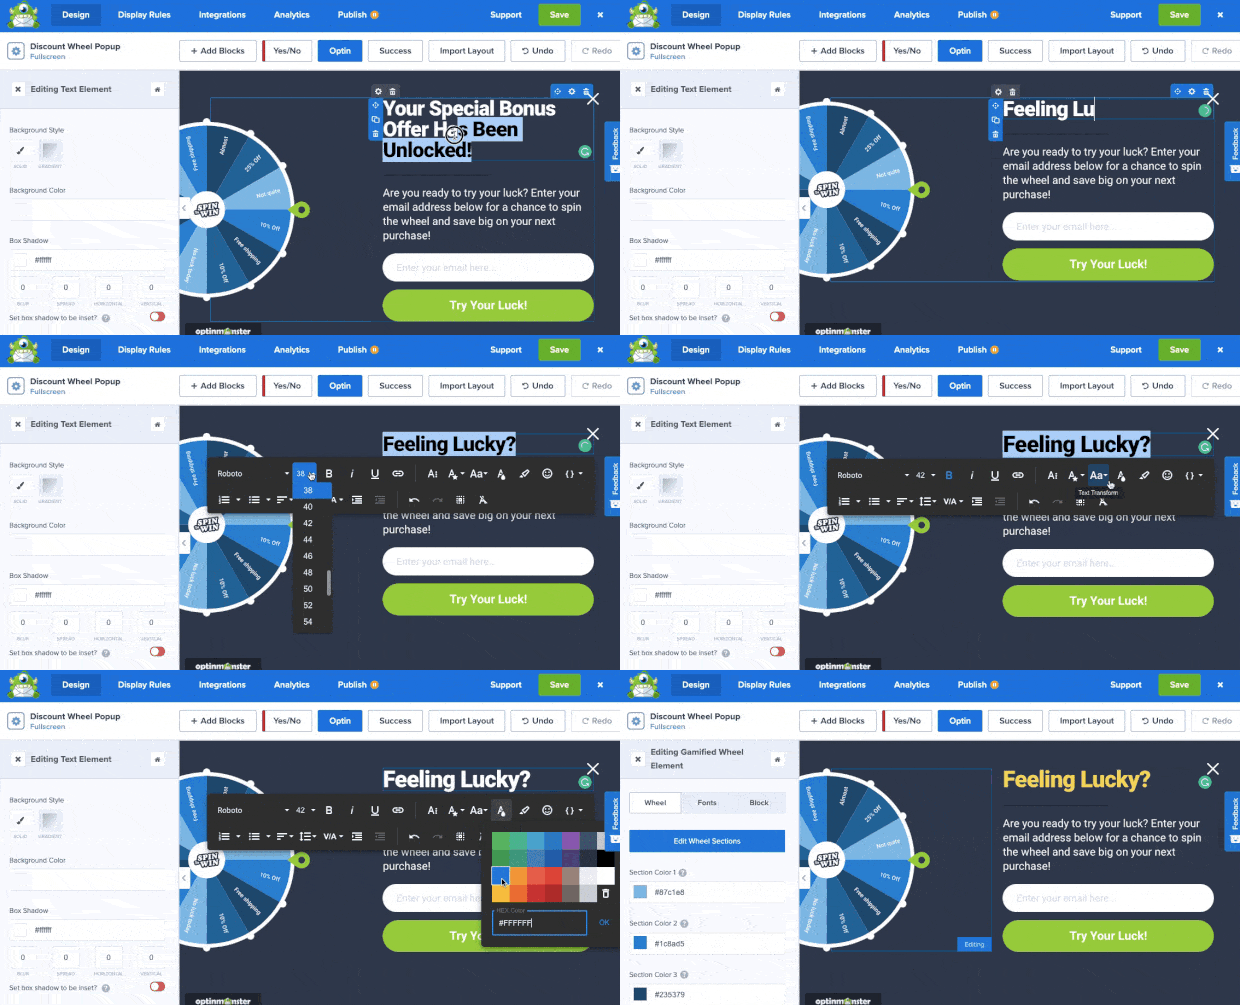
First, to change your popup’s text, you can simply use OptinMonster’s inline text editor:
With the inline editing tool, you can change everything about your campaign’s text, including:
- Font-family
- Size
- Color
- Style (bold, italic, underline)
- Font-weight
- Line height
- And more…
This lets you personalize the messaging of your campaign to better reach your target audience.
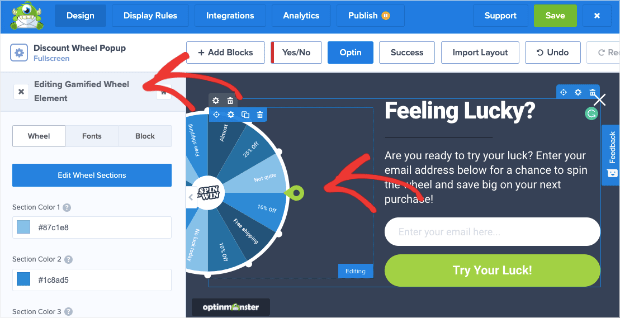
Next, you’ll likely want to change the promotional offers or discounts for your gamified popup. To do so, simply click on the wheel in the builder. This will pull up the editing tools on the left-hand side:
Here, you can change lots of elements to your campaign wheel, such as:
- Section colors
- Inner-wheel image
- Wheel flipper color
- Wheel width
- And much more…
This allows you to modify the color scheme and design of your discount wheel popup. But, more importantly, we need to modify the discounts you’ll be offering.
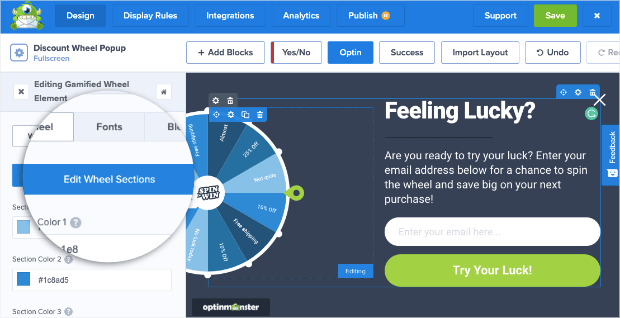
For that, click Edit Wheel Sections on the left-hand side:
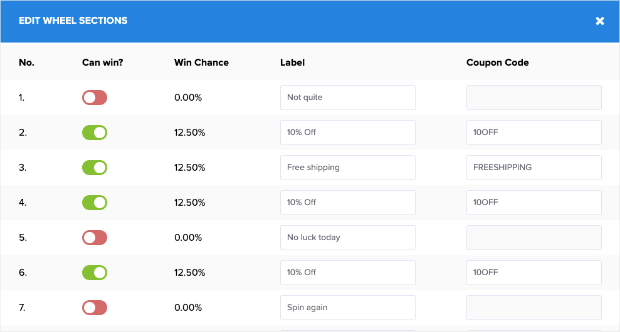
This will pull up a separate screen with the following configuration categories:
- No.: Refers to the section of the wheel you’ll modify.
- Can Win?: Allows you to turn some prizes On or Off depending on your inventory.
- Win Chance: Calculates the percentage chance of each wheel section (this changes depending on what’s activated in the Can Win column)
- Label: The name users will see in the wheel section.
- Coupon Code: This is the coupon people can use to redeem their prize.
These options let you quickly and easily modify your discount wheel popup. You can simply enter the prizes in the Label field and add the corresponding Coupon Codes.
Then, if you run out of an item or you’re waiting for it to arrive, you can turn off the prize to make sure people don’t win an item that you no longer have.
Once you configure your discount wheel’s text and promotional prizes, you’re ready for the next step: setting your display rules.
Step 3) Target Your Audience
Creating your discount wheel popup is only half the battle. The other half is making sure that you’re showing the gamified popup to the right people and at just the right time in their customer journey.
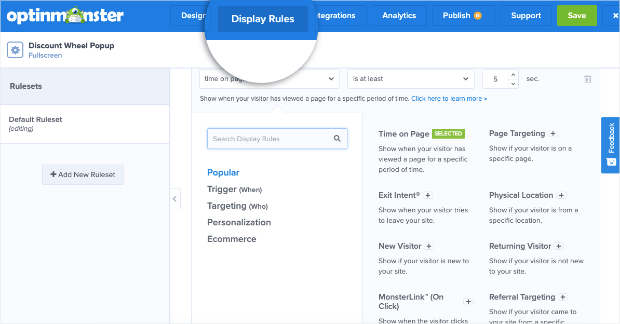
For that, head over to Display Rules at the top of your OptinMonster editor:
From this dashboard, you can target your campaigns to people or places that will get the highest conversion rates possible.
And with OptinMonster, you can make these campaigns as targeted as you’d like. Our display rules break down into 2 categories:
- Targets
- Triggers
Targets rely on your visitors’ demographic information to determine whether or not a campaign will appear.
These kinds of rules include things like:
- What content your visitor is looking at
- Where the user is physically located
- How the user has interacted with previous campaigns
- What device your visitors are using (desktop, mobile, or tablet)
- And much more…
On the other hand, Triggers rely on your visitors’ behavior to determine whether or not a campaign will appear. Common triggers include:
- When the visitor clicks a link (MonsterLinks™)
- If a visitor is actively leaving your website or page (Exit-Intent®)
- How far down the visitor scrolls
- And more…
By using a combination of triggers and targeting rules, you can get way more conversions. Just check out some of these success stories some of our customers have achieved:
- Crossrope explodes their email list by 900% with an exit-intent popup
- Adam Enfroy gets 11,000 new email subscribers in 1 year
- Shotkit attracted 40+ NEW leads per day with OptinMonster
These are just a few examples of customers who built and targeted their campaigns to exceed their company’s marketing goals.
But which is the best display rule for you?
For discount wheel popups, we recommend getting started with 2 rules:
- Exit-Intent®: This helps you recover visitors who are actively leaving your website and is one of our most popular triggers.
- New Users: This targeting rule is a great way to start off on the right foot. A discount wheel popup creates a memorable experience that can turn new users into loyal customers.
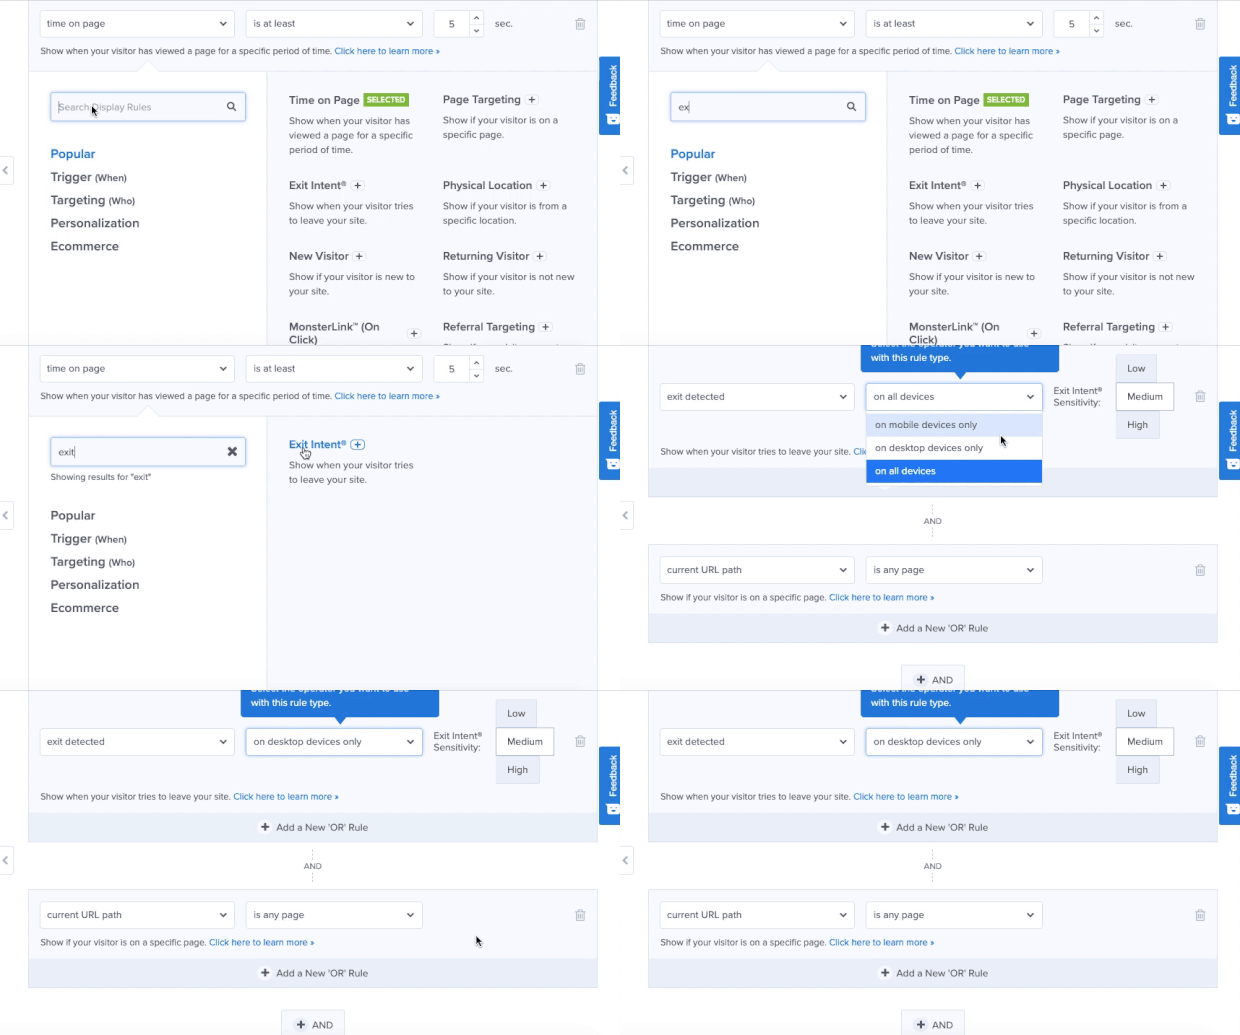
And to make things easier, you can use the search bar in your Display Rules menu to find any targeting rule or trigger you want:
At OptinMonster, we strive to make it easy for all users to create professional campaigns in minutes to reach their ideal audience.
Before wrapping up, we still have one last step: connecting OptinMonster to your email service provider (ESP).
Step 4) Integrate Your ESP
The goal of your discount wheel popup is to grow your email list. For that, you need to head over to Integrations at the top of your OptinMonster editor:
Now you can save your new leads in 2 different ways (using either or both methods)
- Integrate your ESP
- Activate Monter Leads
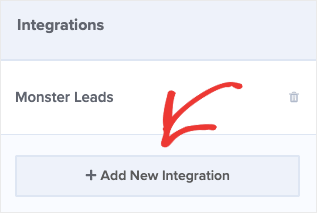
If you already have an email service provider, you can click + Add New Integration in the left-hand side menu:
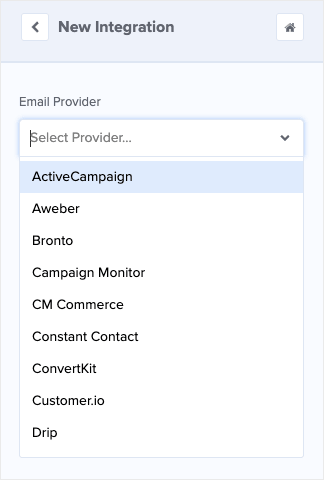
Then you can select your ESP from the drop-down menu:
OptinMonster integrates with over 30 of the most popular email providers on the market. Many of these simply require entering an API key that can easily be found from your email provider’s dashboard.
Don’t see your ESP on the list? No worries. You can connect OptinMonster with any ESP on the market using webhooks.
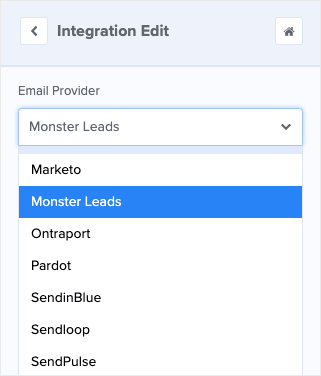
But what if you don’t have an ESP or you want to create a backup list for added security? For that, you can select Monster Leads from the drop-down menu:
This will store your contacts in your OptinMonster account.
Many of our customers will connect with their ESP and Monster Leads at the same time. This sends their leads directly to their email provider so they can automate their email marketing strategy.
But they have a separate list stored with OptinMonster if their ESP is shut down, hacked, or other problems crop up.
Once you’ve connected your ESP to OptinMonster, there’s only one last step: publishing your campaign.
Step 5) Publish Your Discount Wheel Popup
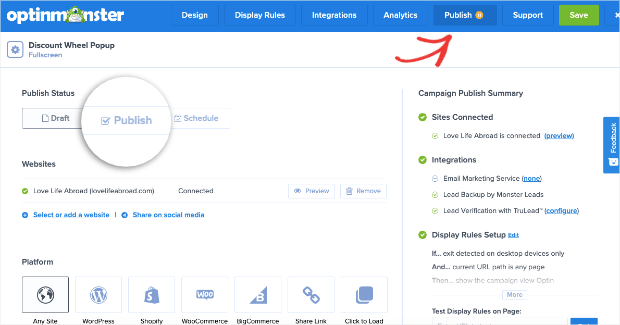
When you’re finished with your campaign, it’s time to publish. From the Publish tab in your OptinMonster editor, you can:
- Review the campaign
- Preview how it looks on your site
- Publish the campaign
- Schedule the campaign
To publish, switch the discount wheel popup’s status from Draft to Publish:
And that’s it! Your discount wheel popup will now be live on your site.
We hope you found this post helpful. If you did, you might want to check out the following resources:
- How You Win Big With Gamification in Marketing
- How to Run a Successful Email Marketing Campaign
- 17 Tips for Writing Email Copy That Converts
These articles will have everything you need to grow your email list and increase revenue from your email marketing strategy.




Add a Comment