Have you heard of retargeting but aren’t sure how to use it for your business? Maybe you’re wondering how does a retargeting pixel work?
Retargeting marketing is a strategy that can build brand awareness, move qualified leads into your sales funnel, and even grow the lifetime value of a customer.
We’re going to teach you how a retargeting pixel works and how you can use retargeting pixels with OptinMonster to increase your conversions.
In this article, we’ll show you:
- What Is a Retargeting Pixel?
- Types of Retargeting
- How to Install a Meta Retargeting Pixel
- How Does a Retargeting Pixel Work for Bloggers
- How Does a Retargeting Pixel Work for Publishers
- How Does a Retargeting Pixel Work for eCommerce
- How Can Retargeting Marketing Grow Your Business
By the end of this post you’ll know what a retargeting pixel is, how to install a retargeting pixel, and how you can use one to grow your business.
What Is a Retargeting Pixel?
A retargeting pixel is a way to remind potential customers about your brand after they leave your website. The pixel identifies people who have visited your site before.
Think of it as a stamp in someone’s digital passport that shows they have been to your website or landing page. The ads shown on Facebook or Instagram vary based on which “stamps” a user has in their passport.
The retargeting pixel itself is a piece of Javascript code that you add to your website or landing page. That pixel code drops an anonymous cookie on the visitor’s browser.
When that visitor leaves your website, the cookie tells Facebook (Meta) to show your ads to that person. Because that person has already visited your website, they might be more inclined to purchase or subscribe when they see your ad.
OptinMonster can serve a Facebook (Meta) ad pixel when users subscribe to your email list or otherwise interact with campaigns on your website.
Using a retargeting pixel is a powerful way to segment your audience and deliver personalized content based on what their actions say about their readiness to buy.
Types of Retargeting
There are two main kinds of retargeting: offsite retargeting and onsite retargeting.
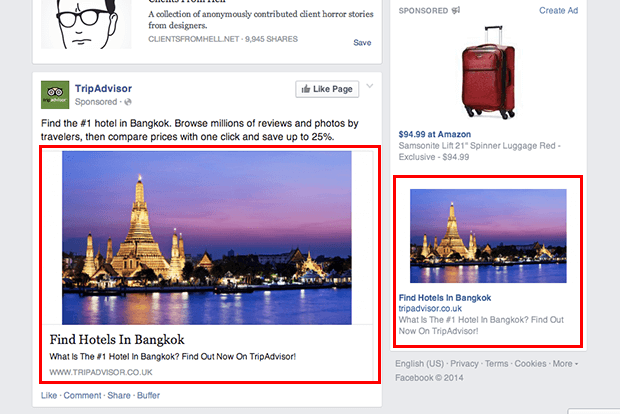
The Facebook retargeting pixel is an example of offsite retargeting. The pixel follows the user when they leave your website. Then it displays your ads on another website or app like Facebook or Instagram.
Onsite retargeting is another powerful tool for boosting conversions. OptinMonster’s Onsite Retargeting® is specifically designed to target repeat visitors with new offers. That way you’re not showing them ads for a product they’ve already purchased. You also don’t want to ask them to opt in when they’ve already subscribed.
You can use both offsite and onsite retargeting with OptinMonster to deliver personalized promotions. This will increase your chance of converting that customer.
How to Install a Meta Pixel
Ready to get started? Let’s go!
Here’s how to add a Facebook (Meta) retargeting pixel to your website:
Step 1: Create a Meta pixel.
The first thing you need to do is create a Meta pixel. This is easiest to do from a laptop or computer rather than your phone or tablet.
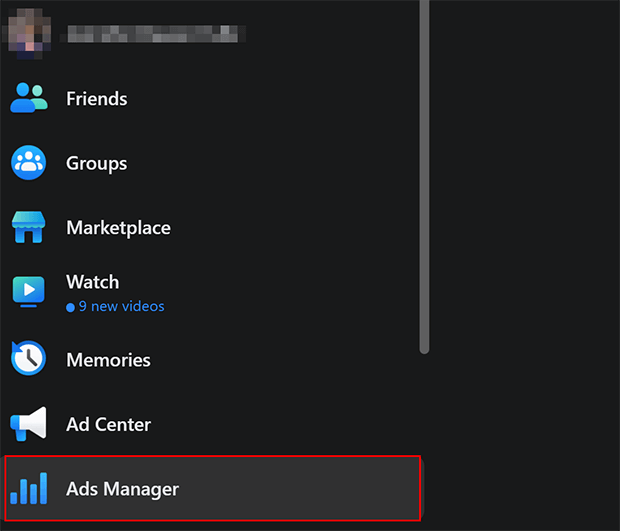
From Facebook’s homepage, find the Ads Manager in the bookmarks menu on the left side of the screen. You may need to click More to show all the options.
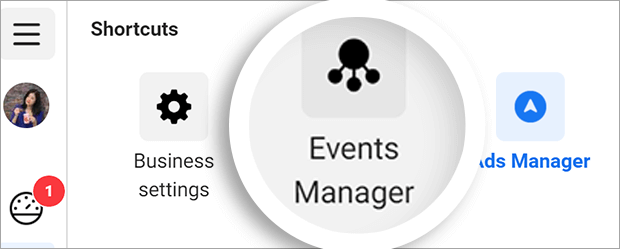
From the Tools menu, select Events Manager.
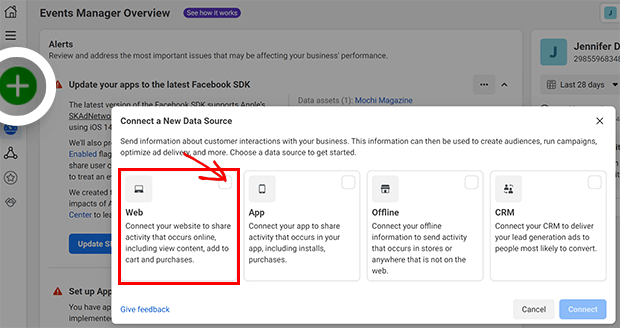
Click the green circle labeled Connect Data Sources and select Web.
Add your Pixel Name. Choose something simple like the name of your website.
Click Create Pixel.
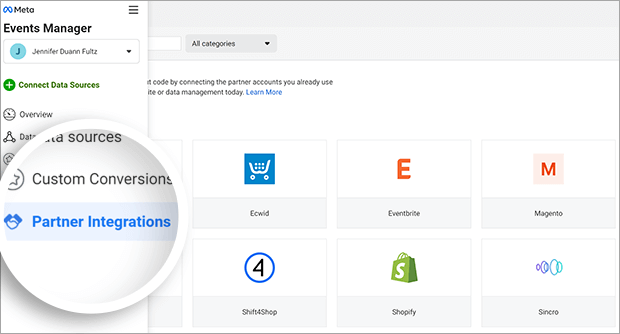
You can also check Partner Integrations to see if Facebook already integrates with your website or eCommerce platform.
Follow the instructions for partner integration specific for your website or eCommerce platform.
In addition to tracking page visits, you can use a Meta pixel to track conversion-related events such as:
- Completing a signup or subscription form
- Searching for content
- Filling out a contact form
Step 2: Add the Pixel base code to your website.
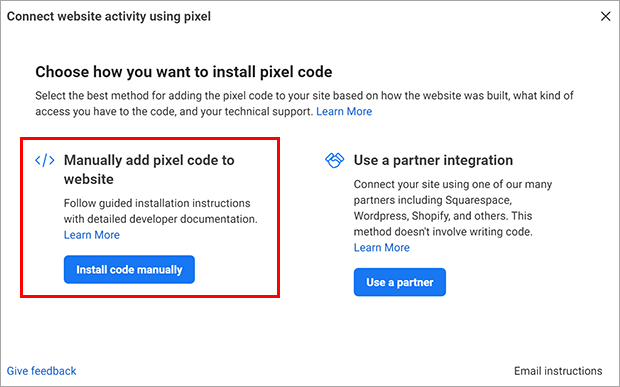
You can either manually add the Pixel base code to your website or use a partner integration.
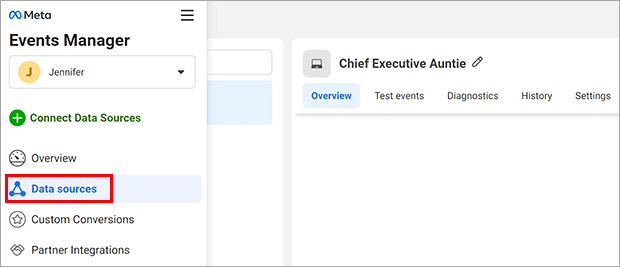
First, click on the Data sources icon on the left side of the page.
Click Continue Pixel Setup.
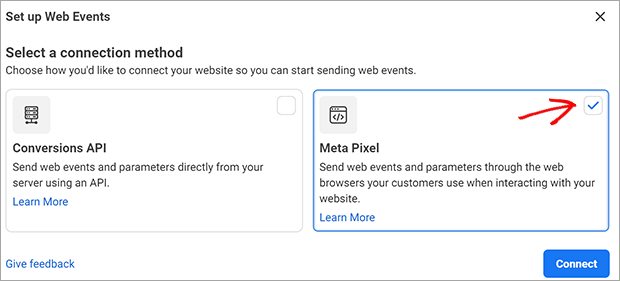
Select Meta Pixel.
Click Connect.
Manual Installation
To manually add your pixel code to your website, click Install code manually.
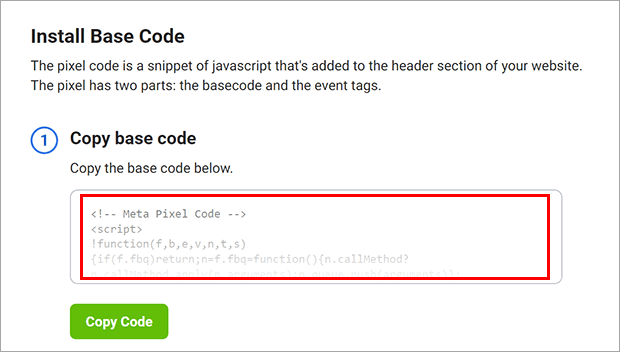
Copy the base code.
Go to the page on your website where you want to add the base code.
Paste the base code in the header section, just before the closing </head> tag.
Partner Integrations
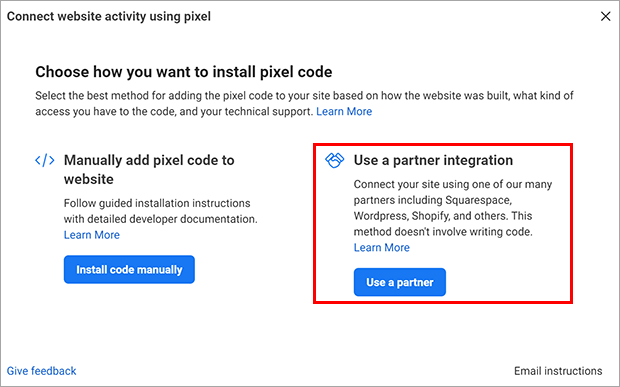
Facebook also partners with a variety of eCommerce and website platforms to make installing a Pixel on your site easier, such as:
- WooCommerce
- Shopify
- WordPress
- Webflow
- Squarespace
To use a partner integration, click Use a partner.
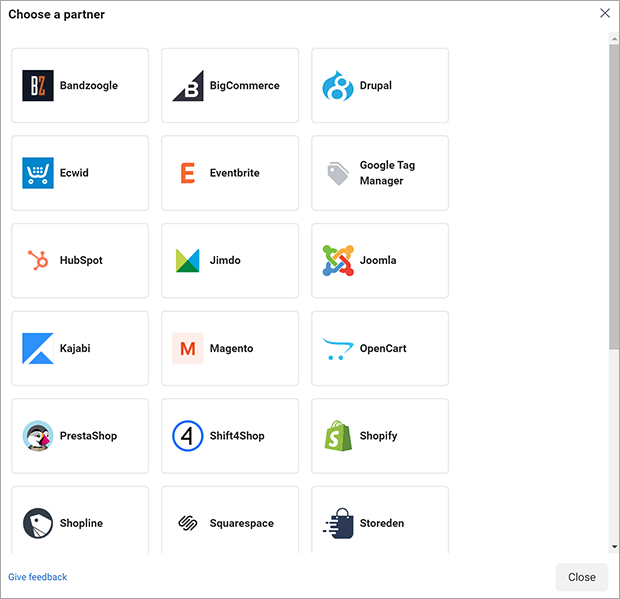
Select your platform from the list and follow the directions given.
Step 3: Add the Standard Event code to your Pixel base code.
The Standard Event code tells your OptinMonster campaign when to trigger the Meta Pixel.
You can trigger the Meta Pixel when someone signs up for your email list, closes a campaign without signing up, or other actions. A converted subscriber will respond differently than someone who closed a campaign without subscribing. You can therefore customize ads based on behavior.
You can choose your standard event code from this list on Facebook’s Business Help Center.
Once you have your standard event code, add it to your base code right above the closing tag </script> as indicated by the red arrow below.
You may use the same Standard Event for all pages on your website, or choose different Standard Events for different pages, as detailed in the use cases listed later in this article.
You can also use the Event Setup Tool to set up events without modifying the code, unless your business is in a regulated vertical such as investment banking, pharmaceutical, retail, and others.
Step 4: Add the Standard Event Code to OptinMonster.
The easiest way to connect your Meta Pixel with an OptinMonster campaign is Success Scripts. With Success Scripts, you can trigger the Meta Pixel script to run after a user opts into a campaign.
To add a success script, follow these steps:
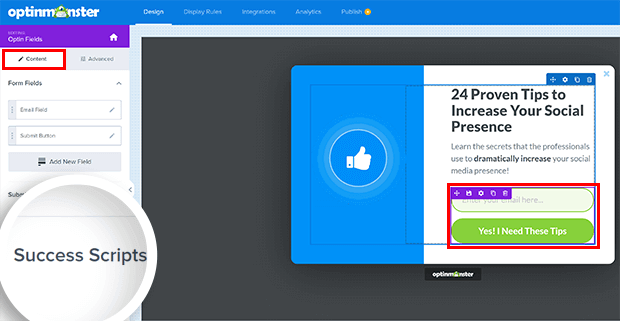
Open the Campaign Builder.
Click on the Design tab in the top menu.
Click on the Optin Field in the live preview.
Click on the Content tab in the left menu.
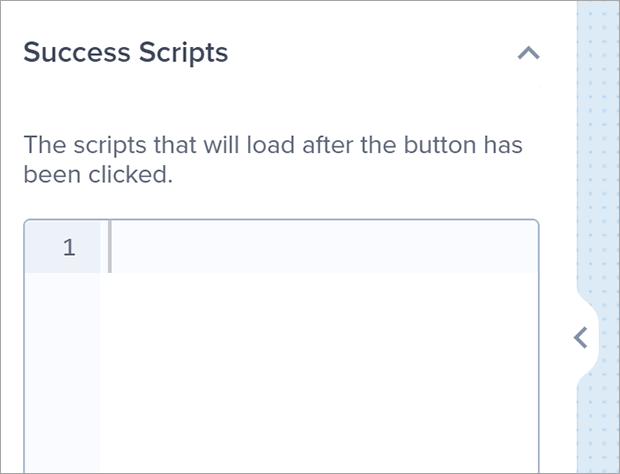
Click on the Success Scripts option to expand.
Add your Standard Event code to the provided field. That code is what you found on Facebook’s list of Standard Events in step 3.
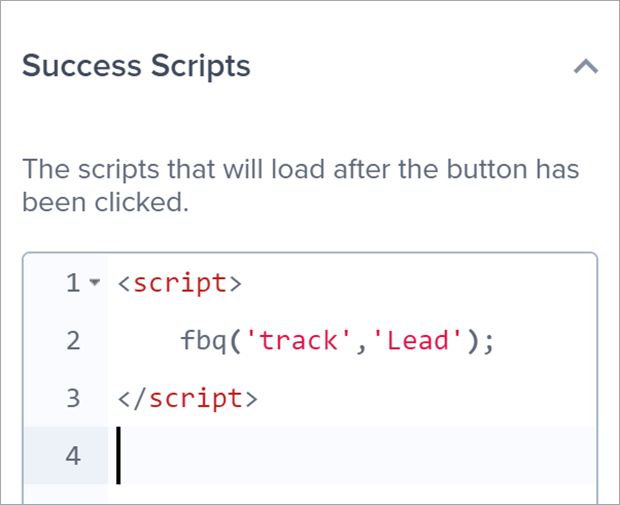
Wrap the Standard Event code within <script> tags.
The provided field should contain code that looks like this, though your Standard Event code may be different.
Click Save when you’re finished.
Success Scripts is available on OptinMonster’s Growth subscription plan.
Use a HTML Block to Add a Standard Event Code
If you do not have a Growth subscription or would like to trigger the Meta Pixel on a different event than conversion, you can use the Javascript Events API.
Here’s how to add a Standard Event code to OptinMonster using a HTML block:
Determine when you want your Meta Pixel to trigger. You can see all of OptinMonster’s events on our Javascript Events API doc. Choose the corresponding code for the event you want to trigger the Pixel. This is indicated below in green.
Add your Meta Pixel Standard Event code to the OptinMonster event code you found above. This is indicated below in blue.
Wrap the OptinMonster event code in <script> tags.
It should look something like this:
We recommend dropping this code into a text document for easy access.
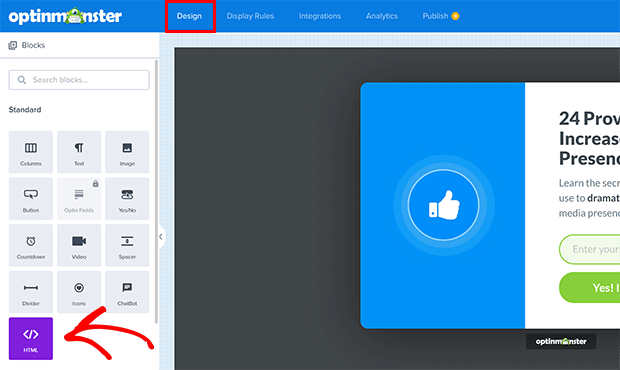
Click on the Design tab in the top menu.
Select the HTML Block from the Standard Blocks section.
Drag it onto your campaign in the Live Builder. It doesn’t matter where you put it as it will not add anything visible to your campaign.
Add the code you wrote above to the HTML block.
When you’re finished, click Save.
The Meta Pixel will now trigger when a user interacts with your OptinMonster campaign.
Retargeting Examples and Retargeting Strategy
We’ll take a look at how retargeting pixels can help grow your business if you are a:
- Blogger
- Publisher
- Ecommerce store
Let’s get started!
How Does a Retargeting Pixel Work for Bloggers
Many bloggers earn revenue through ads and affiliate links. If you can increase your pageviews, there will be more people clicking on ads and affiliate links, which means more revenue.
A retargeting pixel can follow visitors to Facebook and serve ads that nudge them back toward your blog for more content. Visitors who filled out a form or searched for a term can be served specific ads that catch their interest.
Some Standard Event codes that might work well for increasing pageviews include:
- fbq(‘track’, ‘Lead’);
- fbq(‘track’, ‘Search’);
- fbq(‘track’, ‘ViewContent’);
When you optimize your Facebook ads, you can target users who have visited specific blog posts or submitted an optin form based on the activity tracked by the pixel. These users are more likely to respond to ads about other content they might like and go back to your blog. This will drive up your pageviews and your revenue from ads and affiliate marketing.
How Does a Retargeting Pixel Work for Publishers
Like bloggers, online publishers can earn revenue through ads and affiliate marketing. You can increase your pageviews with a retargeting pixel like we discussed above.
Another revenue channel for publishers is email marketing. If a publisher can grow its email subscriber list, they have a large audience primed for paid offers such as eBooks, workshops, conferences, and more.
A publisher might want to use these Standard Event codes to trigger a Meta Pixel:
- fbq(‘track’, ‘CompleteRegistration’);
- fbq(‘track’, ‘Lead’);
- fbq(‘track’, ‘Search’);
- fbq(‘track’, ‘ViewContent’);
You can use a Meta Pixel with OptinMonster to serve Facebook ads that lead to an opt-in landing page. Someone who has visited your website already is more likely to opt in when they see an ad for your publication.
Make sure you have a compelling lead magnet to offer potential subscribers who see your ads.
How Does a Retargeting Pixel Work for eCommerce
Retargeting pixels are a powerful way for eCommerce stores to show specialized content and offers to users based on demographics and where they are in the sales funnel. This can increase the lifetime value of the customer.
Suppose a user places an item in their cart but doesn’t complete the purchase. A Meta retargeting pixel can follow this user and serve an ad for that item the next time they’re on Facebook. It’s a simple, non-invasive way to say, “Do you still want this item?”
A retargeting pixel can also serve customized recommendations for visitors based on previous purchases. Imagine someone has bought a fountain pen from your business. Then on Facebook they see an ad for your ink products. They buy ink from your business, and the pixel can then suggest stationery or other products they might like.
To set up a Meta Pixel for eCommerce, follow the same directions for creating and installing a Meta Pixel. Make sure to choose a Standard Event suitable for eCommerce, such as:
- fbq(‘track’, ‘AddToWishlist’);
- fbq(‘track’, ‘AddToCart’);
- fbq(‘track’, ‘CustomizeProduct’);
- fbq(‘track’, ‘InitiateCheckout’);
- fbq(‘track’, ‘AddPaymentInfo’);
- fbq(‘track’, ‘Purchase’, {value: 0.00, currency: ‘USD’});
These events correspond to different stages in the sales funnel. Someone who has just added an item to their cart is less prepared to purchase than someone who has initiated checkout and added payment information.
The Add to cart event could trigger a Facebook or Instagram ad gently reminding the user about the item they were interested in, especially if there are limited quantities.
The Add payment information event could offer a free shipping coupon to sway someone who almost purchased but didn’t.
The Purchase event could recommend similar or complementary products that the purchase might also like.
Refer to Meta’s list of Standard Event codes to find the one that’s right for your business.
How Can Retargeting Marketing Grow Your Business?
Retargeting with a Facebook pixel is a powerful way to deliver personalized content to visitors and grow your business.
You can use a retargeting pixel to increase your pageviews and therefore any ad or affiliate revenue on your blog or publication.
Retargeting pixels can also help you grow your email subscriber list. The many benefits of email marketing make a large, healthy email list a powerful source of leads and revenue for your publication or eCommerce business.
Finally, you can use a retargeting pixel to bring potential and past customers back to your eCommerce website with ads customized to their interests and readiness.
Retargeting works best when paired with effective ad campaigns. Here are some ways to improve your Facebook ad strategy:
- How to Optimize Facebook Ads to Skyrocket Your Conversions
- How to Properly Run Retargeting Ads for Shopify: Step by Step
- [Case Study] How The Advisor Coach Increased Conversions 3X from Facebook Ads
If you’re ready to power up your business with retargeting, click here to try OptinMonster risk-free!




Add a Comment