Facebook has 2.38 billion active users. More than 1.5 billion of them log in every single day.
If you’re not running ads on the platform, you’re missing out on what amounts to a captive audience.
Plus, Facebook is phenomenal at helping you get the right ads in front of the right people. It lets you easily target a specific segment of its users, create an objective for your campaign, then puts your ads in front of those folks.
Here, we’re going to show you just how easy it is to create high-converting Facebook retargeting ads, even if you break into a cold sweat whenever you hear the word “pixel.”
What Is Facebook Retargeting?
Facebook retargeting is personalized and targeted Facebook advertising that focuses on visitor behavior.
Facebook’s retargeting ads operate just like other retargeting ads: you embed a piece of code in your website that lets you monitor and track visitor behavior.
How Does Facebook Retargeting Work?
Facebook optimizes ads based on user behavior, so different types of ads are shown to different users.
For example, conversion ads are shown to users that are most likely to convert, while engagement ads are shown to those most likely to engage.
Facebook gets all of this information about user behavior from a piece of code, called a pixel, that you embed in your website.
Depending on the way you’ve set up your ad campaigns, Facebook can decide if a visitor to your site should be shown an ad when they leave it, or not.
What Is a Facebook Pixel?
So, we’ve mentioned the pixel a couple of times. Let’s talk about what that actually is.
The pixel is a 1×1 file that’s embedded in your website’s header via JavaScript and automatically loads on all pages of your site.
When someone visits your site, the pixel installs a cookie and uses it to track and report their actions on your site to Facebook.
What’s really cool about the Facebook pixel is that it matches to the user. That means that even if the user logs on from somewhere else, as long as they’re also logged into Facebook, the pixel is going to track their behavior for you.
This helps you understand how your cross-device ads help influence conversions and ensure that your ads are shown to the people most likely to take action.
How to Create a Facebook Pixel
Before you create a Facebook pixel, you’ll want to have a business website that you have admin privileges for since you’ll need to update the code.
Ready to go? Cool.
Go to your Facebook Ads Events Manager and click Set up Pixel.
From here, you have 3 options:
- Connect a Partner Platform
- Manually Install Pixel Code Yourself
- Email Instructions to a Developer
Depending on which option you select, Facebook will offer step-by-step instructions to help you place the code.
How—and Where—to Place Your Facebook Pixel
Once you’ve created your pixel, you need to place the Facebook pixel code on your website.
If you’re comfortable with placing the code yourself, and you have access, we recommend updating the header template in your CMS or web platform. This way, you won’t have to update the header on every page you want to add the pixel.
Adding the pixel is easy…
Find the header tags in your site’s header template and paste the code there:
You’ll want to cut and paste the pixel code into the header near the bottom of the header section, just above the tag.
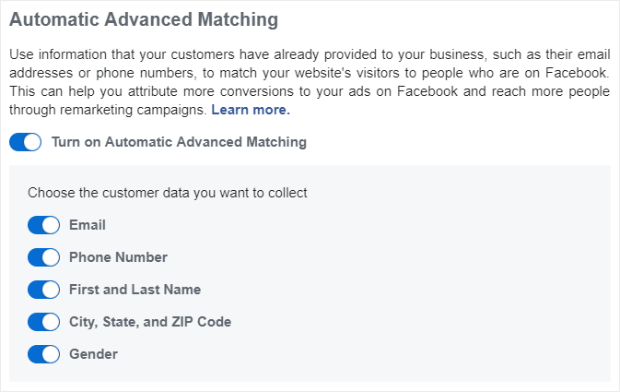
If you’re already using OptinMonster to collect visitor information on your website (and you should definitely be doing this – get started with OptinMonster NOW!), you’ll want to enable Automatic Advanced Matching.
After your pixel is installed, test that it’s functioning properly by sending test traffic to your page.
How to Set Up a High-Converting Facebook Retargeting Campaign
To set up a high-converting Facebook retargeting campaign, you first have to create and install a Facebook pixel on your website, which we took care of in the last section.
In this section, we’ll be setting up the actual retargeting campaign, step-by-step.
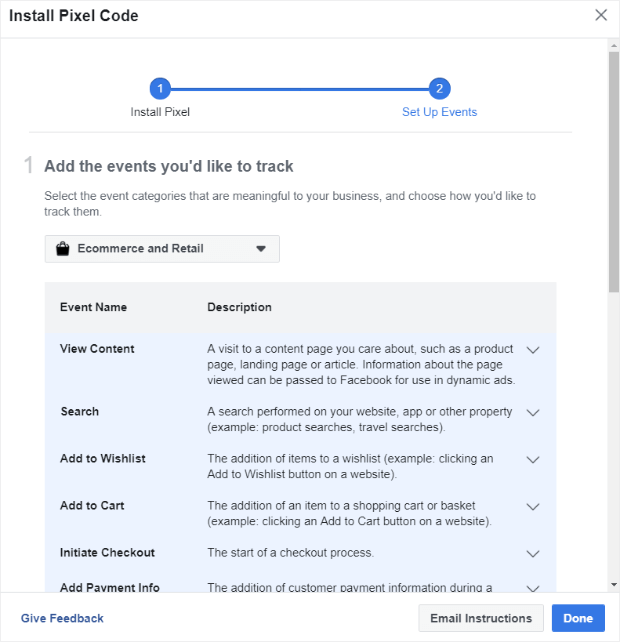
Step 0. Set Up Event Tracking
If you didn’t set up events to tracking during initial pixel setup, do it now.
You can get there by clicking on Set Up » Set Up New Events:
Using the Facebook Pixel With OptinMonster
You can set up your OptinMonster conversions to trigger a Facebook pixel on your site with OptinMonster’s JavaScript Events API!
To do that in an existing OptinMonster campaign, log in to your OptinMonster dashboard and select the campaign you want to use.
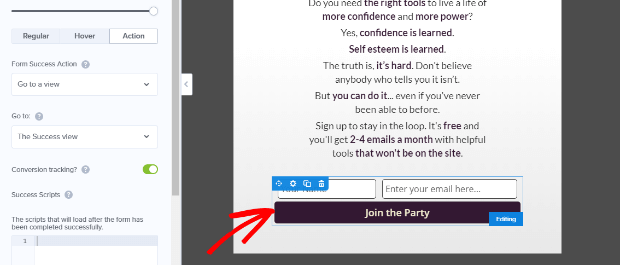
You can then edit the action settings of a form or button element to trigger a success event, which is what we want to do here.
Click on the element you want to change to bring up the editing tools. In this case, we’re making changes to the submit button:
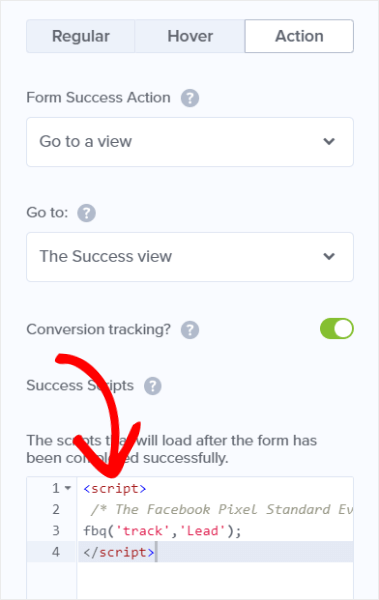
Next, we’re going to add the code for the event we want to trigger in the scripts section:
That’s it! Now every time your optin is successfully submitted that Facebook script will run and the event will be tracked by your Facebook pixel.
There are other events you can track too, like if the campaign is closed, when it first shows up, or maybe something else entirely. You can customize a Facebook standard event to fit your needs.
Don’t have a native OptinMonster integration? That’s okay, we can show you how to do this with Custom HTML and our Canvas template too.
Step 1. Create a Custom Audience
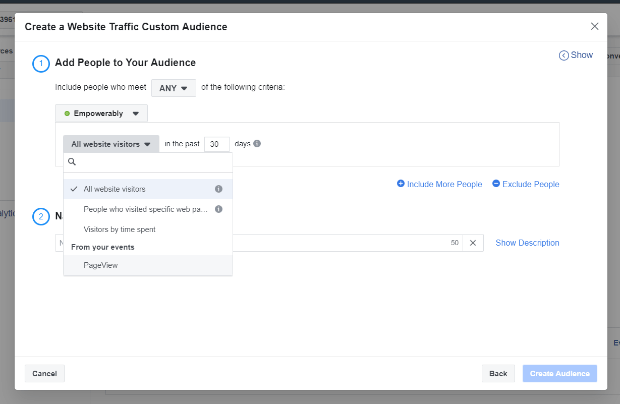
We’re going to create a custom audience by clicking Create Audience » Custom Audience.
This will bring up a selection screen that you can use to set your criteria.
Facebook gives you a lot of options for creating a custom audience like targeting all site visitors, visitors by time spent, or visitors just to specific pages of your site.
You can also choose to include or exclude visitors based on those same criteria.
We’re going to set this custom audience to all website visitors for the maximum of the past 180 days.
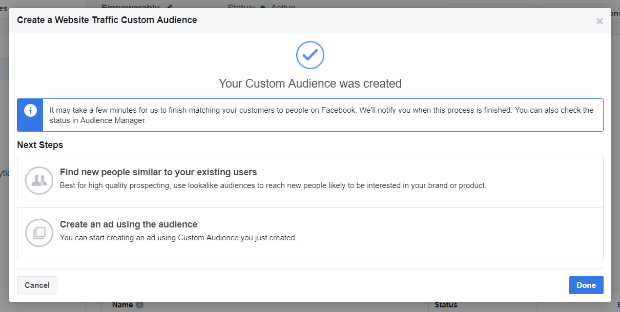
Then, name your custom audience and click Create Audience. You have the option of creating an ad for the audience on the screen that comes up next, but just click Done.
Step 2. Set Up a Facebook Retargeting Campaign
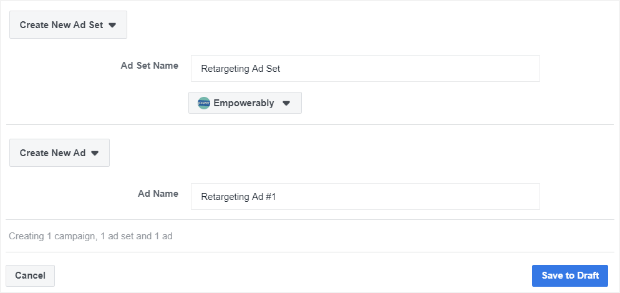
Now we’re going to click on the Create Ad button and then Switch to Quick Creation.
Give your new retargeting ad campaign a name and select Reach as the Campaign Objective.
Give your retargeting ad set and ad a temporary name and click Save to Draft.
Step 3. Target Your Custom Audience in Your Retargeting Ad Set
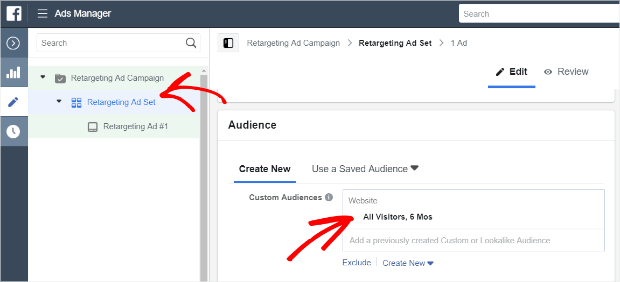
Next, you’ll add your custom audience to your retargeting ad set.
To do that, click on the name you gave your retargeting ad set so you can edit it. Then, scroll down to the Audience section and select your custom audience from the Custom Audiences list.
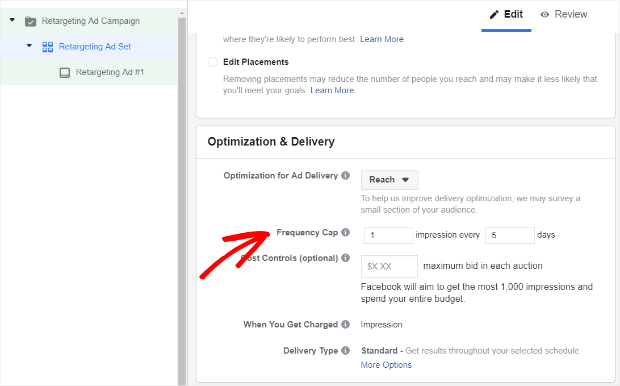
Step 4. Set a Frequency Cap
We talked about the frequency cap in our post on retargeting best practices.
Ad fatigue and brand blindness are a real problem and setting a frequency cap can help.
Seeing the same ads over and over gets boring and your visitors will absolutely, 100% get sick of you.
To set a frequency cap, scroll down to the Optimization & Delivery section in your retargeting ad set and set a frequency cap.
Remember, we recommend an ad frequency of 15-20 times in a 30-day period (decrease the frequency for customers that haven’t visited your site in a while).
This translates to 1 impression every 7 days for a 14-ad series or 1 impression every 5 days for a 10-ad series.
Step 5. Create Your Facebook Retargeting Ad Content
Now you need to create the ad content for your Facebook retargeting ad campaign!
Here are 3 key tips to keep in mind when creating your ad campaign content to help you avoid ad fatigue and brand blindness:
Create Many Distinct Ads
Not only should you have a number of ads, but the ads should be noticeably different from one another. Subtle changes aren’t gonna cut it.
Use Different Ad Formats
Static images are just fine for ads. But not for every ad in a 12-ad campaign. Don’t forget that you can also use videos, text, carousels, and more.
Always Include a Call to Action
You have to include a call to action in your ads. Without it, your viewers won’t know what to do next.
Not sure what to say? Let us help you create a powerful call to action.
3 Facebook Retargeting Ad Strategies to Try
Now that you know the basic steps you need to take to set up a Facebook retargeting ad campaign, let’s talk strategy.
Here are 3 strategies that you can put into action right now to boost site traffic, grow your email list, increase brand awareness, and recapture abandoned carts.
Target All Site Visitors From the Past 30 Days
Best for: Boosting site traffic, growing your email list, increasing brand awareness
Audience: All visitors to site from within the past 30 days
Retargeting Ad Strategy: Visitors who’ve been active on your site within the past 30 days are likely interested in what you have to offer and need to be shown ads for specific content and products that will pull them back to your site to make a purchase or sign up for your mailing list.
Recapture Abandoned Carts
Best for: Getting back “lost” revenue from abandoned carts
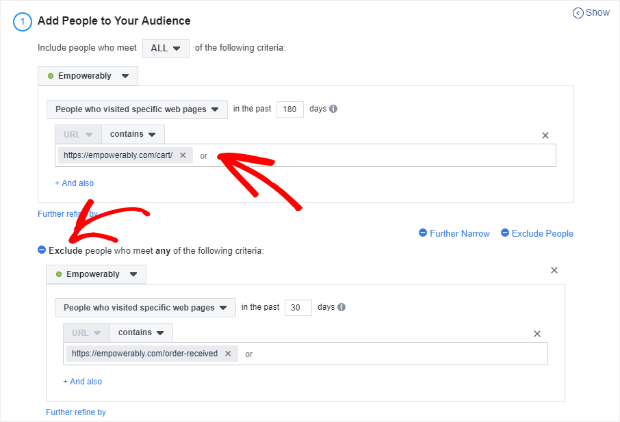
Audience: Users who have abandoned a sale on your site. You can set this up as a Custom Audience by including visitors who have seen your cart page and excluding visitors who haven’t seen your order confirmation page.
Retargeting Ad Strategy: The goal is to get the conversion, so you’ll want to include discounts and offers of free shipping or other gifts with purchase to your retargeting ads.
ADVANCED STRATEGY: Targeting a Window of Opportunity
Best for: Getting repeat business or stealing it away from competitors
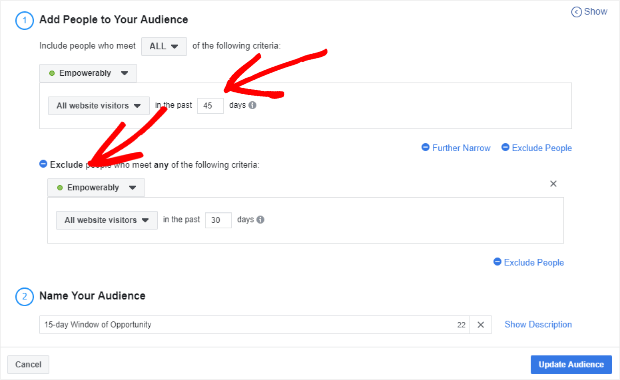
Audience: You’ll actually have 2 audiences for this strategy. The first is all visitors who have visited within the past 45 days. The second is all visitors who have visited within the past 30 days.
But… the cool thing about this strategy is that you’re really targeting the gap, or window, between the two audiences.
You can do this easily on Facebook by just targeting all visitors within the last 45 days and excluding all visitors within the last 30 days.
Retargeting Ad Strategy: The purpose of this ad strategy is to target the visitors who are within a specific window of time when they are getting ready to buy a recurring or consumable product again.
For example, if you sell vitamins on your site, it’s a pretty safe assumption that the folks visiting your site are interested in vitamins.
Given that vitamins are consumable, it’s also safe to assume that a visitor who hasn’t purchased from you with a certain number of days has either decided to hold off or has found another place to get their vitamins.
Either way, it’s more cost effective for you to stop promoting your products to them… until the next window of opportunity comes ‘round.
Why? With consumables or repeatable/recurring services (hair care, landscaping, etc.), there will be regular windows that come up. Why spend money on ad impressions for 30 days when you only need them for 15?
Facebook Retargeting Ad Reports
So, you have your pixel and your custom audiences and your ads are running…
Now what?
How do you know if all of this is working?
Reports, of course!
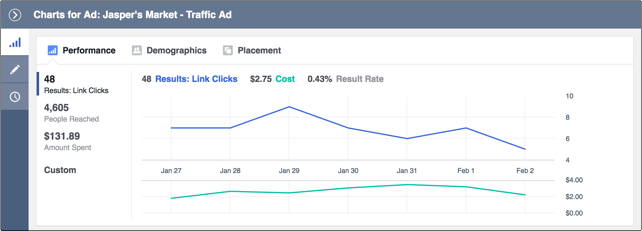
Create Reports in Ads Reporting
Click here to go directly to your Ads Reporting.
You can access Ads Reporting from the Ads Manager by selecting Measure & Report from the main menu.
From there, you have about a million different ways you can look at your data.
Check out Facebook’s Results & Reports section for insight with all the different ways to break down your data.
There you have it! All the goods on Facebook retargeting ads to add to your retargeting knowledge.
If you enjoyed this post, you might also be interested in learning how to properly run retargeting ads for Shopify. That article is a great resource for running ads for another popular eCommerce platform.
Hey, if you haven’t yet, be sure to get started with OptinMonster. OptinMonster is the best out there at getting your brand from “who’s that?” to “give me more!”





Add a Comment