How to Create a Keap Popup That Converts (The Easy Way)

Last updated on

by

Featured Image How to Create a Keap Popup

Do you want to add a Keap popup to your website to grow your email list?

Many small businesses boost their traffic, sales, and revenue by consistently sending valuable content and relevant offers straight to their subscribers.

But getting started with email marketing can be overwhelming.

Fortunately, email service providers make it easy for you to run targeted email campaigns.

And one of the most popular email providers is Keap, previously known as Infusionsoft.

In this tutorial, we’ll show you the simplest way to add to a high-converting Keap popup to your website.

What is a Keap Popup?

A Keap popup is an optin form designed to attract your subscribers’ attention, with the ultimate goal of collecting their email addresses. This popup is connected to your Keap account.

With Keap, you can:

  • Collect your visitors’ email address
  • Segment your email list
  • Send automated emails to new subscribers

But, to turn your site visitors into subscribers, you know you need to make sure that you grab your visitors’ attention at just the right moment your visitors are likely to take action, such as subscribing to your list.

And that’s where conversion-optimized popup campaigns make all the difference.

OptinMonster-homepage

And using OptinMonster is the best way to add popups like these to your site. OptinMonster lets you create beautiful forms that appear in front of your audience at just the right time.

It helps bloggers and business owners to generate more leads, sales, and traffic. It’s built to help you increase conversions on your site:

  • Attractive pre-built templates: choose from 50+ templates for desktop, mobile, and tablet
  • Targeting options: decide where you want to show your campaign
  • Campaign triggers: build campaigns based on site visitors’ behavior
  • Conversion analytics: uncover the most effective tactics

The backend is simple, and you won’t need to write any code to run automated campaigns. And it’s versatile, too.

OptinMonster integrates with any website builder and email service provider.

Using WordPress and Infusionsoft? Below, we’ll walk through the simple steps to connect your site to OptinMonster in under 10 minutes.

In this tutorial, we’ll cover how you can:

  • Design a high-converting Keap popup
  • Connect OptinMonster to your WordPress site

If you want to start generating from leads from your site, get an OptinMonster account here.

Ready to create a Keap popup that will build your email list?

Let’s get started.

How to Create a Keap Popup With OptinMonster

Creating a Keap popup with OptinMonster is simple.

Just follow the step-by-step guide below to publish a popup campaign that converts your site visitors into subscribers.

For the sake of this tutorial, we’ll be creating this popup:

Keap popup shoe store discount

Step 1: Create Your Keap Popup Campaign

First, you’ll need to log into your OptinMonster account.

Now let’s go ahead and create our campaign by clicking Create New Campaign.

Create new OptinMonster campaign button

There are several campaign types you can choose from, such as:

  • Popups
  • Inline forms
  • Floating bars
  • Fullscreen Welcome Mats

For this tutorial, we’ll focus on Popup.

Choose OptinMonster Campaign Type

Now, let’s choose a template.

You can choose from over 50 designs or create your own popup from scratch with the Canvas template.

OptinMonster Campaign Templates overview

Let’s go with the Shopping template, because it has all the elements we need to build a popup that skyrockets our list.

Today, we’re going to offer our site visitor a discount in exchange for their email address. Incentives like these increase the odds of our audience signing up to our list.

OptinMonster Shopping template

OptinMonster’s templates work on any device. But if you want, you can choose a mobile-first template.

OptinMonster mobile optimized template filter

Now, let’s name our campaign.

Name campaign

The next step is to design our popup in the OptinMonster drag and drop builder.

Step 2: Tweak Your Keap Popup Campaign

OptinMonster makes it easy to customize popups even if you have no design experience.

You have so many options to choose from to create the perfect popup for your audience.

To change any element of your popup, all you need to do is click on it. Then, you’ll see the editing tools appear on the left side.

Now, we’ll change our image:

Once we’ve added our own image, we’ll change the text.

High-converting headlines are short and catchy, so we’ll make our offer compelling and clear right from the start. Consider using OptinMonster’s headline analyzer to come up with great headline ideas.

And the freedom to change your template doesn’t end there.

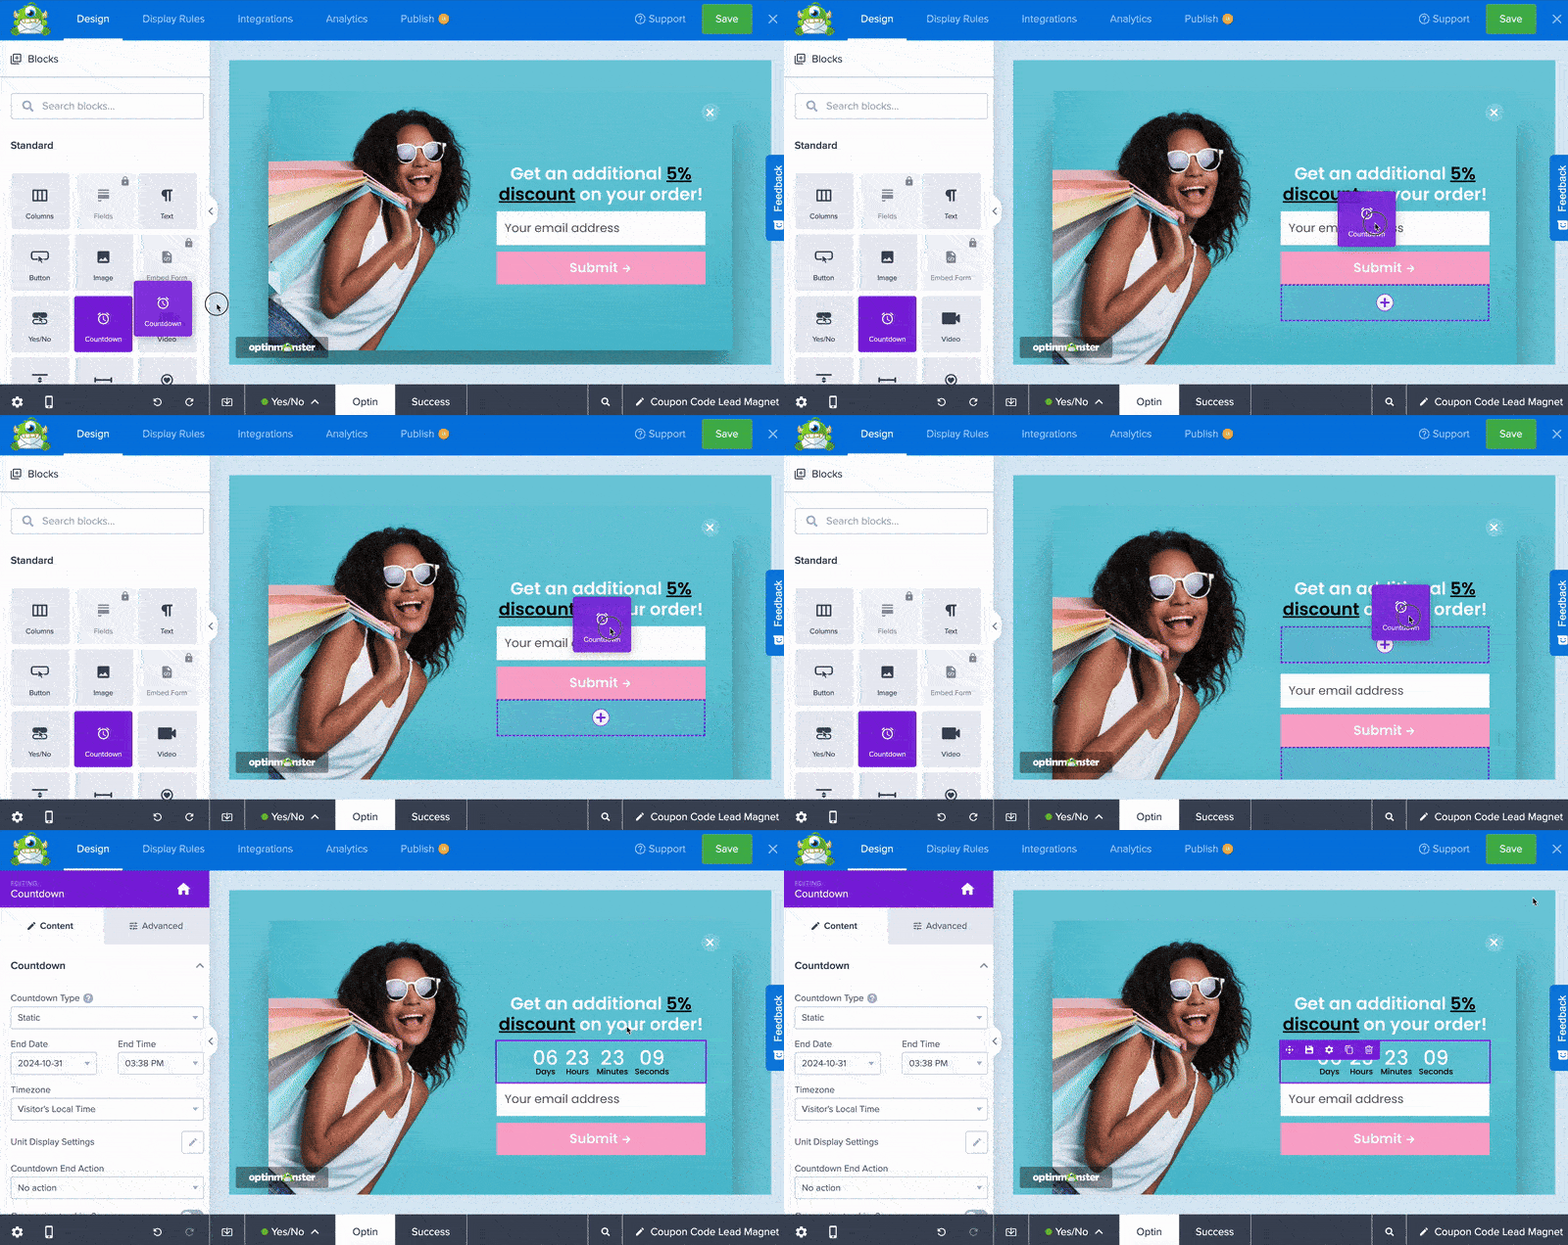
You can add just about any element to your campaign to make it your own. These elements are called Blocks.

OptinMonster blocks ribbon

Here’s a snapshot of the elements available to you.

Block elements

But that’s not all. You can also add the following custom fields and easily map them with your Keap popup:

Step 3: Display Your Keap Popup

At this stage, you’ll decide where and when you want to display your popup.

OptinMonster offers several campaign triggers and targeting rules.

These include:

  • Exit Intent®
  • Time on Page
  • Time on site
  • Referral targeting
  • Page targeting

For this tutorial, let’s focus on Monsterlinks™.

One of the most effective ways to increase your conversions is to use 2-step optins.

OptinMonster makes it really easy to do that with our MonsterLinks feature. Using MonsterLinks, you can turn any link or image into a MonsterLink.

MonsterLinks is based on a psychological trigger called the Zeigarnik effect. It stays that people are more likely to finish an action they’ve already started.

For example, Sportique used MonsterLinks to boost their conversions by 58%.

This is how it works…

Once your site visitor clicks on the link, they’ll be taken to your optin. That means they’ve already started the process by clicking on your link or image, increasing the chance that they’ll complete your optin form.

To activate Monsterlinks, head over to Display Rules. Find and select MonsterLinks™  (On Click).

OptinMonster Monsterlinks Display Rule

Copy your Monsterlink code.

Monsterlink code

Paste anywhere on your site or link to an image.

Step 4: Integrate OptinMonster with Keap

Now, all that’s left to do is integrate OptinMonster with Keap. And that’s a super simple process.

Head over to Integrations at the top of your editor.

Click Add New Integration.

Integrations ribbon

Click on Add New Integration in the left menu.

Add new OptinMonster integration

Choose Infusionsoft from the Email Provider dropdown.

Infusionsoft email dropdown

Select Register with InfusionSoft button to start the secure authorization process.

Infusionsoft keap registration

In the next window, you’ll need to log into your Infusionsoft account.

Infusionsoft login page screen

Next, a new window will appear asking you to allow OptinMonster to connect with Infusionsoft. Click Allow.
Allow Keap registration for OptinMonster

The window will close and you’ll be back in your OptinMonster dashboard. Now, label your Infusionsoft account. This label helps to organize your integrations, and it’s especially useful if you want to add more than one Infusionsoft account.

Select Connect to Infusionsoft to finish the process.

OptinMonster connect to keap

Now, OptinMonster will connect to your Infustionsoft account and import your existing tags. Choose a tag you want to assign to new subscribers.

You can also choose Lead Source Assignment. This will let you assign a source for leads in the campaign.

Infusionsoft lead tag OptinMonster

That’s it. OptinMonster is now synced with your Keap account.

Finally, save and publish your campaign.

Connecting OptinMonster to WordPress

OptinMonster offers seamless integration with any websites.

And if you’re using WordPress, you can install a plugin to connect to your account.

Step 1: Install OptinMonster Plugin

To start, log into your WordPress dashboard. Navigate to  Plugins»Add New.

Next, search for OptinMonster and select the Install Now button. Once the plugin is installed, click the Activate button.

Install OptinMonster plugin to WordPress

Step 2: Authorize OptinMonster

In the next step, you’ll have two options:

  • Connect an existing OptinMonster account
  • Create a new OptinMonster account

OptinMonster WordPress Welcome

If you don’t have an account yet, click Get OptinMonster Now and follow the easy step-by-step setup prompts.

OptinMonster homepage

If you’ve already created your OptinMonster account, choose Connect Your Account.

Then, select Authorize OptinMonster.

WordPress OptinMonster Authorize

Next, you’ll be taken to the OptinMonster login page. Enter your details and click Login.

OptinMonster login screen

Finally, select Connect to WordPress.

Connecting to WordPress screen message

And you’re all set. Now, you can access OptinMonster from WordPress.

We hope this article helps you create a Keap popup for growing your list and building better relationships with your visitors.

Now, if you’re looking for more practical advice on building an email list filled with engaged subscribers, check out these posts:

These articles will help you craft email campaigns that connect with your audience and grow your business.

Want to grow your email list? Get started with OptinMonster today!


Disclosure: Our content is reader-supported. This means if you click on some of our links, then we may earn a commission. We only recommend products that we believe will add value to our readers.


Add a Comment

We're glad you have chosen to leave a comment. Please keep in mind that all comments are moderated according to our privacy policy, and all links are nofollow. Do NOT use keywords in the name field. Let's have a personal and meaningful conversation.

Popular Posts

Connect with us:

Start Getting More
Leads & Sales Today
with OptinMonster!

Popups work, and you can get started for a few bucks a month. What are you waiting for?

Create and launch smart capture forms
today in minutes. What are you waiting for?

In only 7 months, we added more than 95,654 names to our email list using OptinMonster’s Exit Intent™ technology. We strongly recommend it!

Michael Stelzner - Best Lead Generation Tool

Michael Stelzner

Founder Social Media Examiner

I hate popups, so I was hesitant to try one on my site. But the results from OptinMonster exit-intent popup speak for themselves. I doubled my subscription rate immediately without annoying my users. I haven’t had a single complaint. My only regret is that I didn’t start using OptinMonster sooner. I can only imagine how many subscribers I could have added to my email list! If you have a blog, then I highly recommend you start using OptinMonster. I’ve researched them all, and it’s the best in market.

Michael Hyatt - WordPress Lead Generation

Michael Hyatt

New York Times Bestselling Author Platform: Get Noticed in a Noisy World

Exit-intent popups have doubled my email opt-in rate. When done right, you can see an instant 12% lift on driving sales. I highly recommend that you use OptinMonster for growing your email list and sales.

Neil Patel - WordPress Popup Plugin

Neil Patel

Founder QuickSprout