Your WooCommerce store has amazing content, killer products, and unbeatable deals. The only problem?
You need your customers to know about it.
A WooCommerce announcement bar can be the perfect solution to draw your customers’ attention where you want it. That way, you can better serve them by making sure your customers never miss out on what you have to offer.
That’s why we’re going to teach you exactly how to create a WooCommerce announcement bar in under 5 minutes. Here’s a sneak peek at the one we’ll be working on today:
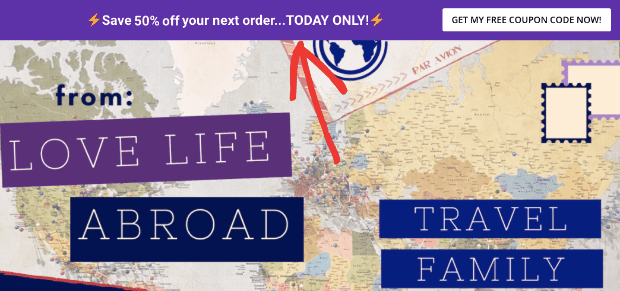
But first, let’s get clear on what an announcement bar is and why you need one on your WooCommerce site.
What Is a WooCommerce Announcement Bar?
A WooCommerce announcement bar is a banner notification that sits on the top or bottom of your site’s page to give your audience helpful information. That could be letting your audience know about:
- New content on your site
- Product launches
- Special promotional offers
- Lead magnets (that you can use to grow your email address)
And more.
While there are many WordPress notification bar plugins on the market, none are nearly as effective as OptinMonster.
That’s because our easy campaign customization saves you time while our many targeting options give you the freedom to choose where your campaign is displayed.
In other words, our WooCommerce announcement bars get better results in less time.
Announcement bars are so effective that DowntownOrlando.com uses them to consistently add over 4,000 subscribers to their email list each year.
It’s also how Crush Empire generated 460 sales in 1 year and saved countless hours in campaign creation.
Now you can get the same amazing results for your WooCommerce store because we’re going to teach you how step-by-step.
Let’s dive into how you can make a WooCommerce announcement bar in under 5 minutes.
Need an OptinMonster Account?Grow your traffic, email list, and sales faster by joining OptinMonster today!
Creating a WooCommerce Announcement Bar
We understand that not everyone learns the same way. That’s why we also made this helpful video tutorial for our visual learners:
But for a totally in-depth guide, we recommend going through these written instructions. Let’s get started.
Step 1: Design Your WooCommerce Notification Bar
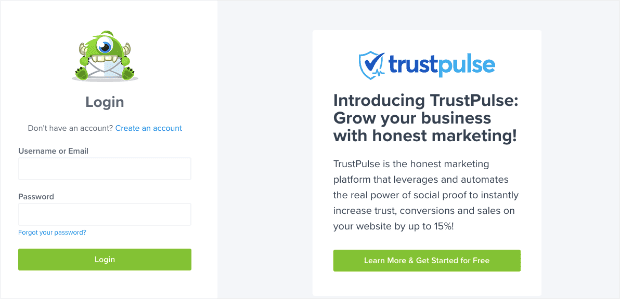
First, log into your OptinMonster account:
Then select your campaign type. For our WooCommerce announcement notification bar, we’ll choose Floating Bar:
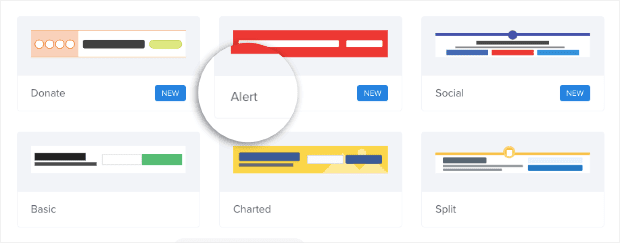
Now choose a template that best suits your WooCommerce announcement. We have over 50 pre-built templates to choose from that work across desktop, tablet, and mobile devices.
Many of these easy notification bars come with built-in features like optin fields, pre-made images, or countdown timers.
Did You Know?Countdown timers are great for creating a sense of urgency with your customers. In fact, countdown timers are how Cracku, an exam preparation service, increased conversions by 300%!
But the template you choose will depend on your goal for your WooCommerce announcement. For today’s tutorial, we’ll choose the Alert template because it can be customized to fit many different use cases:
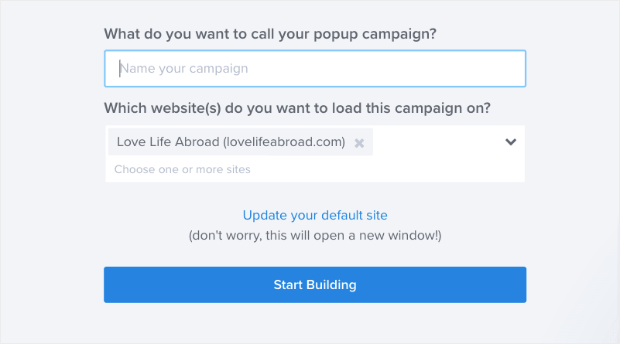
Then name your campaign, connect it with your WooCommerce website, and click Start Building:
Now your campaign is in your editor, ready to customize.
In this tutorial, we won’t dive deep into how to customize your campaigns with OptinMonster. If you’ve never worked on an OptinMonster campaign in the past, check out this helpful resource on creating your first campaign.
But rest assured that any changes you’d like to make to your WooCommerce announcement are easy!
To customize your notification bar, simply click on the part of your campaign that you want to edit. This will bring up the editing tools on the left-hand side menu.
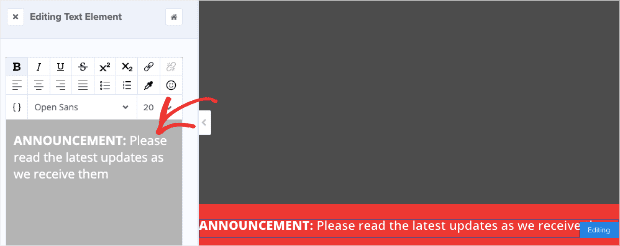
For example, you can change text of your message:
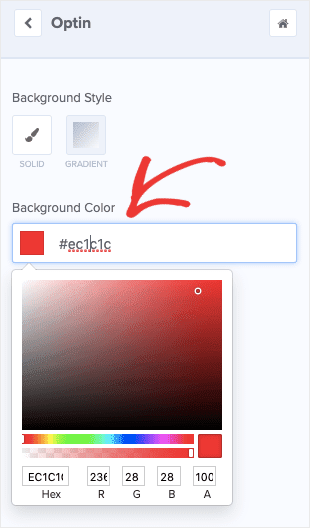
The background color to match your brand:
NoteYou can also change this element by clicking Optin Settings » Optin View Styles from the home menu in your editor.
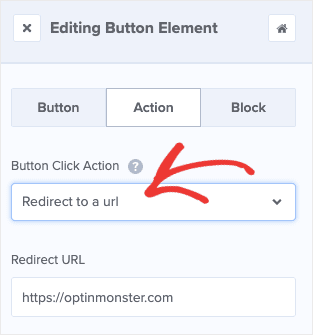
Or redirect your users to another page by changing your WooCommerce announcement button Action:
These are just a few of the customizations you can make to your WooCommerce announcement bar in a matter of minutes. Again, the specific changes you make to your campaign will depend on how you want to use your WooCommerce notification.
But one thing you need to know for any kind of WooCommerce notification bar is that you can easily change where it displays on your store’s website.
By default, your notification bar will rest at the bottom of your browser, but you can easily bring it up to the top.
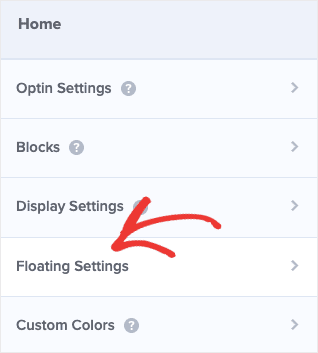
Go to the home menu of your editor and click Floating Settings:
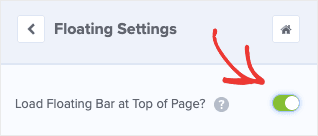
Then activate the toggle switch to Load Floating Bar at Top of Page:
And now your WooCommerce announcement will display at the top of your store’s page in the header.
Once you’ve created the perfect campaign for your WooCommerce store, it’s time for our last and final step.
Step 2: Decide When & Where Your Announcement Appears
We just saw how you can change the position of your campaign to either the top or the bottom. But now it’s time to determine your WooCommerce announcement’s location.
To do this, head over to Display Rules at the top of your editor:
You can make your notification bar appear wherever (and whenever) you’d like on your website. We’ve found that most business owners use their WooCommerce announcement for 1 of 2 reasons:
- To display an announcement across their entire site
- To display an announcement on specific product pages
Let’s quickly show you the display settings for each of these scenarios.
WooCommerce Announcements for Site-Wide Notifications
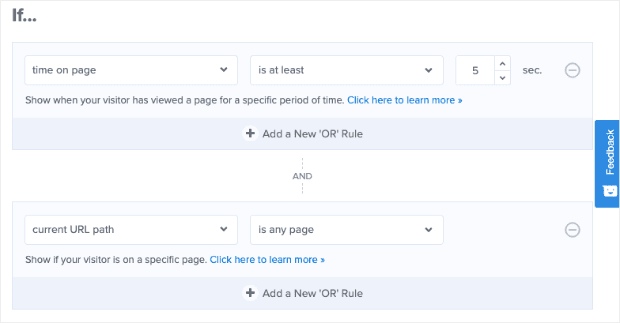
This is the simplest use case to customize because it comes with the default settings! When you’re in your Display Settings, you’ll see that you have 2 conditions already configured:
- Time on Page is at least 5 seconds
- Current url is any page
That means the only decision you need to make is how long your visitors should be on your site before seeing your campaign. We put a 5-second delay on these notification bars because it’s the best way to get your audience’s attention.
If you’d like your WooCommerce announcement to appear at the same time as your page loads, you can change this setting from is at least to is immediate:
Now your WooCommerce announcement will appear as soon as your visitors reach your site.
Since your second condition is already set to display on every page, you’re all set! But what if you want your WooCommerce announcement bar to only appear on certain pages? Let’s see how you can configure that.
WooCommerce Announcements for Specific Pages
In some cases, you may only want to show your notification bar on certain pages. This comes in handy when you are:
- Running a sale on specific products
- Building an optin campaign bar for certain content pages
- Making related product suggestions for upsell offers
Whatever the case may be, you can easily decide where you want your WooCommerce announcement bar to appear on your site.
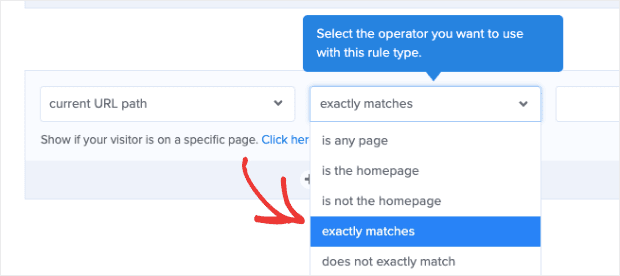
Simply change the second condition of your display rules in the default settings. Leave the field current url path as it is. But in the next field over, change is any page to exactly matches:
You can then add the specific URL that you want your WooCommerce announcement bar to appear on:
If you want to add more pages, simply click the +AND button to create a new rule:
Also, you may find that you want to add your notification bar to many related pages on your site. For example, you may want to display your WooCommerce announcement on all of your product pages, rather than just 1 product.
But setting up all of those URL display rules can become tedious.
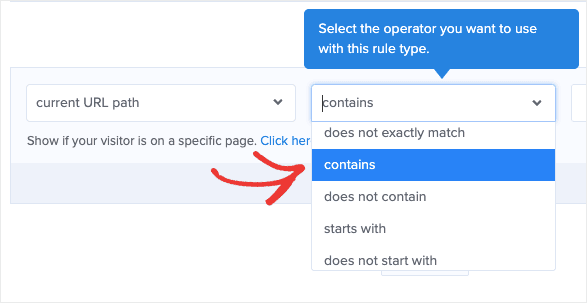
A simpler way of doing this is to take your current URL path condition and change the setting from is any page to contains:
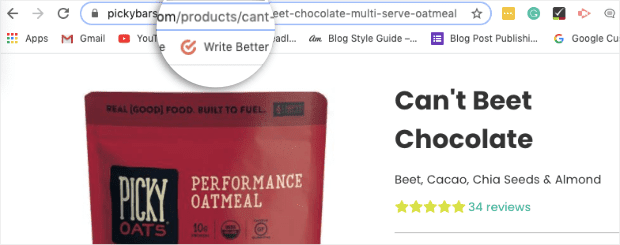
Then you can insert unique terms from your URL slug for categories from your website. For example, the WooCommerce store Picky Bars uses the unique term “products” in their URL for all of their product pages:
This unique term for product pages is common for WooCommerce stores. In this case, you could put “products” for your current url path contains setting:
Now your WooCommerce announcement bar will appear on all pages where the term “products” appears in your URL slug.
And that’s it! Well, one last thing… don’t forget to Save and Publish:
You’ve just built a custom WooCommerce announcement bar for your site. Here’s the one we built and customized in around 3 minutes to show you how quick and beautiful these announcement bars can be:

You can give your customers cool deals, let them know you offer free shipping, or use your WooCommerce announcement bar any way that helps your business thrive.
We hope you enjoyed this tutorial as much as we enjoyed making it. If you did, feel free to pass it along to a friend who would find it helpful.
You may also want to read the following related articles if you’re serious about increasing user experience and growing your business:
- How to Create a WooCommerce Popup (+7 Ways to Boost Sales)
- How to Create a Custom WooCommerce Login Popup
- How to Create a WooCommerce Popup to Cross-Sell
- How to Create a WordPress Notification Bar
Got any tips for using WooCommerce notifications to get more business? Let us know about them on Facebook, Twitter, or in the comments section below.
You can also check out on YouTube where we have loads of helpful tutorials that will teach you to take your business to the next level.
Sign up for OptinMonster today to join over 2,000,000 websites in driving more traffic, increasing conversions, and skyrocketing sales!








Add a Comment