Creating a website for your small business might seem like a daunting task, especially when you’re juggling other responsibilities. But it doesn’t have to be.
With the right tools and guidance, you can have a professional small business website up and running in just a few hours. And you can do it without a developer or coding skills. In this guide, I’ll walk you through the process step by step so you can confidently build and manage your website.
- Why Your Small Business Needs a Website
- Essential Tools for Building a Website
- How to Make a Website for a Small Business
Why Your Small Business Needs a Website
Some business owners think a social media page is enough. But relying solely on platforms like Instagram or Facebook means you’re at the mercy of their algorithms and policies, which can change overnight. A website gives you full control over your online presence and credibility.
Here’s why a website is essential:
- Professionalism: A well-designed website shows customers you’re serious about your business.
- Control: You decide the look, feel, and content of your website—not a social media platform.
- Availability: Your website works 24/7 to showcase your services, answer questions, and generate leads.
The good news? Building a small business website has never been easier. Let’s get started.
Essential Tools for Building a Website
To create your website, you’ll need these three things:
- Domain Name: This is your website’s address.
- Web Hosting: A service that stores your website online.
- Website Builder: A tool to design and manage your website without coding.
Why WordPress Is Our Recommendation:
WordPress powers over 43% of all websites because it’s versatile, scalable, and user-friendly. You can build anything from a simple page to a full eCommerce store with WordPress. Alternatives like Squarespace, Wix, or Shopify are also good options for specific needs, such as portfolios or online stores.
How to Make a Website for a Small Business
Step 1: Choose Your Domain Name and Hosting Provider
Your domain and hosting provider are the foundation of your website. Think of hosting as the land you’re building on and the domain as your address.
Choosing Your Domain NameFollow these tips for selecting the perfect domain:
- Keep it short, relevant, and easy to spell.
- Include your business name or location for added clarity
Pro Tip: If your ideal domain is taken, try tools like Nameboy for creative alternatives.
Choosing a Hosting Provider:
My recommendation is to use either SiteGround or Bluehost for your hosting. For a full comparison between these and other hosting options, see our guide to the best managed WordPress hosting services.
Step 2: Install WordPress (or Your Preferred Builder)
If you’ve chosen Siteground, Bluehost, or a similar hosting provider, installing WordPress is a breeze. Most hosts offer a 1-click WordPress installation that sets everything up for you.
Here’s how to get started:
- Log into your hosting account’s dashboard.
- Look for the WordPress installer or setup wizard.
- Follow the prompts to install WordPress on your domain.
Once installed, you can log into your WordPress site using the link and credentials provided by your hosting provider.
Prefer Alternatives?If you’re not using WordPress, platforms like Wix, Squarespace, and Shopify come with built-in hosting and setup tools, making them great options for absolute beginners.
Step 3: Pick a Theme
A WordPress theme determines how your website looks and feels. Thankfully, there are thousands of free and premium themes to choose from.
Here’s how to choose the perfect theme for your small business:
- Prioritize Simplicity: Look for a clean design that supports your business goals without unnecessary clutter.
- Mobile Responsiveness: Over 50% of web traffic comes from mobile devices, so ensure your theme looks great on any screen size.
- Ease of Customization: Choose a theme compatible with drag-and-drop editors like SeedProd or Elementor for easy updates.
- Support and Updates: Check reviews and ensure the theme is actively updated to avoid security vulnerabilities.
How to Install a Theme

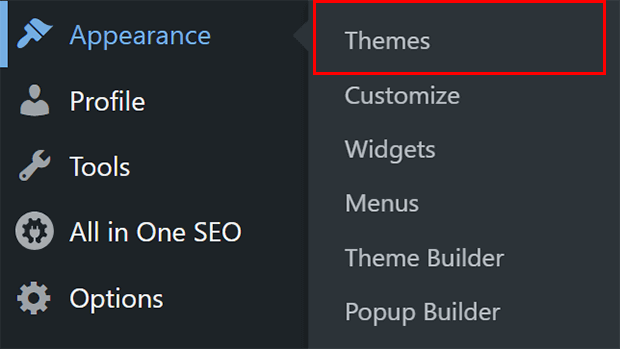
- In your WordPress dashboard, go to Appearance » Themes » Add New.
- Browse free themes or upload a premium theme you’ve purchased.
- Click Activate once you’ve chosen your theme.
Step 4: Add Essential Plugins
Plugins are like apps for your website. They add extra features, such as contact forms, SEO tools, or eCommerce functionality.
Here are the must-have plugins for a small business website:
- SeedProd: Build custom pages and layouts easily with its drag-and-drop interface.
- All in One SEO (AIOSEO): Optimize your site for search engines to attract more visitors.
- OptinMonster: Convert visitors into leads and customers with engaging popups and forms.
- WPForms: Add user-friendly contact forms to your site.
- MonsterInsights: Track visitor stats and analytics directly in your WordPress dashboard.
- Duplicator: Back up your website automatically to prevent data loss.
How to Install Plugins
- Go to Plugins » Add New in your WordPress dashboard.
- Search for the plugin by name.
- Click Install Now and then Activate.
For any premium WordPress plugins that you purchase, follow the brand’s instructions for installation. You may need to download the plugin from the brand’s website, and you’ll usually have an activation key you’ll need to enter into WordPress.
Pro Tip: Avoid installing too many plugins, as this can slow down your site. Stick to essentials that directly support your business goals.
Step 5: Build Your Pages
With your theme and plugins in place, it’s time to create the core pages of your website.
Here are the key pages every small business website should include:
- Homepage: This is the first impression visitors get. Include your business name, a brief description, and a strong call-to-action like “Book a Consultation” or “Shop Now.”
- About Page: Share your story, values, and what sets your business apart. This builds trust with potential customers.
- Services/Products Page: Showcase what you offer with clear descriptions, pricing, and customer testimonials.
- Contact Page: Make it easy for customers to reach you. Add your address, phone number, email, and a contact form.
Optional Pages:
- Blog: Share helpful tips or news related to your industry. This can improve SEO and engage visitors.
- FAQ Page: Address common customer questions to save time and improve satisfaction.
- Portfolio/Testimonials: Highlight past work or client reviews to build credibility.
How to Add Pages in WordPress

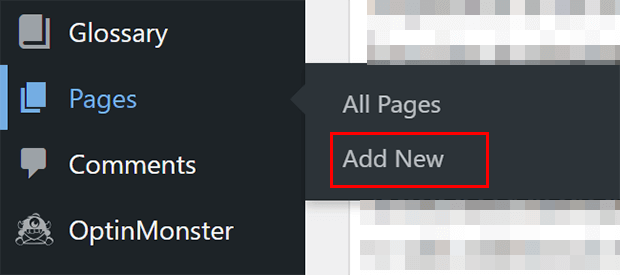
- Navigate to Pages » Add New in your WordPress dashboard.
- Enter a title for your page, such as “About” or “Contact.”
- Use WordPress’s Block Editor or a page builder like SeedProd to customize your page layout.
- Publish your page when you’re ready.
Great! I’ll pick up where we left off and continue refining the next sections, focusing on clarity, usefulness, and updated information.
Take the Next Step: Build and Grow Your Website Today
Congratulations! You now have all the tools and knowledge to create a professional small business website. By following these steps, you’ve set the foundation for building trust with your audience, showcasing your services, and driving business growth.
But a great website is only the beginning. To maximize its potential, you need to turn visitors into leads and customers. That’s where OptinMonster comes in.
With OptinMonster, you can create powerful popups, slide-ins, and other conversion tools to:
- Build your email list effortlessly.
- Recover abandoned carts and drive sales.
- Increase engagement with personalized campaigns.
Join thousands of small business owners using OptinMonster to supercharge their websites. Try OptinMonster risk-free today and see how it can help your business thrive!
More Resources for Small Businesses:


Add a Comment