Do you want to load custom fonts into OptinMonster but aren’t sure how?
Using custom fonts can be great for your site’s branding. Or, you may simply want to test our new fonts to see if they affect conversions.
Whatever the case may be, adding custom fonts to your OptinMonster campaign is easy. And today, we’re going to show you exactly how with 2 different methods:
- Using custom fonts that are already installed on your website
- Adding custom fonts that aren’t on your website
By the end of this post, you’ll see just how simple it is to tailor your OptinMonster campaign’s style with custom fonts.
But first, let’s briefly chat about why you’d want to use custom fonts in the first place.
Why Would You Want to Use Custom Fonts?
When you’re creating a brand, choosing the right font is crucial. Professional web designers often compare your site’s fonts with shoes:
The type you choose reflects a specific style you’re going for.
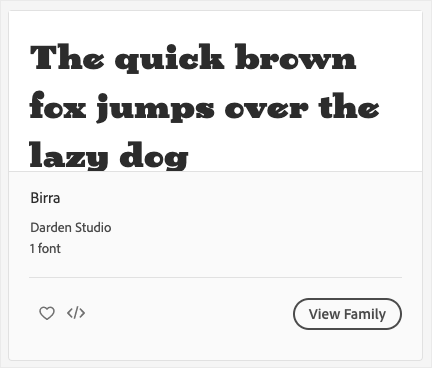
In other words, your font can enhance your brand’s image. A really great font gives your site a unique personality. They can be fun and bold like this Birra font from Adobe Fonts:
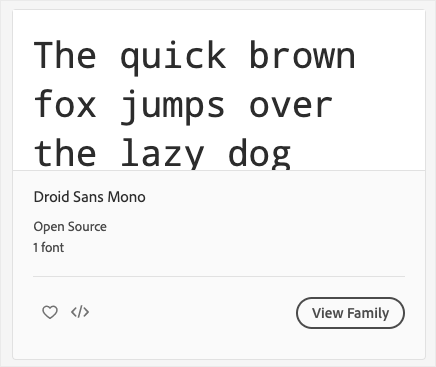
Or they can be drier and give a more traditional look, like this Droid Sans Mono font:
The font you choose for your site and your optin campaigns speak volumes about the type of brand you want to be. And believe it or not, your choice of font also impacts your conversion rates.
That’s why it’s important to choose your fonts carefully. OptinMonster supports tons of different fonts natively, but if you want to load a font that’s not natively supported, don’t worry. Because right now, we’re going to teach you exactly how to upload custom fonts to your OptinMonster campaign.
Let’s dive in.
Upload Custom Fonts to OptinMonster
We understand that everyone learns a little differently. That’s why we created this video tutorial if you’re more of a visual learner:
Otherwise, feel free to follow along with our in-depth written guide.
In this article, we’ll show you 2 methods for adding custom fonts to your OptinMonster campaigns:
- Loading custom fonts that are functioning on your website
- Using custom fonts that are separate from your website
Let’s get started.
Method 1: Matching Custom Fonts With Your Website
With this method, you’ll be using a new custom font for both your website and your OptinMonster campaign.
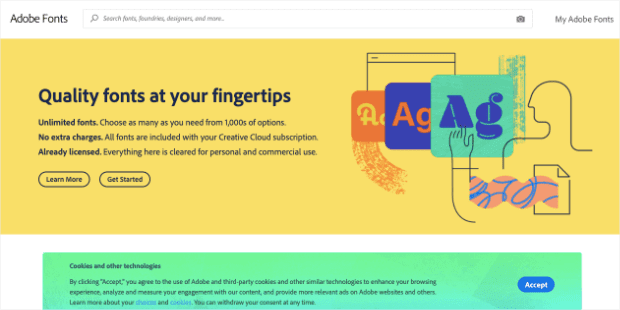
When it comes to choosing a custom font service, you’ve got plenty of options. But the easiest way to add custom fonts is with Adobe Fonts (formerly known as Typekit):
Adobe Fonts is a cloud-based service that allows you to easily add and work with custom fonts on your websites.
The first thing you need to do for this tutorial is to sign up for an Adobe Fonts account. There’s a free version, so you won’t have to pay anything if you only need a few fonts. For larger projects, you’ll want to look into their premium plans.
Once you’ve created your Adobe Fonts account, you’re ready to begin.
Step 1: Select Your Custom Font in Adobe Fonts (Typekit)
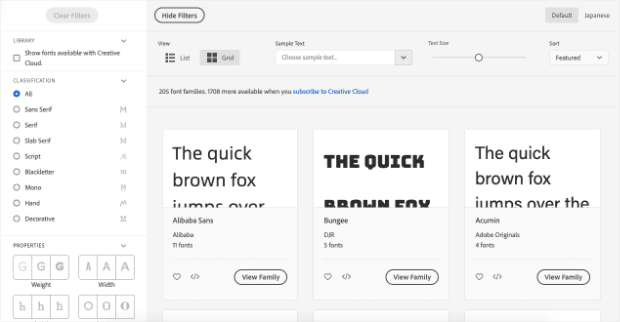
In your Adobe Fonts dashboard, you can immediately begin looking for new font families:
You have hundreds of font options available on the free plan. You can upgrade to the Creative Cloud for thousands more.
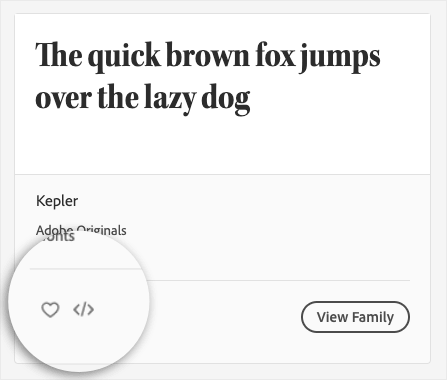
Today, we’ll use the Kepler font because it stands out. That means it will be easy to see changes in the fonts for this tutorial.
When you’ve decided on a font for your website, click on the HTML icon:
You’ll arrive on a new page with details about the font. You need to do 2 things here:
- Activate the fonts you want to use
- Add the font-family to a web project
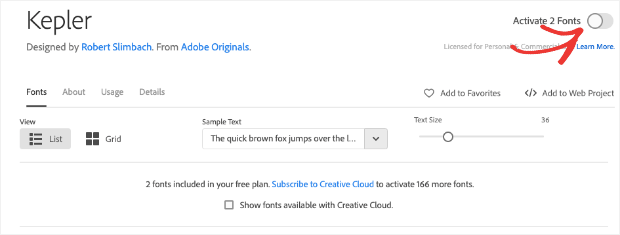
Both are really easy to do. On the font’s page, look in the upper right-hand corner to activate the font:
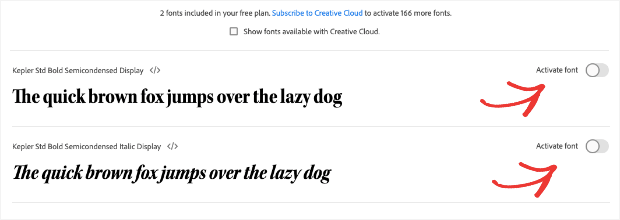
You can also scroll down and look through all the font-family’s font options to activate a select few:
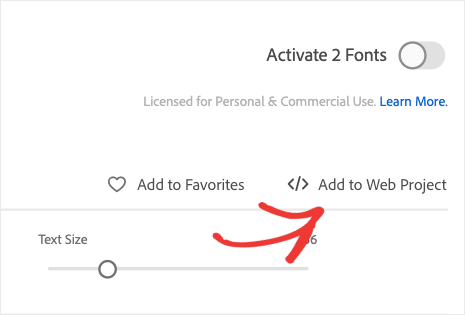
Once you’ve activated the fonts you want, it’s time to create a web project. On the same page, go back to the upper right-hand corner. Click Add to Web Project:
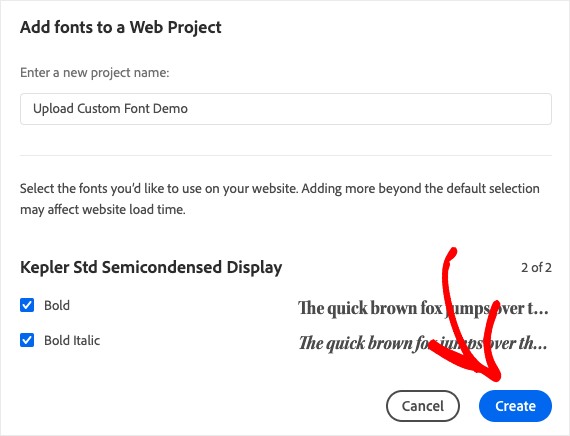
A new window will appear. You can now name your project and click Create:
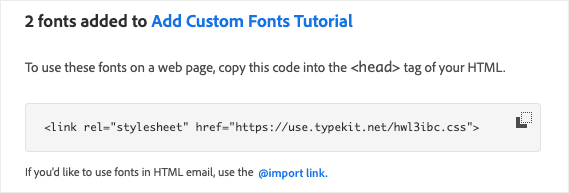
Then, you’ll see a summary of your font selections. You’ll also get a small piece of code that you need to embed into the <head> tag of your site if you’re not using WordPress:
Now you need to connect Adobe Fonts with your website.
Step 2: Connect Adobe Fonts to Your Site
Like we just said, you’ll need to embed the Adobe Fonts HTML code in the <head> tag of your site if you’re not using WordPress.
Since there are so many different website builders out there, you’ll need to check with your specific platform to see how to insert this code in your site’s <head> tag.
But if your site is built with WordPress, the process is much simpler. That’s because we can use the plugin Custom Adobe Fonts (Typekit).
With this plugin, we can sync our WordPress site with our Adobe Fonts account. Then, as you’ll see, we just need to enter our Adobt Fonts’ project details to upload the fonts.
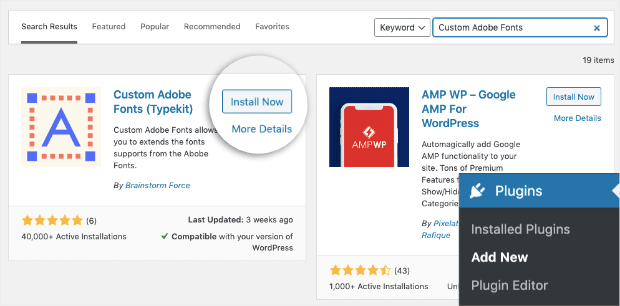
Go to your WordPress dashboard. Find Plugins » Add New in your admin menu and search for the plugin. When you’ve found it, click Install Now:
When it’s done installing, click Activate. Now you have everything you need to start using your custom fonts.
But if you’ve never installed a plugin before and need some help, no worries. You can read this article that gives you 3 ways to install and activate a WordPress plugin.
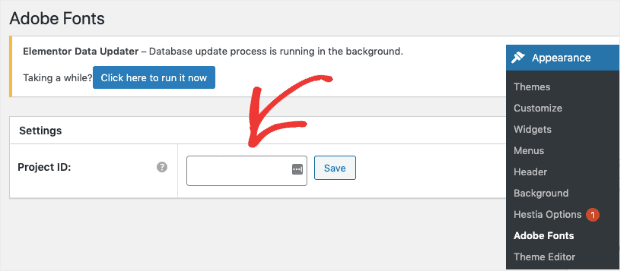
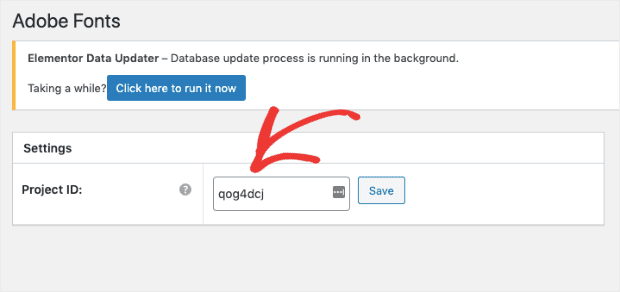
Once your plugin is active, go to Appearance » Adobe Fonts. You’ll see an empty field box that’s labeled Project ID:
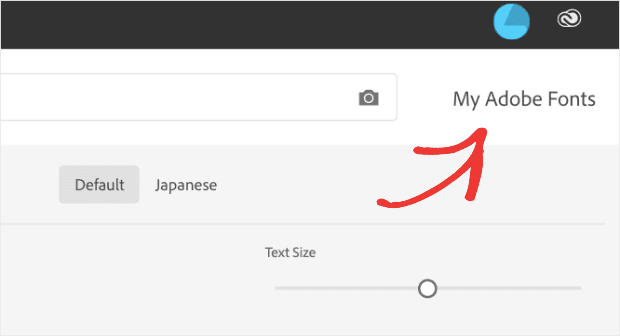
Keep this tab open and switch back to your Adobe Fonts dashboard. In the upper right-hand corner, click My Adobe Fonts:
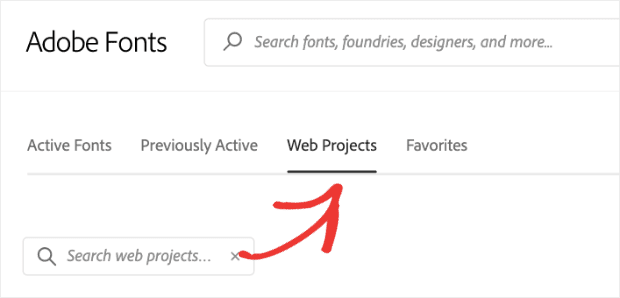
On the next page, locate and click Web Projects in the page’s menu:
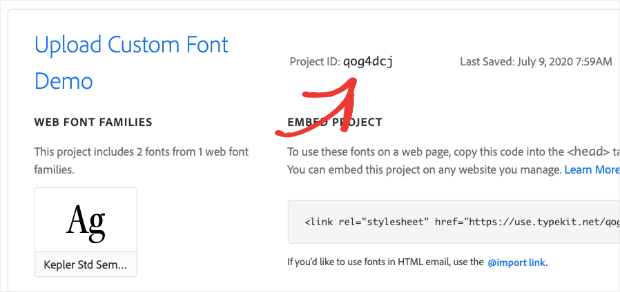
Now you’ll see your Adobe Font projects. Locate the one you want to upload, and you’ll see a Project ID:
Copy and paste this ID in your WordPress dashboard. Then click Save:
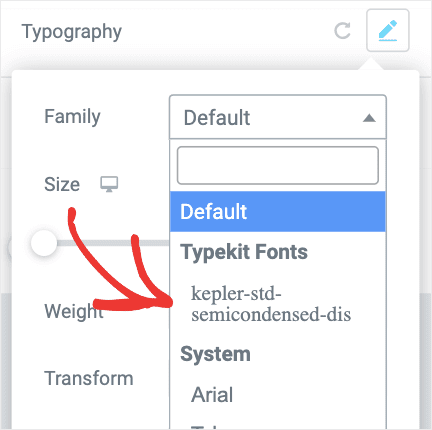
And that’s it. Your custom fonts are now saved to your website. If you’re creating your site with popular page builders like Elementor or Beaver Builder, you’ll see the custom fonts appear:
Now it’s time to customize your OptinMonster campaign to match the new fonts on your website.
Step 2: Create Your OptinMonster Campaign
First, make sure you’re logged into your OptinMonster account. If you don’t have an account yet, no worries.
You can get started with OptinMonster today risk-free with our 14-day money-back guarantee.
Then you’ll need to choose a campaign type. For today, we’ll select a Popup:
Next, select a template for your optin campaign. We’ll be using the Basic template to get started:
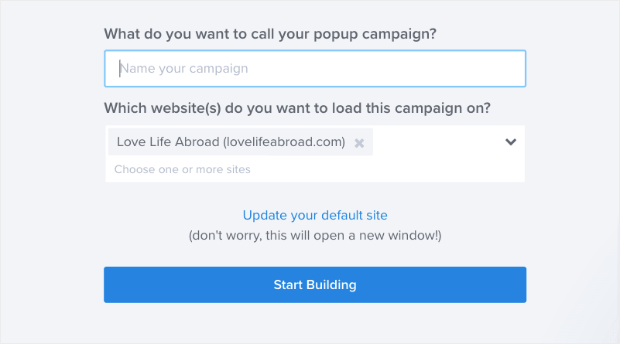
Then you just need to name your campaign, assign it to your website, and click Start Building:
We aren’t going to get into much detail about how to modify your campaign in today’s tutorial. Frankly, there are too many customization options to cover here.
But if you need more help designing your campaign beyond uploading custom fonts, we’ve got you covered. Check out this article on how to create and design your first campaign with OptinMonster.
Today, we’ll just be sticking with adding custom fonts to your popup.
Step 3: Upload a Custom Font to Your OptinMonster Campaign
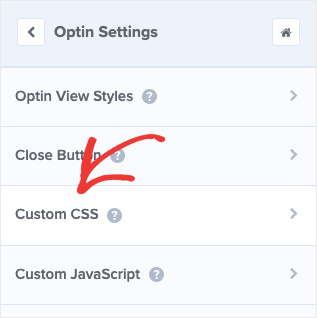
Once you’re in the OptinMonster editor, click Optin Settings » Custom CSS from the left-hand side menu:
You’ll enter a bit of code here that you’ll need to modify for your specific campaign. Use can use this code snippet as the base for your own campaign:
#om-{{id}} span[style] {
    font-family: kepler-std-semicondensed-dis, serif!important;
}
But, again, you’ll need to make some modifications for your:
- Campaign ID {{id}}
- Font-family
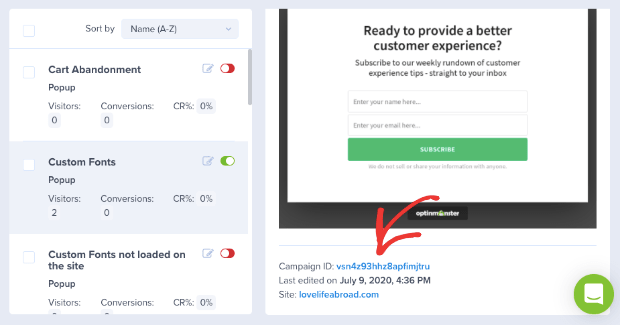
Every OptinMonster campaign has a unique ID that you can find in your OptinMonster dashboard. Simply select the campaign you want to add a custom font to and scroll down to Campaign ID:
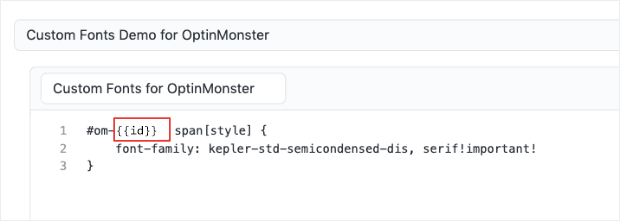
Then you’ll replace this part of the code snippet with your unique OptinMonster campaign’s ID:
Leave everything else in that line exactly as it’s shown above.
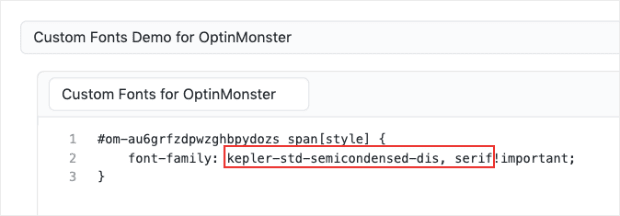
Also, we’re using the Kepler font-family in this tutorial. But you may want a different font-family. You can change the font-family in this section of the code:
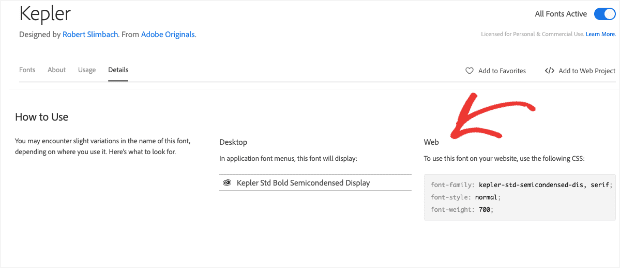
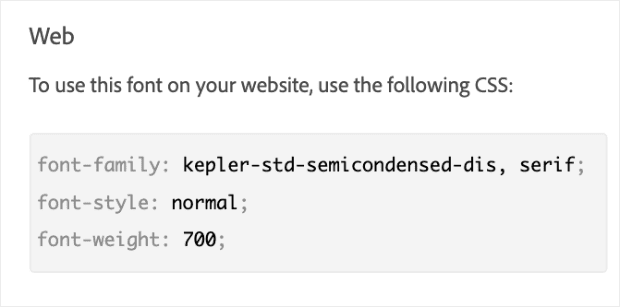
How do you know what code you should use for your specific font-family? That can be found back in your Adobe Fonts dashboard. Click on the custom font you’re using and scroll down to the How to Use section.
You’ll see the CSS you need for the font-family of your choice:
Here’s a closeup of the CSS code from the image above:
Note that more advanced users who are familiar with CSS can also adjust the font-style and font-weight for their OptinMonster campaign.
So to recap, take the following code snippet:
#om-{{id}} span[style] {
    font-family: kepler-std-semicondensed-dis, serif!important;
}
And change the:
- Campaign ID {{id}}
- Font-family
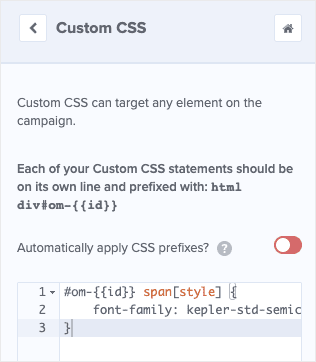
Then insert the code into your Custom CSS box in OptinMonster:
You’ll notice that the toggle switch for Automatically apply CSS prefixes is turned off in the image above.
This is super important because the code we’re using in this tutorial already includes a modified version of the CSS prefix (where you updated your campaign’s ID).
So make sure that you’ve deactivated this option.
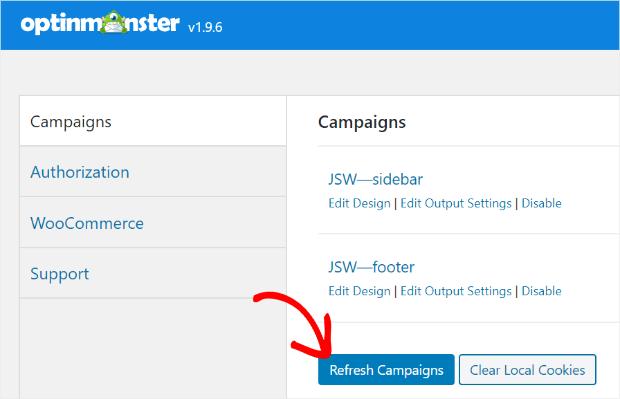
And if you’re using OptinMonster’s WordPress plugin, there’s one last thing to remember.
Any time you customize your campaign’s CSS or JavaScript fields, you’ll need to refresh your campaigns in your OptinMonster plugin dashboard.
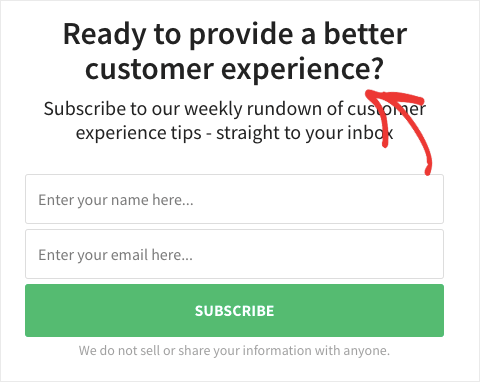
When all that is finished, you can test your new campaign. The fonts won’t load in OptinMonster’s builder, but you’ll be able to see them when the campaign is live. That’s how we went from a default template like this:
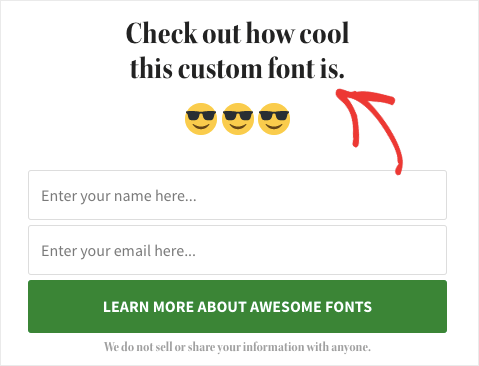
To a new campaign with this Kepler custom font:
But what do you do if you want to use a font with OptinMonster that isn’t currently on your website?
Method 2: Use Custom JavaScript to Load Fonts
Sometimes you may want to use a custom font just for your OptinMonster campaigns that aren’t on your website.
This could be for many reasons:
- Making your campaign really stand out
- Beginning the process of rebranding your site
- Testing new fonts with your audience
That last one is particularly important. You can create a campaign with OptinMonster and use one of our many fonts that come with the template.
Then, you could create a split test and use a custom font to see which one performs better with your target audience.
That way, you have real data to help you determine which font would be best for your brand. This is a lot easier than split testing fonts on your actual website and will save you tons of time.
Whatever the reason may be, loading a custom font to your OptinMonster campaign is easy! Even if that font isn’t pre-loaded onto your website.
How is this possible?
Because OptinMonster now offers custom JavaScript support. That opens up so many doors for you to personalize your campaigns, including:
- Set custom cookies
- Load additional resources like animation libraries
- Use language translation based on location
And, of course, uploading custom fonts to your OptinMonster campaign.
Let’s look at how this works.
Step 1: Create a Web Project With Adobe Fonts
This method starts out exactly like the last. You’ll need to:
- Sign up for Adobe Fonts
- Select the custom fonts you want for your campaign
- Create a Web Project in Adobe fonts
- Activate the fonts you chose
If you need a quick refresher on these steps, you can click here to jump back to that section of the tutorial.
Step 2: Upload Your Font-Family Code to the Custom JavaScript Field
When you’ve completed step 1, return to your OptinMonster campaign.
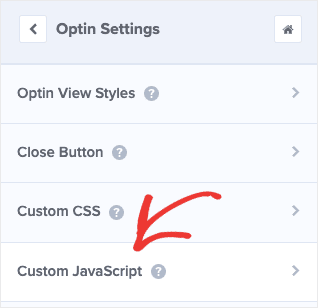
From the home menu, click Optin Settings » Custom JavaScript:
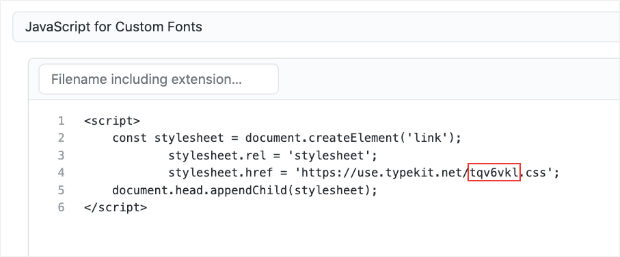
Paste the following code snippet into the JavaScript field:
<script>

    const stylesheet = document.createElement('link');

            stylesheet.rel = 'stylesheet';

            stylesheet.href = 'https://use.typekit.net/tqv6vkl.css';

    document.head.appendChild(stylesheet);

</script>
There’s one thing you’ll need to update in the code:
- Your Adobe Font’s web Project ID
Remember, you can find your Project ID code from your Adobe Fonts dashboard under Web Projects:
Copy and paste your Project ID to replace the default code in the JavaScript snippet we provided:
This will let your OptinMonster campaign pull from your Adobe Fonts account without any fonts needing to be loaded onto your site.
Now you’re ready for step 3.
Step 3: Load Font-Family to Your OptinMonster Campaign
The good news is that if you’ve been following this tutorial, then you already know exactly what to do.
Simply repeat the steps for customizing your campaign’s CSS field box from earlier using the following code snippet:
#om-{{id}} span[style] {
    font-family: kepler-std-semicondensed-dis, serif!important;
}
Again, you need to modify 2 parts of this code:
- Campaign ID {{id}}
- Font-family
If you need a refresher, you can click here to head back to that portion of the tutorial.
And that’s it! Your campaign will now have custom fonts that are separate from the fonts on your website.
Remember that your custom font will not appear in the OptinMonster builder. But if you followed these instructions, the font will show up when your campaign is live.
Here’s another look at the default campaign’s template and font:
And here’s a quick comparison of how the fonts changed:
Again, this is using the Kepler font, which is not currently supported on the website for which this popup will appear.
But because OptinMonster offers custom JavaScript support, adding any custom font you want is easy!
Something not working? Here are 3 things to check that usually fix the problem:
- Did you hit Save and Publish for your campaign?
- Have you refreshed your campaigns from your OptinMonster plugin dashboard (for WordPress)?
- Is the toggle switch for Automatically apply CSS prefixes turned off in your CSS field box?
These are the usual culprits if your campaign isn’t showing your custom font right away.
We hope you enjoyed this article. And if you’re interested in uploading custom fonts to increase conversions, you may be interested in the following posts, as well:
-
The Ultimate eCommerce Optimization Guide: 13 Steps to Instantly Boost Revenue
-
69 Highly Effective Lead Magnet Ideas to Grow Your Email List (Updated)
These articles will have everything you need to get higher conversions and make more sales from your OptinMonster campaigns.
Want to get started? Join OptinMonster today risk-free with our 14-day money-back guarantee.






Add a Comment