Do you want to add a click-to-call link to your WordPress site?
Your site visitors may need to get in touch with you to negotiate a quote, discuss their requirements, or get support. A click to call link will make it easy for them to connect with you.
In this article, we’ll show you 3 easy ways to easily add a click to call link in WordPress.
Why Add a Click to Call Link in WordPress?
We live in the age of instant gratification, and that applies to your business as well. When customers are interested in your product or service, they may want to contact you right away.
Click to call links are really helpful if you want to offer the following services:
- Get in touch for a quote
- Discuss pre-sale requirements
- Book consultations or appointments
- Resolve queries and complaints
Click to call links are a great option for small businesses as well as large enterprises. However, if you’re just starting out, you may want to check out professional business phone services like Nextiva.
You can take advantage of awesome features like call forwarding, voice messages, automated responses, and ringtones.
Having said that, let’s dive into how to add a click to call link on your site.
Creating a Click to Call Link in WordPress
We understand that not everyone learns in the same way. That’s why we created this helpful video tutorial for our visual learners:
Otherwise, we encourage you to continue with these written instructions.
We’ll show you 3 different ways to add click to call links to your WordPress site. Here’s what we’ll be covering today:
- Add a Click to Call Link in a Popup
- Add a Click to Call Link in a Button
- Insert a Click to Call Link in Your WP Menu
You can use these quick links to jump ahead to the type of click to call link you’re looking for.
1. Add a Click to Call Link in a Popup
One of the most effective ways to display a click to call link on your site is in a popup.
Not every visitor will look for a click to call link on your site. A much better option is to prompt them to call you with popup displays like this:
It lets them know you’re available to talk to them personally. It also helps remove any hesitation and nudges them to take action.
To add a click to call popup, you can use the OptinMonster tool.
OptinMonster is the most powerful lead generation tool for WordPress that can skyrocket conversions.
You can create awesome popup displays with a click to call link that are optimized to deliver the highest conversion rates.
It has a drag and drop builder and comes with 50+ beautiful prebuilt templates so you can create your campaign in minutes.
Plus, OptinMonster has powerful targeting features to control where, when, and to whom your click to call popup appears.
Step 1: Create a Click to Call Popup
The first thing you need to do is install and activate OptinMonster. If you need more help with this, see our guide on how to install OptinMonster.
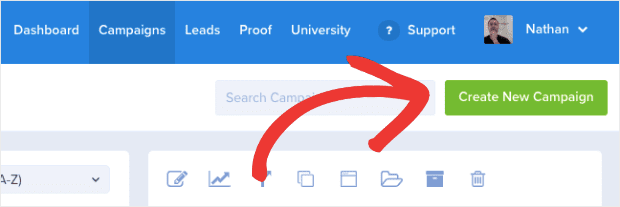
After that, you can open the OptinMonster dashboard and get started by clicking on the ‘Create New Campaign’ button.
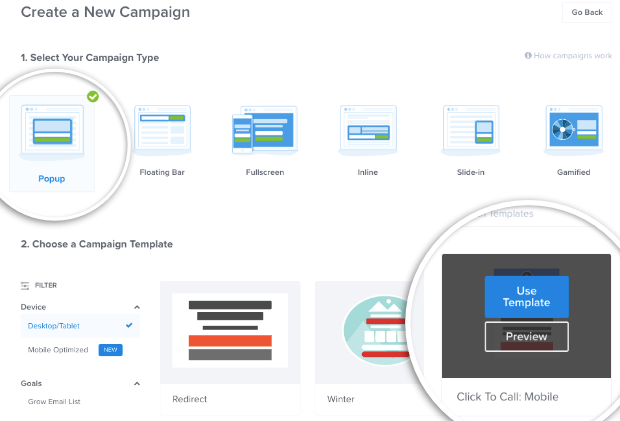
Now, you’ll need to choose a campaign type. For this tutorial, we’ll show you how to create a popup.
But you can come back and explore the other options. You’ll find really cool ways to display your click to call link in a slide-in, banner, floating bar, or inline popup.
Coming back to the tutorial, Under campaign types, select the popup option. Then find the ‘Click to Call Mobile’ template.
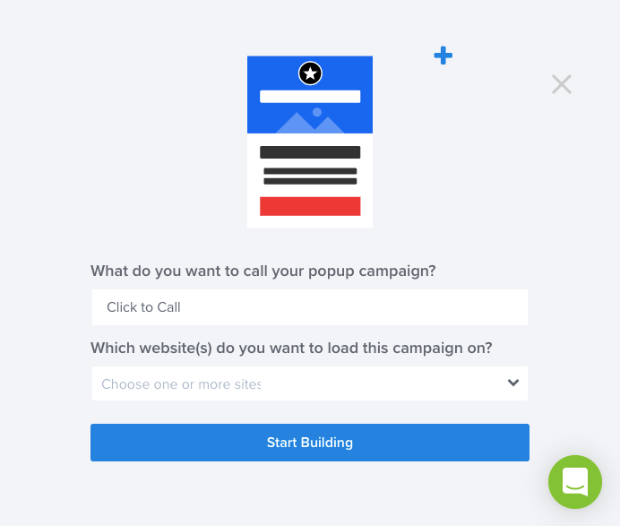
This template already has the click to call links set up so you don’t have to start from scratch. On the next page, you can enter a name for your campaign and select your website.
Once done, click on the ‘Start Building’ button. This will open up the campaign editor where you can customize the template.
Step 2: Customize Your Click to Call Popup
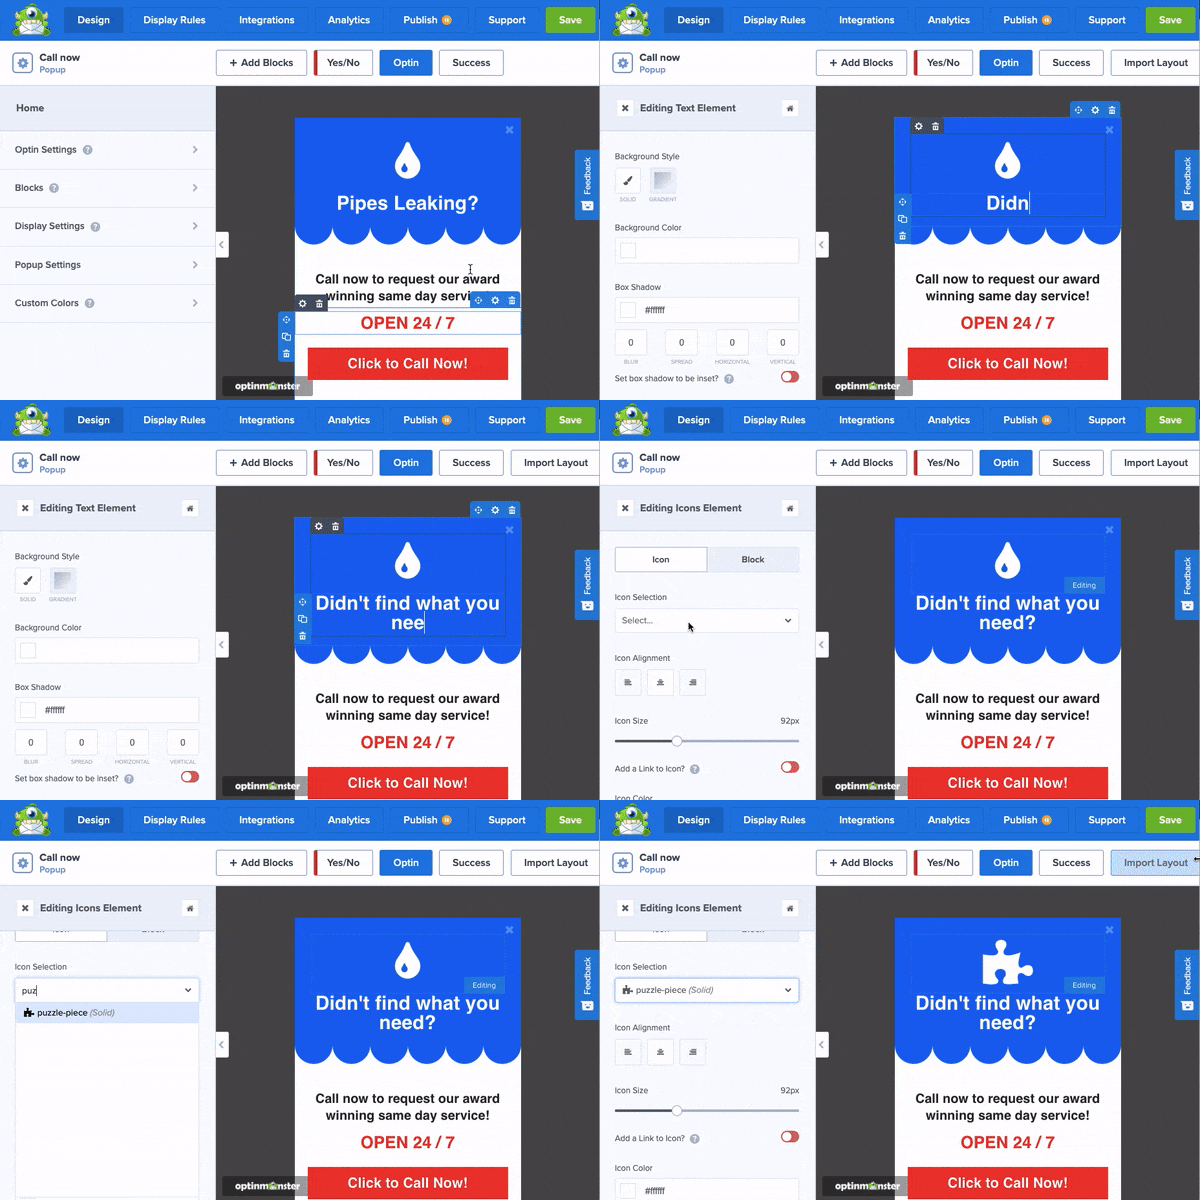
OptinMonster has a drag and drop visual builder. This means you’ll see a preview of your campaign where you can click on any field and edit it.
You can change the background, icon, and text to suit your website’s theme.
Step 3: Add a Phone Number to the Click to Call Popup
For visitors to be able to call you, you’ll need to add your phone number to the popup.
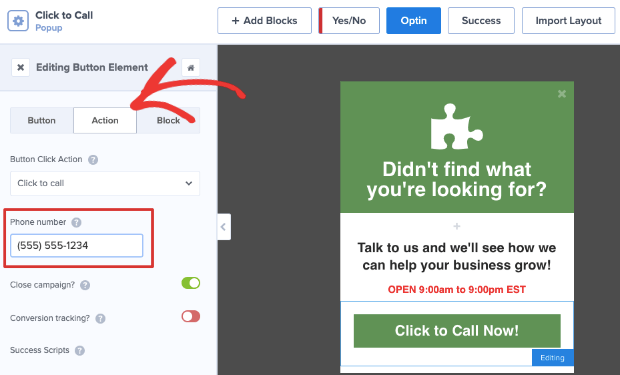
To do this, simply select the ‘Click to Call Now’ button in the preview section. This will open up the button settings in the left panel.
You’ll need to switch to the ‘Action’ tab where you’ll see a ‘Phone Number’ field.
We recommend entering your phone number with the international code so visitors will be able to place the call no matter where they are.
Step 4: Set Up Rules to Display the Popup
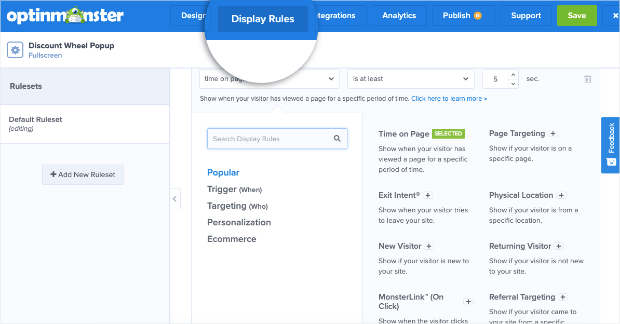
Once you’ve entered your phone number, switch over to the ‘Display Rules’ tab. Here, you’ll see a list of options to control where and when your popup will appear.
You can choose to display it after a visitor has spent a certain amount of time on your site or if they’re on a specific page.
OptinMonster also has built-in Exit-Intent® technology that can detect when a visitor is about to leave your site and trigger the popup.
After you select the display rules, it’s time to publish your campaign.
Step 5: Publish Your Click to Call Popup
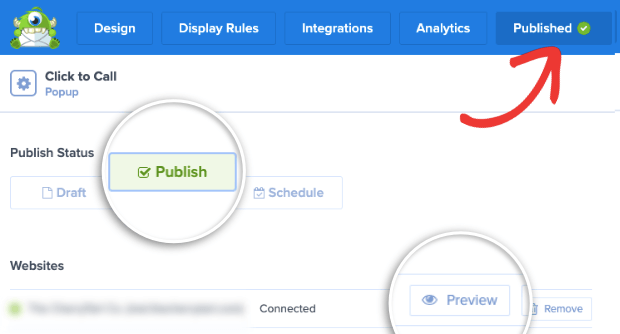
Once you’re happy with your click to call popup, you can switch to the ‘Publish’ tab.
Here, you can preview a sample of your campaign to see how it would look when it’s live.
When you’re happy with the popup, under ‘Publish Status’ you’ll need to click on the ‘Publish’ button to make your popup campaign live.
Now you can visit your site and you’ll see your click to call link in a stunning popup!
2. Add a Click to Call Link in a Button
Another option to display a click to call link on your site is in a button like this:
You can easily create this ‘Call Now’ button using WP Call Button.
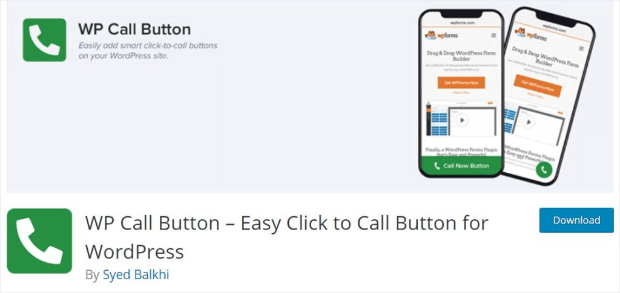
WP Call Button a free WordPress plugin that’s easy to use. When you install the plugin and enter your details, the plugin will automatically create the button for you.
It also lets you completely customize the look and position of the button. Plus, you can control whether you want it displayed across your site or only on specific URLs.
Ready to add the click to call link in a button? Let’s get started.
Step 1: Install and activate WP Call Button
The first thing you’ll want to do is install and activate WP Call Button on your site just like you would any WordPress plugin.
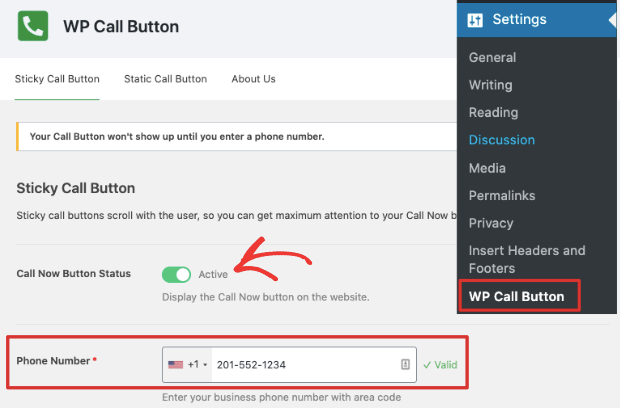
Once it’s activated, you can go to Settings » WP Call Button page to open the WP Call Button dashboard
Step 2: Activate the Click to Call Link
Your click to call widget won’t appear on your site till you enter a phone number in WP Call Button.
To do this, on the WP Call Button dashboard, first, use the toggle switch to activate your call button.
Next, enter a valid phone number. Make sure your country code is correct so that visitors connect to the right number.
Step 3: Customize the Click to Call Link
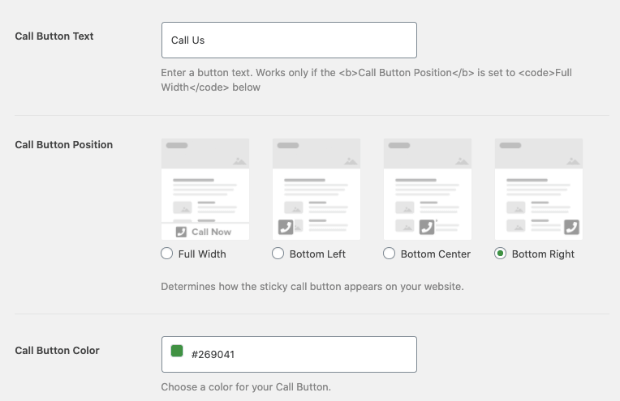
On the same page, you’ll find options to customize the text and color of your click to call widget.
You can also decide where the click to call widget will appear such as the bottom left, right, or center of your site.
You can even display it as a full-width banner across the bottom of the page.
Step 4: Choose Where To Display the Click to Call Link
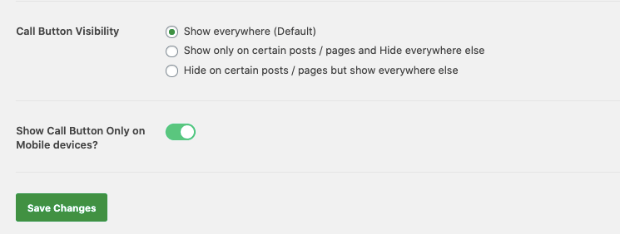
WP Call Button lets you choose which pages and posts you want the click to call link to appear on.
You can choose to have it appear on every page of your site. Or you can selectively include or exclude specific pages or posts.
And by default, WP Call Button will display the click to call widget on mobile devices.
In case you don’t want it to show on mobile, you can use the toggle switch to turn this feature off.
Now, all that’s left to do is store your changes using the ‘Save Changes’ button.
Once you’ve done that, you can visit your site to see the click to call link active on your site.
Step 5: Add Click to Call Link in Pages or Posts
In case you want to manually add the click to call link to a page or post, WP Call Button has you covered.
First, edit the page or post where you want to add the link.
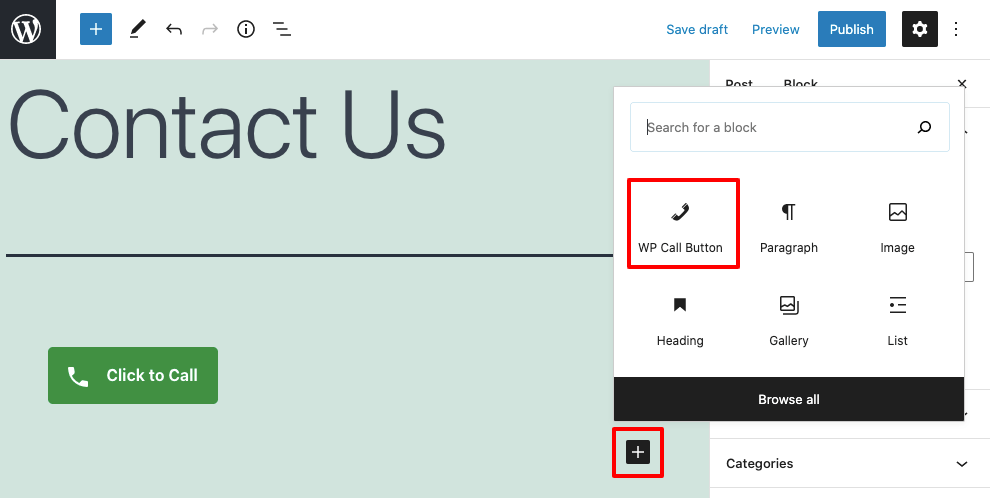
Now, add a block by clicking on the (+) icon and search for ‘WP Call Button’.
Simply add this widget to your page or post and the click to call link will be embedded.
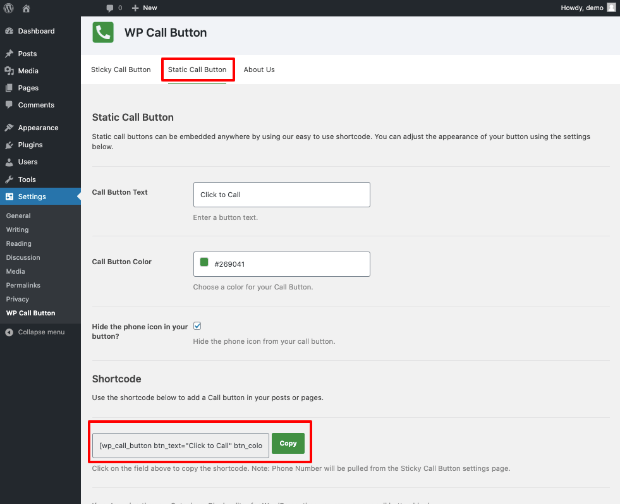
In case you’re using the classic editor, WP Call Button lets you use shortcodes to add the click to call button.
You can find this shortcode under the ‘Static Call Button’ tab in the WP Call Button dashboard.
Simply copy and paste this code into your post or page and the link will be embedded.
3. Insert a Click to Call Link in Your WP Menu
You can also display the click to call link to in your WordPress menu like this:
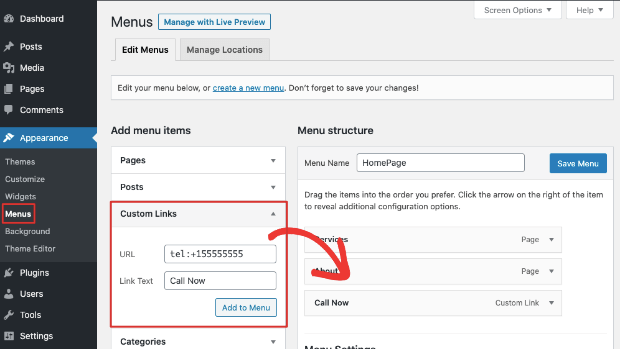
To do this, navigate to the Appearance » Menu tab. Here, you can use the Custom Links widget to add your telephone number.
When you open this widget, in the URL field, you need to enter your phone number in this format: tel:+1234567890
In the Link Text field, enter the link name as you would like it to appear in your menu.
Once you’re happy with it, simply click on the ‘Add to Menu’ button. Then save your menu and visit your WordPress site.
You’ll see the ‘Call Now’ link added to your navigational menu so visitors can easily call you.
And with that, you should have everything to insert a click to call link on your WordPress site.
We hope you liked this tutorial, and if so, you may also be interested in these posts:
- 10 Best Business Phone Systems (For Any Budget)
- 40 Exit Popup Hacks That Will Grow Your Subscribers and Revenue
- The Ultimate Guide to Growth Hacking for Exponential Success in 2021
These articles are packed with tips and tricks you could use to grow your business.
And if you’re ready to skyrocket conversions on your site, join OptinMonster today!







Add a Comment