Do you want to add a custom Instagram feed to WordPress, but you’re not sure where to start?
Instagram is one of the most popular social media platforms on the market. Once you grow your following, you’ll gain instant and direct access to a large audience of potential leads.
But what if there were a way to get even MORE followers to your Instagram in under 5 minutes?
Today, that’s exactly what we’ll cover. Becuase, in this post, we’ll teach you how to add a custom Instagram feed to your WordPress website.
Before we dive into the tutorial, though, let’s get clear on why you’d want to add Instagram to WordPress in the first place.
Why Add an Instagram Feed to WordPress?
Many marketers understand that there are different channels for reaching out to new leads and customers. The most common ones are:
- Social media
- Email marketing
- Content marketing
- Pay-per-click
But only the BEST marketers understand that while these are distinct channels, they can work together to get even better results.
One way to do that is by adding an Instagram feed to your WordPress site.
You may be wondering, though, “How would this actually benefit my business?”
When you add Instagram to your website, you’ll see a few major advantages:
- Increase Instagram Followers: Leverage your site’s traffic to grow your following on Instagram.
- Boost Site Traffic: Drive more traffic back to your website by posting engaging content for the larger following you’ve grown.
- Improve SEO: Increase your average time on page by giving visitors fun photos to browse. In turn, you’ll show search engines like Google that people stay on your site when they land there.
As you can see, adding a custom Instagram feed to your WordPress website can work with your content marketing strategy to get more exposure for your brand.
And know that you know why you should add Instagram to your site, let’s look at how you can quickly do so.
Add an Instagram Feed to WordPress
For this tutorial, we’ll be using the plugin Smash Balloon:
Smash Balloon is the world’s best social media feed plugin for WordPress. It allows you to quickly and easily add social media feeds to your website, including:
- Facebook groups
- YouTube
As you’ll see, Smash Balloon requires zero coding or technical skills to install and run. Instead, anyone can add an Instagram feed to their WordPress site in under 5 minutes.
Plus, your Instagram feed’s look is totally customizable, so you can match the style and look of your brand.
Now that we know what tool we’ll be using, let’s dive into the tutorial.
Step 1) Download Your Smash Balloon Plugin
The first thing you’ll need to do is decide which Smash Balloon tools you’ll want to use.
If you’ll only be working with Instagram, then you can use Instagram Feed Pro as an individual plugin:
Instagram Feed Pro is what we’ll be using in this tutorial. You can sign up for your account, download the plugin, and get started FAST.
But if you’re using more social media channels like Facebook, Twitter, or YouTube, then you may need a more advanced tool.
We’d recommend Smash Balloon’s Social Wall Pro with the All Access Bundle.
This lets you combine feeds from Instagram, Facebook, Twitter, and YouTube.
For today, though, we’ll assume you’re only working with Instagram, so we’ll stick with Instagram Feed Pro.
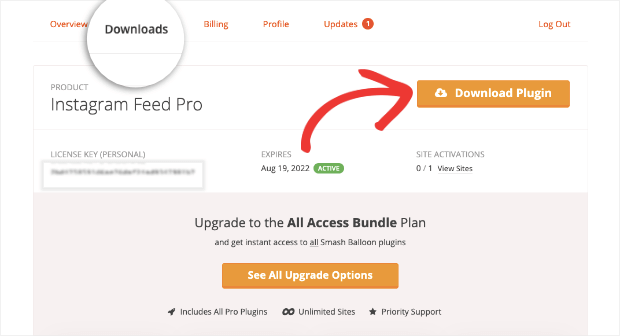
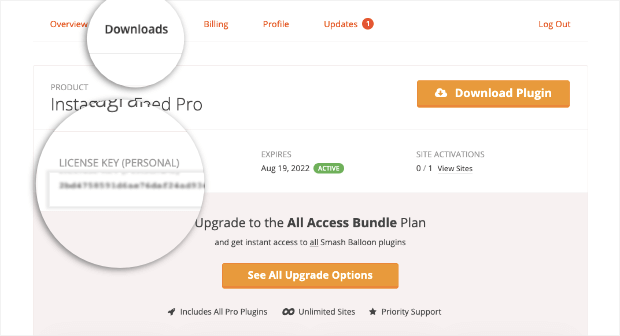
Once you sign up for an account, you’ll be able to download the plugin from the Download tab in your Smash Balloon dashboard:
Then you can download and install the Instagram Feed Pro plugin like you would any other plugin on your site.
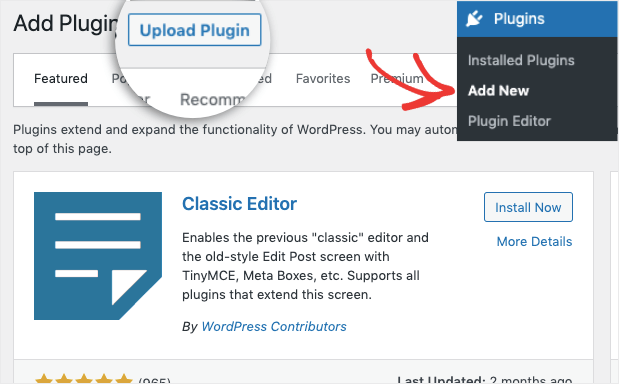
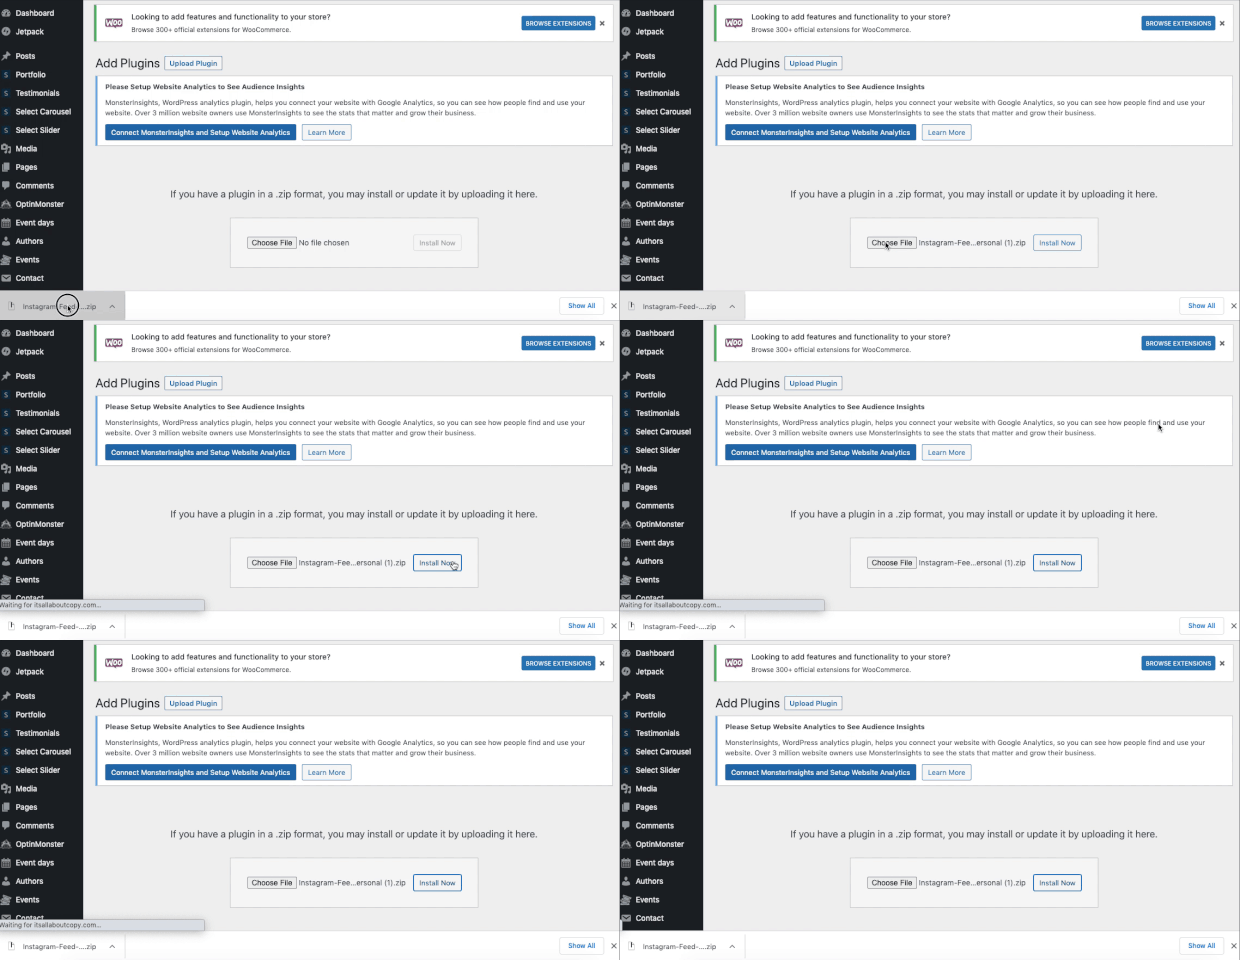
Simply click Plugins » Add New from your WordPress dashboard. Then click Upload.
You can now drag and drop your Instagram Feed Pro plugin and click Install Now:
Then click Activate Plugin:
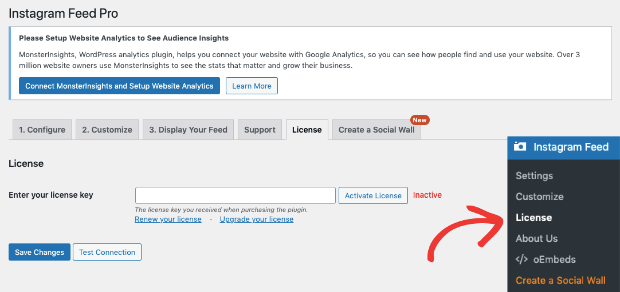
Next, you’ll need to enter your Instagram Feed Pro license key.
Click Instagram Feed Pro » License from the WordPress admin menu:
Switch back to your Instagram Feed Pro account dashboard (where you downloaded the plugin) to find your license key. It’s under the Downloads tab:
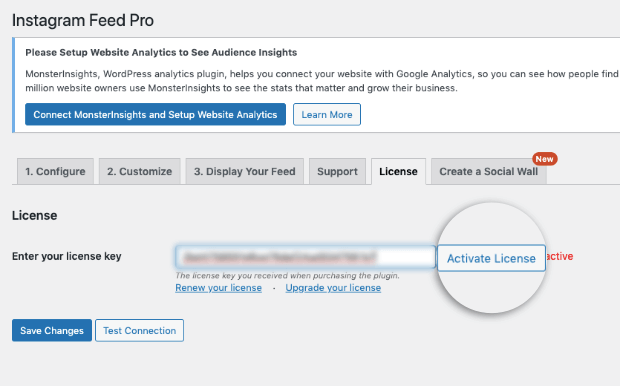
Copy and paste the key back in your WordPress dashboard and click Activate License:
Now you’re ready to connect your Instagram account and add your custom feed.
Step 2) Connect Your Instagram Account
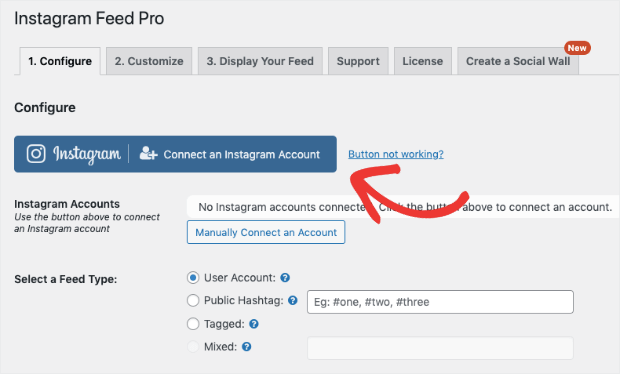
From your Instagram Feed Pro dashboard in WordPress, click the Configure tab.
Make sure you’re logged into Instagram on another browser screen and click Connect an Instagram Account:
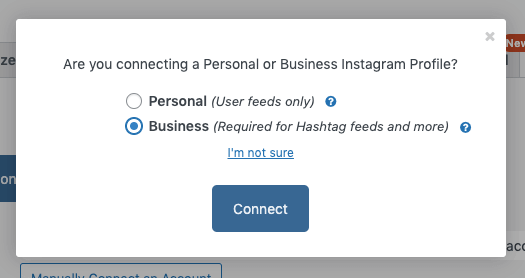
A new window will appear asking if you’re joining for a Personal account or for Business.
Personal accounts can only show feeds from their own Instagram profile. Business accounts let you show filtered feeds with hashtags, photo tags, and more.
Your choice will depend on your social media marketing strategy and how you want to use Instagram with your website.
For this tutorial, though, we’ll select Personal and click Connect:
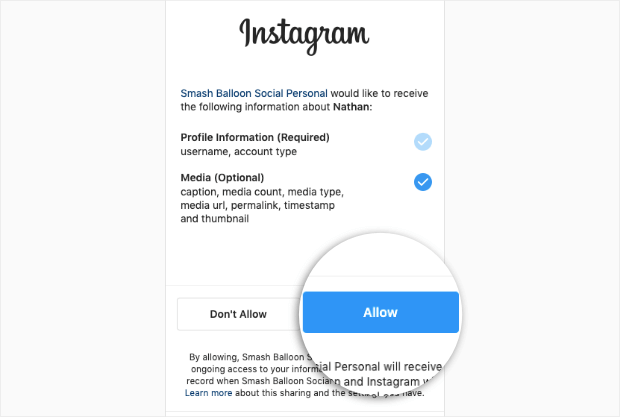
You’ll then be prompted to grant access to Instagram Feed Pro for your Instagram account. Click Allow:
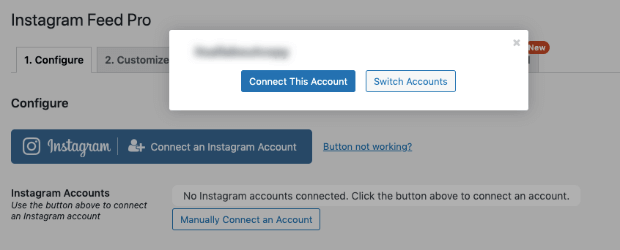
A small window will appear showing you the name of the Instagram account requesting access. Click Connect This Account:
When you’re connected, you’ll be ready to modify your Instagram feed.
Step 3) Customize Your Instagram Feed
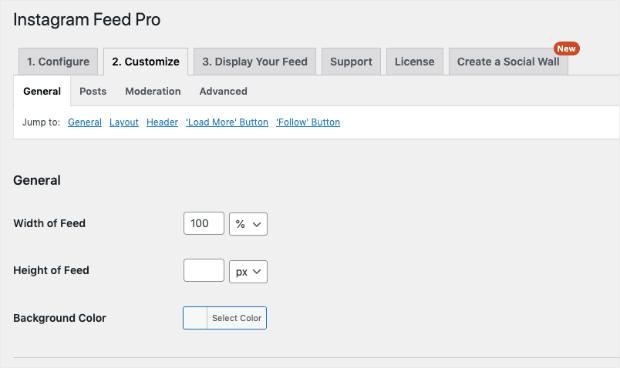
Under the main settings page, click the Customize tab:
Here you’ll be able to modify different aspects of how your Instagram feed appears on WordPress. You can modify the:
- General settings
- Layout
- Header
- ‘Load More’ Button
- ‘Follow’ Button
This gives you FULL control over your Instagram feed’s appearance. You’ll be able to change the width, height, and background color of your feed.
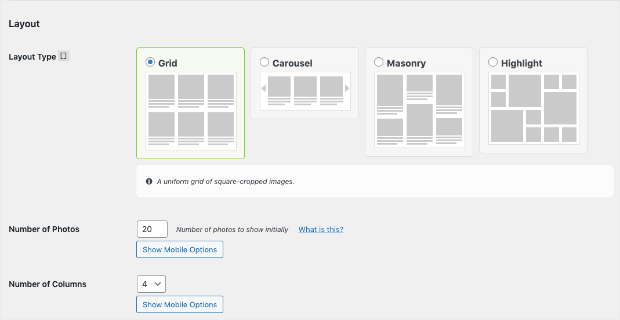
You can also determine which layout you’d like to choose and how many photos appear at any time:
With these layouts, you have 4 options:
- Grid
- Carousel
- Masonry
- Highlight
Since the layout is such an important factor in your Instagram feed’s appearance, let’s quickly look at what each will look like.
1) Grid
Your Grid layout shows your Instagram photos in a clear-cut fashion. It shows your images in equally sized cropped blocks.
2) Carousel
The Carousel layout shows your photos in a horizontal Instagram feed that users can scroll through.
3) Masonry
The Masonry layout shows your photos in their original aspect ratios (meaning they aren’t cropped like in the other 2 layouts we’ve seen).
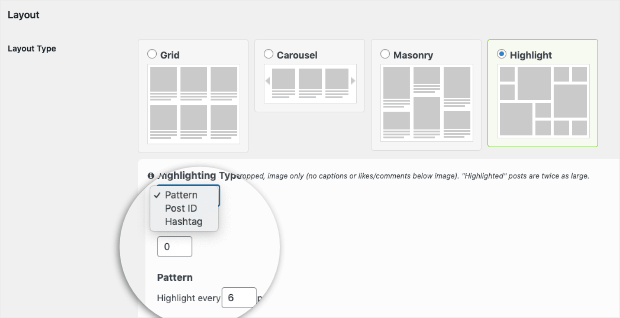
4) Highlight
The Highlight layout shows square-cropped images with no captions, hashtags, or anything other than the images themselves.
Then you can configure the pattern style you want to highlight specific images from your Instagram feed:
Again, Smash Balloon gives you endless customization options to make an Instagram feed tailored to your WordPress site.
We won’t get into much more detail on how to customize your Instagram feed. But rest assured that making changes is incredibly simple and doesn’t require any coding or technical skills at all.
And once you’ve styled you Instagram feed, you’re ready to add it to your WordPress site.
Step 4) Add Instagram Feed to WordPress
There are 2 ways you can add an Instagram feed to WordPress:
- Add your feed to a post or page
- Add your feed as a widget
Let’s look at how you can do both of these in detail.
Add Instagram Feed to a Post or Page
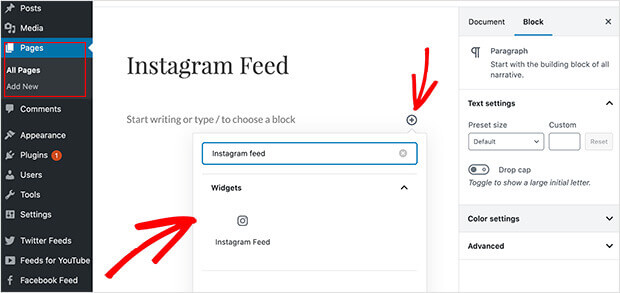
If you’re using the Gutenberg editor, you’re in luck. That’s because you can simply click the Plus (+) icon to add a new element to your page.
Then search for Instagram Feed:
Then your feed will instantly appear where you’ve just embedded it:
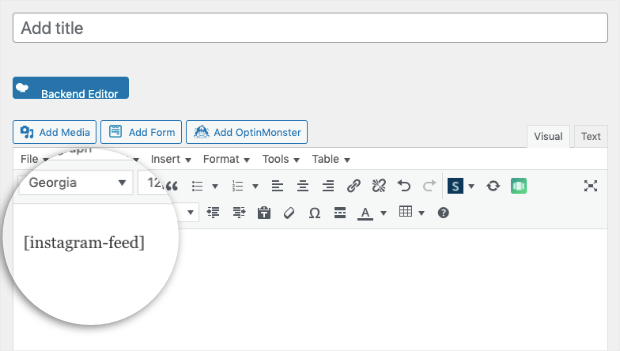
Still using the Classic editor? That’s no problem.
You can copy and paste this shortcode onto any post or page: [instagram-feed]
And just like that, your Instagram feed will be added to your WordPress site.
Add Instagram to WordPress as a Widget
In some cases, you might not want your Instagram feed to appear on specific posts or pages. Instead, you’d rather it be a permanent element of your site.
In that case, you’ll need to add your Instagram feed as a WordPress widget.
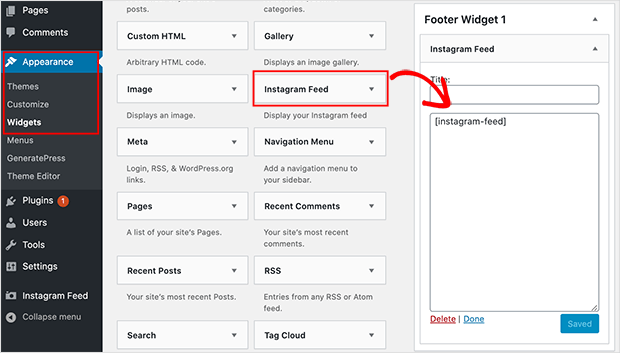
To do so, click Appearance » Widgets from your WordPress admin menu.
Then you can select which widget area you want (like footer or sidebar, for example). Locate the Instagram widget to drag and drop it in the widget area you’d like:
This will automatically place the shortcode in the widget area (you can add this shortcode manually, as well).
Now you just need to Save and, just like that, you’ve added an Instagram feed to one of the widget areas on your WordPress site.
And that’s all for today! We hope you found this tutorial on how to add a custom Instagram feed to WordPress helpful.
If you did, then you’ll definitely want to check out the following resources:
- Instagram Lead Generation: 12 Strategies to Boost Your ROI
- Best Instagram Plugins for WordPress (Compared)
- How to Make Money With Instagram (With Under 10k Subscribers)
These posts will have even more information on how you can leverage your Instagram account to drastically grow your business!











Add a Comment