GetResponse is one of the most popular email marketing platforms, helping businesses collect leads, send automated emails, and nurture customer relationships. One of its key features is the GetResponse popup, which allows you to capture email addresses directly from your website and add them to your GetResponse email list.
Popups are an essential tool for building an engaged audience. A well-designed popup can grab attention, encourage visitors to subscribe, and increase conversions. GetResponse offers a built-in popup creator, but its customization and targeting options are limited. If you want more control over your popups and better results, OptinMonster is the best solution for integrating advanced popups with GetResponse.
In this guide, I’ll walk you through:
- GetResponse’s Built-In Popup Features
- Why OptinMonster is the Best Tool for GetResponse Popups
- How to Create a GetResponse Popup with OptinMonster
By the end, you’ll know how to create a high-performing email capture popup that helps you grow your list and convert more visitors into subscribers.
GetResponse’s Built-In Popup Features
GetResponse provides 2 ways to create popups, both of which offer the same basic features for capturing email leads:
- GetResponse’s standard popup tool: Works on any website but requires adding code.
- GetResponse Website Builder’s native popup tool: Only available for websites built with GetResponse, but they don’t require any code.
1. The Standard GetResponse Popup Tool
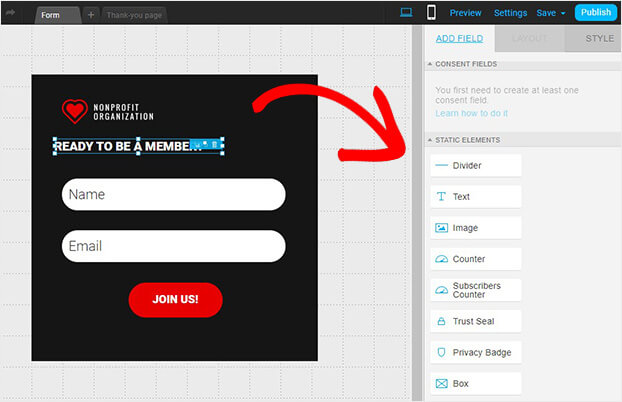
GetResponse includes a popup builder within its email marketing platform.

This tool lets you design signup forms and display them on external websites.
- Pre-Designed Templates: Start with ready-made popup designs.
- Customization Options: Edit text, images, colors, and form fields.
- Basic Display Triggers: Set popups to appear based on:
- Time delay (after a set number of seconds).
- Scroll percentage (after visitors scroll down a page).
- Exit trigger (when visitors move to close the tab).
- Email List Integration: New signups are automatically added to your GetResponse contacts.
The Catch: Since these popups are for external websites, you must manually copy and paste a code snippet into your site’s HTML for the popup to appear. If you’re using a website builder like WordPress, Shopify, or Wix, this can be an extra step that some users find frustrating.
2. The GetResponse Website Builder Popups
If you’re using GetResponse’s Website Builder (available in Creator and higher plans), the popup tool works the same way—but with one key advantage:
- No Code Required: Since these popups are built natively into the GetResponse website, you don’t need to add any code.
- Drag-and-Drop Editor: Easily place popups anywhere on your site.
- Same Customization & Triggers: Includes the same basic design and display options as the standard popup tool.
In short, if you don’t use GetResponse’s Website Builder, you’ll have to deal with adding code for popups to work.
For a small online business starting out, GetResponse can be a great all-in-one tool to build your website, create lead-generating popups, and manage your email marketing all in one platform.
Want to give it a try? Sign up for GetResponse today!
Why OptinMonster is the Best Tool for GetResponse Popups

GetResponse is a great platform for email marketing, and its built-in popup tool provides essential features to capture leads. But if you want more advanced targeting, greater flexibility, and higher conversions, OptinMonster is the perfect way to enhance your GetResponse popups, especially if you use WordPress.
Tons More Targeting & Triggering Options
GetResponse lets you trigger popups based on time delay, scroll percentage, inactivity, and exit intent. They also offer very basic targeting rules, so you can display specific popups to new or returning visitors, people in specific countries, and people using mobile or desktop devices.
OptinMonster offers all of these same options, but with even more advanced targeting features to boost engagement and conversions:
- Page-Level Targeting: Show different popups depending on which page or category a visitor is viewing.
- Geolocation Targeting: GetResponse lets you target by country, but OptinMonster offers much more specific geographic targeting
- Referral Detection: Display popups based on where a visitor came from, such as Facebook, Google, or an email link.
- Cookie & AdBlock Detection: Target visitors based on their browsing history or whether they use ad-blockers.
- OnSite Retargeting®: Show popups based on a visitor’s previous behavior on your site. For example, if they turned down a 10% coupon, offer a 20% discount on their next visit.
Sound complicated? It’s actually very easy. It only takes a few clicks to enable any of these settings in OptinMonster’s Display Rules:

These advanced targeting options help you show the right message to the right person at the right time, increasing the likelihood of conversion.
More Popup Types & Customization Options
GetResponse only offers standard popups and embedded forms, but OptinMonster provides a wide variety of lead-generation campaigns:
- Lightbox Popups: Attention-grabbing popups that appear in the center of the screen.
- Floating Bars: Sticky banners that stay at the top or bottom of the page.
- Fullscreen Welcome Mats: High-impact overlays that take up the entire screen.
- Slide-In Scroll Boxes: Popups that slide into view as users scroll.
- Gamified Spin-to-Win Wheels: Fun, interactive popups that boost engagement.
- Inline & Sidebar Forms: Embedded forms that blend seamlessly into your site’s content.
With 700+ professionally designed templates and a drag-and-drop builder, OptinMonster makes it easy to create fully customized popups that match your brand.
The Best GetResponse Popup Solution for WordPress Users
If your website is built with WordPress, OptinMonster is the best way to add popups to your site—without touching any code.
- WordPress Plugin: Easily create, customize, and manage popups directly from your WordPress dashboard.
- No Manual Code Insertion: Unlike GetResponse’s standard popup tool, which requires copying and pasting a code snippet, OptinMonster works seamlessly with WordPress.
- Native WordPress Integrations: Combine popups with WooCommerce, SeedProd, Divi, and other WordPress tools for an even better lead-generation strategy.
With OptinMonster’s WordPress plugin, you can publish popups in minutes without any technical hassle.
A/B Testing & Advanced Analytics
Want to know which popups perform best? OptinMonster offers built-in A/B testing and detailed analytics, so you can:
- Test different headlines, images, and offers to find the highest-converting version.
- Track views, conversions, and engagement rates in real time.
- Continuously optimize your campaigns to increase your email signups.
How to Create a GetResponse Popup with OptinMonster
Now that you know how OptinMonster enhances GetResponse popups, let’s go step by step through how to create one.
Step 1: Create a New Campaign in OptinMonster
First, sign up for an OptinMonster account if you haven’t already. Then:
- Log into your OptinMonster dashboard.
- Click Create New Campaign.
- Choose to start with a Template.
- Select Popup as your campaign type.
- Browse through 700+ professionally designed templates and select one that fits your brand.
- Name your campaign and click Start Building.
Step 2: Customize Your Popup Design
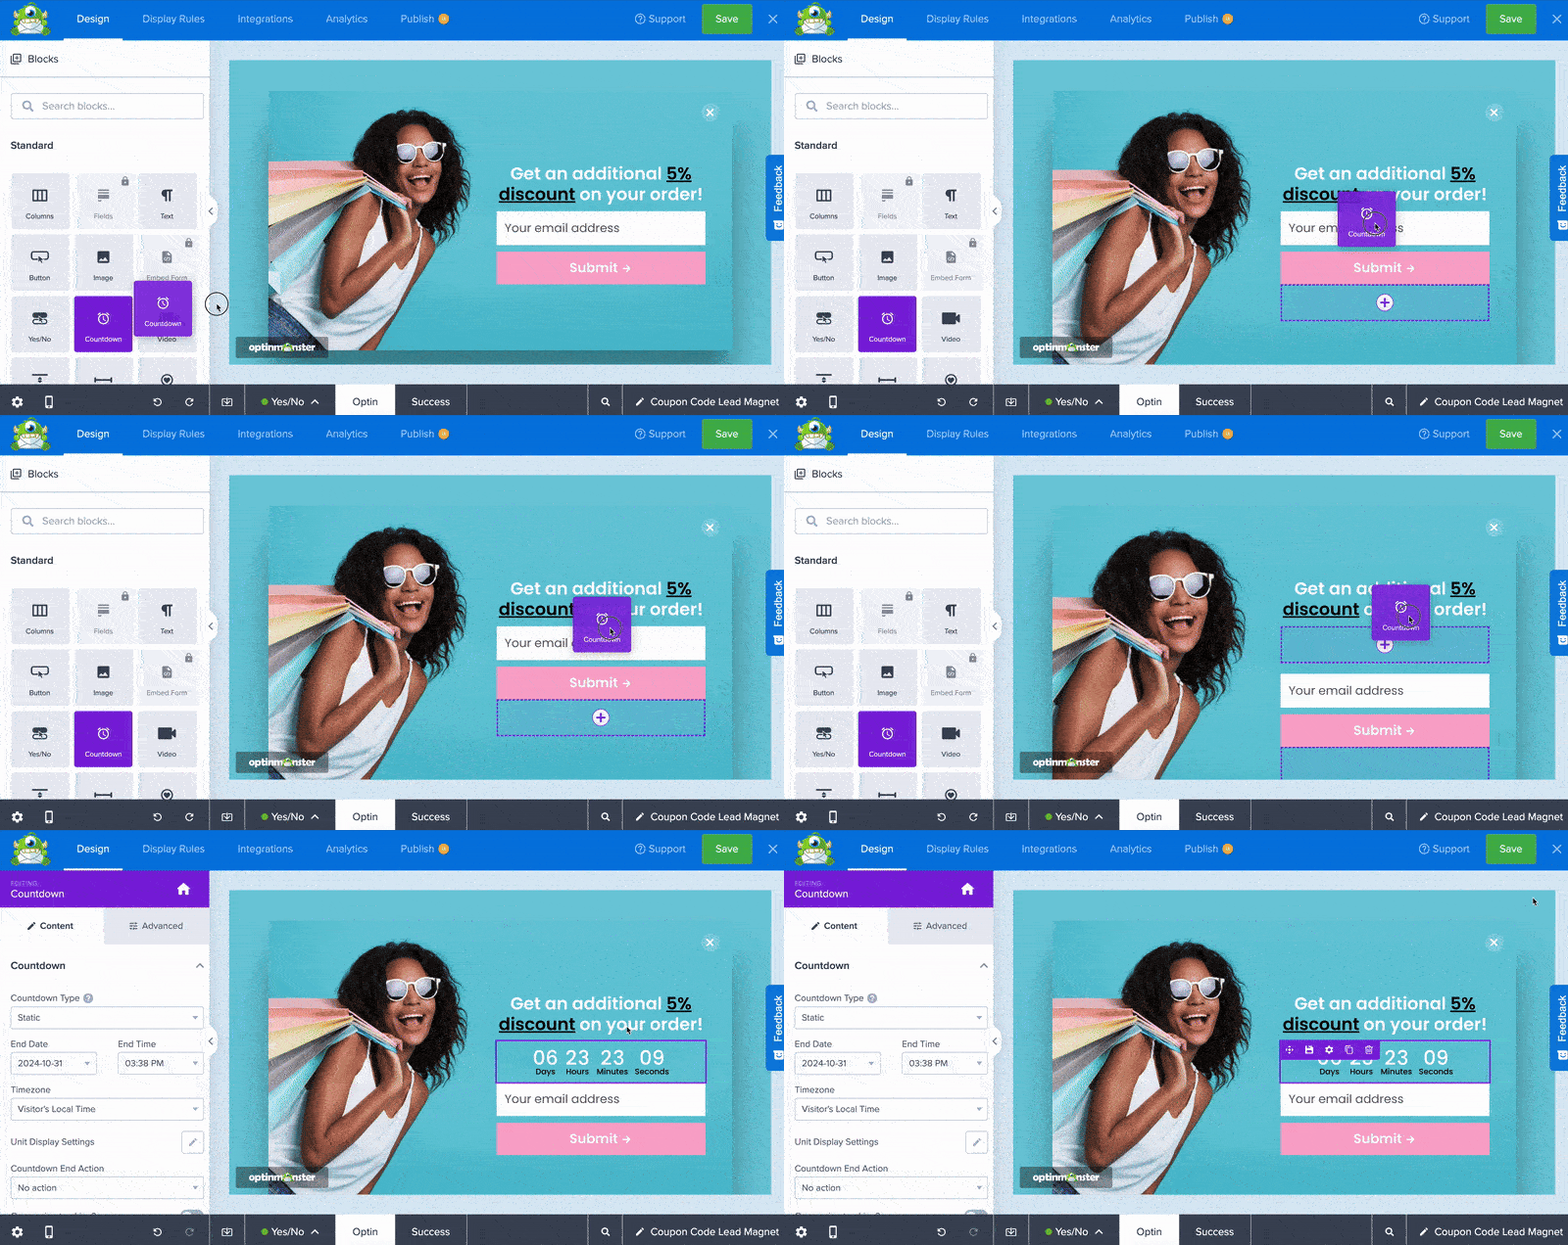
Once your campaign is created, you’ll enter OptinMonster’s drag-and-drop builder, where you can fully customize your popup.

Here are just a few of the customizations you can make
- Modify the text, colors, and images. Click on any element to edit it.
- Add extra elements. Drag and drop form fields, buttons, or custom elements.
- Include interactive features. Add countdown timers, images, or custom CSS for a unique look.
- Click Save once your design is complete.
With OptinMonster’s easy-to-use editor, you don’t need coding skills to create a professional, high-converting popup.
Step 3: Set Display Rules & Targeting Options
Unlike GetResponse’s built-in popups, OptinMonster allows you to set advanced display rules to target the right visitors at the right time.
- Click on the Display Rules tab.
- Set when your popup should appear, using advanced triggers like Exit-Intent®, Inactivity Detection, Scroll Percentage, and more
- Use targeting rules to personalize your popups with settings like Geolocation Targeting, Referral Detection, OnSite Retargeting®, and more.
- Click Save to apply your display settings.
Step 4: Connect OptinMonster to GetResponse
Once your popup is set up, you need to integrate it with GetResponse to collect leads. You’ll only need to complete this step for your first popup. Once you’ve integrated GetResponse, you’ll just need to select GetResponse as the chosen integration for that popup.
- Go to the Integrations tab in OptinMonster’s campaign builder.
- Click Add New Integration and select GetResponse from the list.
- Enter your GetResponse API Key (you can generate this from your GetResponse account).
- Select the GetResponse list where you want to store your new leads.
- (Optional) Assign subscriber tags to organize your leads.
- Click Save to confirm your integration.
For full details on connecting OptinMonster to GetResponse, check out this step-by-step guide.
Step 4: Connect OptinMonster to GetResponse
Once your popup is set up, you need to integrate it with GetResponse to collect leads.
- Go to the Integrations tab in OptinMonster’s campaign builder.
- Click Add New Integration and select GetResponse from the list.
- Enter your GetResponse API Key (you can generate this from your GetResponse account).
- Select the GetResponse list where you want to store your new leads.
- (Optional) Assign subscriber tags to organize your leads.
- Click Save to confirm your integration.
For full details on connecting OptinMonster to GetResponse, check out this step-by-step guide.
Step 5: Publish Your Popup on Your Website
Now that your popup is ready, it’s time to go live.
- Go to the Publish tab in OptinMonster.
- Select where you want to display your popup:
- If you use WordPress, install the OptinMonster plugin and enable the campaign—no coding needed.
- If you use another website builder, copy and paste the embed code into your site’s HTML.
- Click Publish, and your popup will start showing to visitors.
That’s it! Your GetResponse popup is now live and actively capturing leads.
Start Growing Your GetResponse Email List with OptinMonster
GetResponse is a powerful email marketing platform, and its built-in popup tool is a great starting point for capturing leads. However, if you want better targeting, more design options, and higher conversions, OptinMonster is the perfect tool to enhance your GetResponse popups.
With OptinMonster, you get:
- All the same targeting and triggering options as GetResponse, plus advanced options like specific Geolocation Targeting, Referral Detection, and OnSite Retargeting®.
- More campaign types, including floating bars, fullscreen welcome mats, and gamified spin-to-win popups.
- Seamless integration with GetResponse, so every new lead is automatically added to your email list.
- The best WordPress popup solution, allowing you to add popups with no coding required using the OptinMonster plugin.
If you’re serious about growing your email list and boosting conversions, combining OptinMonster with GetResponse is the smartest move you can make.
Get started today! Sign up for OptinMonster and start creating high-converting GetResponse popups in minutes. It’s risk-free with our 14-day money-back guarantee.
BONUS: Done-For-You Campaign Setup ($297 value)
Our conversion experts will design 1 free campaign for you to get maximum results – absolutely FREE!


Add a Comment