OptinMonster makes it easy to test an OptinMonster campaign and preview the design on your site before going live for your website visitors.
In this article, you’ll learn how to test and preview OptinMonster campaigns on your website.
Before You Start
To test the Display Rules and optin form submission before you publish the campaign use the Live Site Inspector tool. Details about this tool are covered later in this article.
To preview the visual design of your campaign before you publish the campaign use the Preview tool. The Preview Campaign section of this article provides a comprehensive overview of this tool.
A Note About Cookies
Important:
OptinMonster uses cookies to control how often a campaign can appear after it has been interacted with or converted.
When testing campaigns, depending on the cookie settings you’ve configured, this can prevent campaigns from reappearing. This section will walk you through ways to clear cookies when testing campaigns.
A cookie is a small file stored on your computer that provides information. OptinMonster uses cookies to determine when a campaign was shown to a visitor, closed, and successfully converted. Using that information we can then hide or show the campaign again at a later date.
Learn how to customize the cookie settings in OptinMonster.
There are a few different approaches you can take for clearing cookies when testing campaigns. We generally recommend you use the approach that makes the most sense for your individual workflow.
Clear Cookies When Testing
Incognito / Private Browsing
When you open a new Incognito window (aka private browsing session) it will start out with no previously-set cookies and you’ll be seen as a brand-new visitor by OptinMonster. As you continue using the Incognito window cookies will be set normally.
You can quickly clear cookies by closing the Incognito window and opening a new Incognito window.
Query Argument
You can force OptinMonster to manually clear all OptinMonster-related browser cookies when you load a webpage by adding a query argument to the end of the URL you are testing.
To do this, simply add the query argument “?omclear=true” to the end of the page URL.
For example, if you are testing a campaign on the page:
http://domain.com/pageThen you can edit the URL to:
http://domain.com/page?omclear=trueIf the URL already has query arguments, you’ll use an ampersand instead of a question mark, like this.
http://domain.com/page?utm_source=email&omclear=trueOnly OptinMonster’s cookies will be deleted when the page loads.
Note:
If your website is configured to strip query arguments from the URL this method may not work and you’ll need to choose a different option for clearing cookies when testing.
Manually Clear Cookies
You can always manually clear cookies from your browser application before re-testing. This approach is not always convenient since it will end up removing ALL cookies set requiring you to log back into websites, etc.
Learn how to manually clear cookies from any browser application.
Live Site Inspector
OptinMonster allows you to quickly test your Display Rules and test the campaign’s optin form submission using our Live Site Inspector tool.
The Live Site Inspector does not check that the campaign is published live to your site.
It confirms only the Display Rules configured and provides a way to test the optin form submission even if the campaign is not yet published to your site.
To check that your site is published live to your site please use a brand new Incognito window to visit your website directly on the page(s) where your campaign should appear. If you experience any issues with this testing process please reach out to our support team directly, we are delighted to assist!
Test Display Rules
To use the Live Site Inspector feature to confirm your Display Rules, follow these steps:
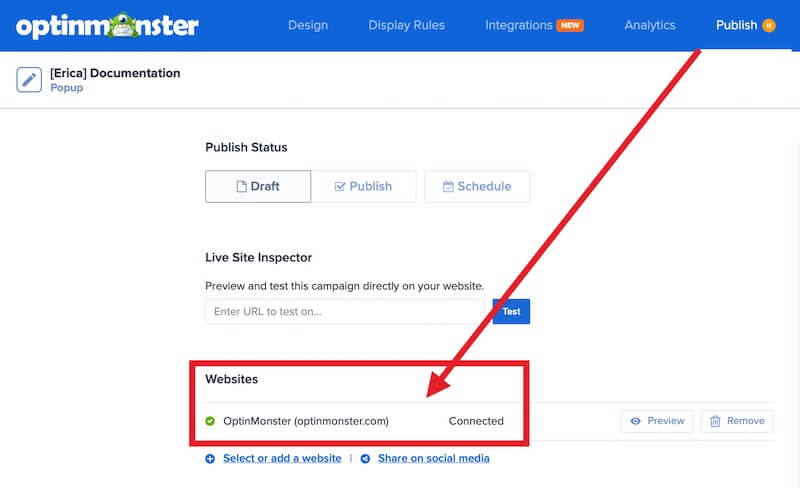
- Before you start, navigate to the Publish view of the campaign builder and confirm you’ve assigned the domain of the site you’ll be testing the campaign on in the Websites section. It’s fine to assign more than one website to a single campaign, but the domain of the URL you plan to test with the Live Site Inspector must be assigned to the campaign before the tool can function.
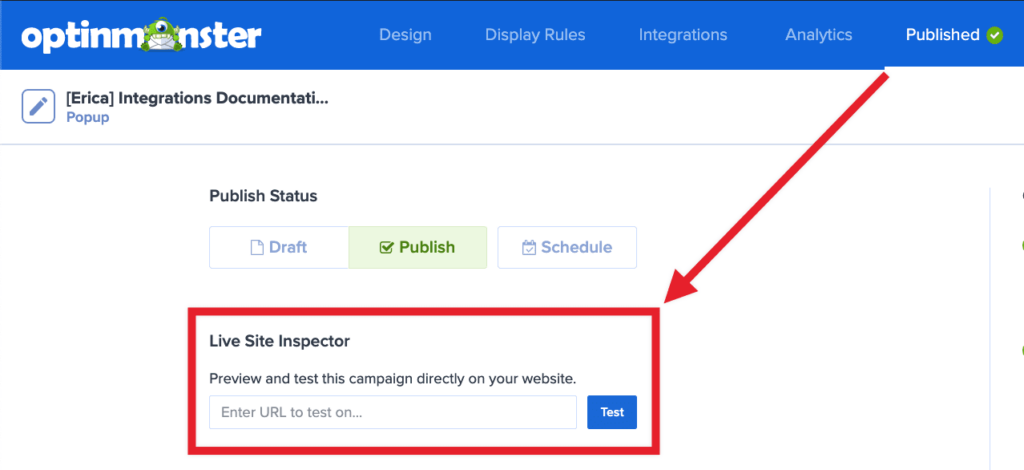
Learn more about assigning sites to your campaigns in this guide. - To begin testing, from the same view of the campaign builder, locate the Live Site Inspector field.
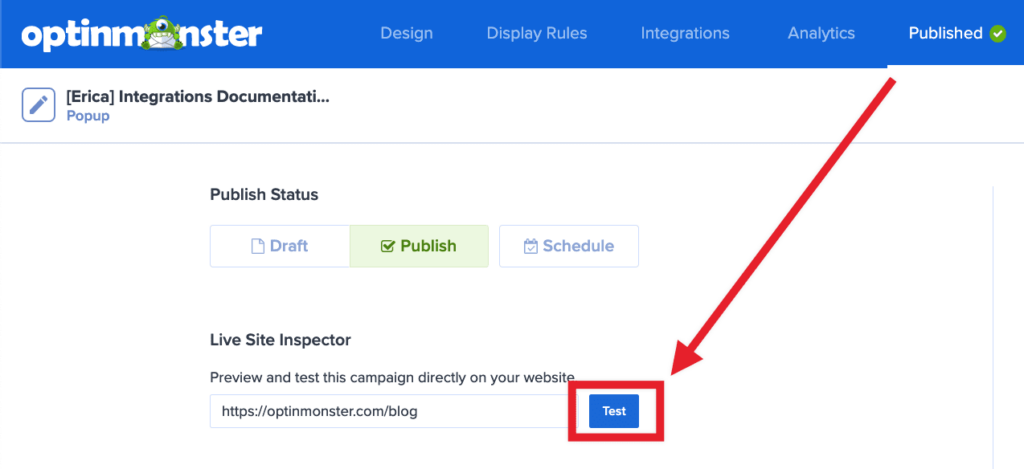
- Enter the full URL of the page you want to test, then select the Test button.
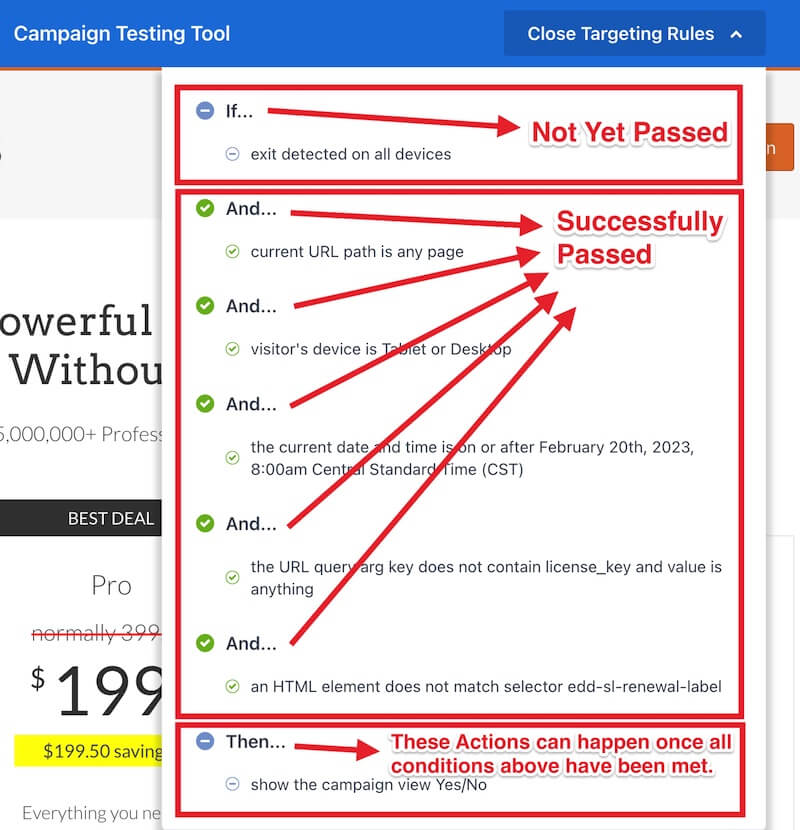
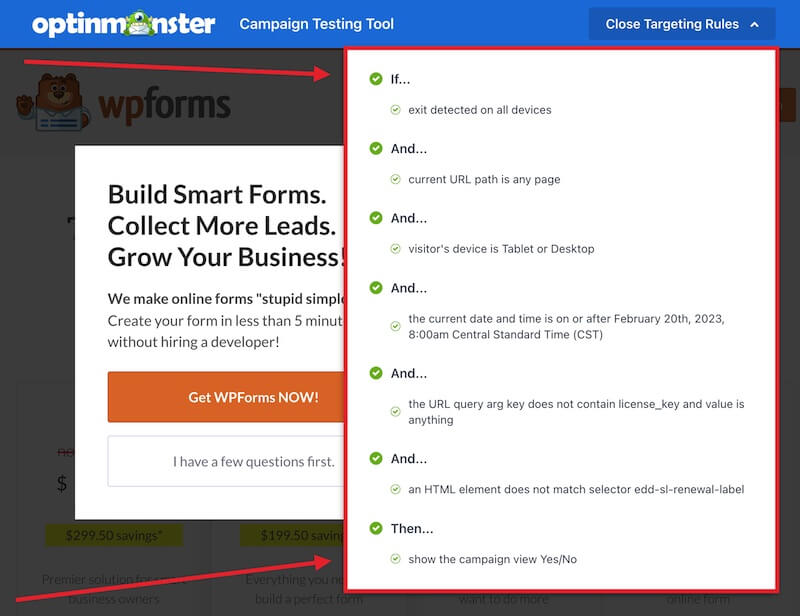
- A new window will open to load the URL you’ve entered in the previous step and show a Summary of the Display Rules confirming which rules have passed and which have failed (if any).
- Once all conditions are met you’ll see the campaign appear on the page and all required conditions marked with a green check like the example below.
- If the campaign doesn’t appear as expected you may need to modify your Display Rules.
Be sure to review the summary that appears on your page test to identify any roadblocks.
Test Optin Form
To use the Live Site Inspector feature to test your optin form, follow these steps:
- Before you start, follow the section above to trigger the campaign’s appearance in the Live Site Inspector Tool. The campaign’s Display Rules will need to be met to show the campaign before you can test submit the optin form.
- Once the campaign is displayed in the Live Site Inspector window, follow the steps needed to submit the optin form. If you are using the Yes/No feature in your campaign you’ll need to select one of the buttons in the Yes/No view of your campaign before the Optin view is shown.
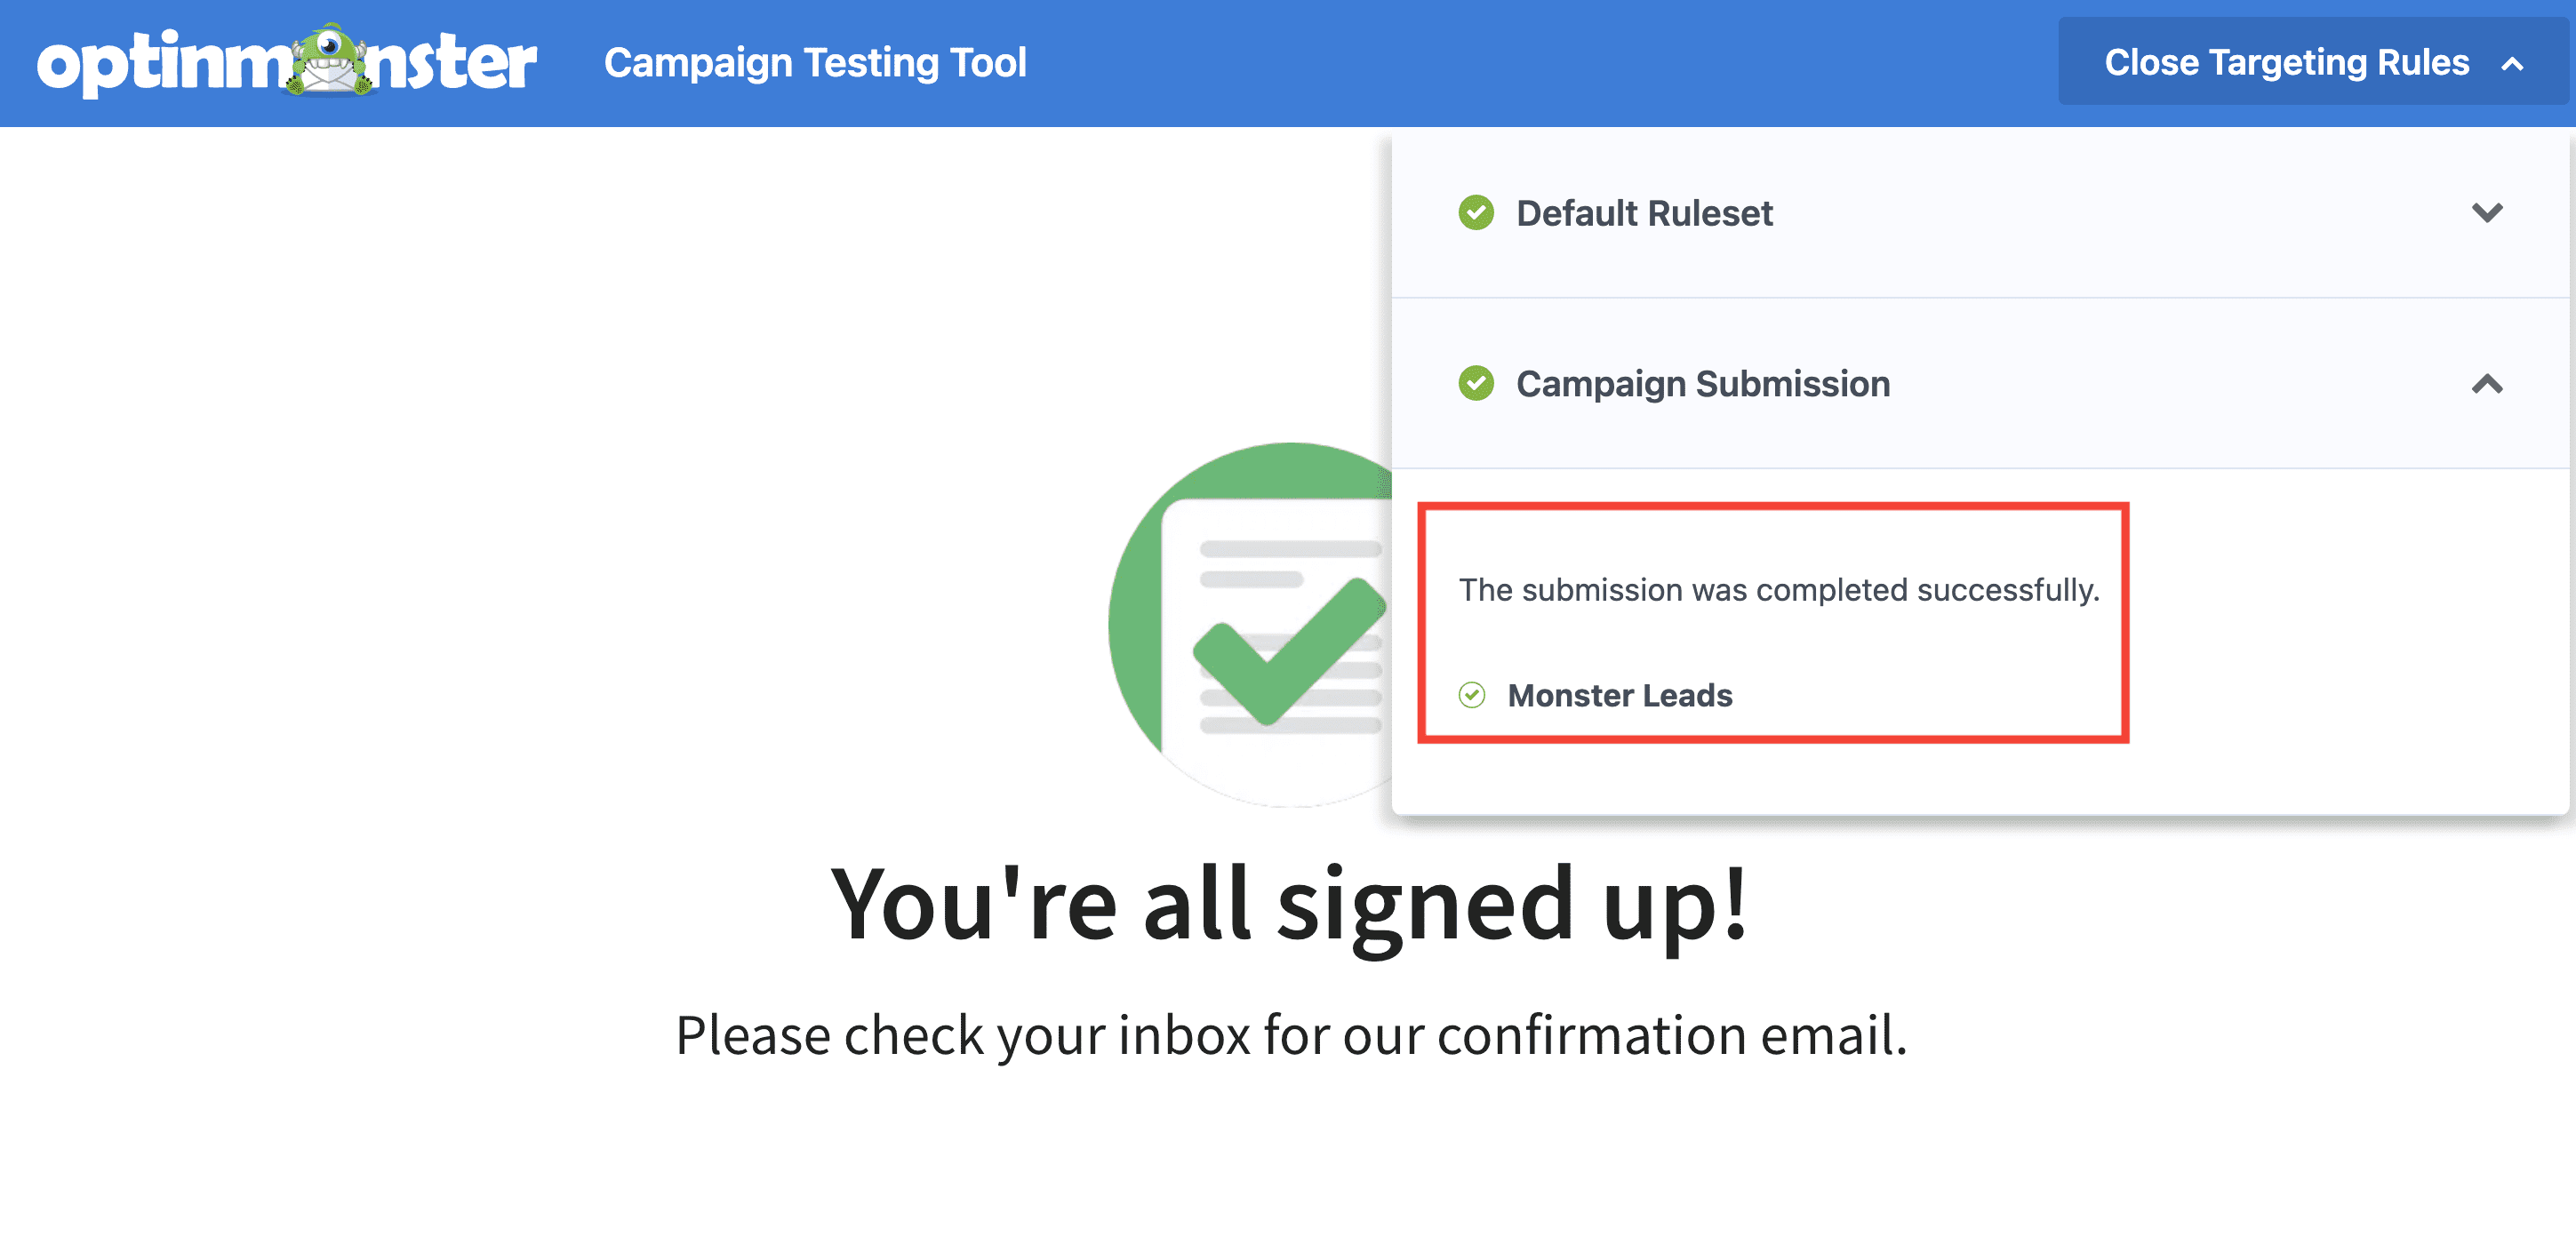
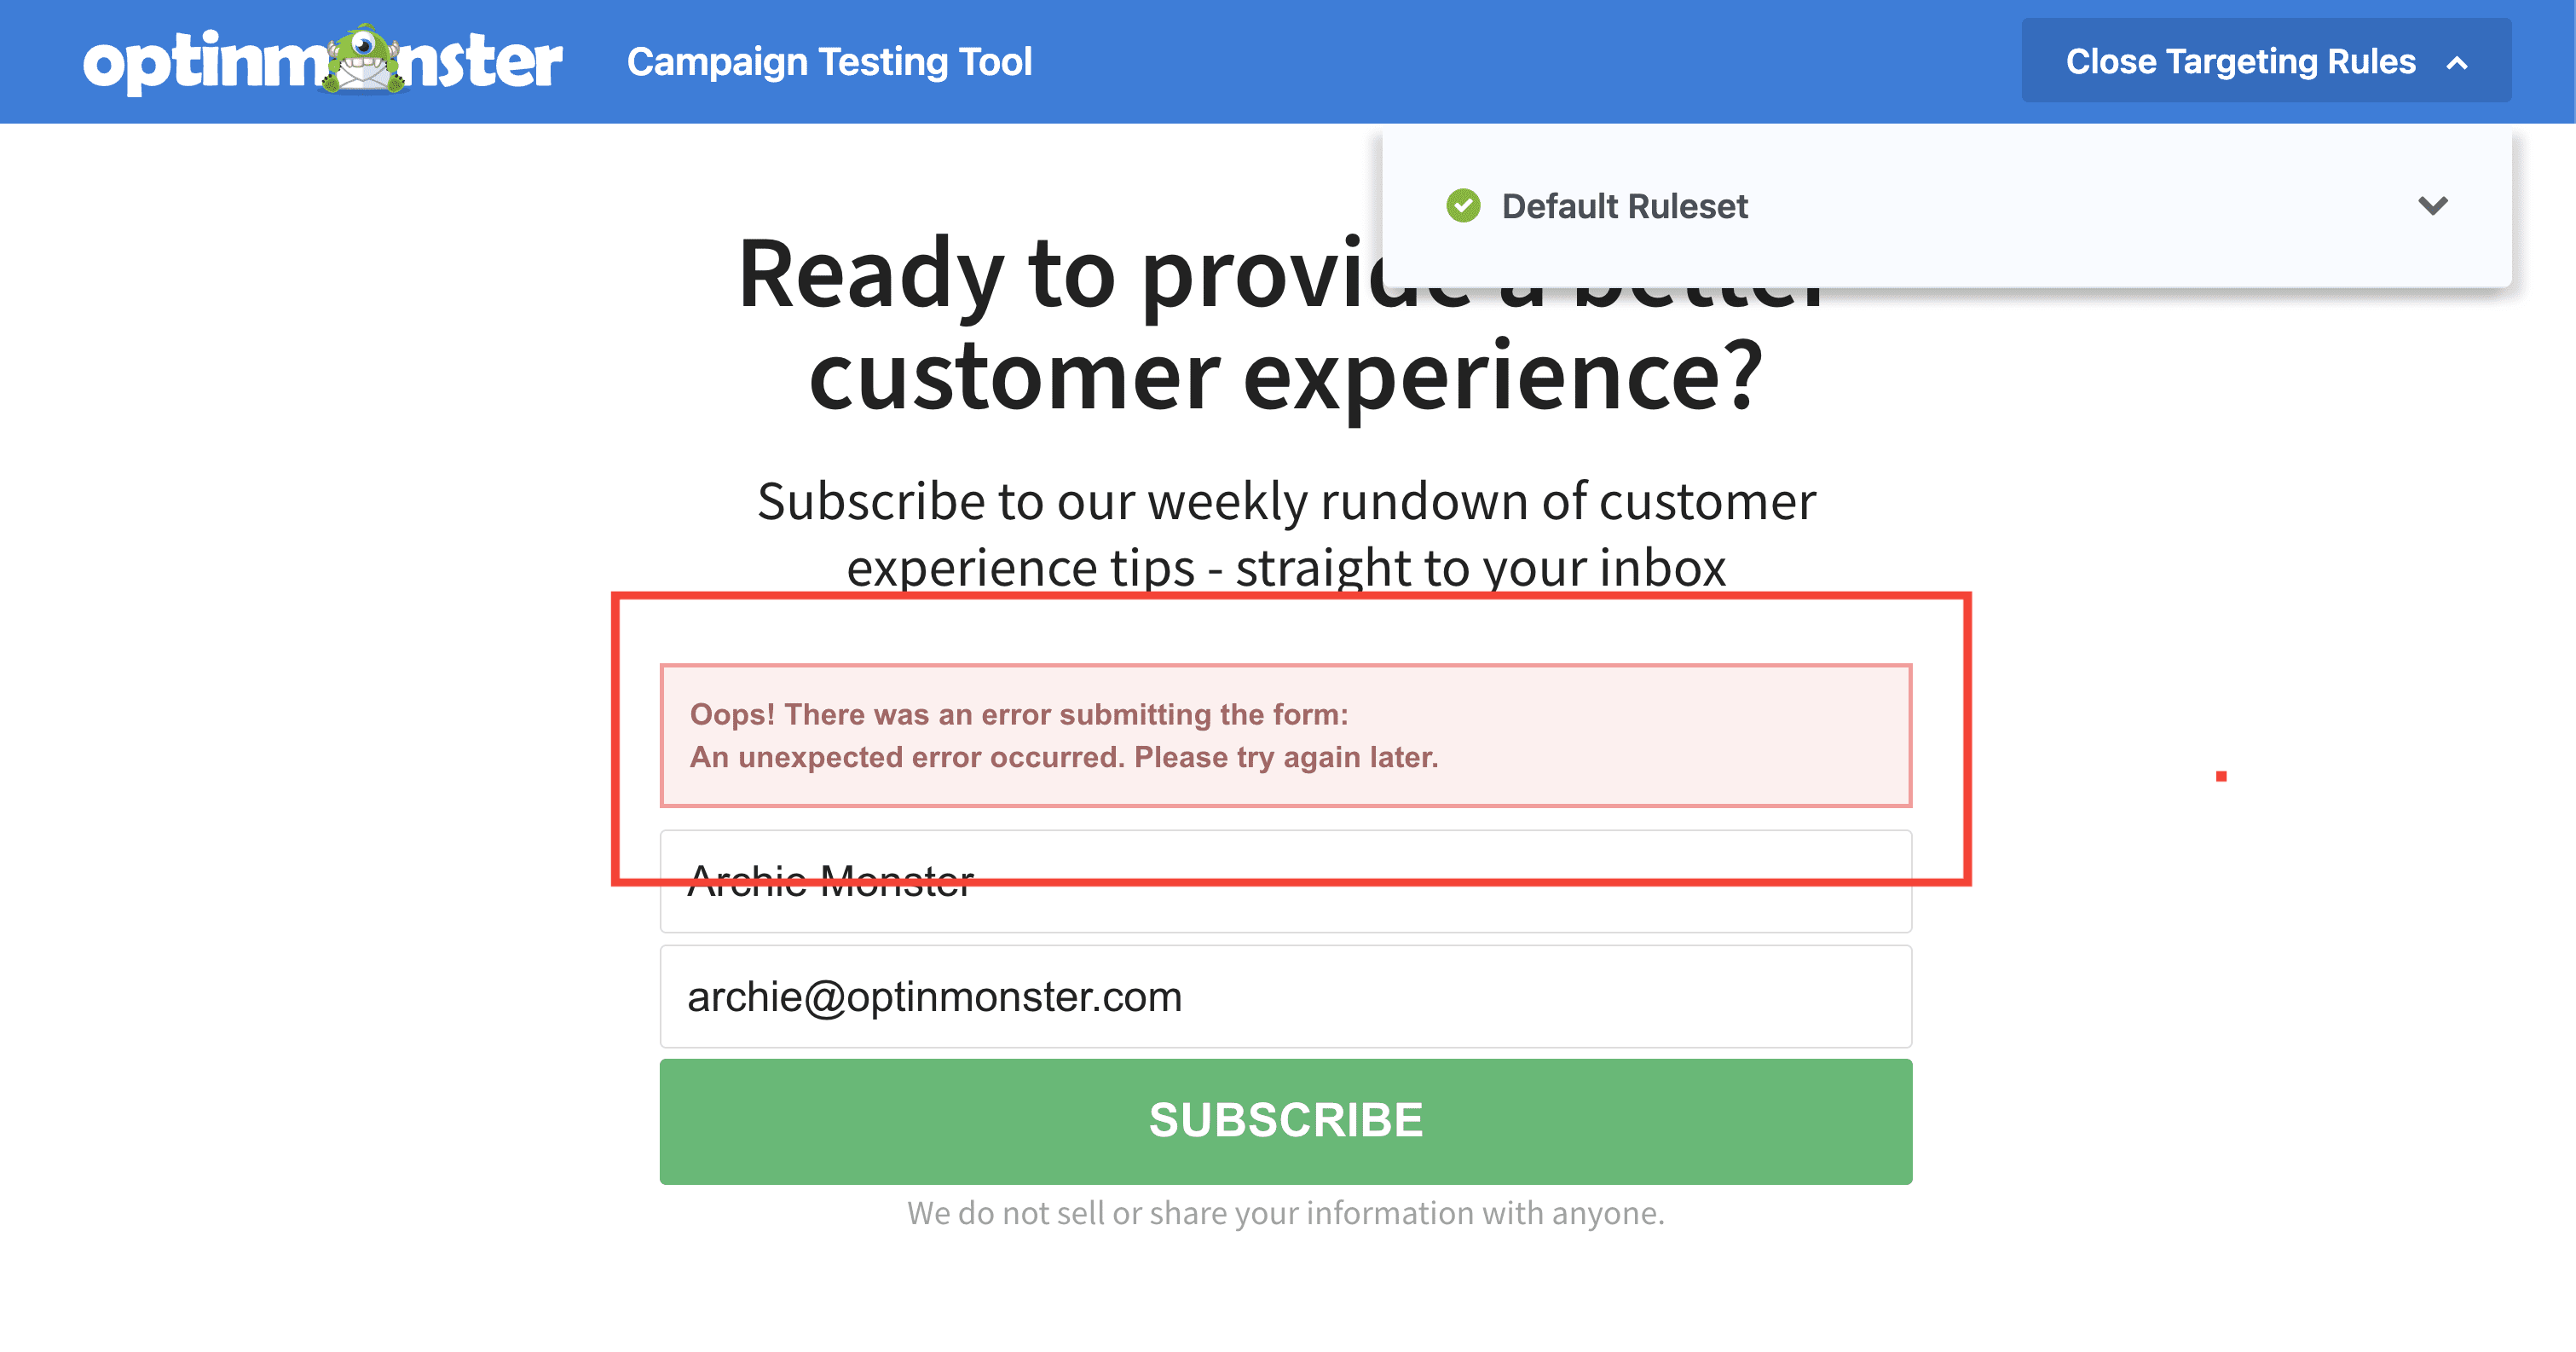
- The Live Site Inspector Summary window will display any errors with the optin form submission.
- Example Success Message: this message will appear when the form submission was successful along with where the lead was submitted, i.e Monster Leads and/or your ESP.
- Example Error Message: this error may appear if no integration has been connected to your campaign yet. An integration is required before data can be successfully captured.
Don’t have an Email Service Provider yet? You can use Monster Leads to capture and store leads within your OptinMonster account directly.
- Example Success Message: this message will appear when the form submission was successful along with where the lead was submitted, i.e Monster Leads and/or your ESP.
Test Field Mapping
When testing Field Mapping, follow these steps:
- Submit your campaign’s optin form following the Test Optin Form section above.
- Log into the Email Service Provider you’ve integrated the campaign with and configured Field Mapping for.
- Locate the lead you’ve test-submitted and check that the custom fields have been successfully recorded.
- If the custom fields have not been captured as you expect check our documentation for the specific Email Service Provider to confirm your Field Mapping settings follow all requirements for that platform. Our support team is also available to help!
Preview Campaign
Preview Popup Campaigns
If you’re looking to preview the campaign’s design on your site you can easily do that before you publish your campaign.
The Preview tool from the Publish screen is available only for popup type campaigns: Lightbox, Fullscreen, Floating Bar, and Slide-in. If your campaign is an Inline type the Preview button will be greyed out and unavailable to use.
Please refer to the Preview Inline Campaigns section for steps on how to preview your Inline campaigns.
To preview your campaign, follow these steps:
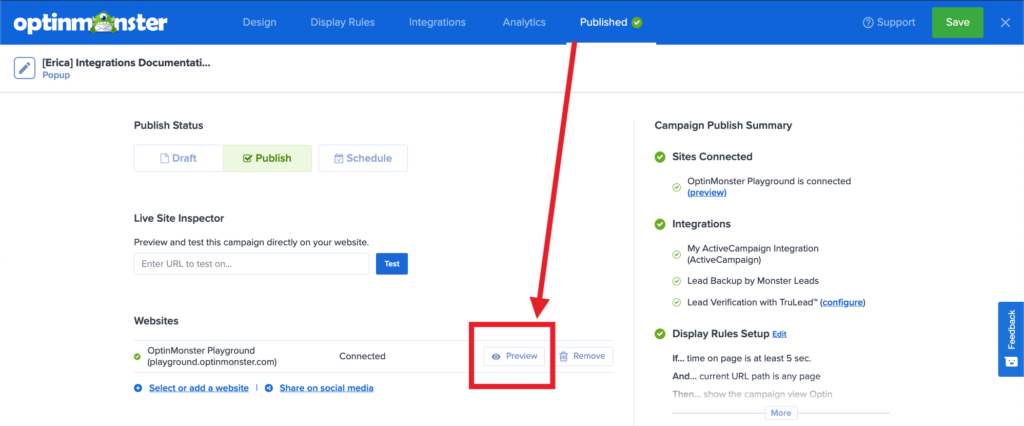
- Navigate to the Publish screen of the campaign builder and select the Preview button next to the site you want to preview your campaign on.
*This button will be unavailable to select if you are viewing an Inline type campaign. Follow the Preview Inline Campaigns section below instead. - A new window will open loading the homepage of your site and show the campaign for you to preview the design.
The Preview tool does not consider any Display Rules configured. The order of design views shown for a campaign using Preview are always:
- Yes/No view (if enabled. Learn how to enable/disable the Yes/No view.)
- Optin view
- Success view (if an action in the Yes/No or Optin views is set to show the Success view. Learn how to control Success Actions.)
To test the Display Rules you should use the Live Site Inspector tool instead.
You can test submit the optin form using the Preview tool only if the campaign is Published. To test a Draft or Scheduled campaign you should use the Live Site Inspector tool instead.
Preview Inline Campaigns
Because Inline type campaigns are shown in the page content and not as an overlay, our automated Preview tool has no way of assuming where in the page content the campaign should be visually displayed. For that reason, the Preview tool (as shown in the previous section) is greyed out and unavailable for Inline campaigns.
You can still preview Inline campaigns on your site before launching them, following these steps:
- Before you start, the campaign should not yet be published. This section will show how to Preview an Inline campaign on your site without Publishing it live to all site traffic.
- Embed the Inline campaign in the page content where you want it to visually appear. This can be done using either the Campaign Embed Code or WordPress Shortcode options in this guide.
- Next, you’ll need two pieces of information to generate the Preview URL for your Inline campaign:
- The URL of the page where you’ve added the campaign embed code following Step 2 of this section; AND
- The unique ID of your Inline campaign.
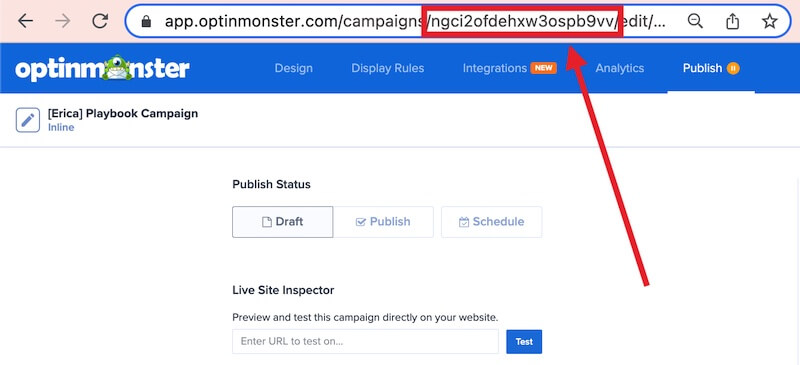
The ID be located in the URL when viewing the campaign in the builder:
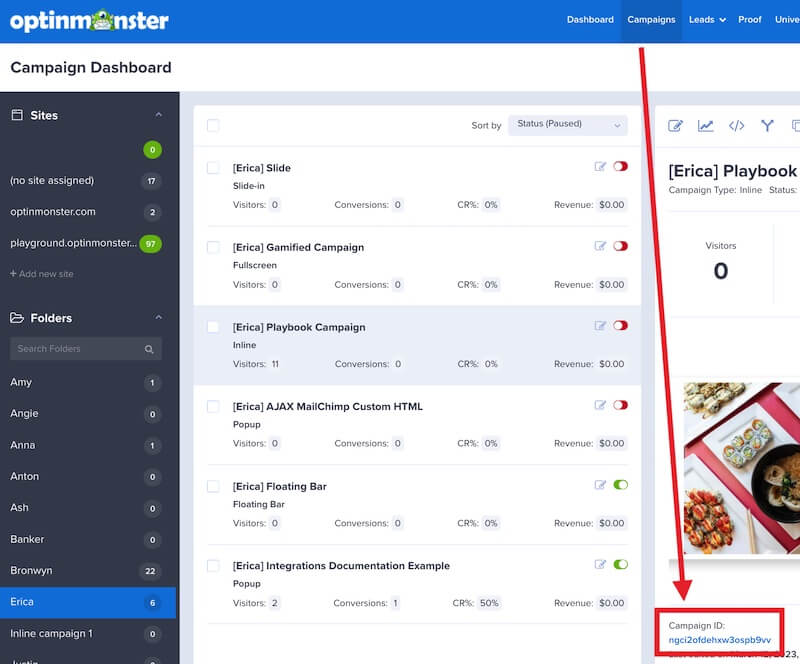
OR you can find the ID from the Campaigns screen when viewing the individual campaign details:
- Your unique Preview URL will be formatted like this: PAGE_URL?om-live-preview=CAMPAIGN_ID
For example, if I embedded the Inline campaign on the following page: https://optinmonster.com/test
And my campaign’s unique ID is ngci2ofdehxw3ospb9vv
My Preview URL will be: https://optinmonster.com/test?om-live-preview=ngci2ofdehxw3ospb9vv
Live Testing
To test a live campaign without being counted in the campaign analytics, you can append this query arg to the end of the URL: ?omdisabletracking=1
For example: https://optinmonster.com?omdisabletracking=1
FAQs
Will my test submissions be counted in the campaign Analytics?
When using any of the testing methods outlined in this guide the Analytics for your campaign will not count your submissions.
If you’re serious about jumpstarting your website business growth, then get started with OptinMonster today!
Get Started With OptinMonster Today!BONUS: Done-For-You Campaign Setup ($297 value)
Our conversion experts will design 1 free campaign for you to get maximum results – absolutely FREE!
Click here to get started →
Troubleshooting
No matter what I do my campaign doesn’t show when testing.
The most common reasons testing fails:
The OptinMonster embed code hasn’t been added to the page you’re testing.
If you’re manually adding the embed code to your site double-check that it’s being implemented as you expect. Even if the site status shows as “Connected” in OptinMonster, something may have changed with the implementation of the embed code since our system first checked the connection.
If you are using Shopify be sure you’ve assigned the campaign to both the pretty domain and the Shopify admin domain of your store. Both are required before testing and publishing the campaign will work as expected. Learn more about domain assignment for Shopify campaigns.
If you are trying to test an Inline type campaign be sure you’ve placed the campaign’s embed code in the page source where it should visually appear. Learn more about how to embed Inline campaigns.
Site caching is somehow interfering.
In some cases, a website’s caching configuration will cause interference. You can often check this by forcing a non-cached version of the page to load by adding the query argument ?nocache=true to the end of the test URL.
For example, if you are testing domain.com you would force a non-cached version of the page to load by visiting domain.com?nocache=true
Browser extension interference.
In some cases, a specific browser extension can cause problems.
To check if this is the case, try using a different major browser (e.g. Chrome, Firefox, Edge, Safari, Opera) that does not have any extensions installed, OR use a brand new Incognito window.
Using a privacy browser.
When testing we recommend you use a major browser and not rely on privacy browsers (like Brave, etc).
Internet network / firewall interference.
Although not common, in some instances your internet network or company firewall may be interfering. In this case, try using a different internet connection to see if that resolves the issue.
Still not working? Please reach out to support, we’d love to help!
I received an Interaction Cookie warning, what does that mean?
We use cookies to control how often a campaign can reappear to the same visitor once they’ve closed or converted it.
If you see a notice of “Campaign loading is disabled because of the interaction cookie.” or “Campaign loading is disabled because of the global interaction cookie.” this indicates a cookie has been set in your browser from previous testing that is now hiding the campaign according to the cookie settings.
The default cookies settings for all new campaigns are to hide the campaign for 30 days after being closed and 365 days after being converted.
To clear the notice during testing you can use one of the following approaches:
- Use a brand new Incognito window for your test (recommended); OR
- Add
?omclear=trueto the end of your testing URL (e.g.https://mywebsite.com?omclear=true), this will remove only the OptinMonster cookies; OR - Manually clear the cookies from your browser (like this).
I’m using the Live Site Inspector feature, but my site isn’t loading. Why?
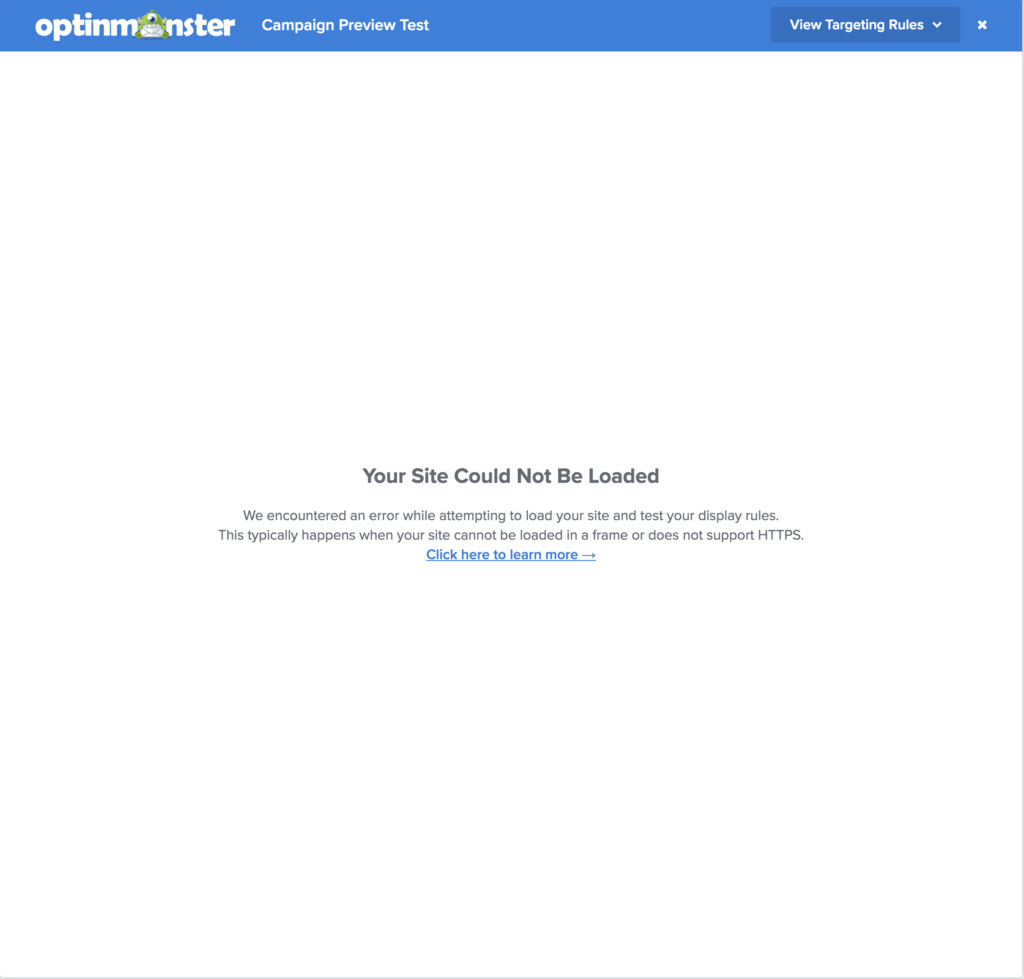
If you’re receiving a warning that the site couldn’t be loaded when using the Test on Page feature, you’ll want to rule out the following causes:
- The Embed Code hasn’t yet been added to your site.
- Your site isn’t available to load over
HTTPS. - Your site has a Content-Security-Policy header like
X-Frame-Options: SAMEORIGIN - Your site took longer than 10 seconds to load.
Why is my campaign not showing in Safari’s private browsing mode?
If your campaign is not showing in Safari’s private browsing mode and your site has the OptinMonster embed code loaded via Google Tag Manager (GTM), it is likely due to Apple’s new Advanced Tracking and Fingerprinting Protection, which is enabled by default in Safari’s private browsing mode on iOS 17.
This protection appears to block Google Tag Manager, preventing the OptinMonster embed script from loading and causing campaigns to fail to display. You can Reduce Protections in a private browsing tab, and your OptinMonster campaigns should appear as Google Tag Manager is unblocked.
To avoid this issue, we recommend adding your OptinMonster global embed code directly to your site. This approach bypasses Safari’s privacy restrictions entirely and ensures campaigns will load, even when the default protections are enabled.
Why is my campaign not showing in Firefox browser?
Firefox includes a feature called Enhanced Tracking Protection (ETP) designed to enhance user privacy by blocking various online trackers, including social media trackers, cross-site tracking cookies, fingerprinters, cryptominers, and other tracking content. While beneficial for privacy, ETP, particularly its stricter settings, can sometimes interfere with the functionality of OptinMonster that rely on JavaScript and cookies to deliver campaigns and track interactions.
If you are using Firefox and notice that your OptinMonster campaigns are not displaying as expected
- Temporarily disable Enhanced Tracking Protection for the site you are testing. You can do this by clicking the shield icon in the address bar and toggling off the protection for the current site.
- Add Exception: If test mode needs to be conducted frequently, consider adding an exception for the affected site by going to Firefox settings > Privacy & Security > Manage Exceptions.
By including these steps, users struggling with Firefox’s privacy features should have a smoother testing experience.

