Here at OptinMonster, we do our best to make sure the campaigns you create have the least impact on your website page speed. However, there are some practices that go against that purpose and we would like to help you navigate around those whenever possible.
In this article, we’ll share tips to help you identify opportunities to optimize your OptinMonster usage.
Before You Start
Here are some things to know before you begin:
- For more advanced technical optimization please see our guide: OptinMonster Campaign Performance Technical Overview and Defaults
Reduce Campaign Quantity
Reducing the total number of campaigns loading on any single page is the number one way to limit the impact that OptinMonster will have on your page speed.
There are two different forms of embed code that we provide to control what campaigns appear on your site:
- Global Embed Code – this single embed code option allows ALL campaigns assigned to that site to be loaded into the page. The Display Rules configured for each individual campaign then determine whether the campaign can appear to the visitor or not.
- Campaign-Specific Embed Code – this single embed code controls only the individual campaign. If the Display Rules also allow the campaign to appear on the specific page the embed code has been placed it can appear to the visitor.
Campaign-Specific Embed Code
Making use of the Campaign-Specific Embed code instead of the Global Embed code where appropriate means a smaller API response or fewer API requests (depending on which embed code you’re using).
And in effect, that reduces the number of resources that must also load into the page (the more resources loading the greater impact on page speed).
WordPress
If your site is built using WordPress and you are using the OptinMonster WordPress plugin you can easily limit which page(s) each individual campaign is embedded on using the Output Settings.
Our WordPress plugin uses the campaign-specific embed code which controls only that specific campaign.
Learn more about how to use the WordPress Output Settings to control where your campaigns appear here.
Advanced Users
Note:
The following details are intended only for advanced technical users; and describes an experimental setting. Please use with caution and test thoroughly before deploying to your production site.
If you don’t have much control over your website code and inserting the Campaign-Specific code is not suitable, there is still something we suggest you can try.
Including the Global Embed code on your site; you can utilize an advanced setting in OptinMonster to activate a URL path filter.
The filter works similarly to the Output Settings of our WordPress plugin (to process which scripts get loaded on your site’s page in the backend), and is meant to reduce the amount of processing the OptinMonster script will be responsible for on the frontend.
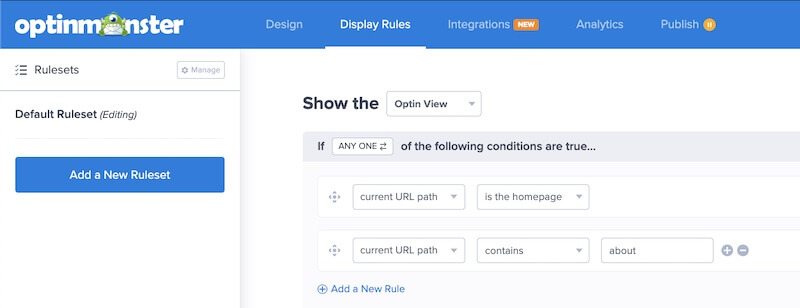
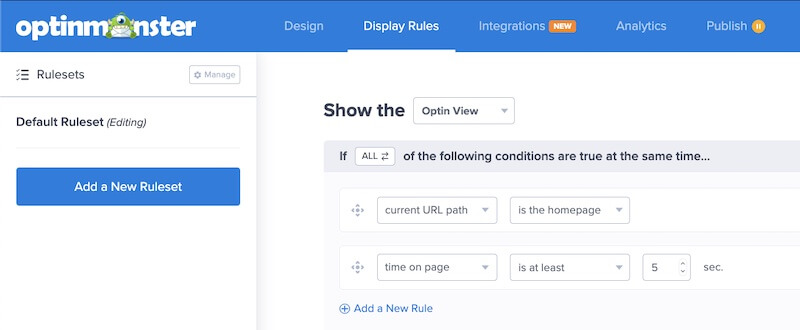
How the filter works is if your campaigns make use of only the URL Path Display Rule to determine where the campaign appears. This rule must be used in exclusion of all other types of rules.
For example, the following is a good Display Rule configuration because the only conditions are URL Path rules:

And the following is bad because it includes a non-URL Path rule (Time Delay):

You can test the URL Path filter by appending the ?omSendUrlPath=1 query argument to any of your pages’ URLs where you have placed the OptinMonster Global Embed code. For example:
https://optinmonster.com?omSendUrlPath=1If you obtained positive results, you can activate the URL Path filter using the following code added to your site:
Optimize Web Fonts and FontAwesome
The OptinMonster campaign builder makes it easy for you to use a bunch of cool and different Web Fonts in your campaigns.
It is important to be aware that the more unique Web Fonts used throughout your campaigns, the more resources that must be loaded onto your site which affects the page speed.
Additionally, each Web Font needs to be loaded before your campaign gets displayed so the design of the campaign does not suffer from font swapping (having the font swapped after it is already visible). The loading of Web Fonts can delay the appearance of your campaign and in some cases (e.g. MonsterLinks™ and Exit-Intent®) can trigger the pre-loading of the Web Font and its resources during the OptinMonster script initialization, which can have a direct impact on your page’s performance score.
To optimize the performance of your OptinMonster campaigns with Web Fonts we suggest the following:
- Reduce the number of unique Web Fonts your campaigns use whenever possible.
- If you are using the same Web Fonts in your campaigns that your website already loads and uses; disable Web Fonts from being loaded by OptinMonster following our guide here.
MonsterLinks™ and Exit-intent® campaigns are naturally more time-sensitive than other campaigns, so they trigger web fonts and images to be preloaded during the OptinMonster script initialization so they can be displayed without delay.
FontAwesome Icons:
In October 2020, we released an update to replace the FontAwesome icons from Web Fonts to SVGs. That change allows the icons to work without loading additional resources on your page, which is a great thing! However, if you have campaigns that were created before October 2020 that contain icons it’s possible those campaigns are still relying on Web Font loading.
We recommend you audit older campaigns and for any containing icons, delete and re-add the icon element again. That change should be enough to force the campaign to use the SVG version instead of Web Fonts.
Optimize Images
Images can be heavy resources that drag down website performance very quickly so giving them special attention when creating campaigns goes a long way to optimize campaign usage in OptinMonster.
Image Compression
OptinMonster automatically compresses images when they are uploaded to your OptinMonster account.
Image Dimensions
Adjusting the dimensions of the image to be no larger than it will be displayed within the campaign is the ideal approach to reducing image filesize and optimizing the performance.
Learn more about optimizing your OptinMonster campaign’s image dimensions here.
Avoid Cumulative Layout Shift (CLS)
Cumulative Layout Shift happens when the page content initially appears on the page in one way and then shifts or adjusts the layout during or after the page has finished loading.
This can annoy site visitors, and Google’s Core Web Vitals tool warns against it.
In OptinMonster there are two campaign types that can trigger a CLS warning; Inline and Floating Bar campaigns.
When implementing either of these campaigns we recommend the following:
Inline Campaigns
When placing your Inline campaign, enclose it in a <div> container and add a style to the div that sets a minimum height. This height value should match or slightly exceed the height that your Inline campaign will display at.
This allows the page to load with the spacing reserved for the Inline campaign to appear within and no shifting of the layout to occur.
For example:
Learn more about adding your Inline campaign to your site here
Floating Bar Campaigns
When showing a Floating Bar campaign on your site we recommend:
- Configure the Floating Bar campaign to shown on user-interaction (e.g. Scroll Percentage, MonsterLink™, or Exit-Intent®) or use a Time Delay value that is greater than the amount of time it takes for your page to finish loading fully. For example, if the page takes 5 seconds to finish loading set a value of 7 seconds or great for the time delay.
- Alternatively, reposition the Floating Bar at the bottom of the screen instead of the top. Floating Bars that show at the top of the screen push the page content downwards when they load so they won’t obscure the header/navigation; this can trigger a CLS warning if the campaign is allowed to appear too early in the page loading sequence.
Pro Tip:
Use a tool like GTMetrix to check the average load time for any page of your site.


