OptinMonster makes it easy to collect and store leads using our Monster Leads feature. Whether you’re starting from scratch, or securing a backup, Monster Leads is where you can store your lead data.
In this article, you’ll learn how to connect Monster Leads with OptinMonster.
Before You Start
Here are some things to know before you begin:
- As a best practice, we recommend you connect your campaigns to Monster Leads and a second Email Service Provider (like Constant Contact or Mailchimp, etc) to manage and send emails to your leads.
- Monster Leads only stores your leads but is not able to send any emails.
- We recommend using tags for each campaign to help distinguish which campaign your leads subscribed through. This can help you with segmenting your leads.
Connect Monster Leads
When you create a campaign in OptinMonster that you intend to collect leads with you’ll want to integrate with one or more services to send those leads to.
To send leads to Monster Leads, follow these steps:
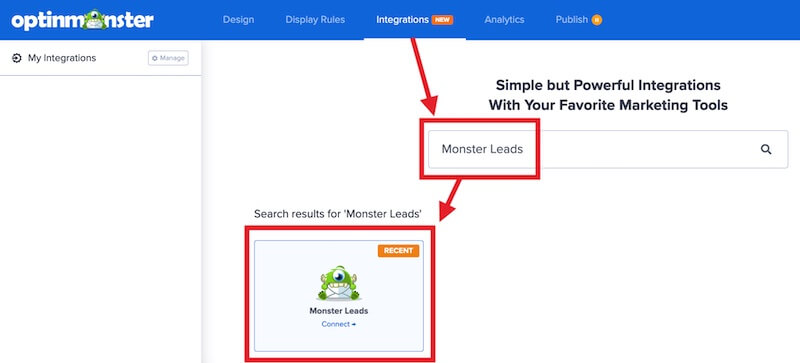
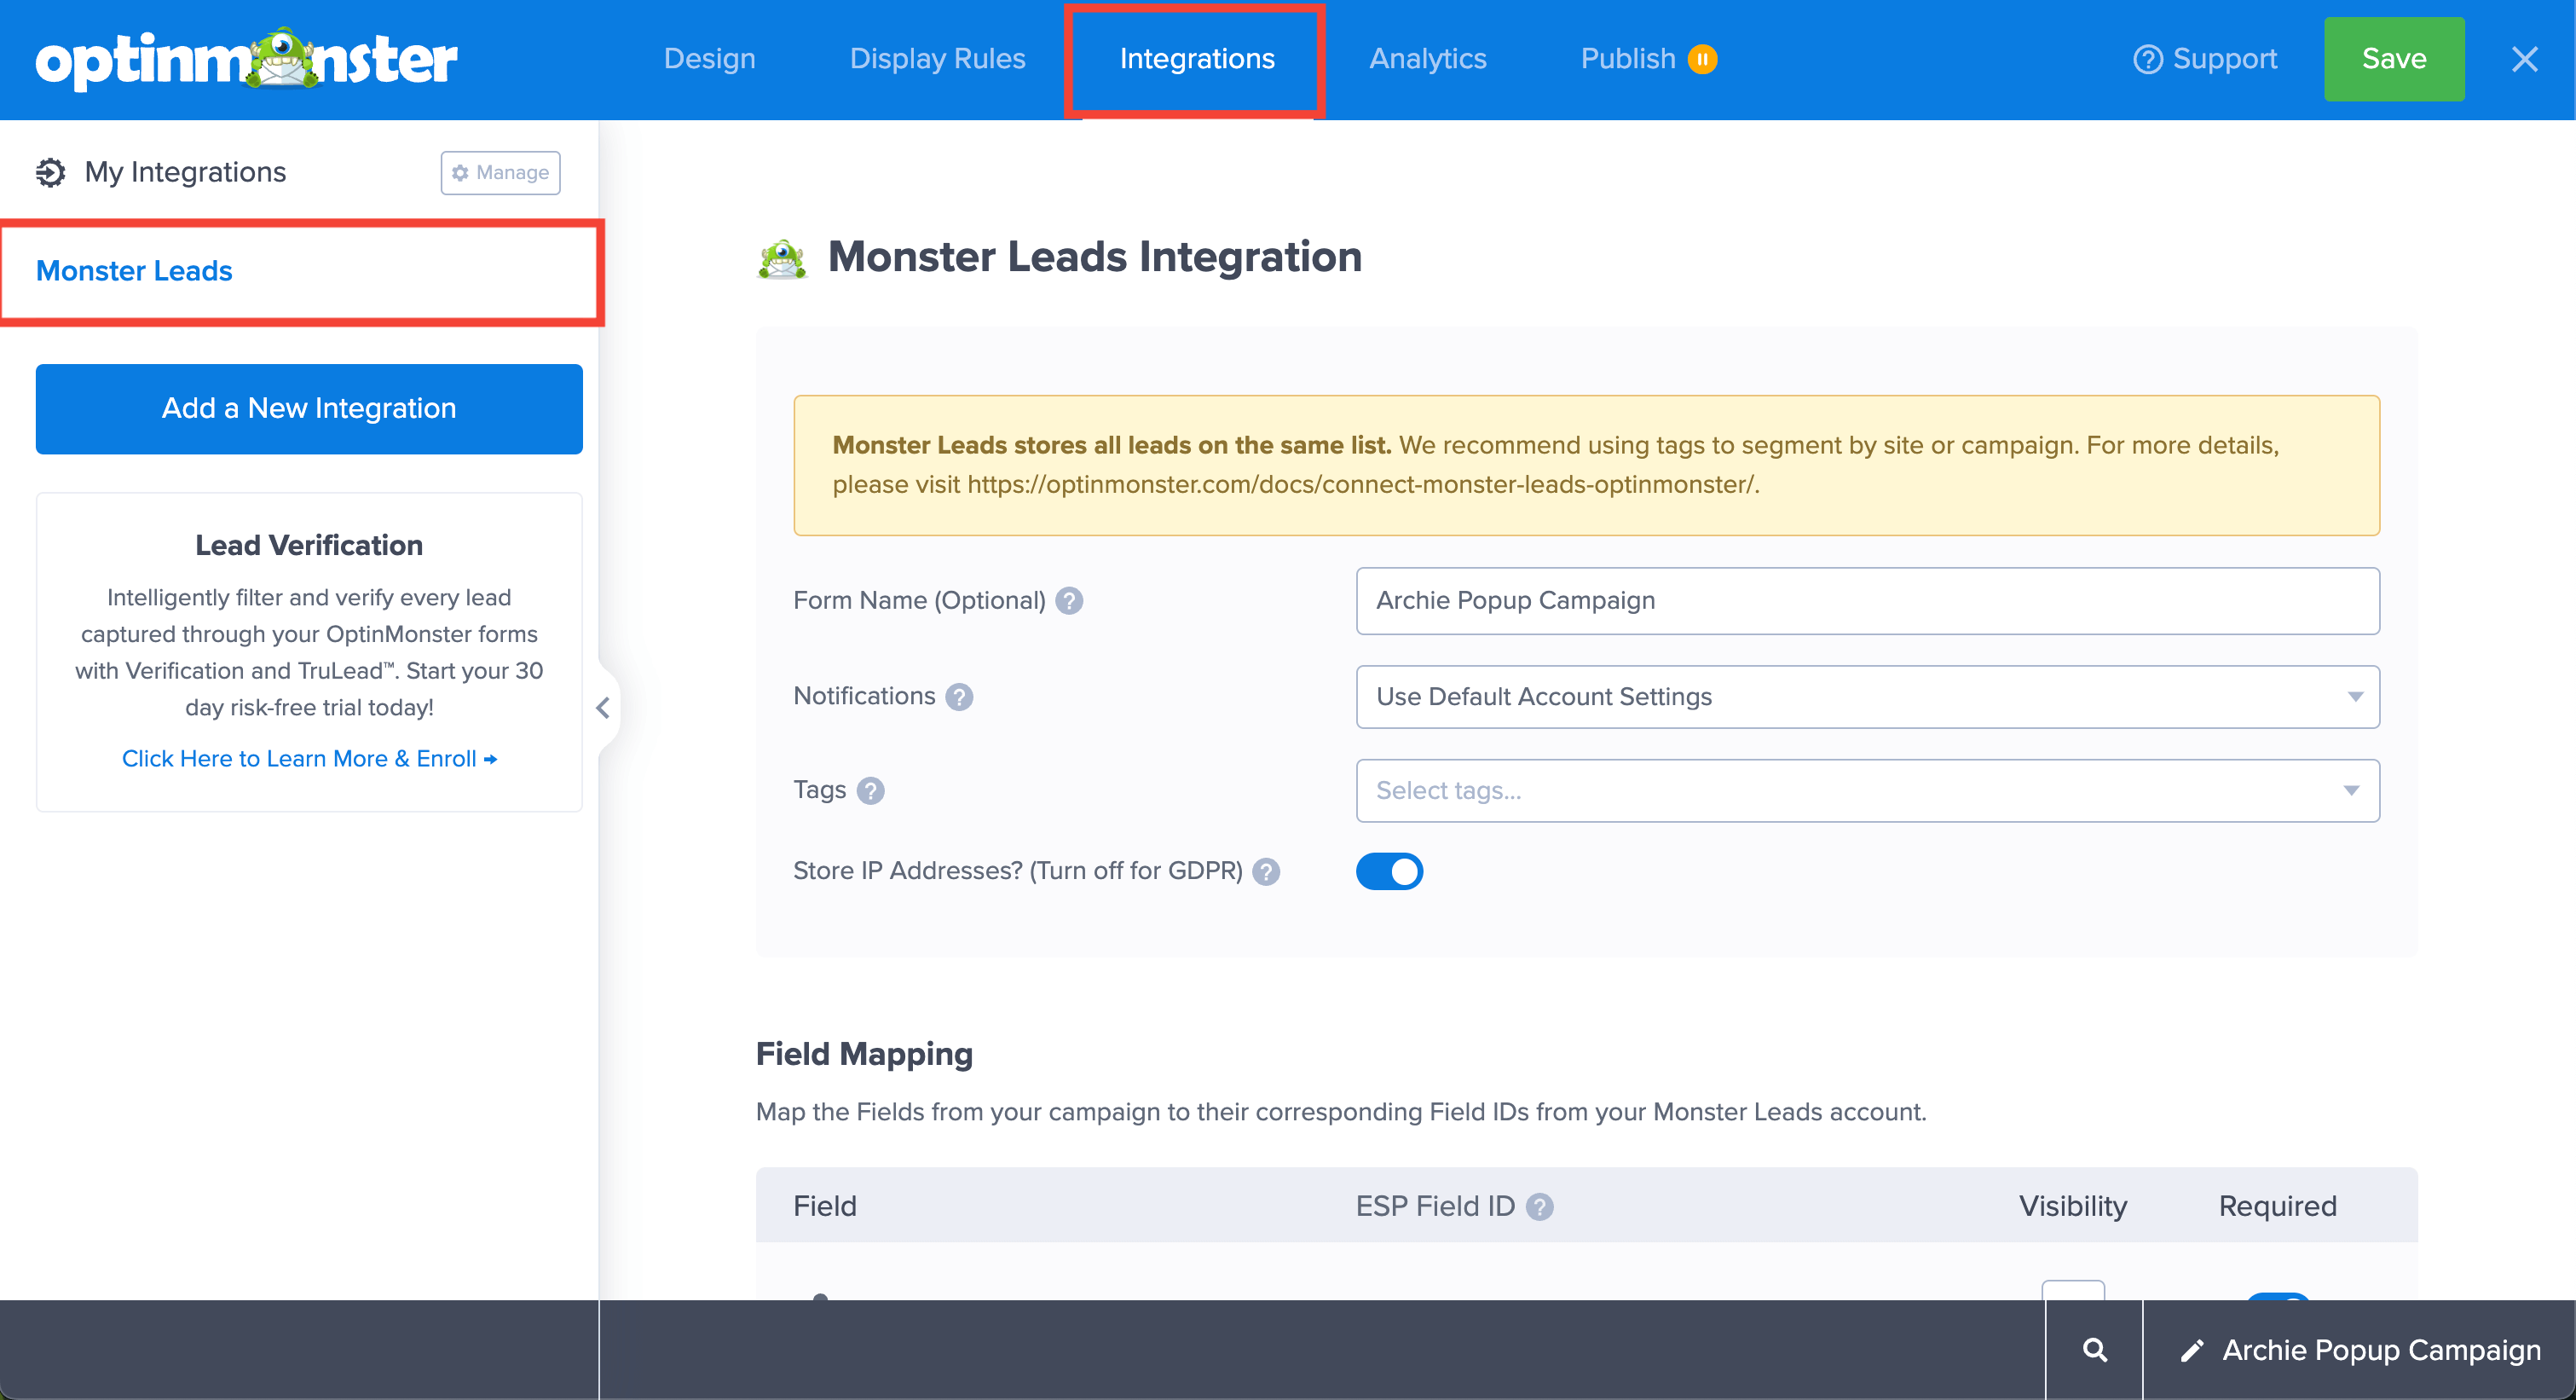
- Navigate to the Integrations view in the campaign builder, search for and select Monster Leads.
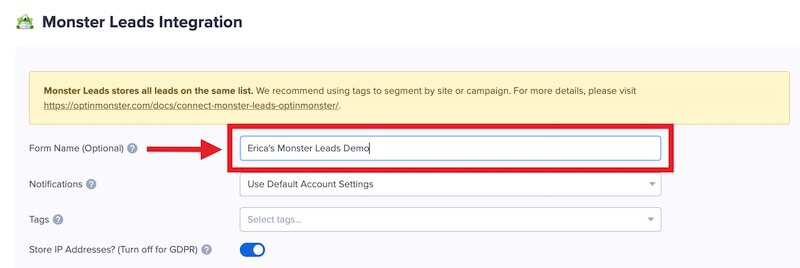
- Optional: Enter a Monster Leads Account Name (*internal use only).
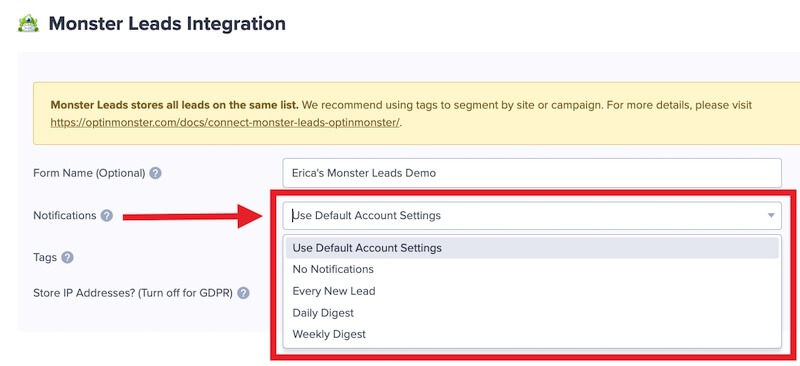
*By default, it will be populated with the Campaign Title. The Monster Leads Account Name can be anything that helps you identify the specific campaign your leads were captured with. - Optional: You can customize the Notifications setting for your individual campaign to control how you’re notified by email of new leads.
- Use Default Account Settings – this setting will default to the Notifications option selected in the Account Integrations setting for Monster Leads
- No Notifications – no emails will be sent
- Every New Lead – an email will be sent for each individual lead captured
- Daily Digest – one email will be sent per day showing all leads captured during a 24-hour period
- Weekly Digest – one email will be sent per week showing all leads captured during a 7-day period
*When choosing Every New Lead, Daily Digest, or Weekly Digest you’ll be provided with a field to specify the email address(es) to send notification emails to. Type any valid email address into the field and press the Enter key to apply the setting. You can add as many email addresses as required.
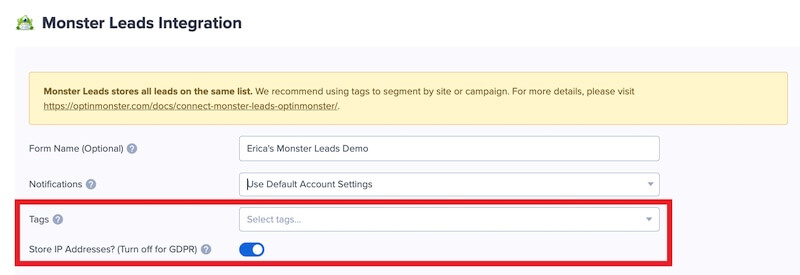
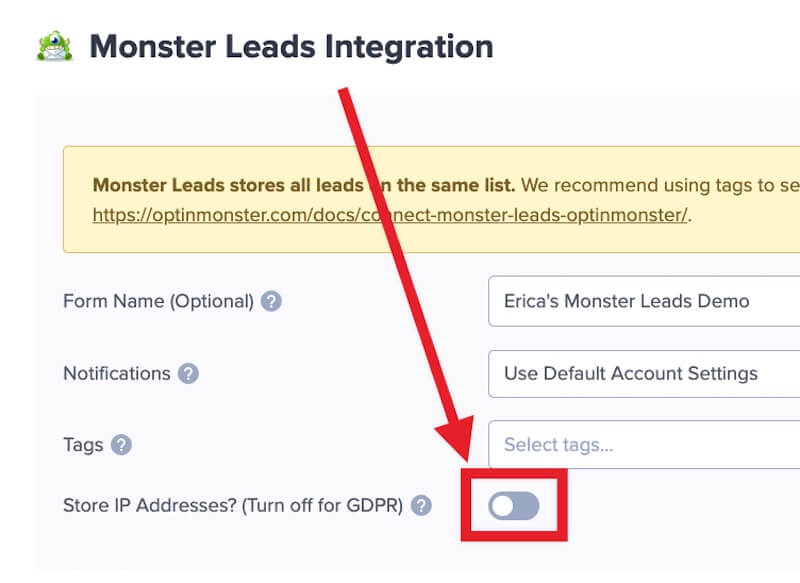
- Optional: You can also assign Tags and configure the Store IP Addresses? (Turn off for GDPR) setting.
- When you’re finished, Save your campaign.
Add Extra Fields
Field Mapping
Get started using Field Mapping with Monster Leads.
Before you begin using Field Mapping with Monster Leads, please consider the following:
- The following custom fields arereserved in Monster Leads and cannot be mapped to:
COUPON_CODE(the Coupon Code won when creating a Gamified spin-to-win campaign)COUPON_LABEL(the Coupon Label when creating a Gamified spin-to-win campaign)
- Custom field names should only contain uppercase ASCII characters and underscores. We automatically remove non-ASCII characters, hyphens, and empty spaces.
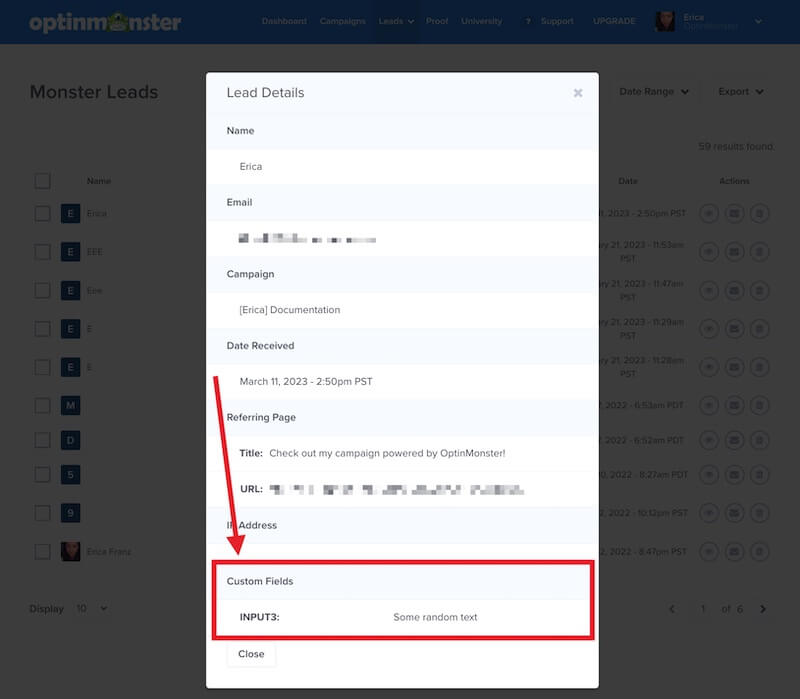
- Custom field data can be located at the bottom of individual lead records when viewing Leads in OptinMonster.
Lead Notifications
Lead Notifications can be configured for your default account settings, or for individual OptinMonster campaigns.
Monster Leads Notification emails are sent to the email address(es) specified when you configure Notifications for your individual campaigns and/or account default settings.
Please be sure to whitelist all emails from @optinmonster.com in your email application so they do not get blocked or filtered as spam.
Campaign Notification Settings
Individual campaign Notification settings can be configured in Step 3 of the Connect Monster Leads section in this guide.
Default Notification Settings
To change the default settings for how often you receive Monster Leads Notifications, follow these steps:
- Navigate to Account > Integrations to manage your integrations.
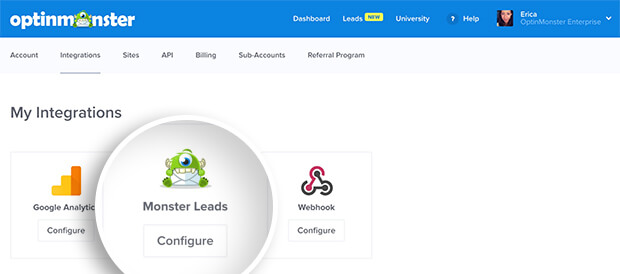
- Select Configure under the Monster Leads integration.
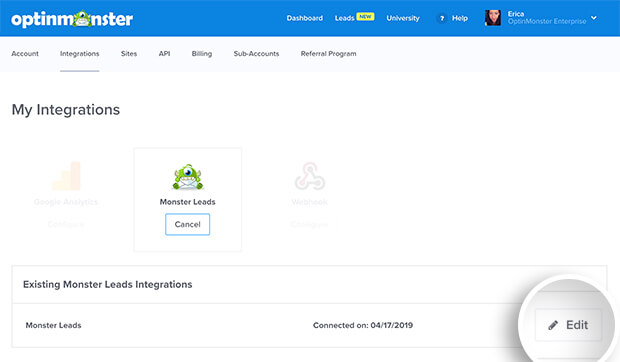
- Select Edit next to your Monster Leads integration.
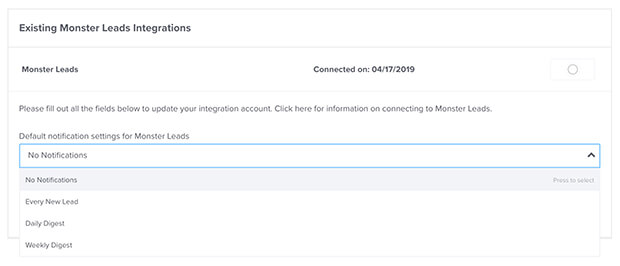
- Choose the Notification option you prefer from the dropdown field.
- When you’re finished, select the Update Integration to Monster Leads button.
The following Notification options are available to choose from:
- Use Default Account Settings – this setting will default to the Notifications option selected in the Account Integrations setting for Monster Leads.
- No Notifications – no emails will be sent
- Every New Lead – an email will be sent for each individual lead captured
- Daily Digest – one email will be sent per day showing all leads captured during a 24-hour period
- Weekly Digest – one email will be sent per week showing all leads captured during a 7-day period
*When choosing Every New Lead, Daily Digest, or Weekly Digest you’ll be provided with a field to specify the email address(es) to send Notification emails to. Type any valid email address into the field and press the Enter key to apply the setting. You can add as many email addresses as required.
Notification Email Examples
Every New Lead
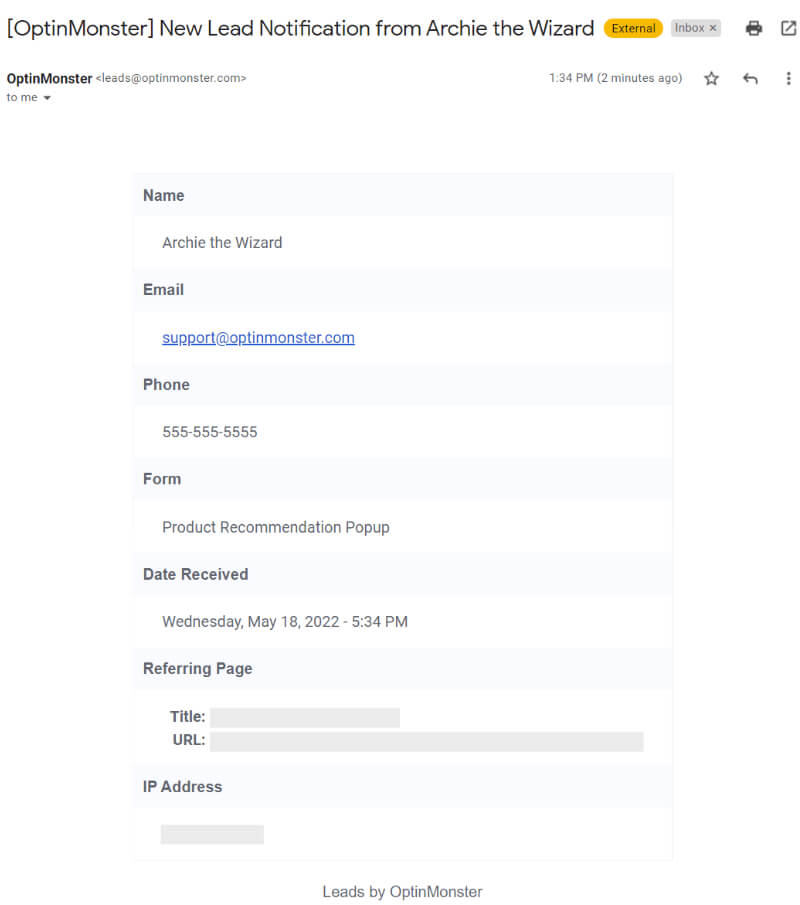
When you receive a Monster Leads Notification for every new lead, it will contain:
- Lead Data
- Email address (always required)
- Any additional fields in the campaign (e.g. name, phone, etc)
- Coupon Code and Coupon Label if using a spin-a-wheel gamified campaign
- Form – OptinMonster campaign title
- Date Received – timestamp will be in GMT
- Referring Page – Title and URL of the page where the OptinMonster campaign was submitted
- IP Address – if IP Address storage is enabled for your integration, and the IP Address was available to be captured
Daily and Weekly Digest
Digest Notifications are sent daily, or weekly on Mondays.
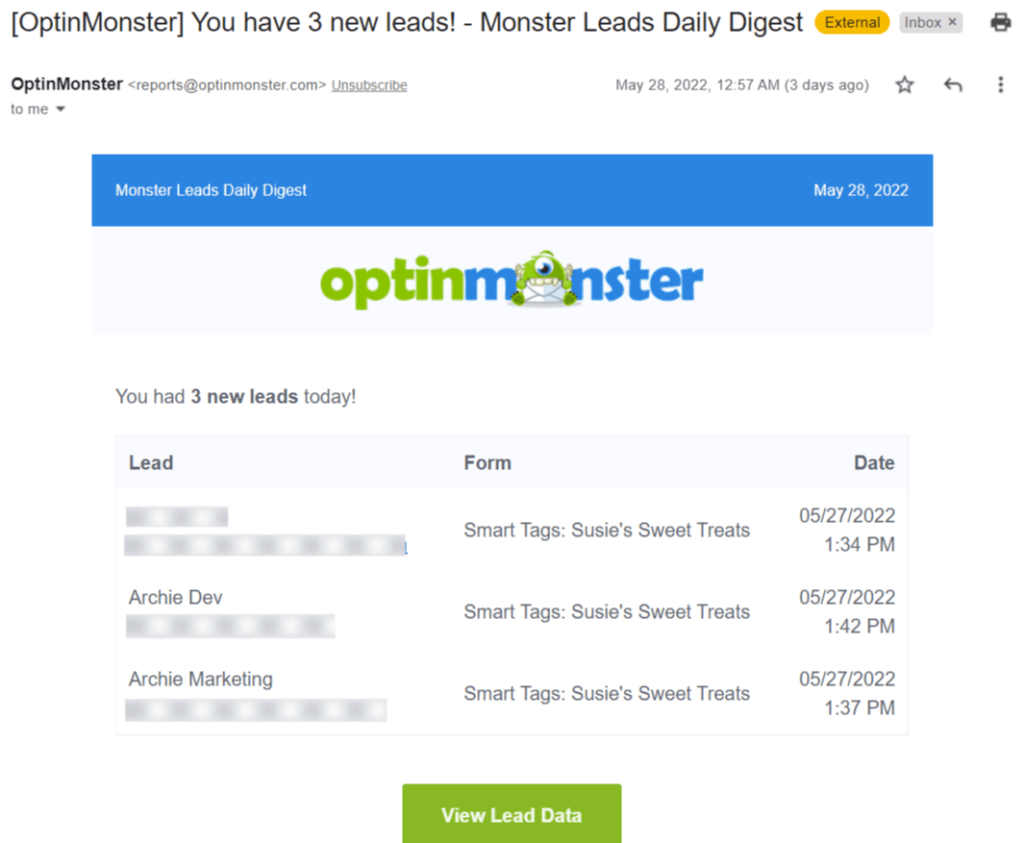
When you receive a Monster Leads Digest Notification (daily or weekly), it will contain:
- Lead Data
- Email address (always required)
- Any additional fields in the campaign (e.g. name, phone, etc)
- Coupon Code and Coupon Label if using a spin-a-wheel gamified campaign
- Form – OptinMonster campaign title
- Date Received – timestamp will be in GMT
Email Automations
Monster Leads is a lead storage option only, and no emails are sent to leads.
To send automated emails to new leads you’ll want to integrate your campaigns with a third-party Email Service Provider and configure automated emails through that platform.
See all of the Email Service Providers we integrate with here.
If you don’t find your Email Service Provider listed, we also integrate with Zapier, Webhook, and our Form Embed block allows you to add webform embed codes from any platform.
Spin-a-Wheel Support
If you are configuring a Gamified spin-to-win campaign, spin-a-wheel support is not available at this time to store the coupon data in Monster Leads.
However, the coupon data will be sent with the lead data in email Notifications if you have Notifications enabled.
View / Export Leads
OptinMonster App
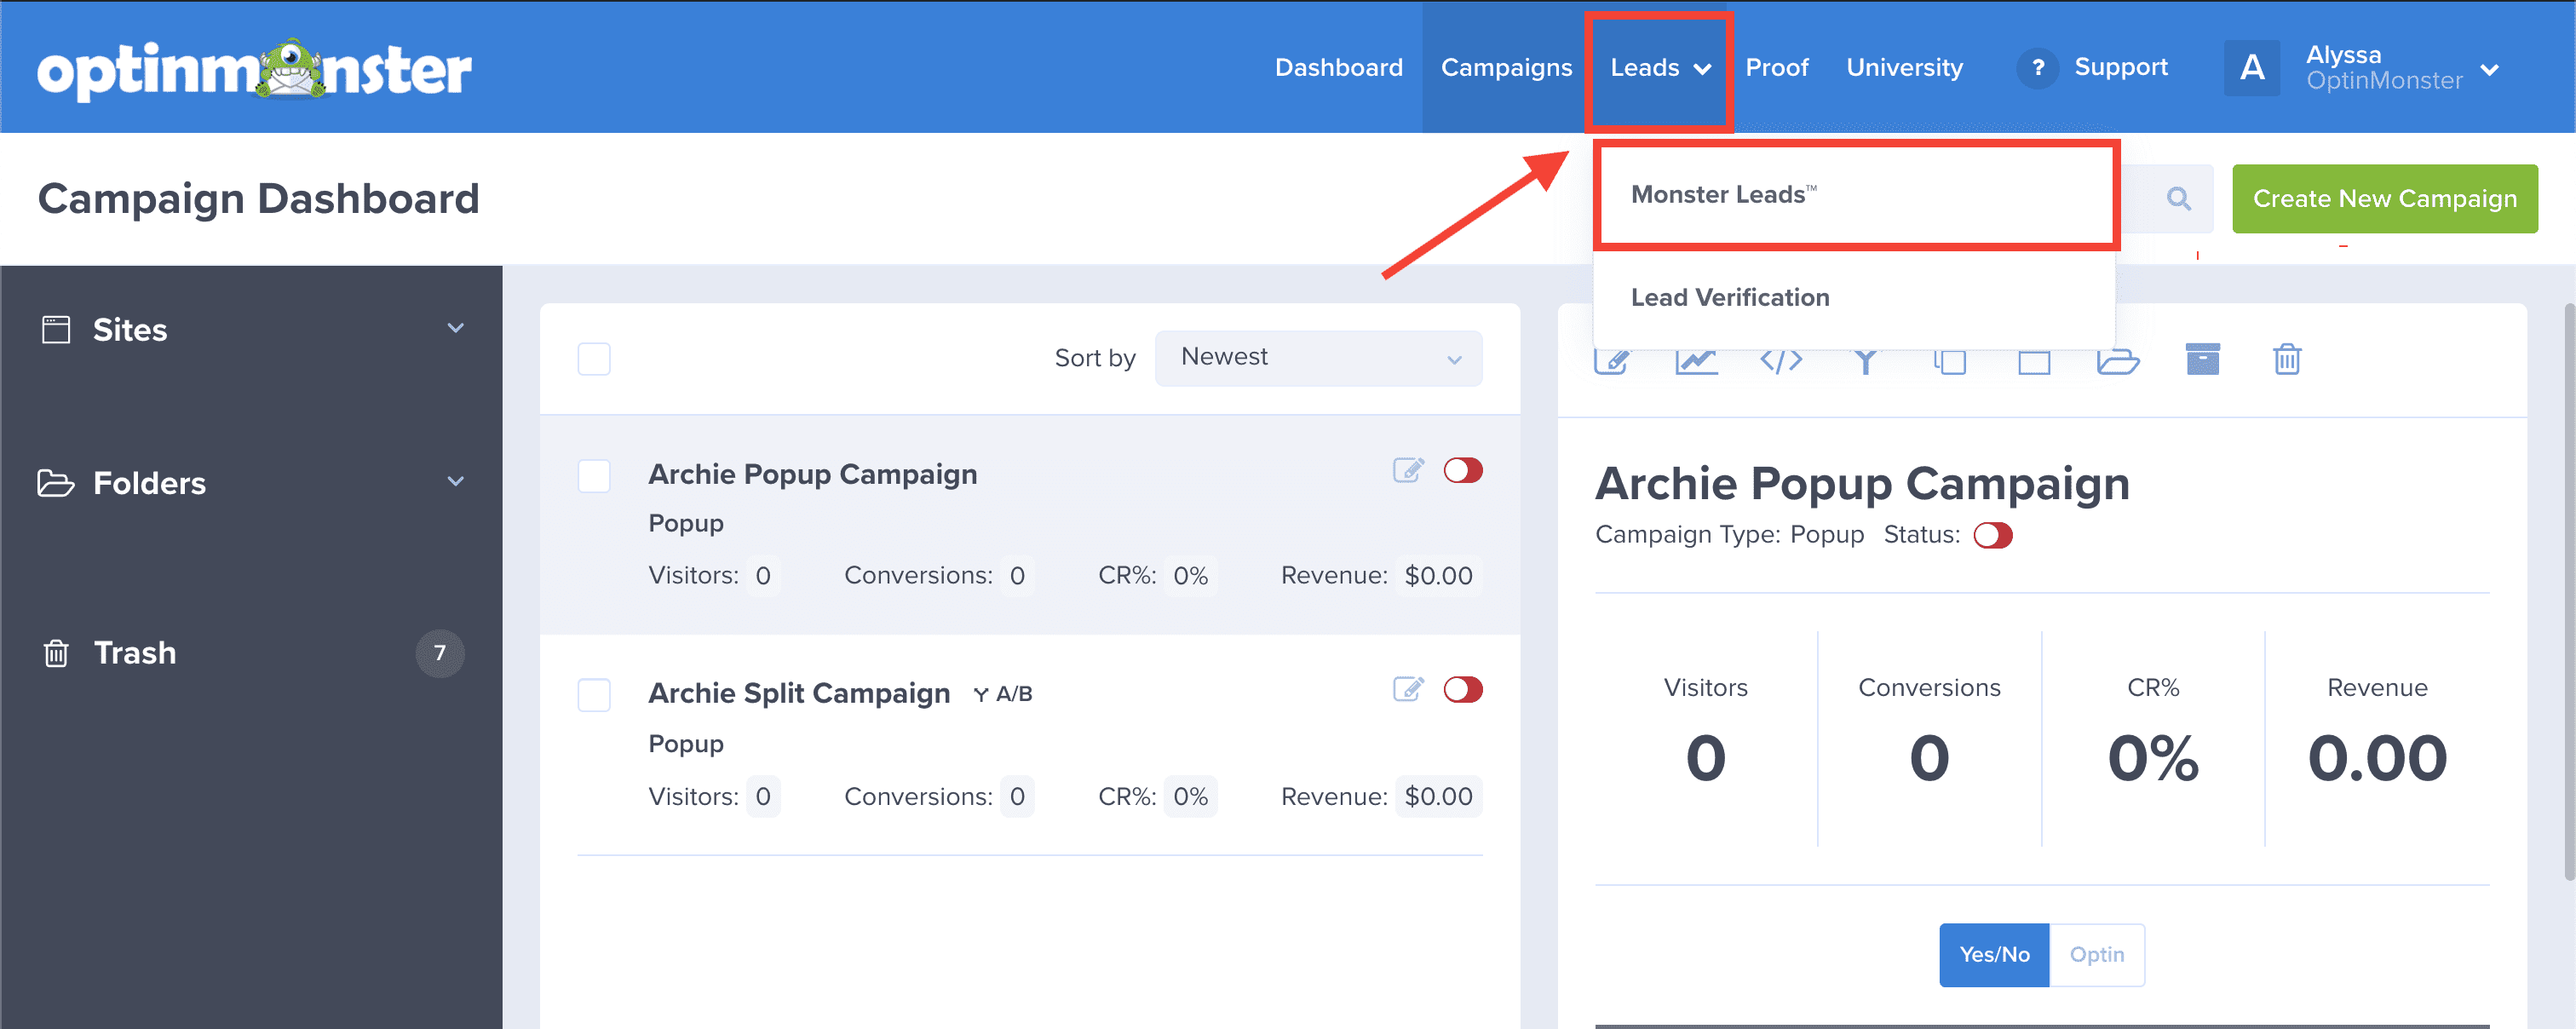
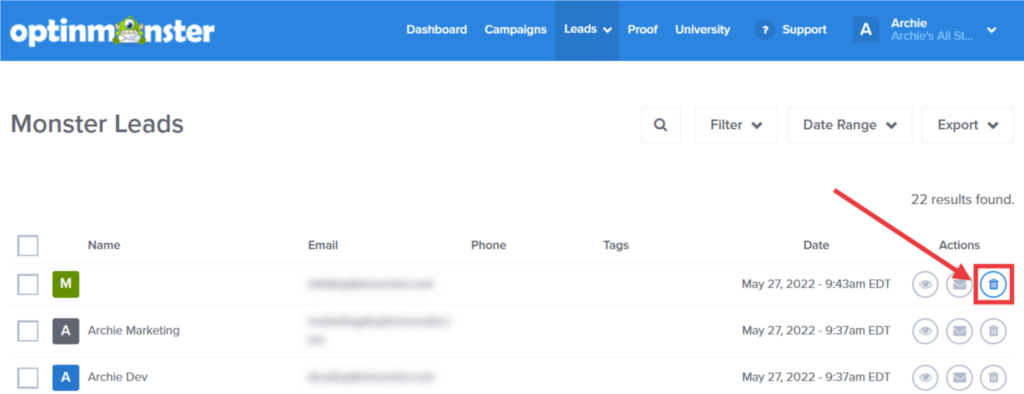
- To view your leads in OptinMonster, navigate to the Leads > Monster Leads page.
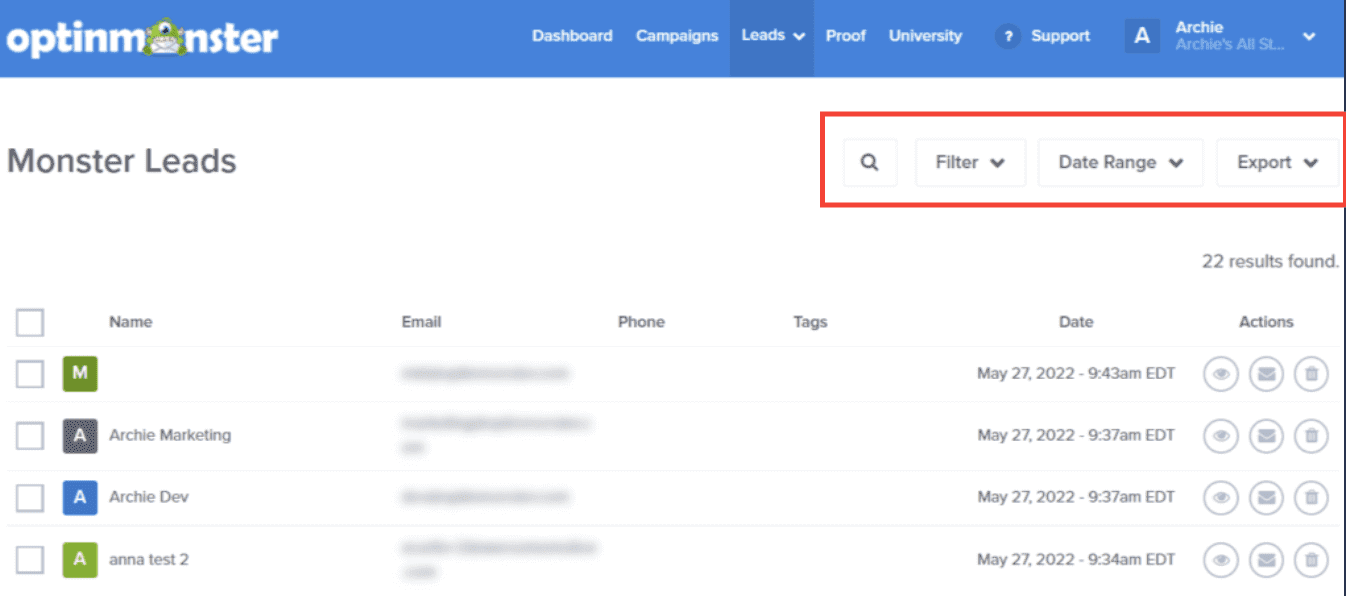
- You’ll now see a list of all leads. From this screen, you can view individual lead details, filter, and export your leads.
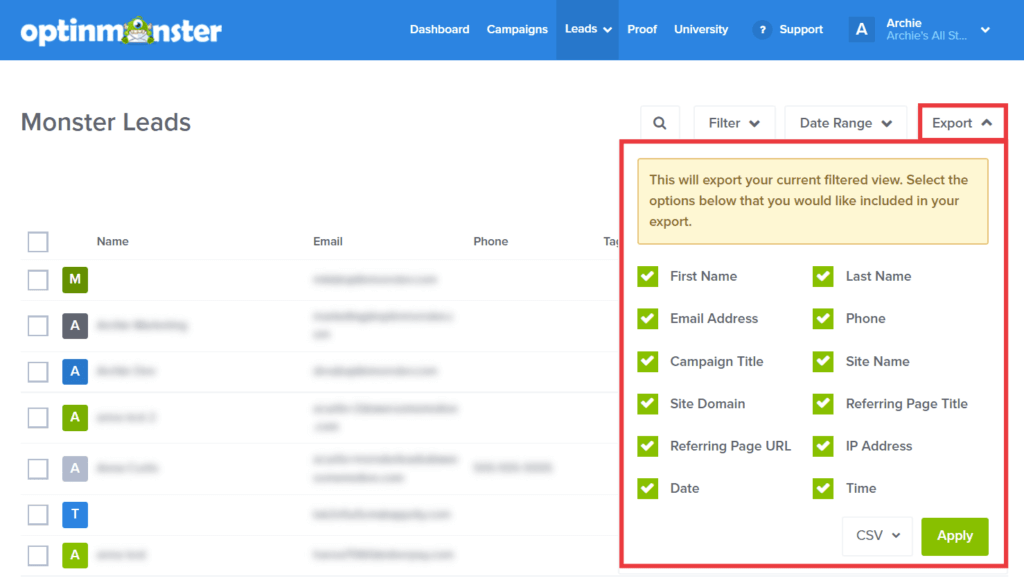
- To export leads from Monster Leads, click the Export dropdown. Here you can choose which data to export with your leads, and the file format of your export.
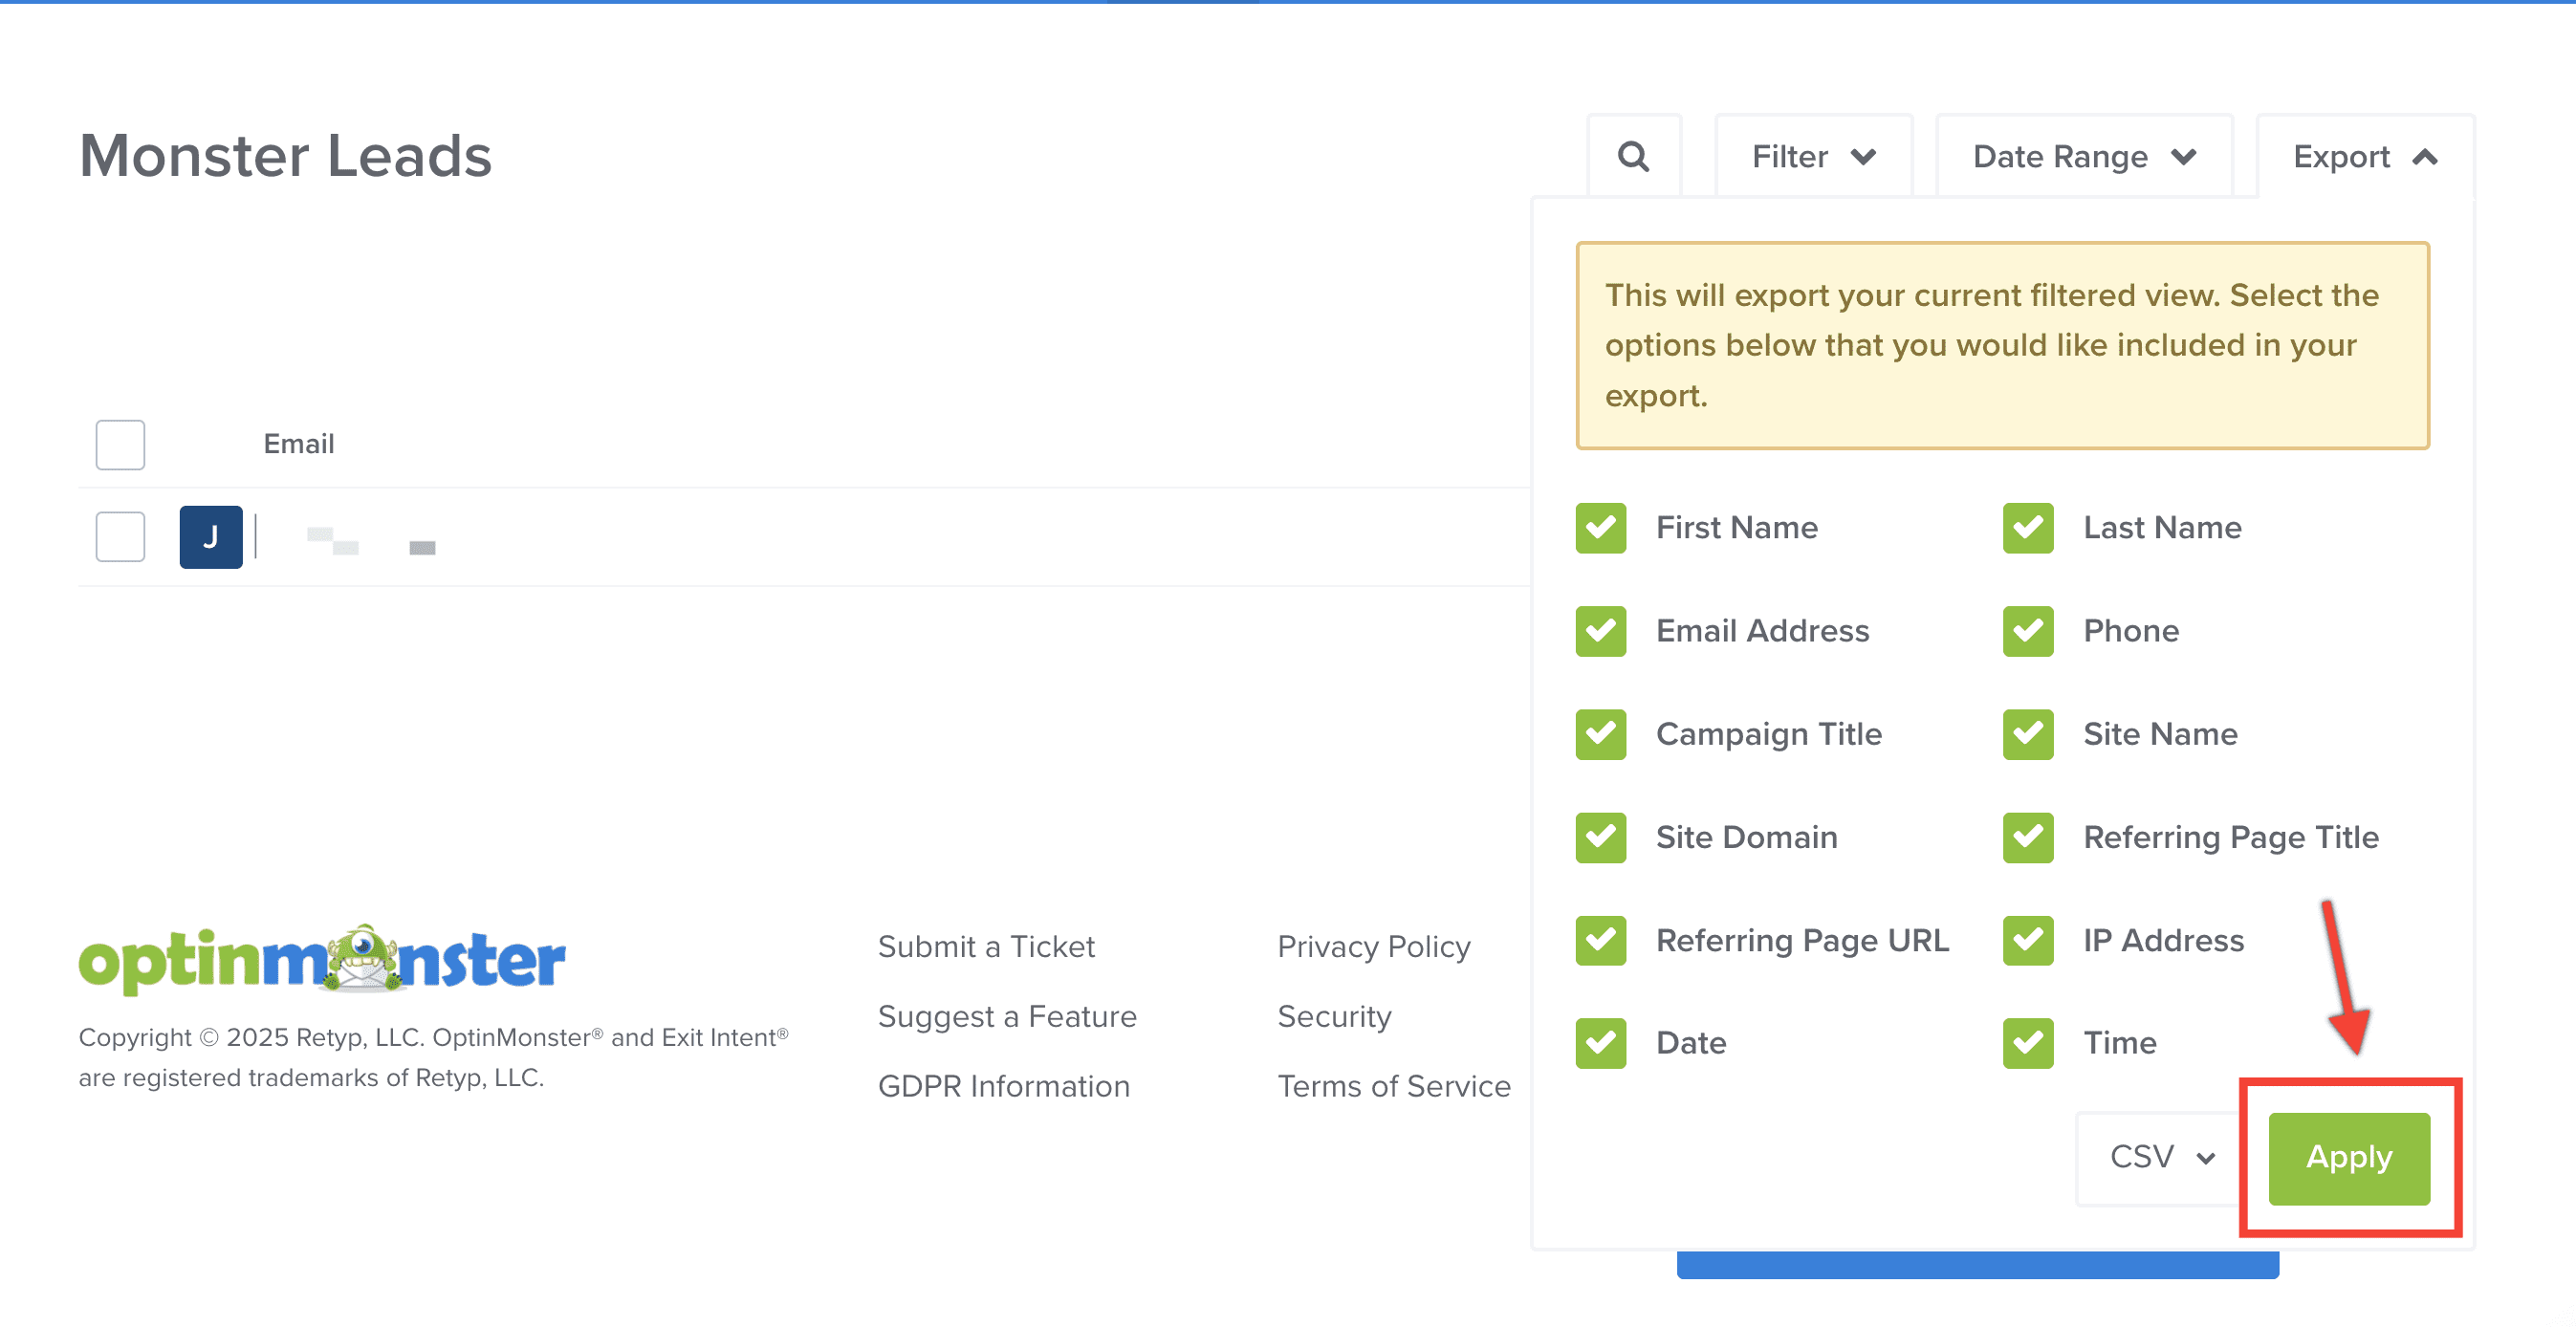
- When you’re ready to export, click the Apply button.
- Your export will be automatically downloaded.
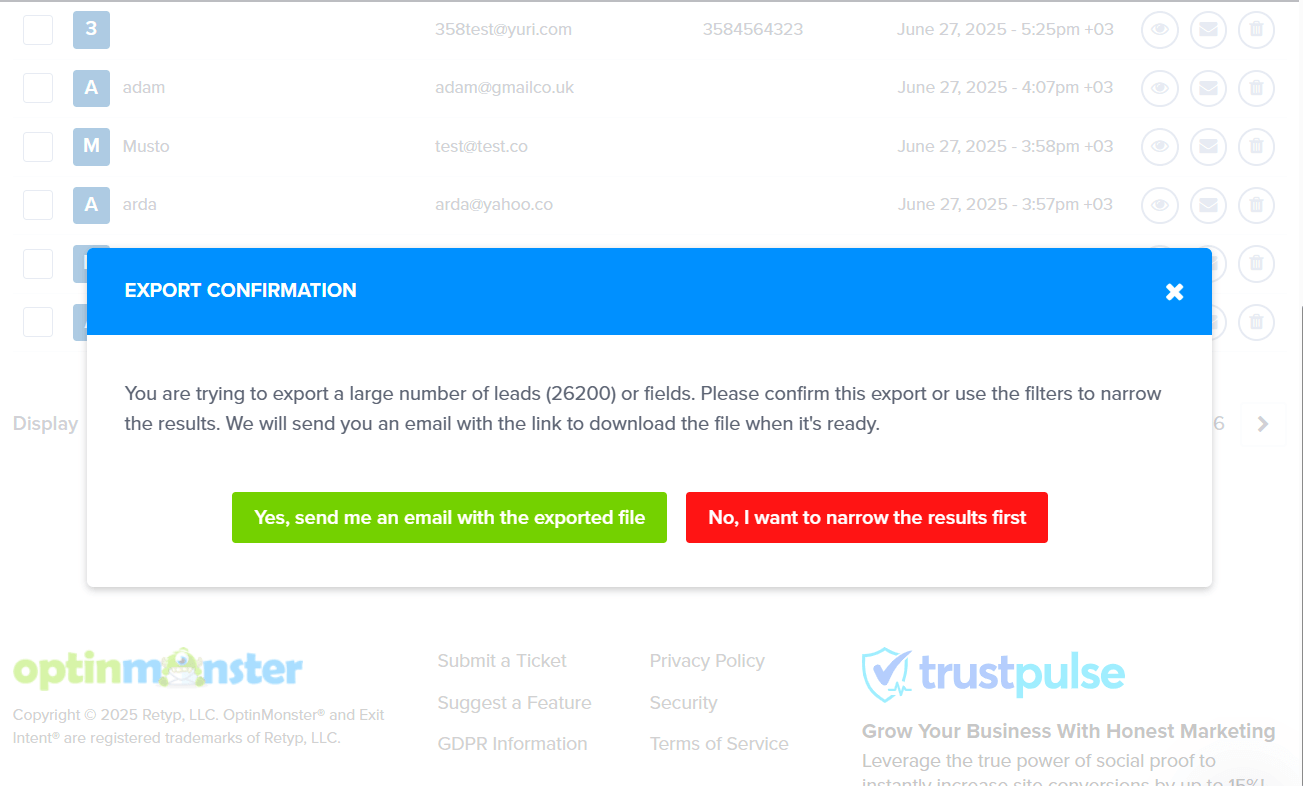
If you are exporting a very large list of leads (more than 25,000 at a time), instead of an instant download, you’ll see a small window pop up with two choices:
No, I want to narrow the results first: Clicking this lets you add more filters to your search. This helps you shrink the list so you can download it right away.
Please note that even if you add additional filters, you won’t be able to export the leads immediately unless the total count is 25,000 or fewer. Otherwise, this modal will continue to appear.
Yes, send me an email with the exported file: If you click this, we’ll prepare your export file in the background and send you an email with a secure download link as soon as it’s ready. This way, you don’t have to wait on the page!
If your export fails to download automatically, you may need to check your browser’s settings to be sure the browser isn’t blocking the file download.
WordPress Plugin
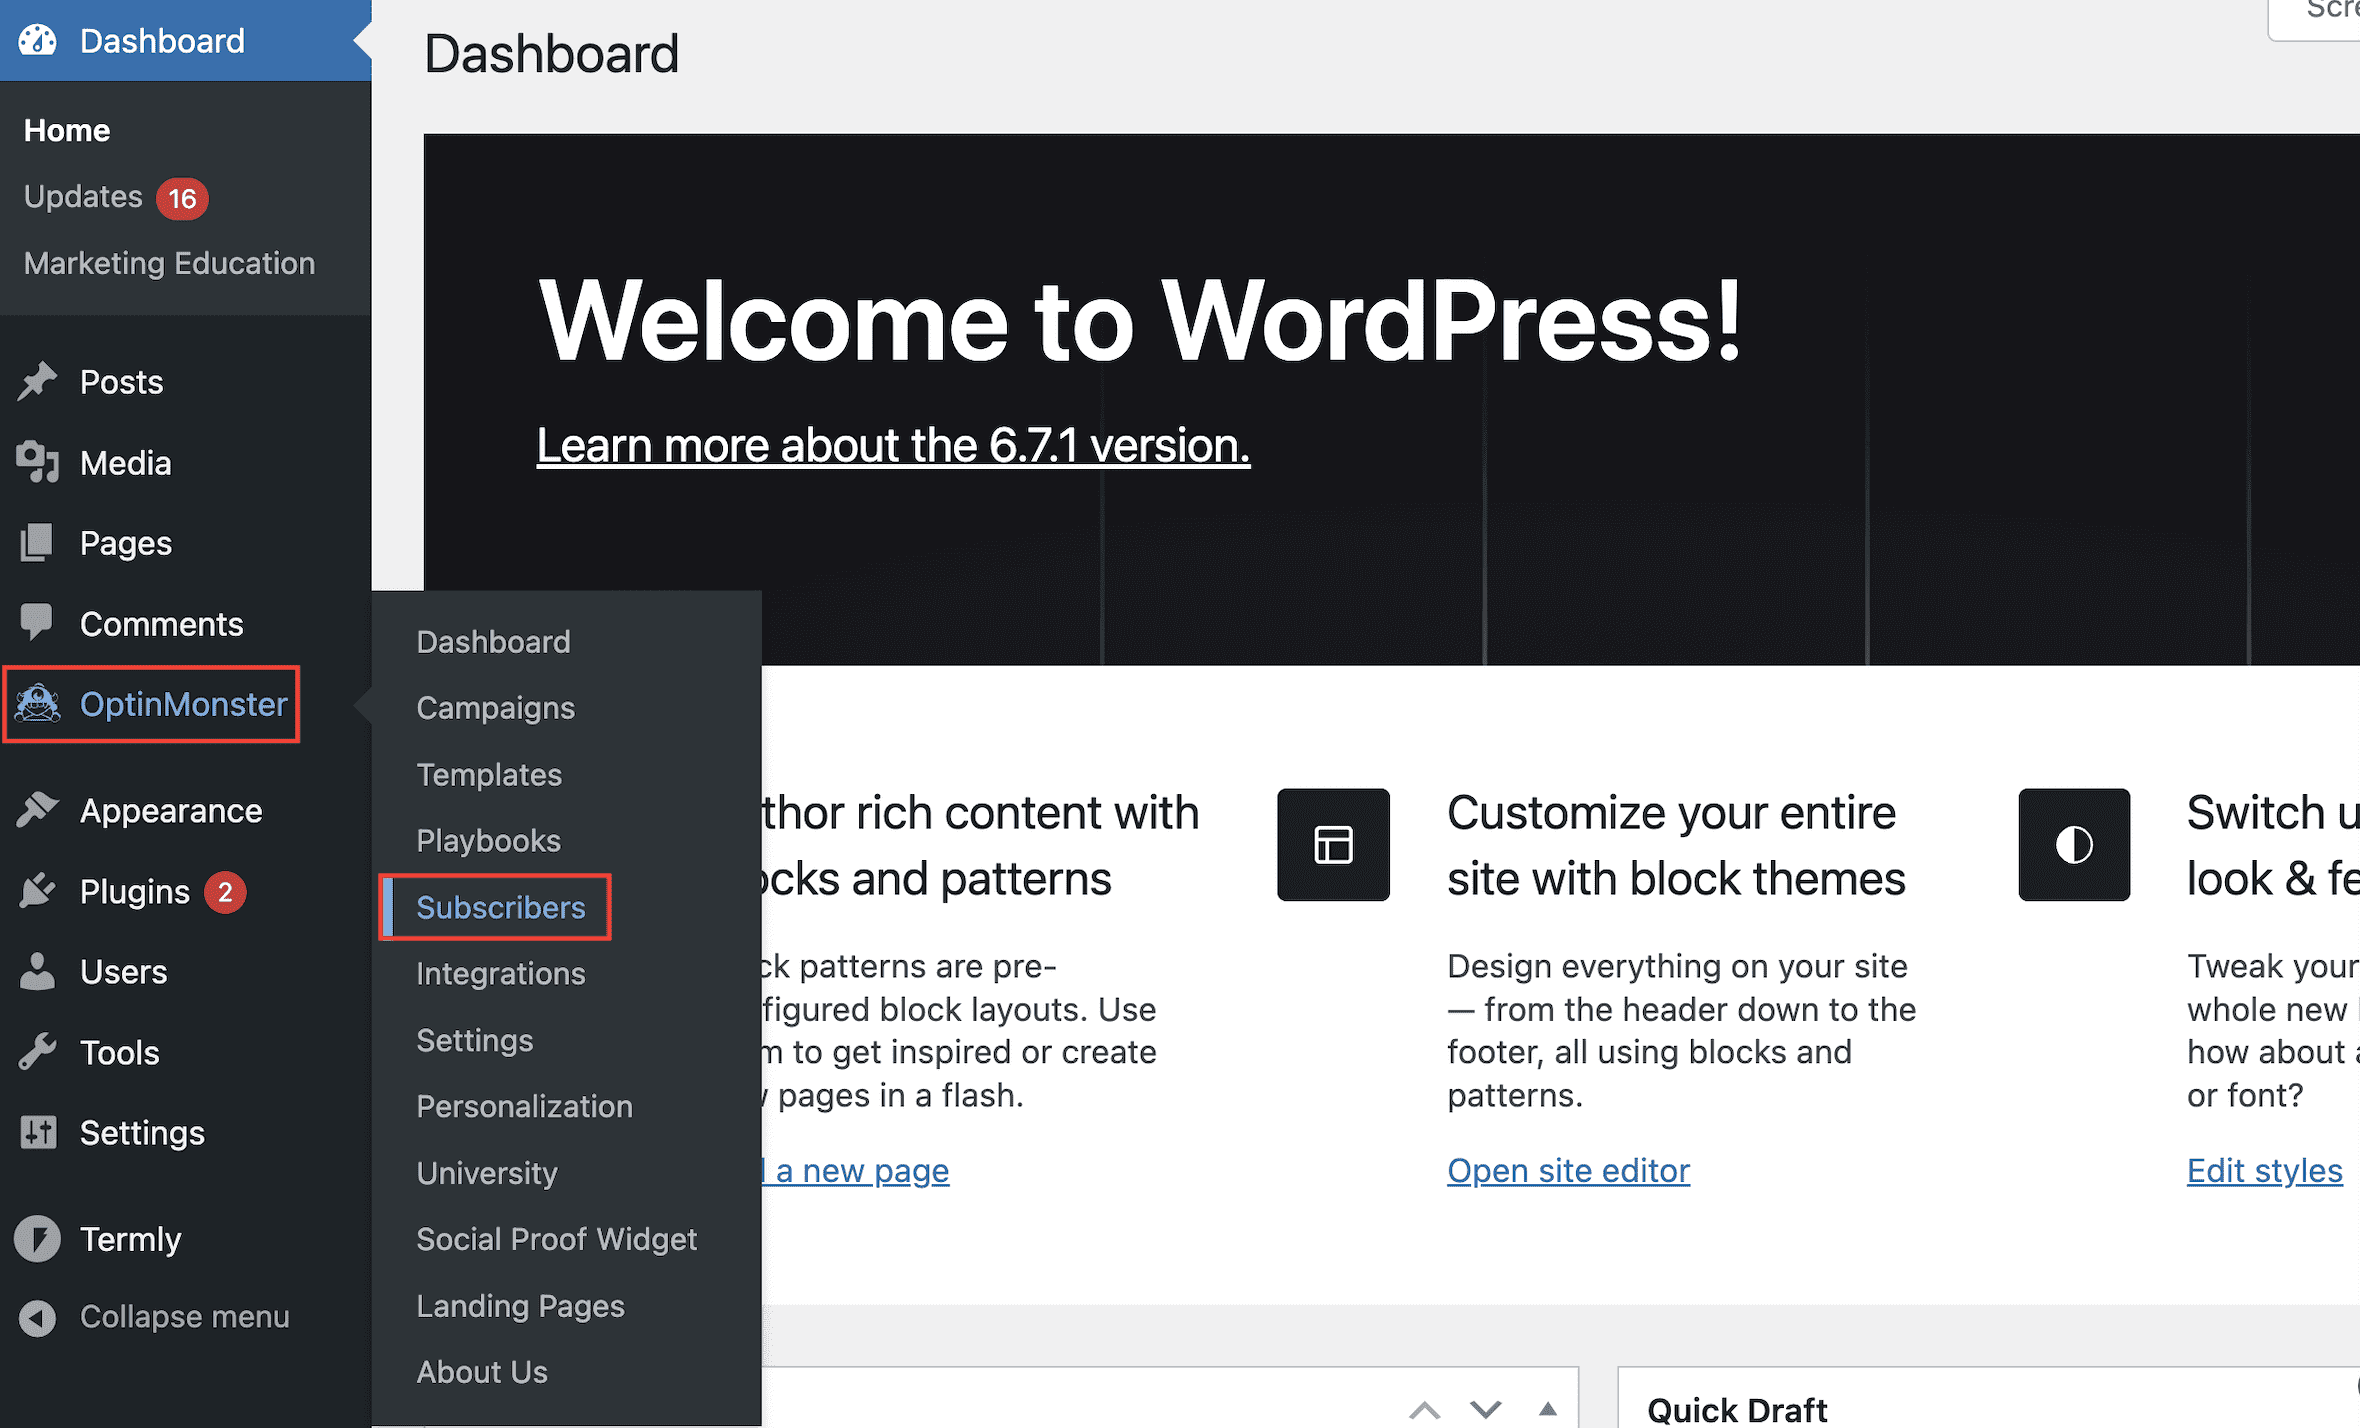
- To view your leads in the OptinMonster WordPress Plugin, first navigate to the OptinMonster > Subscribers page from the side panel menu.
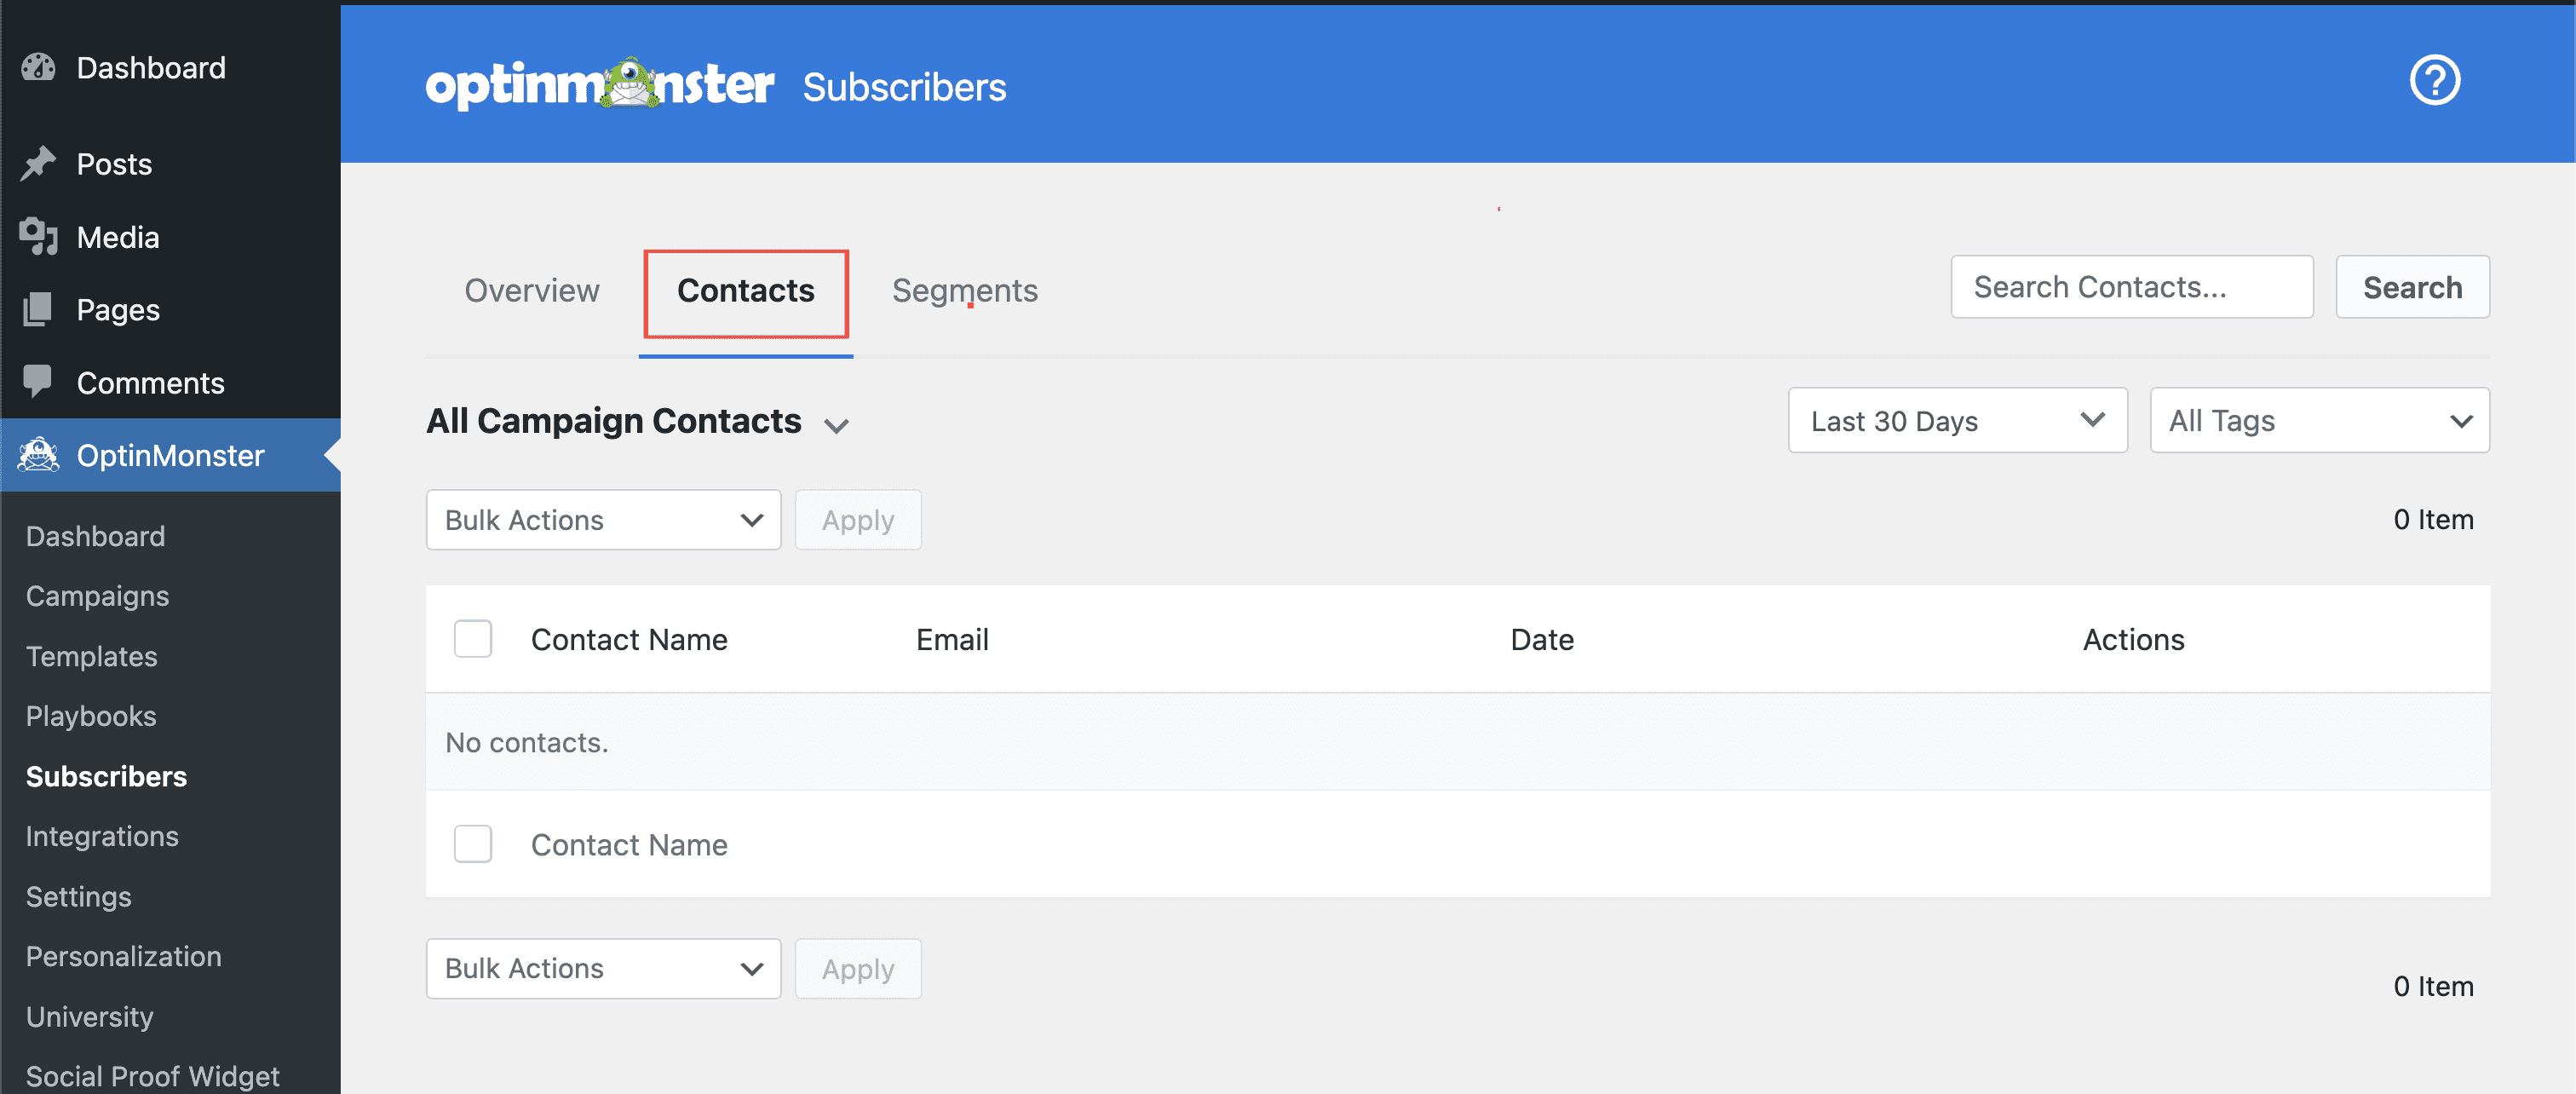
- From this page, click Contacts and now you’ll see a list of all leads. Now, you can view individual lead details, filter, and export your leads.
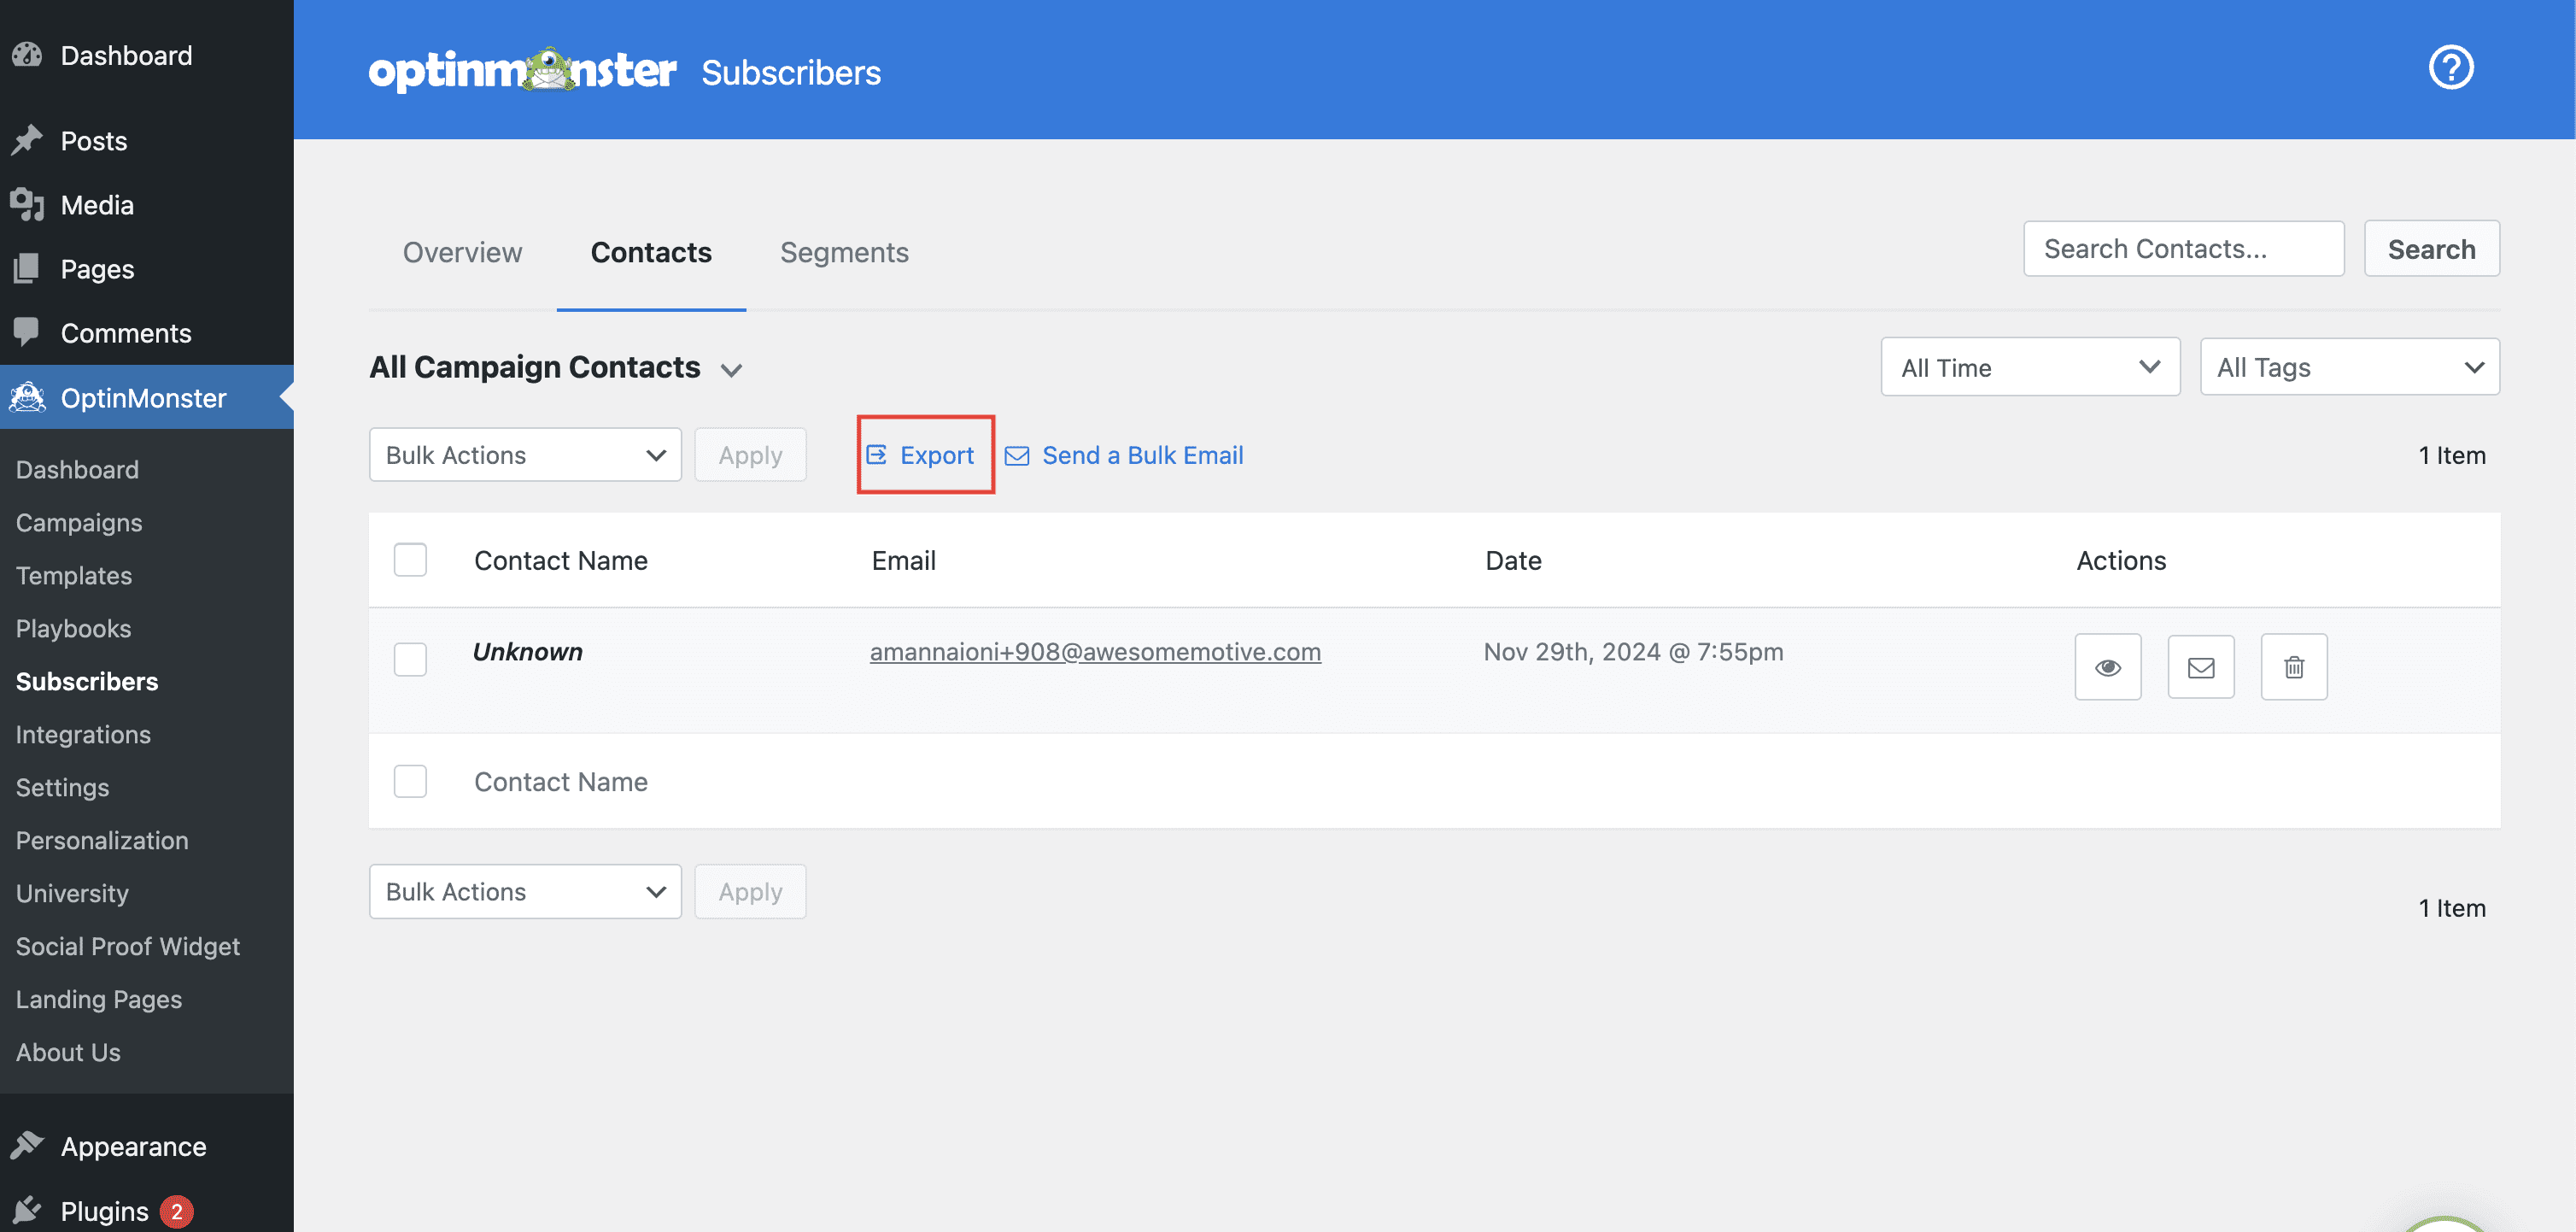
- Click Export to export your leads
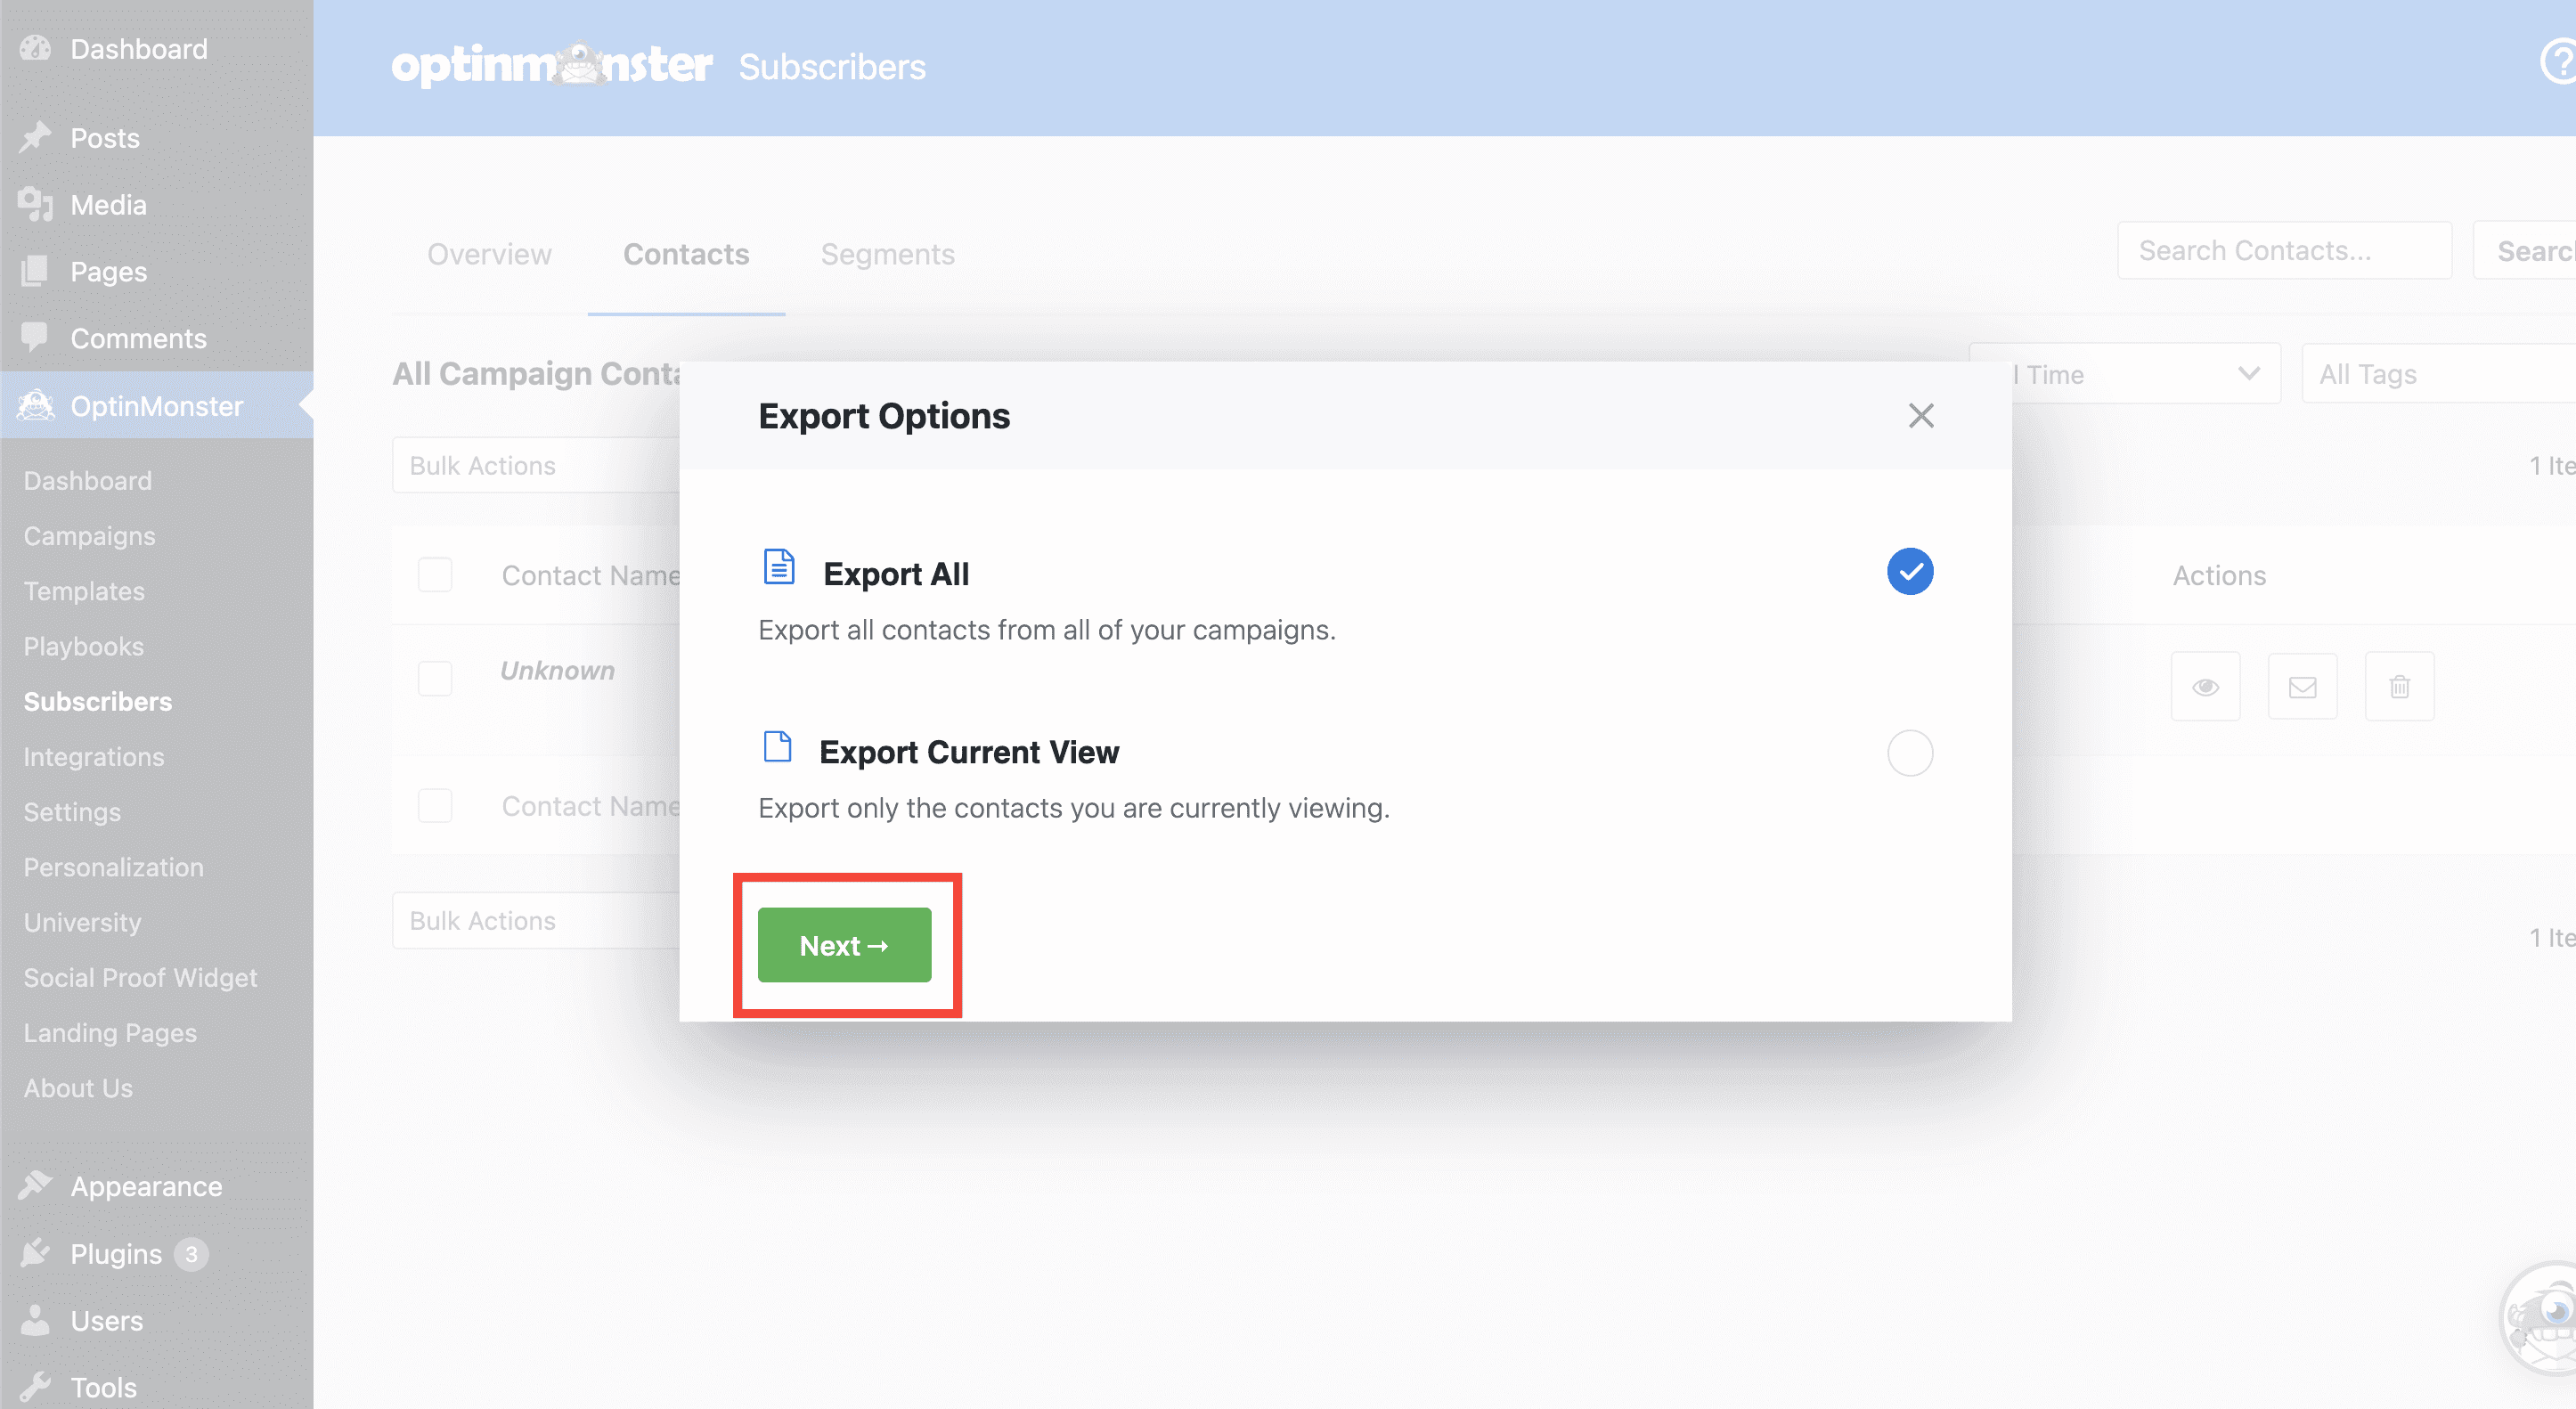
- Choose to export all of your leads or the leads you have selected and click Next.
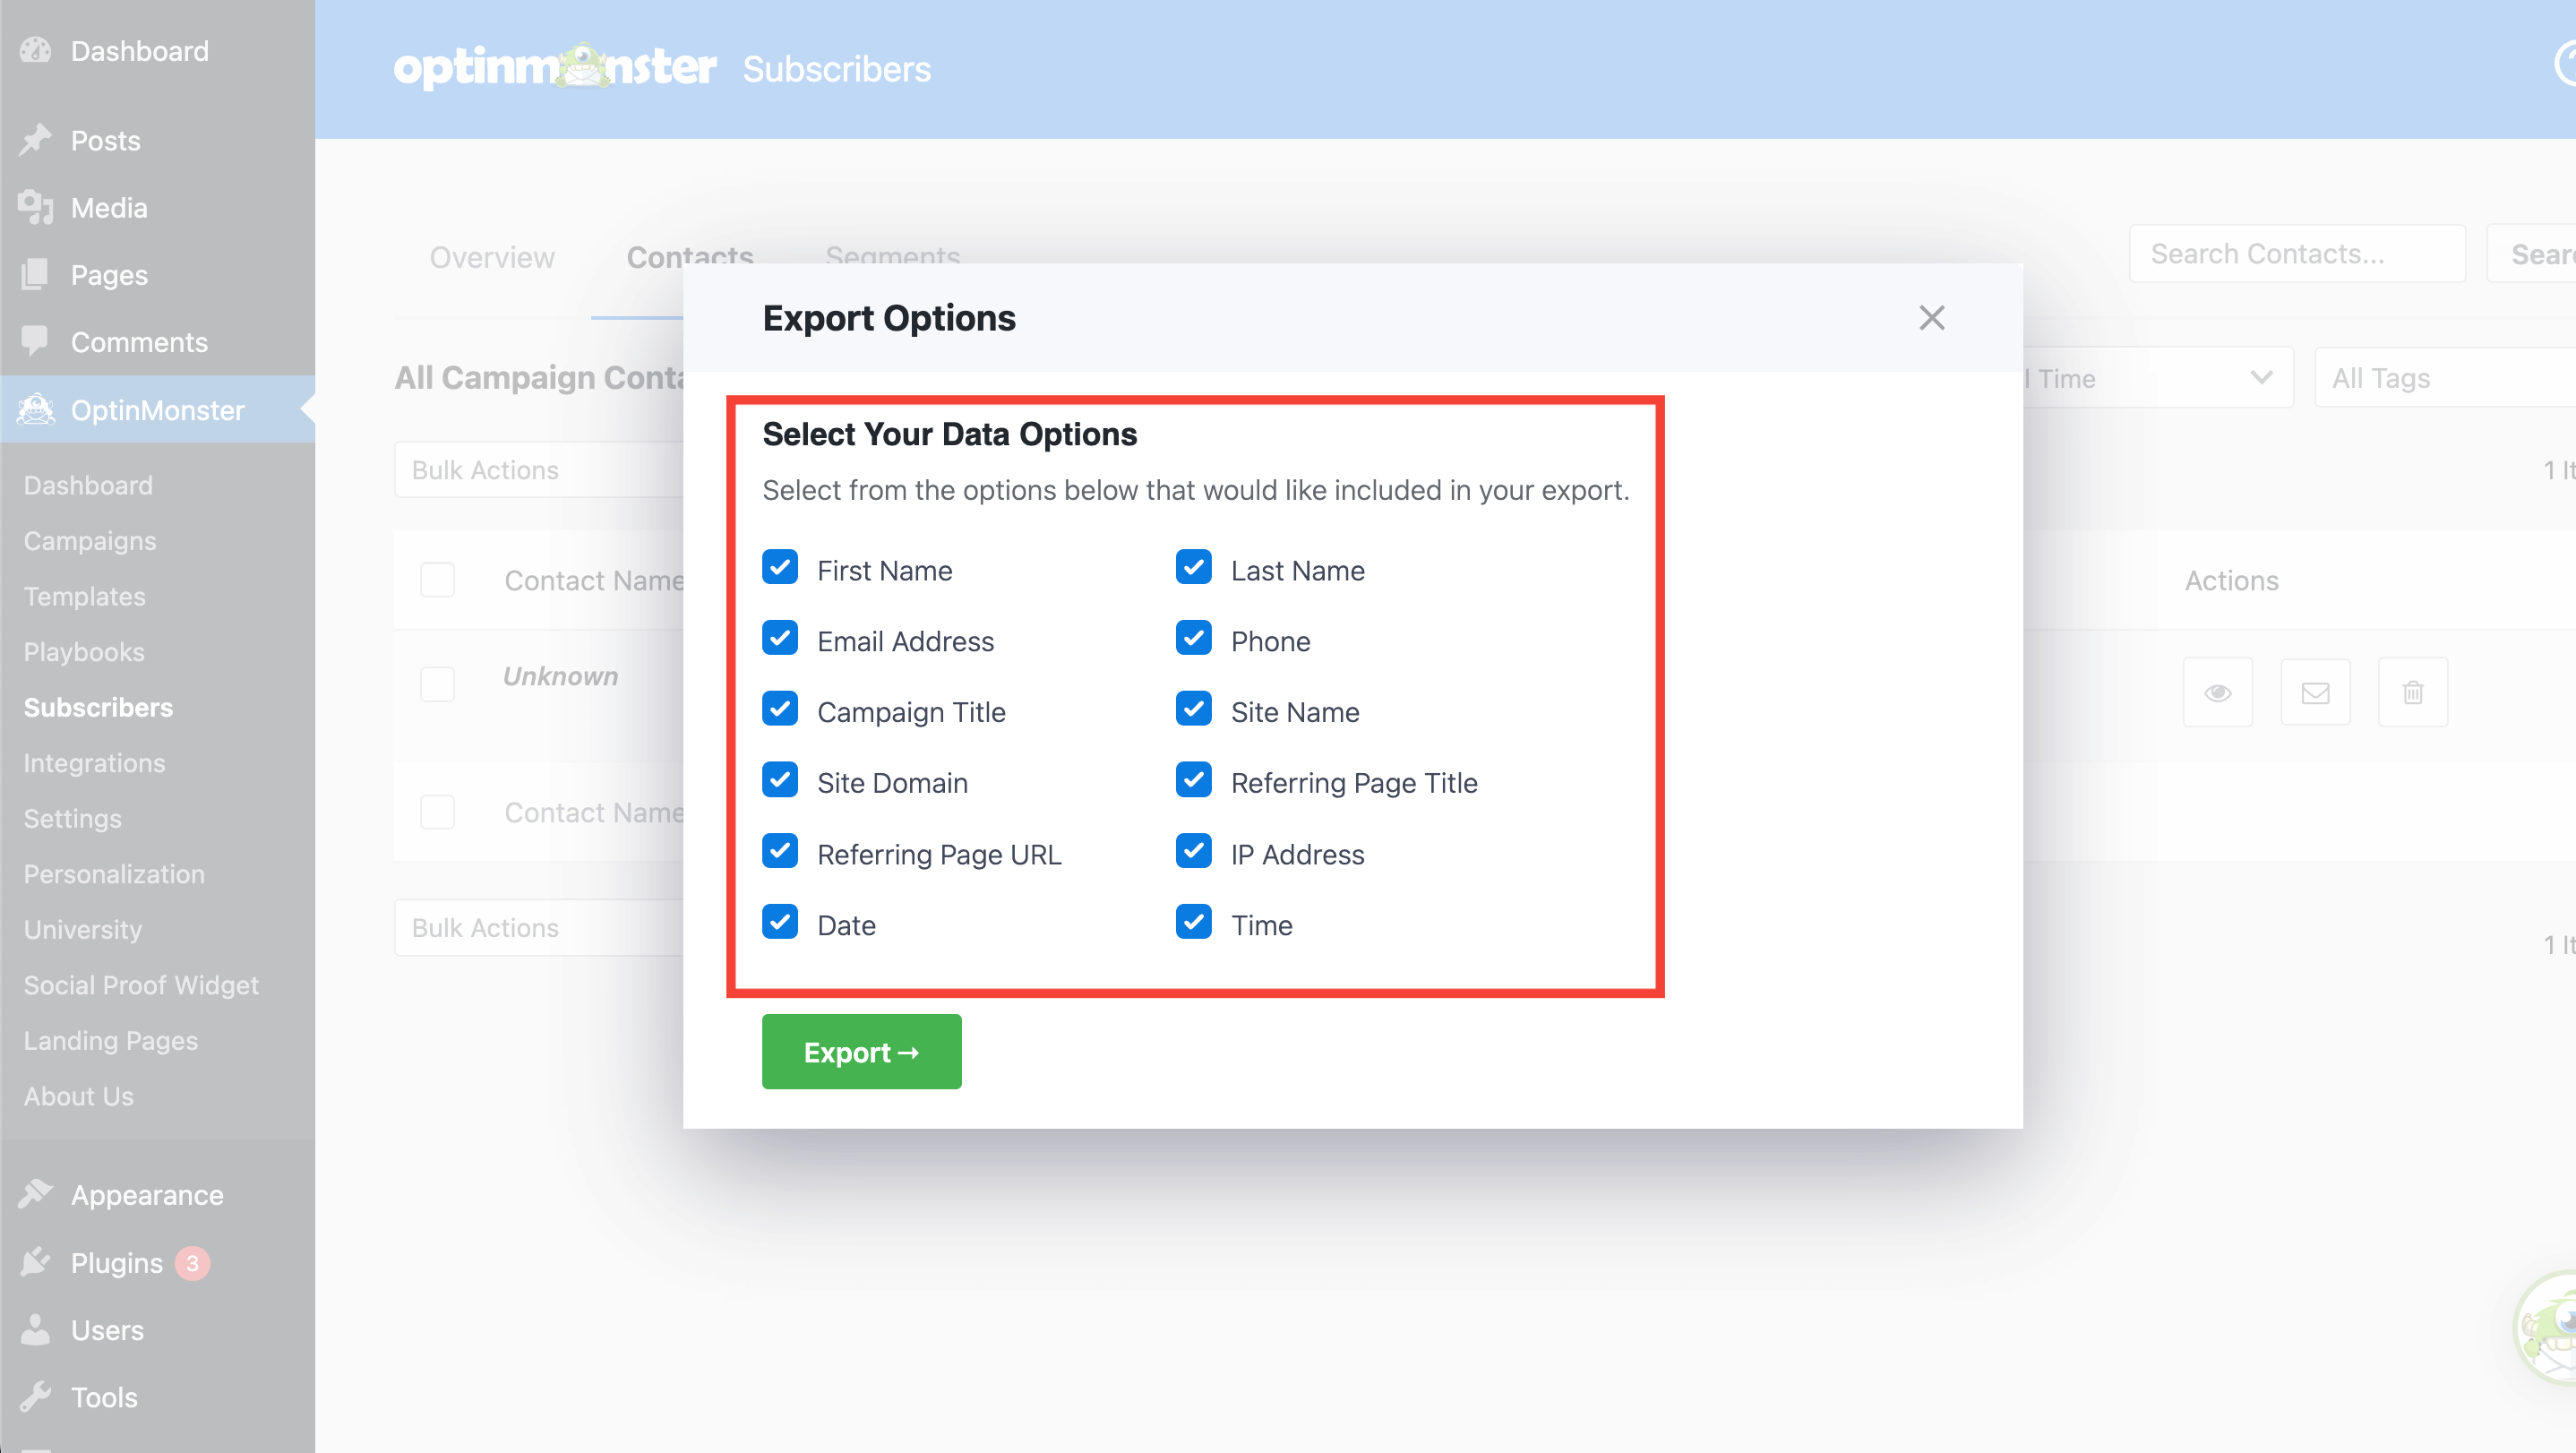
- Filter what data you would like to be exported.
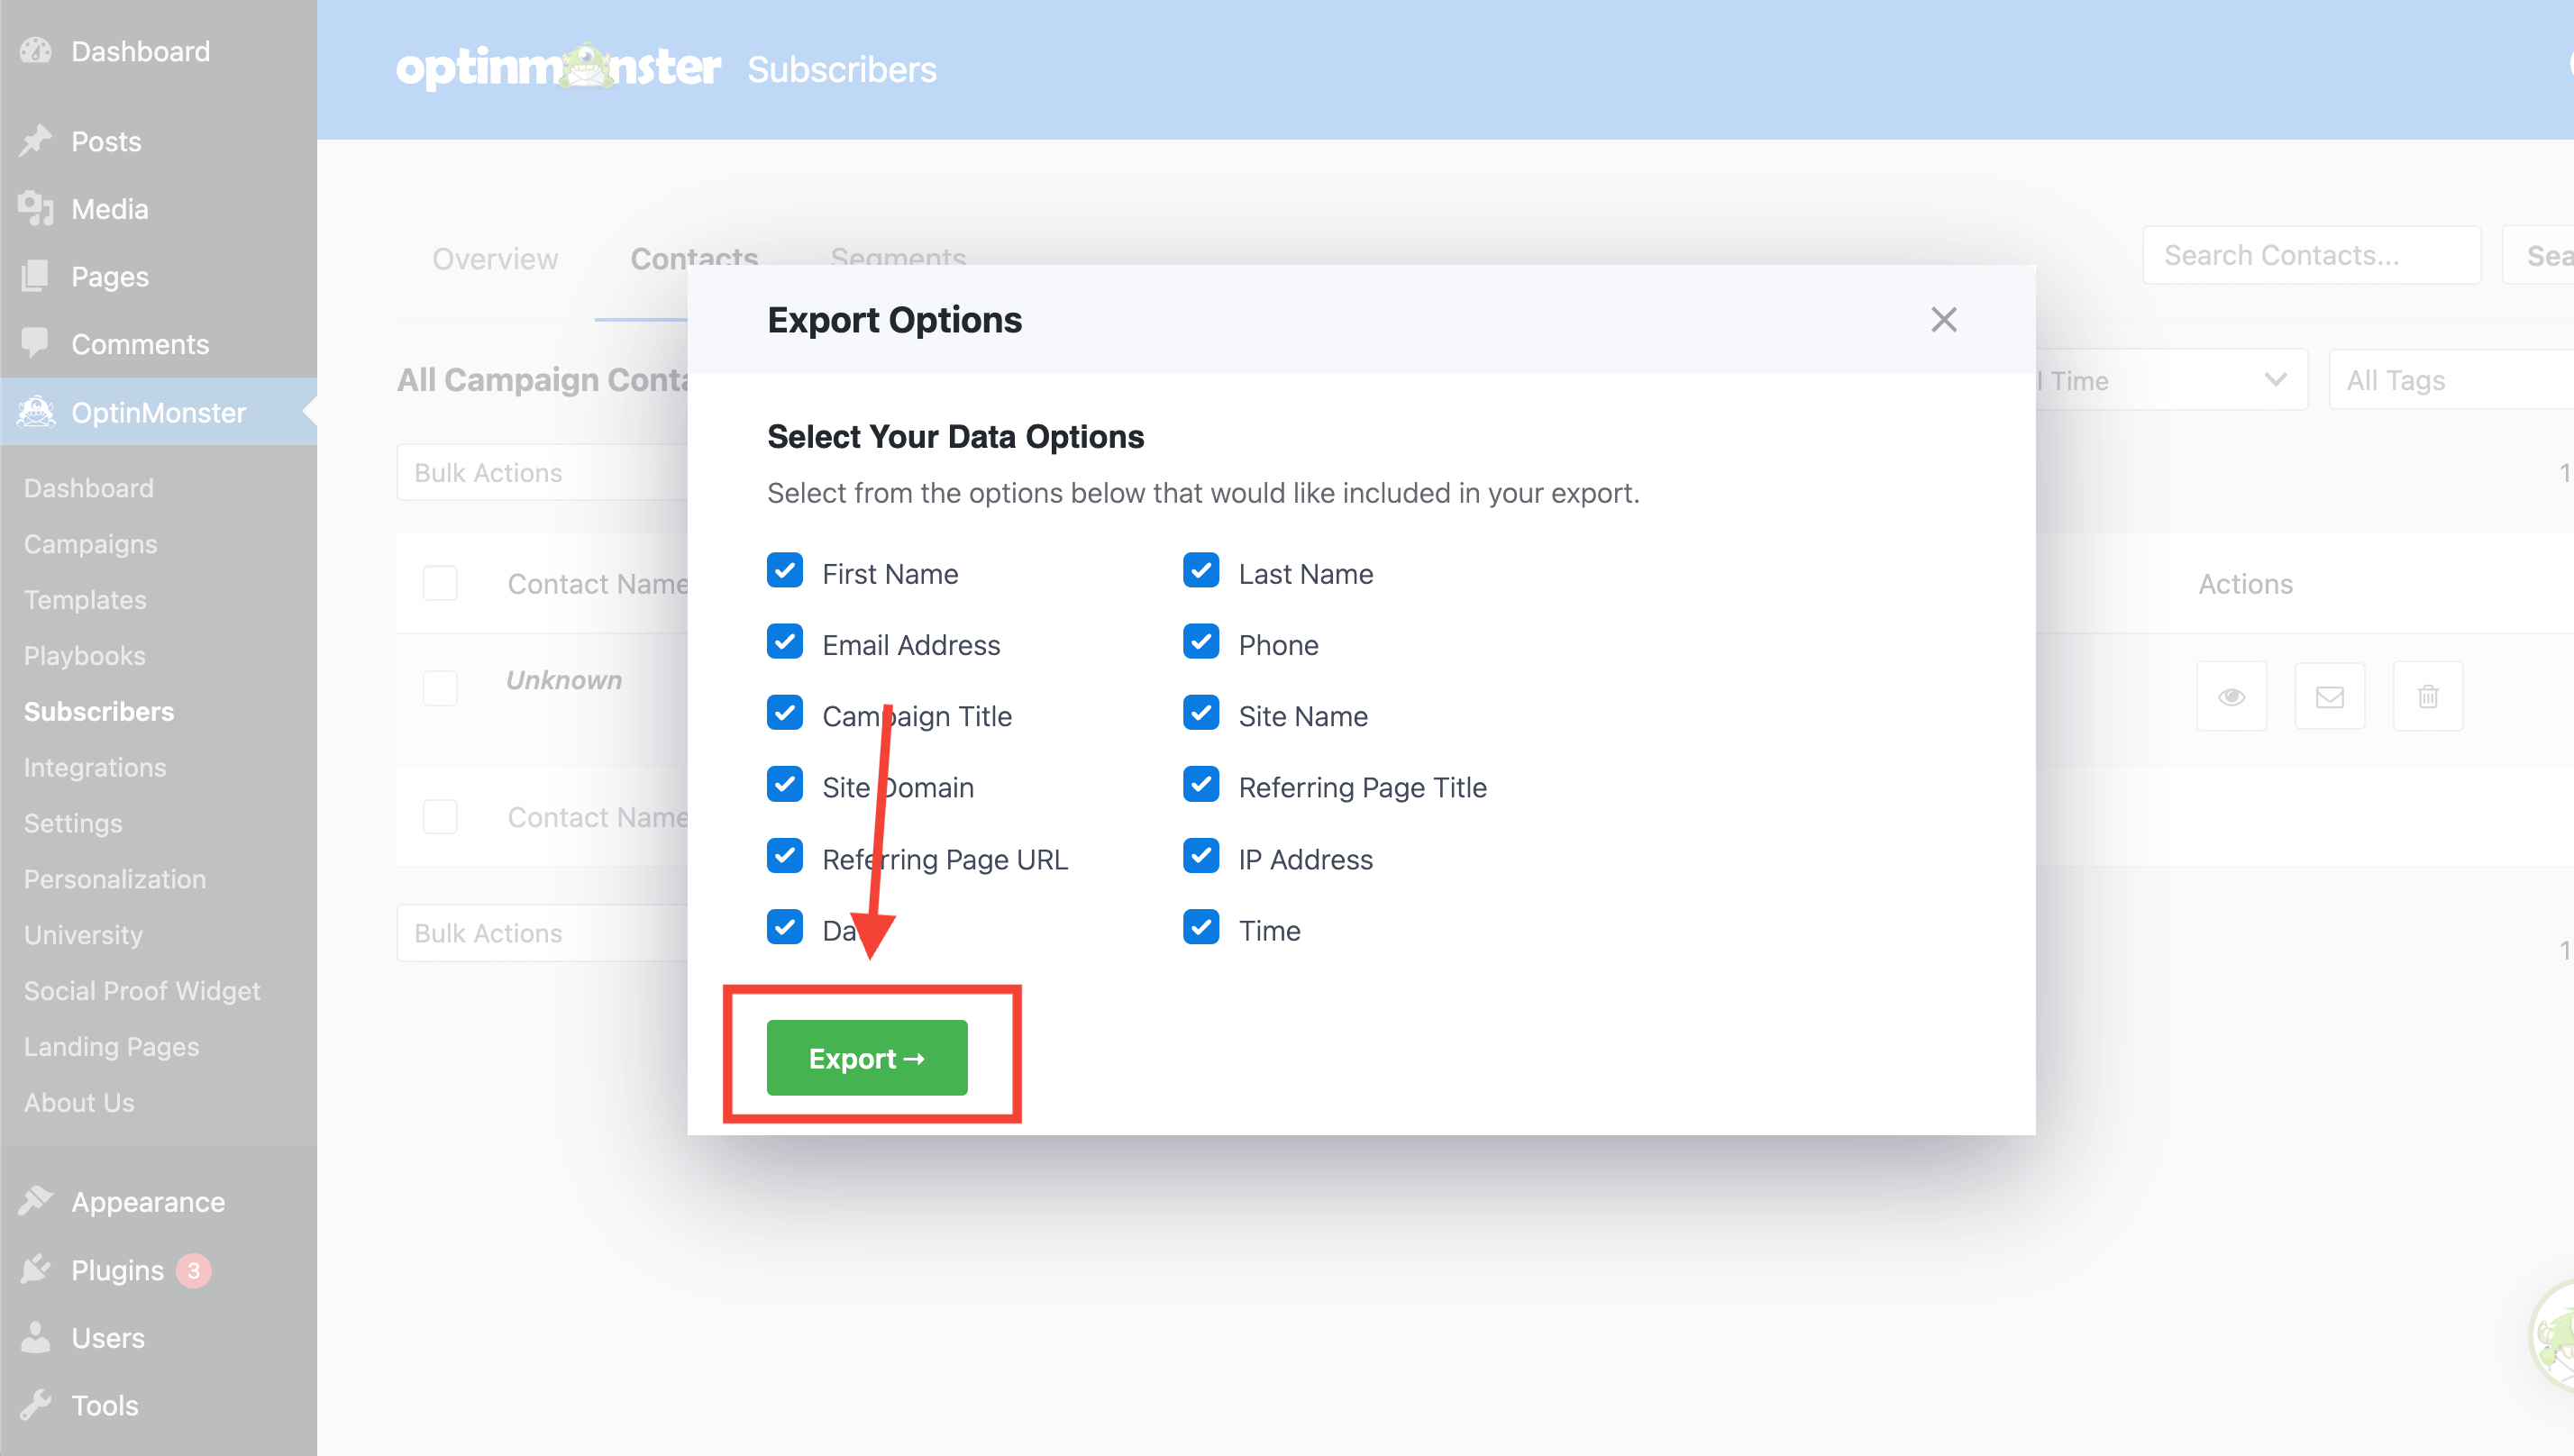
- When you’re ready to export, click the Export button.
- Your leads will be automatically downloaded.
If you are exporting a very large list of leads (more than 25,000 at a time), instead of an instant download, you’ll see a small window pop up with two choices:
No, I want to narrow the results first: Clicking this lets you add more filters to your search. This helps you shrink the list so you can download it right away.
Please note that even if you add additional filters, you won’t be able to export the leads immediately unless the total count is 25,000 or fewer. Otherwise, this modal will continue to appear.
Yes, send me an email with the exported file: If you click this, we’ll prepare your export file in the background and send you an email with a secure download link as soon as it’s ready. This way, you don’t have to wait on the page!
If your export fails to download automatically, you may need to check your browser’s settings to be sure the browser isn’t blocking the file download.
Manage Lead Tags
All Monster Leads tags are managed directly through the campaign builder’s Integrations > Monster Leads view.
Follow the steps below to either add an existing tag, a new tag, or delete a tag.
Add Existing Tag
- To add an existing tag, click the Tags field and begin typing the name of the tag.
- Select the individual tag from the dropdown menu to apply the tag.
- Save your campaign after to apply the change.
Add New Tag
- To add a new tag, click the Tags field and type the full name of the new tag to be added.
- When you are finished, type the Enter key to apply the tag.
- Save your campaign after to apply the change.
Delete Tag
- To delete a tag, select the x icon next to the added tag in the Tags field.
- Save your campaign after to apply the change.
At this time it is not possible to permanently delete any tag from your OptinMonster account, or to rename an existing tag.
GDPR
What country are your servers located in?
The Monster Leads servers are located in the United States.
How can I manually delete leads permanently from Monster Leads?
To delete leads permanently from Monster Leads, follow these steps:
- Navigate to the Leads page of your OptinMonster account.
- Locate the lead record you would like to delete.
- Select the trash icon from the Actions column to delete the lead.
How can I disable the storage of IP Addresses?
When configuring your Monster Leads integration in the campaign builder following the Connect Monster Leads section above.
FAQs
How do I configure single or double opt-in?
Double opt-in is not available for Monster Leads at this time.
Is it possible for me to add a phone field to my campaign?
Yes! You can add a phone field. Learn how to capture phone numbers with OptinMonster.
How can I make Monster Leads the default integration for my OptinMonster account?
To use Monster Leads as the default integration, follow these steps:
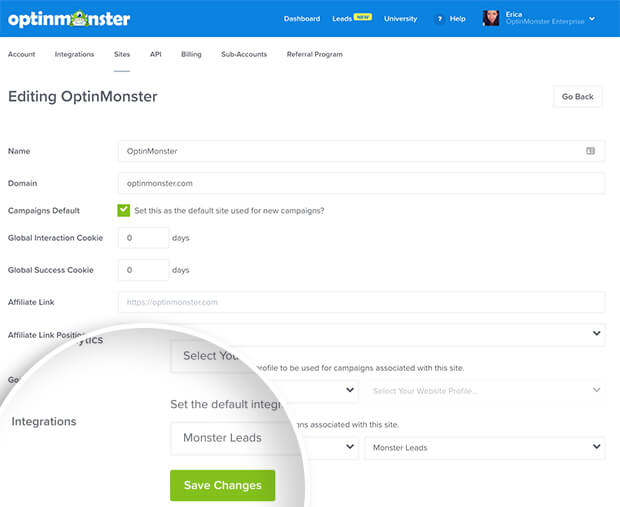
- Navigate to Account > Sites to manage your sites.
- Select the site you wish to edit.
- Search for and select Monster Leads from the Integrations dropdown field, then select Monster Leads from the Account dropdown field.
- When you’re finished, Save Changes.
All new campaigns associated with that domain will now automatically integrate with Monster Leads by default.
Does OptinMonster collect lead data without MonsterLeads connected?
If you have connected your campaign to any of our third-party integrations, leads are passed directly to that platform. OptinMonster will only directly capture and store leads if you have integrated your campaign with Monster Leads, our internal lead storage.
Can notifications be sent to multiple email addresses?
Yes! You can add as many email addresses as you’d like to receive lead notifications.
How many leads can Monster Leads store?
There is no limit to the amount of leads that can be stored within Monster Leads!
How quickly are leads sent to Monster Leads? Is there a delay?
There is no delay. Lead submissions are sent to Monster Leads in real time. OptinMonster will not perform the Button Action (like showing a success view or redirecting the user) until we get a confirmation that the submission was successfully received.
Even if your campaign is integrated with multiple Email Service Providers (ESPs) at the same time, OptinMonster sends the lead data to all connected integrations simultaneously, without delay.
Why doesn’t my conversion count match the number of leads in Monster Leads?
It is normal for these numbers to differ. There are some reasons for a discrepancy between the conversion count in OptinMonster and the lead count in Monster Leads:
- Existing Subscribers: OptinMonster records a conversion each time a form is successfully submitted, provided that conversion tracking is enabled on the submit button. However, if an existing subscriber fills out your form again, Monster Leads will not create a new entry, but instead update the existing lead record.
- Tracking on Other Elements: Conversions can be tracked on various elements, not just the form submission button. For example, if you have conversion tracking enabled on an image link and a visitor selects it but does not fill out the form, OptinMonster will still count a conversion. This increases your conversion count without a lead being submitted.
- Lead Filtering: When a user signs up with a disposable email address or is flagged as suspicious, the campaign will still record a conversion (form submission), but Monster Leads may reject or filter out the lead.
The conversion count doesn’t match the number of leads in Monster Leads. Which one should I rely on for an accurate lead count?
For the total number of form submissions, use the conversions count. For a count of valid, unique, and saved leads, refer to the Monster Leads count. It provides a clearer view of leads that are actually usable.
My campaign is connected to both Monster Leads and another integration. If a conversion appears in Monster Leads, does that mean the lead was successfully sent to other integration?
Not necessarily. Monster Leads acts independently of your other integration. It captures leads regardless of your other integration connection status. You’ll need to check your other integration separately to ensure leads are flowing there.
Troubleshooting
The campaign is capturing leads but shows 0 conversions in analytics.
Confirm that conversion tracking is turned on for the submit button in your campaign. See our guide on How to Enable Conversion Tracking.

