
OptinMonster offers seamless integration with HubSpot email marketing service. Connecting OptinMonster to your HubSpot email list is very easy.
In this article, you’ll learn how to connect HubSpot with OptinMonster.
Before you start, this integration is available with a Pro and higher subscription.
All subscription plans can add custom forms using the Form Embed block.
As a best practice, we recommend you also connect your campaigns to Monster Leads as a backup.
Adding a custom HubSpot form to your campaign? Follow our guide here
Connect HubSpot
When you create a campaign in OptinMonster that you intend to collect leads with you’ll want to integrate with one or more services to send those leads to.
To send leads to HubSpot, follow these steps:
- Navigate to the Integrations view in the campaign builder, search for and select HubSpot.

- Next, select the Register HubSpot button at the top of the integration section to begin authorization.

- A new window will open requesting you login to your HubSpot account. Once logged in, select the HubSpot Account you wish to connect with OptinMonster and click the Choose Account button to authorize the connection between OptinMonster and your HubSpot account.

- Return to the OptinMonster campaign builder, enter a HubSpot Account Name (*internal use only), then select the Connect to HubSpot button.

*The HubSpot Account Name can be anything that helps you identify the specific integration within OptinMonster. It’s possible to add more than one HubSpot integration to your account and this is an easy way to differentiate between them when assigning integrations to individual campaigns. - Required: Once the HubSpot integration has been connected select the HubSpot *List you wish to send leads to from the Email Provider Lists field.

*Only Static Lists will be available to choose from. Active Lists cannot be selected. If no Lists are available to select be sure you’ve created at least one Static List in your HubSpot account first following this guide. - Optional: You can also select an *Assigned Form to submit leads to.


Important Details About Assigned Form
The Assigned Form you select must contain the same fields as your OptinMonster campaign. If there is a mismatch of fields the submission will fail and leads will not be captured in HubSpot.
Also, leads will only be submitted to the assigned form if the hubspotutk cookie is set in the user’s browser. If the user has cookies blocked or disabled, they may not be submitted to the assigned form. Learn more about HubSpot Tracking Code in this guide.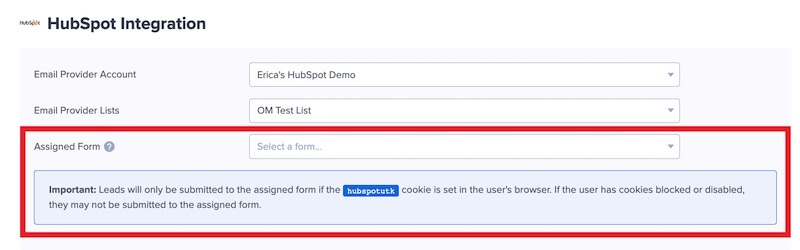
Assign Lead Source
We automatically create and pass the custom field campaign_lead_source which populates with OptinMonster when using our HubSpot integration.
To customize the lead source name, enable and configure Custom Branding for your OptinMonster account. The Brand Name you set will then be passed as the lead source.
To show this field when viewing HubSpot contacts, you’ll need to make the field visible following this guide.
Track Subscriber Events
Your HubSpot event tracking code can be added to individual OptinMonster campaigns using one of these options:
- Growth plan: Success Triggered Scripts
- All plans: use our Javascript Events API to determine which OptinMonster event to run the HubSpot event tracking code on, and add it to campaigns using our Custom Javascript Tool
Learn more about using HubSpot’s event tracking in these guides:
- Install the HubSpot Tracking Code
- Create manually tracked custom behavioral events
- Tracking code API overview
Add Extra Fields
Field Mapping
This integration supports Field Mapping, so you can easily add radio buttons, phone fields, text areas, number fields, lists, and more!
Before you begin using Field Mapping with HubSpot, please consider the following:
- Custom fields are referred to as Custom Properties in your HubSpot account.
- The following custom fields arereserved in HubSpot and cannot be mapped to:
campaign_lead_sourceom_campaign_nameom_coupon_code(the Coupon Code won when creating a Gamified spin-to-win campaign)om_coupon_label(the Coupon Label when creating a Gamified spin-to-win campaign)
- Custom field names must contain only lowercase letters, numbers, and underscores.
- Automatically created custom fields are added as text fields in HubSpot. This can be avoided by manually creating your custom fields in HubSpot before mapping to them in OptinMonster.
- You can manage your custom fields in HubSpot following this guide.
Form Embed Block
Alternatively, you can add any HubSpot webform to your campaign using our Form Embed block.
Required: the custom HubSpot form must be edited before being placed in your OptinMonster campaign following this guide, or the form will not function correctly.
Get started adding a custom form to your campaign.
Email Automations
To send emails automatically to new leads you’ll want to configure email automations within your HubSpot account.
The following guides from HubSpot may be helpful to get started:
- Use automation with emails
- Create automated emails to use in workflows
- How to setup automated email marketing workflows
Testing
We strongly recommend you test the optin form before publishing your campaign to ensure it is working as you expect.
Before you begin, please be aware of the following details when testing HubSpot integrations:
- Previously submitted or already subscribed leads may be treated differently by HubSpot than new leads. For this reason, we recommend using a completely unique email address each time you test submit your campaign’s form. You can use a free tool like TempMail.io or learn how to create unlimited unique email addresses from a single Gmail account.
- If the lead is captured in HubSpot but you do not receive any automated emails it indicates the integration from OptinMonster to HubSpot is correct, and the issue is with the automated email configuration. HubSpot controls email automation exclusively. If you require assistance in troubleshooting email automations we recommend reaching out to HubSpot support directly.
Get started testing with the Live Site Inspector tool explained in our guide on how to test an OptinMonster campaign.
Spin-a-Wheel Support
If you are configuring a Gamified spin-to-win campaign, spin-a-wheel support is automatically enabled when using our native HubSpot integration. The Coupon Label and Coupon Code will be passed as custom fields with each lead.
FAQs
Can I send leads to more than one Campaign?
Yes! See our Lead Sharing guide to accomplish this.
How do I configure single or double opt-in?
See our guide on single vs. double opt-in.
Is it possible for me to add a phone field to my campaign?
Yes! You can add a phone field. Learn how to capture phone numbers with OptinMonster.
How can I identify which campaign the subscriber came through?
OptinMonster automatically creates a property value in HubSpot named “OptinMonster Campaign Name” which captures and passes thru the campaign name to HS.
For most, it will be under the custom field optinmonster_campaign_name.
If you have Custom Branding enabled for your account the optinmonster_ portion may be different.
How quickly are leads sent to HubSpot? Is there a delay?
There is no delay. Lead submissions are sent to HubSpot in real time. OptinMonster will not perform the Button Action (like showing a success view or redirecting the user) until we get a confirmation that the submission was successfully received.
Even if your campaign is integrated with multiple Email Service Providers (ESPs) at the same time, OptinMonster sends the lead data to all connected integrations simultaneously, without delay.
Why doesn’t my conversion count match the number of leads in HubSpot?
It is normal for these numbers to differ. There are some reasons for a discrepancy between the conversion count in OptinMonster and the lead count in HubSpot:
- Double Opt-In: If your email service is set to require double opt-in, a user must first click a confirmation link in an email before they are officially added to your list. OptinMonster records a conversion as soon as the form is submitted, but HubSpot won’t count them as a new lead until they confirm.
- Existing Subscribers: OptinMonster records a conversion each time a form is successfully submitted, provided that conversion tracking is enabled on the submit button. However, if an existing subscriber fills out your form again, HubSpot will likely not add them as a new lead, as their email is already on your list.
- Conversion Tracking Enabled on Other Blocks: Conversions can be tracked on various elements, not just the form submission button. For example, if you have conversion tracking enabled on an image link and a visitor selects it but does not fill out the form, OptinMonster will still count a conversion. This increases your conversion count without a lead being submitted.
- Integration Failure: If the integration experiences a temporary issue, form submissions will still count as conversions. However, the lead data may not be sent to integration.
- Lead Filtering: When a user signs up with a disposable email address or is flagged as suspicious, the campaign will still record a conversion (form submission), but your integration platform may reject or filter out the lead.
Troubleshooting
The form submits fine but leads are not reaching my HubSpot account.
The most common cause for this is related to the Assigned Form setting in your HubSpot integration:
The Assigned Form you select must contain the same fields as your OptinMonster campaign. If there is a mismatch of fields the submission will fail and leads will not be captured in HubSpot. Be sure to check if the fields in your Assigned Form match the fields configured in your OptinMonster campaign and make any necessary changes to synchronize those settings.
Additionally, Leads will only be submitted to the assigned form if the hubspotutk cookie is set in the user’s browser. If the user has cookies blocked or disabled, they may not be submitted to the Assigned Form. Learn more about HubSpot Tracking Code in this guide.
The campaign is capturing leads but shows 0 conversions in analytics.
Confirm that conversion tracking is turned on for the submit button in your campaign. See our guide on How to Enable Conversion Tracking.
I’ve received a Proper Permissions error, what do I do?
If you receive this error it is because you do not have the required HubSpot plan to use their API.
Our native integration with HubSpot requires access to their API. HubSpot allows full access to their API only with their paid plans.
If you are using a free HubSpot account you will need to either upgrade to a paid HubSpot account or use our custom HTML integration option instead of our native integration with HubSpot.


