OptinMonster offers seamless integration with ActiveCampaign email marketing service. Connecting OptinMonster to your ActiveCampaign email list is very easy.
In this article, you’ll learn how to connect ActiveCampaign with OptinMonster.
Before you start, this integration is available with all subscription plans.
All subscription plans can add custom forms using the Form Embed block.
As a best practice we recommend you also connect your campaigns to Monster Leads as a backup.
Connect ActiveCampaign
When you create a campaign in OptinMonster that you intend to collect leads with you’ll want to integrate with one or more services to send those leads to.
To send leads to ActiveCampaign, follow these steps:
- Before you start, you’ll need your ActiveCampaign API URL and API Key. You can generate and copy the API URL and API Key from your ActiveCampaign account following this guide.
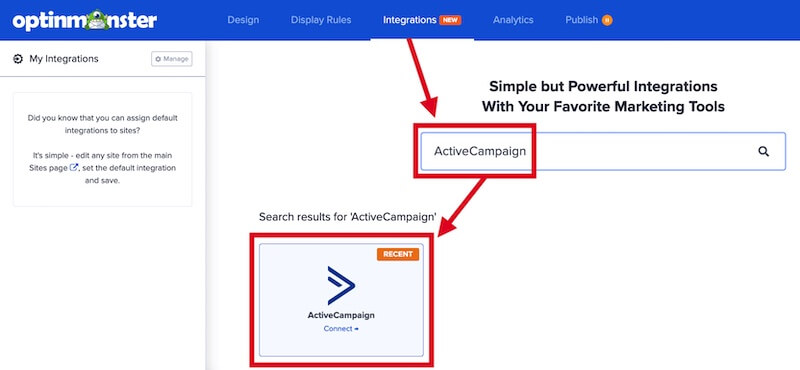
- Navigate to the Integrations view in the campaign builder, search for and select ActiveCampaign.
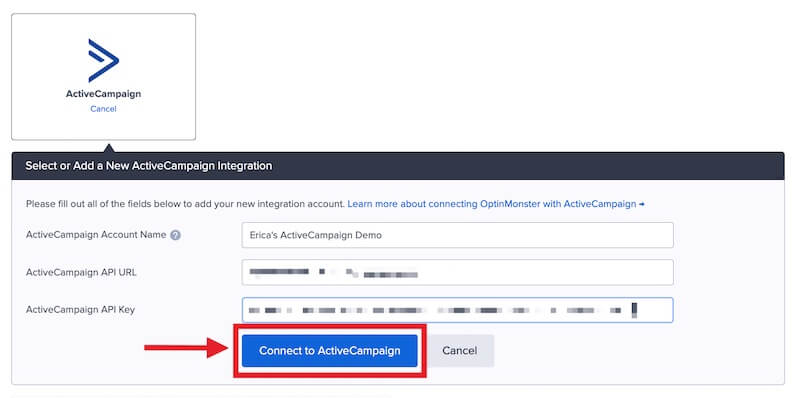
- Enter an ActiveCampaign Account Name (*internal use only), your ActiveCampaign API URL and ActiveCampaign API Key in the appropriate fields, then select the Connect to ActiveCampaign button.
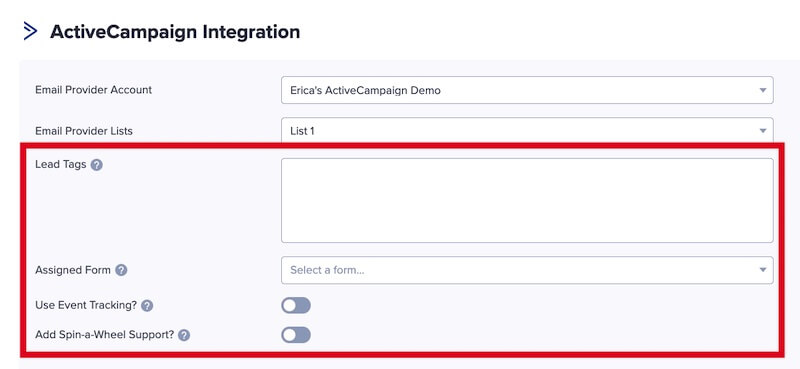
*The ActiveCampaign Account Name can be anything that helps you identify the specific integration within OptinMonster. It’s possible to add more than one ActiveCampaign integration to your account and this is an easy way to differentiate between them when assigning integrations to individual campaigns. - Required: Once the ActiveCampaign integration has been connected select the ActiveCampaign List you wish to send leads to from the Email Provider Lists field.
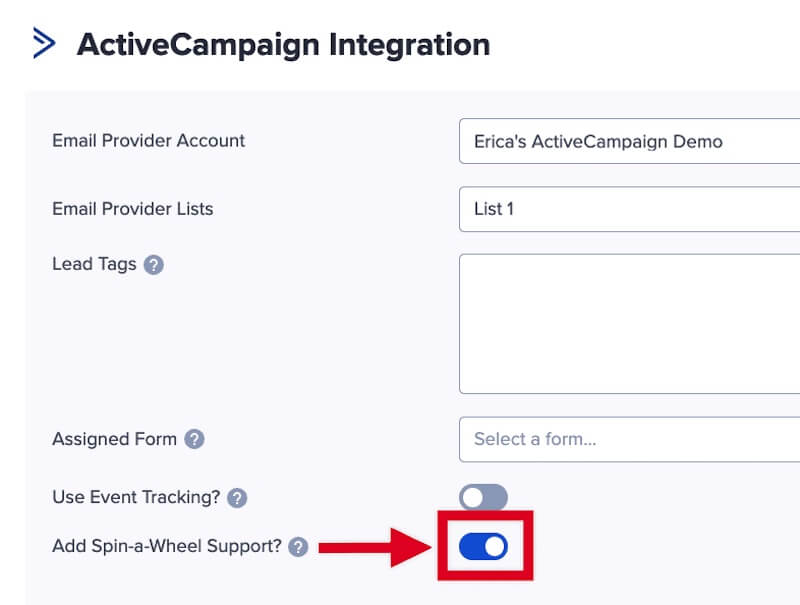
- Optional: You can also assign Lead Tags, select an Assigned Form*, and enable the Use Event Tracking? and Add Spin-a-Wheel Support? options.
- When you’re finished, Save your campaign.
Assigned Form
Note:
When configuring your ActiveCampaign integration following the section above, you are provided the option to set an Assigned Form. This assignment will link leads captured to a specific form you’ve created in your ActiveCampaign account.
Assigned Form is required to be set if you plan to use email automations and/or double opt-in with ActiveCampaign.
For example, in this article the assigned form is used as a trigger to send a welcome email series
Event Tracking
OptinMonster makes it easy to use ActiveCampaign’s Event Tracking feature with your campaigns.
To enable Event Tracking, follow these steps:
- Required: You will need to enable Event Tracking in your ActiveCampaign account and add ActiveCampaign’s tracking code to your site following this guide.
- Before you start, you will need your ActiveCampaign Event Tracking Account ID and Event Tracking Key. You can retrieve those from your ActiveCampaign account following this guide.
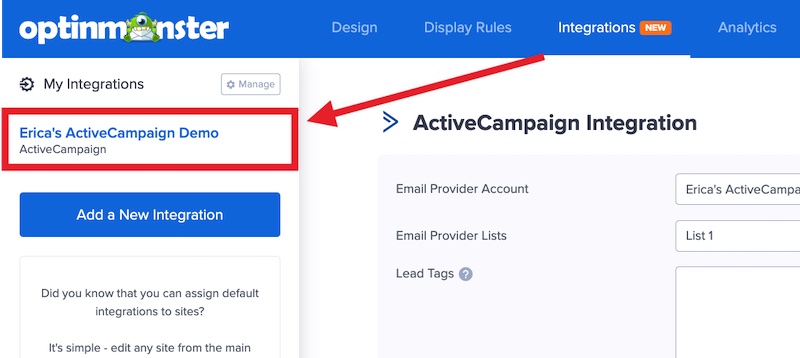
- Navigate to the Integrations view in the campaign builder and select your ActiveCampaign integration from the left sidebar.
- Next, enable the Use Event Tracking? option for your ActiveCampaign integration.
- Enter the Event Tracking Account ID and Event Tracking Key into the appropriate fields.
- When you’re finished, Save the campaign.
Test Event Tracking
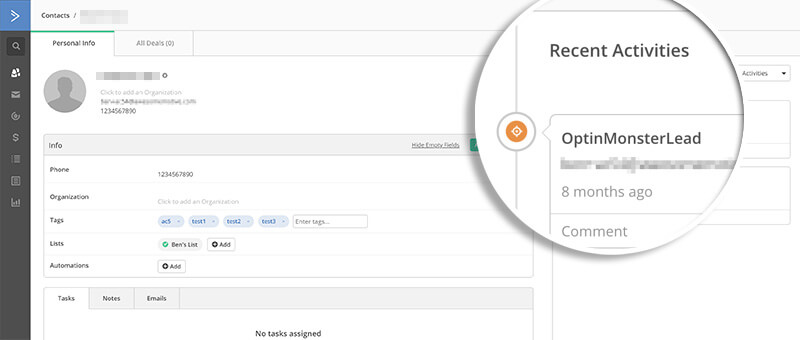
When Event Tracking is working properly, leads added to your ActiveCampaign site through the OptinMonster campaign will show OptinMonster Lead under the Recent Activities column when viewing an individual lead’s details.
Add Extra Fields
Field Mapping
This integration supports Field Mapping, so you can easily add radio buttons, phone fields, text areas, number fields, lists, and more!
Before you begin using Field Mapping with ActiveCampaign, please consider the following:
- The following custom fields arereserved in ActiveCampaign and cannot be mapped to:
COUPON_CODE(the Coupon Code won when creating a Gamified spin-to-win campaign)COUPON_LABEL(the Coupon Label when creating a Gamified spin-to-win campaign)
- Custom field names must only contain uppercase letters, no empty spaces or dashes allowed.
- You can manage your custom fields in ActiveCampaign following this guide.
Form Embed Block
Alternatively, you can add any ActiveCampaign webform to your campaign using our Form Embed block.
Get started adding a custom form to your campaign.
Email Automations
To send emails automatically to new leads you’ll configure email automations within your ActiveCampaign account.
The following guides from ActiveCampaign may be helpful to get started:
- What are Automations in ActiveCampaign?
- How Automations Work in ActiveCampaign
- Create an Automation From Scratch in ActiveCampaign
- Create a “Welcome Email” Automation
Testing
We strongly recommend you test the optin form before publishing your campaign to ensure it is working as you expect.
Before you begin, please be aware of the following details when testing ActiveCampaign integrations:
- Previously submitted or already subscribed leads may be treated differently by ActiveCampaign than new leads. For this reason, we recommend using a completely unique email address each time you test submit your campaign’s form. You can use a free tool like TempMail.io or learn how to create unlimited unique email addresses from a single Gmail account.
- If the lead is captured in ActiveCampaign but you do not receive any automated emails it indicates the integration from OptinMonster to ActiveCampaign is correct, and the issue is with the automated email configuration. ActiveCampaign controls email automation exclusively. If you require assistance in troubleshooting email automations we recommend reaching out to ActiveCampaign support directly.
Get started testing with the Live Site Inspector tool explained in our guide on how to test an OptinMonster campaign.
Spin-a-Wheel Support
When configuring your ActiveCampaign integration following the first section in this guide, you are provided the option to enable Spin-a-Wheel Support.
This option is specific to Gamified spin-to-win campaigns. Enabling this option will pass the Coupon Label and Coupon Code to ActiveCampaign as custom fields with each lead.
To Enable Spin-a-Wheel Support, follow these steps:
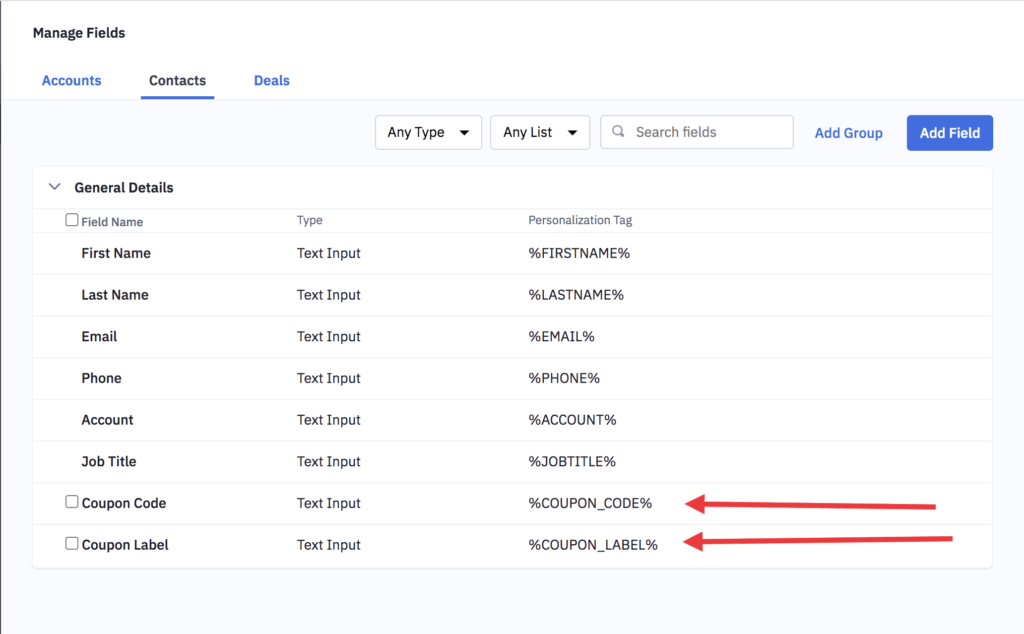
- Required: navigate to your ActiveCampaign Dashboard > Lists > Manage Fields and add two new text fields with the following labels:
- Coupon Code
- Coupon Label
The Personalization Tags should look like %COUPON_CODE% and %COUPON_LABEL%.
- Next, navigate to the Integrations view in the OptinMonster campaign builder and select your ActiveCampaign integration from the left sidebar.
- Next, enable the Add Spin-a-Wheel Support? option for your ActiveCampaign integration.
- When you’re finished, Save the campaign.
And that’s it! Now anytime someone uses your spin-a-wheel campaign that is connected with your ActiveCampaign integration, the winning coupon code and label will be associated with that contact, which can be used in follow-up emails, automation sequences and more!
FAQs
Can I send leads to more than one List?
Yes! See our Lead Sharing guide to accomplish this.
How do I configure single or double opt-in?
See our guide on single vs. double opt-in.
Is it possible for me to add a phone field to my campaign?
Yes! You can add a phone field. Learn how to capture phone numbers with OptinMonster.
What version of the ActiveCampaign API does OptinMonster use for its ActiveCampaign integration?
Currently, OptinMonster utilizes version 1 (v1) of the ActiveCampaign API.
If you’re serious about jumpstarting your website business growth, then get started with OptinMonster today!
Get Started With OptinMonster Today!BONUS: Done-For-You Campaign Setup ($297 value)
Our conversion experts will design 1 free campaign for you to get maximum results – absolutely FREE!
Click here to get started →
Troubleshooting
The campaign is capturing leads but shows 0 conversions in analytics.
Confirm that conversion tracking is turned on for the submit button in your campaign. See our guide on How to Enable Conversion Tracking.

