OptinMonster vs Bloom by Elegant Themes
Want to boost your website’s email conversions? Compare OptinMonster and Bloom to find the lead generation tool that best fits your needs.
OptinMonster vs Bloom: An Overview
Campaign Types
Templates
Lightbox Popups
Slide-in
Inline Forms
Floating Bars
Fullscreen Campaigns
Gamified Campaigns
Builder Features
Drag-and-Drop Editor
Custom HTML/CSS
Real-Time Preview
Multi-Step Campaigns
Targeting and Display Rules
Page-Level Targeting
Content Locking
Exit-Intent®
Geo-Location
eCommerce Rules
Save Custom Rulesets
Advanced Rule Combination
Analytics & Testing
Analytics Dashboard
Split Testing
Revenue Attribution
Support
Live Chat Support
Knowledge Base
Done-For-You Setup
Pricing
Starting Price
Pricing Based On
OptinMonster
700+
$7/month
Campaign Views
Bloom
100+
$7.42/month
Pageviews
See How OptinMonster and Bloom Compare
We’ve focused this comparison on what really matters: how easy these tools are to use, what you can create with them, and how they help you convert more visitors into subscribers.
Want to skip ahead? Click any section below to get straight to what matters most for your business:
OptinMonster vs Bloom: Ease of Use
Creating popups and other lead capture forms shouldn’t give you a headache. After all, the faster you can build and launch campaigns, the sooner you can start growing your email list.
OptinMonster makes the whole process super simple. After purchasing a plan, you can just log into your dashboard and start connecting your site with OptinMonster.
If you use WordPress, you can just install the plugin and manage everything from your dashboard. Running Shopify, Wix, or another platform? Simply copy and paste a small code snippet, and you’re done.
Don’t worry if this is your first time. We provide detailed setup guides for every platform.
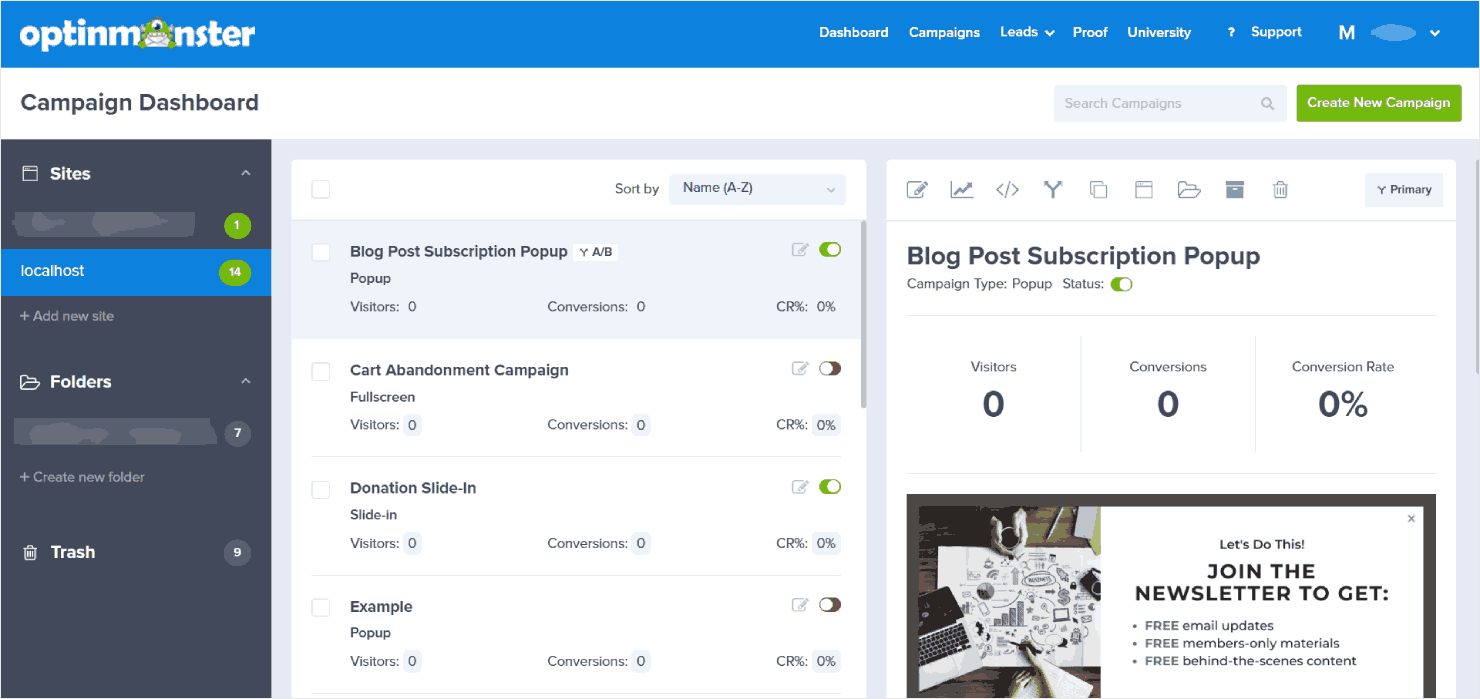
Creating and launching your campaign is straightforward. Everything you need to manage your campaign takes place in one user-friendly dashboard, where you can:
- Choose your campaign type and template.
- Make it your own using simple point-and-click, drag-and-drop editing.
- Set up display rules to configure who sees your campaign and when they see it.
- Connect your campaign with an email service provider.
- Catch any potential mishaps with our pre-launch checklist.
- Hit publish!
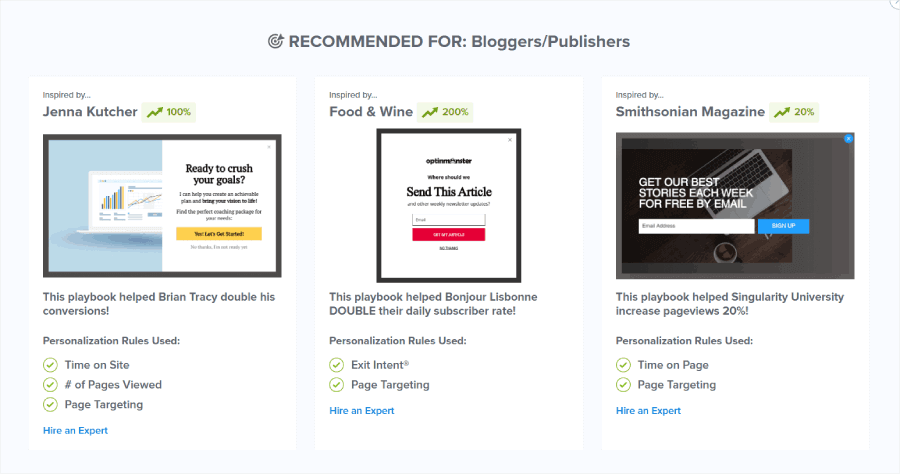
Want to skip the setup entirely? OptinMonster offers two fantastic shortcuts:
- Playbooks – These are ready-to-use campaigns built from proven success stories. Just pick a goal (like growing your email list), customize the design (or not!), and launch. It’s like having a conversion expert in your pocket.
- Done-for-You Campaign Setup – Available with every plan, our experts will create your custom campaign from scratch. Just tell us your goals, and we’ll handle the rest, perfect for busy business owners.
Connecting your email marketing service is just as easy. OptinMonster works with all the popular providers like MailChimp, Constant Contact, and ActiveCampaign.
Don’t have an email service yet? No problem. OptinMonster’s Monster Leads feature stores your leads until you’re ready.
Bloom takes a different approach to setup. First, you’ll need to buy an Elegant Themes membership and install two separate plugins: the main Elegant Themes plugin and the Bloom add-on.
Once installed, you can open the Bloom plugin page to start creating your campaign. The interface is clean and functional, but it feels a bit outdated.
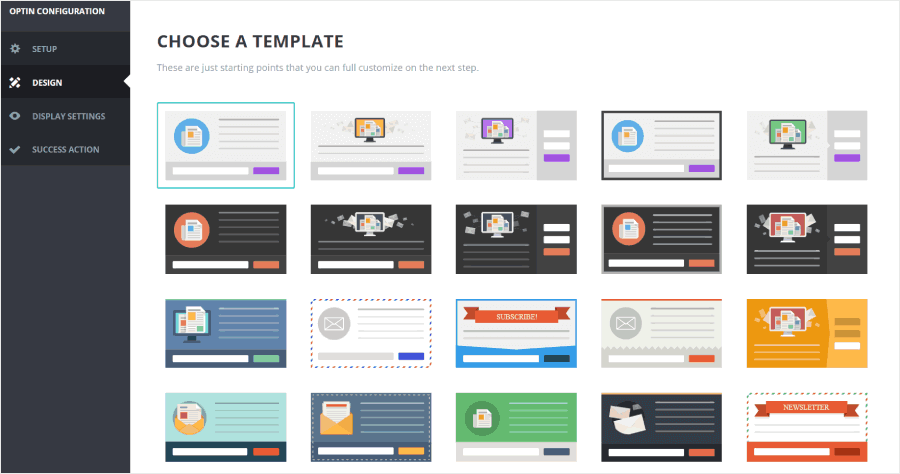
Bloom’s campaign builder uses a menu-based system split into different tabs. You move through different sections like setup, design, and display rules, similar to OptinMonster’s workflow.
While Bloom offers a solid set of basic templates to get you started, it doesn’t include features like Playbooks or done-for-you options for users who want a quicker launch.
🏆 Winner: OptinMonster
While both tools can help you create optin campaigns, OptinMonster’s focus on a user-friendly experience makes it the clear winner for ease of use:
- ✓ Quick setup with no complex installation needed
- ✓ Clean, modern interface that guides you through each step
- ✓ Built-in tools like Monster Leads to store contacts until you’re ready
- ✓ Time-saving features like Playbooks and a done-for-you setup (not available in Bloom)
OptinMonster vs Bloom: Campaign Customization
Your optin campaigns need to catch visitors’ attention and match your brand perfectly. The right customization tools make this easy, while the wrong ones can leave you stuck with generic-looking forms.
Thankfully, OptinMonster gives you complete control over how your campaigns look and feel.
You can start with one of our 700+ pre-designed templates, each one built and tested for maximum conversions. These templates cover every goal you might have, from growing your email list to reducing cart abandonment.
Don’t want to use a template? Start with a blank canvas and build exactly what you want.
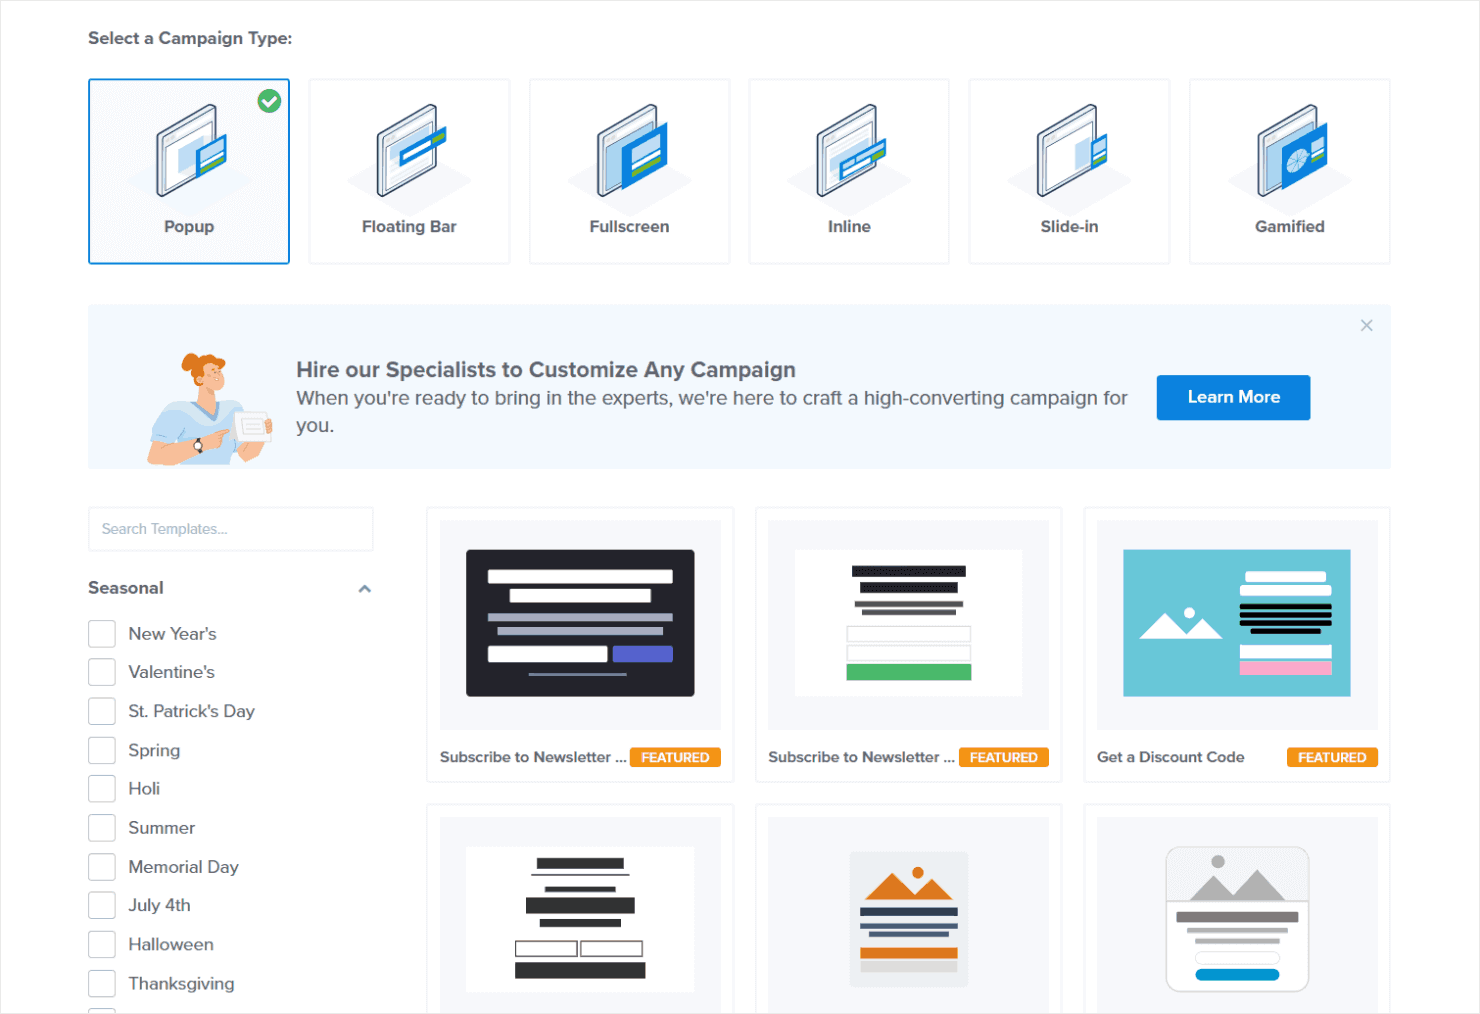
We offer different types of campaigns to help you connect with visitors in the most effective way:
- Lightbox Popups – These appear in the center of the screen to grab attention for your most important offers.
- Floating Bars – Stick to the top or bottom of your page to keep important messages visible as visitors browse.
- Fullscreen Welcome Mats – Cover the entire screen when someone first visits to make a powerful first impression.
- Slide-in Scroll Boxes – Smoothly slide into view as visitors read, perfect for offering content upgrades.
- Inline Forms – Blend naturally within your content to convert already-engaged readers.
- Gamified Wheels – Transform lead generation into an interactive game with prize wheels that visitors love to spin.
Our drag-and-drop editor lets you build beautiful campaigns without touching any code. Just click what you want to change, and see your updates instantly.
Every campaign automatically adjusts to look perfect on all devices. You can use the real-time preview to see exactly how your design will appear on desktop, tablet, and mobile.
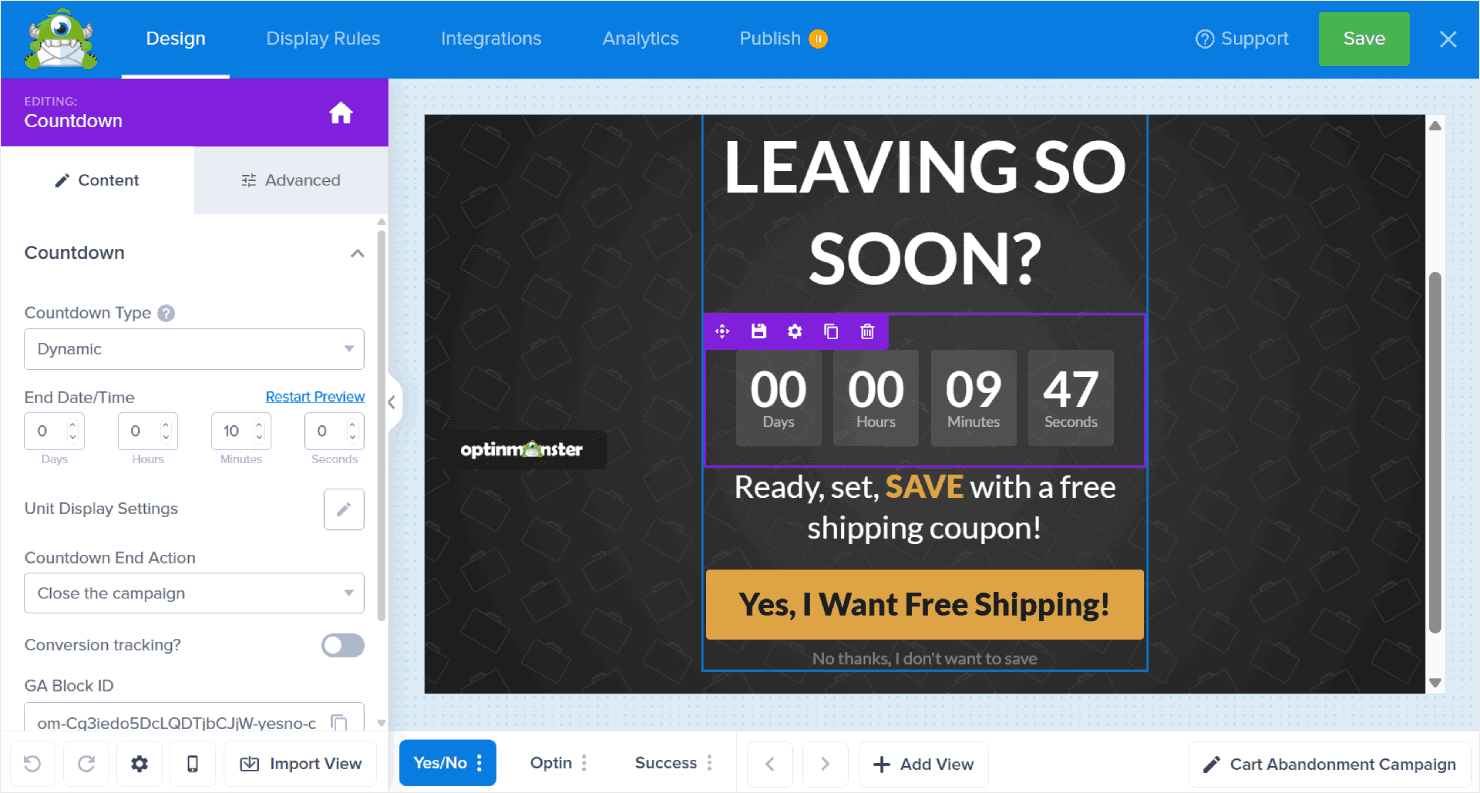
You can also make your campaigns more engaging with these features:
- Make your campaigns pop with exciting blocks, like videos to demonstrate products, countdown timers to create urgency, and eye-catching animations to grab attention.
- Break up your forms into easy steps. Start with a simple ‘Yes/No’ question, then show your form when they click ‘Yes.’
- Include subtle animated and sound MonsterEffects™ when your campaign appears, or when someone clicks a button. It’s amazing how these small touches can boost engagement.
- Let our AI-powered Smart Optimizations help you write high-converting campaign copy, even if you have no writing skills.
- Found a design combination you love? Save it as a custom block to use again later. No need to rebuild your favorite designs from scratch.
- Copy designs between different campaign views to maintain a consistent look.
- Add custom HTML, CSS, or JavaScript if you want to create something extra special.
🎉 Take PortraitFlip for instance: they combined our floating bars, exit-intent popups, and gamified wheels to convert over 3% of their mobile visitors, all without any design experience – just using our templates and drag-and-drop builder.
With Bloom, you get a solid foundation for basic email optin forms, but we found that its design options focus on simplicity rather than flexibility.
The plugin includes about 100 pre-made templates, which is significantly fewer than OptinMonster’s library of 700+ conversion-optimized designs.
Bloom offers six campaign types: popups, fly-ins (what we call slide-ins), below-post forms, inline forms, locked content forms, and widgets.
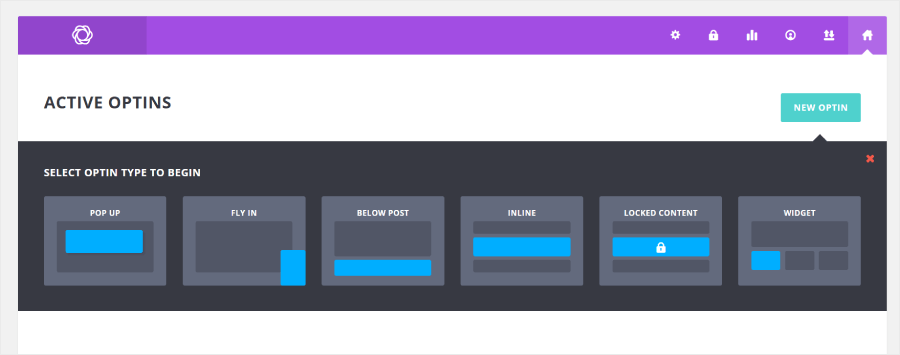
While these cover basic needs, they’re all easily achievable with OptinMonster through different combinations of our campaign types and features.
For example, you can use content locking if you use our inline campaign type, and you can create widget-style forms by simply embedding our inline campaigns in your sidebar.
But Bloom stops there. One significant limitation is their lack of gamified spin-to-win wheels, which is a feature that’s proven to dramatically boost conversions.
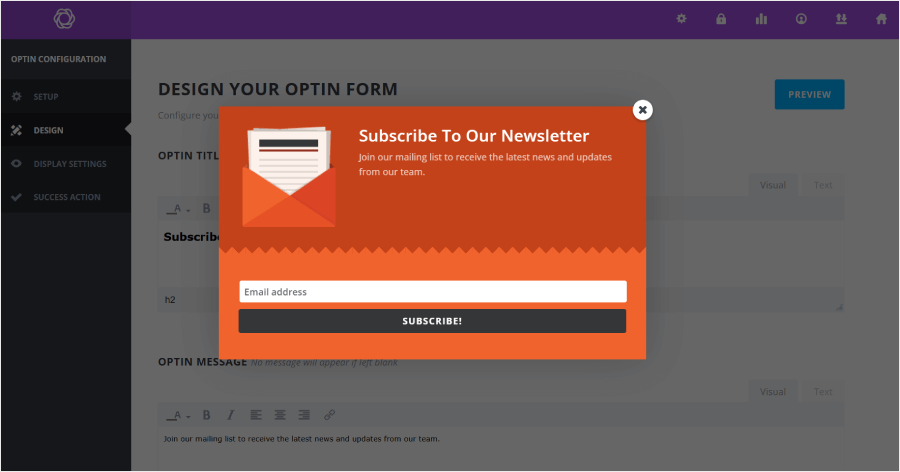
When customizing these templates, you’ll work through a traditional WordPress-style menu system where you can:
- Change your form’s colors, like making your submit button match your brand.
- Adjust how your form looks with basic styling (like adding rounded corners or adjusting border thickness).
- Choose where to place an image on the campaign – left, right, or above your form.
- Set up simple form fields like name, email, and phone number.
- Add basic effects like fade-in animation.
All these changes happen through separate tabs in the editor. If you want to see how your form looks, you’ll need to click the preview button. There’s no real-time view of your changes, which can be highly inconvenient for users.
🏆 Winner: OptinMonster
OptinMonster takes the lead because it gives you more ways to create campaigns that convert:
- ✓ Flexible drag-and-drop editing with real-time preview, unlike Bloom’s tab-based menu system
- ✓ 7x more templates to choose from than Bloom’s 100 basic designs
- ✓ Create any type of campaign your business needs, not just optin forms
- ✓ Advanced features like multi-step forms, countdown timers, and gamified wheels that Bloom doesn’t offer
OptinMonster vs Bloom: Targeting & Display Rules
Now that we’ve discussed how to design eye-catching campaigns, let’s explore what makes them truly effective: showing them to the right people at exactly the right moment.
The best-looking popup in the world won’t help your business if it appears at the wrong time.
OptinMonster gives you precise control over when and where your campaigns appear. Our visual rule builder makes it easy to create powerful display and targeting combinations, even if it’s your first time making a campaign.
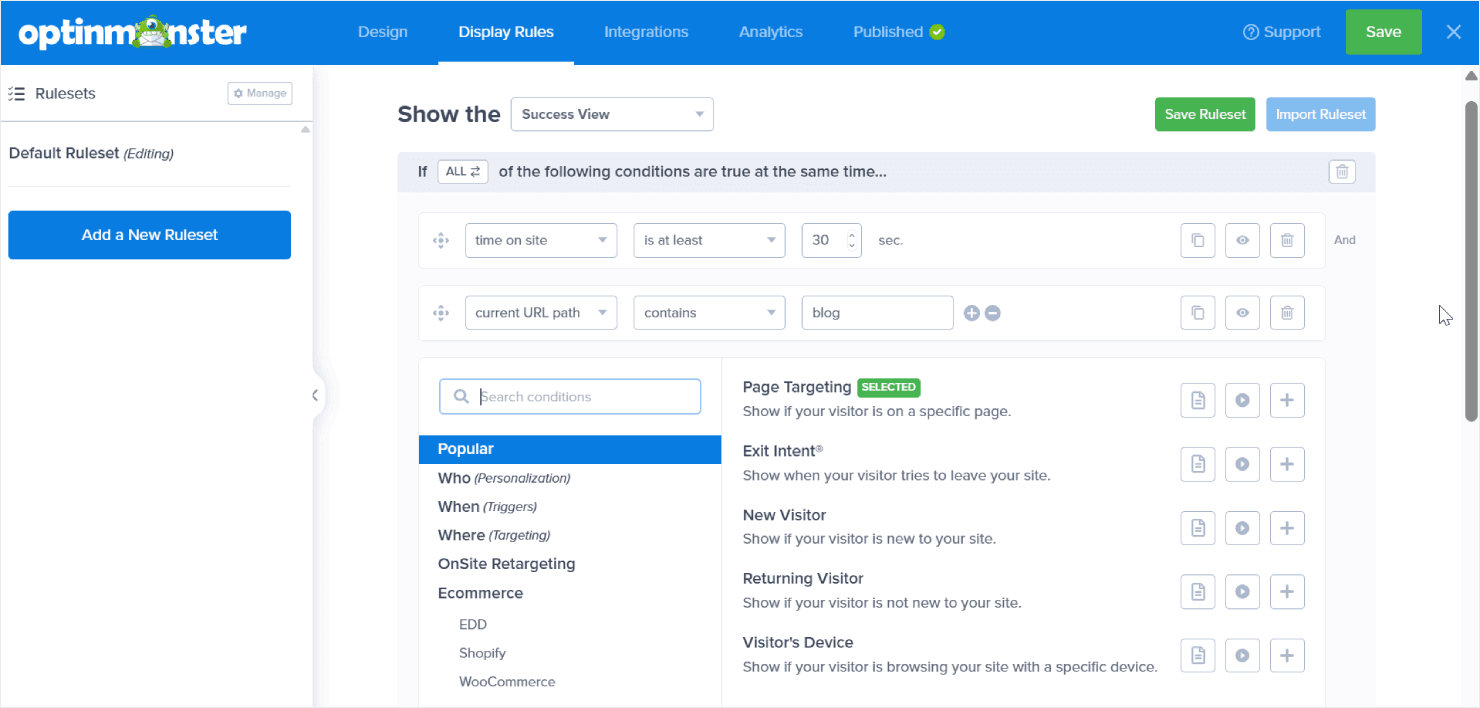
Here are the basic display rules that all of our users get access to:
- Page-level targeting – Show different campaigns on specific pages, like having a special offer on your pricing page and a newsletter signup on your blog.
- Time-based triggers – Wait until visitors have spent enough time on your site before showing your campaign.
- Scroll depth targeting – Display your message after visitors scroll down and show interest in your content.
You can also layer your campaigns with even smarter targeting rules:
- New vs returning visitors – Show first-time visitors your welcome offer while giving loyal fans something different.
- Exit-Intent® technology – Show a campaign right when visitors are about to leave your site, perfect for offering one last compelling reason to stay.
- InactivitySensor™ – Notice when visitors stop moving their mouse or typing, and offer help at just the right moment.
- MonsterLinks™ – Turn any link or button into a trigger for your campaign, so visitors can choose when to see your offer.
- Referral detection – Customize your message based on where visitors came from, like showing a special “Welcome, Pinterest user!” message.
- Cookie retargeting – Create different experiences for new and returning visitors, so you’re not showing the same offer twice.
- Geo-location targeting – Show location-specific messages, like free shipping offers for nearby customers.
- Device-based rules – Make sure your campaigns look perfect whether visitors are on phones, tablets, or computers.
- AdBlock detection – Reach visitors even if they’re using ad blockers, so you never miss an opportunity to connect.
- MonsterChains™ – Create a series of connected campaigns that guide visitors toward conversion.
🎉 Top 6 Digital used OptinMonster’s Display Rules to show perfectly matched offers based on what visitors were reading.
Using this content-specific targeting combined with Exit-Intent®, they achieved incredible results: up to 62% conversion rates on their best-performing campaigns.
Have an online store? These eCommerce-specific rules help you sell more:
- Shopping behavior rules – Target visitors based on their cart value or items they’re viewing.
- Product page rules – Display relevant offers based on what products people are looking at.
The real power comes from combining these rules using simple ‘ALL’ and ‘ANY ONE’ logic. For example, you could:
- Use ‘ANY ONE’ to show a special welcome message to anyone coming from your social media (Facebook OR Instagram OR Pinterest).
- Use ‘ALL’ to make sure visitors are truly engaged before showing your offer (must spend 30 seconds on site AND scroll halfway down).
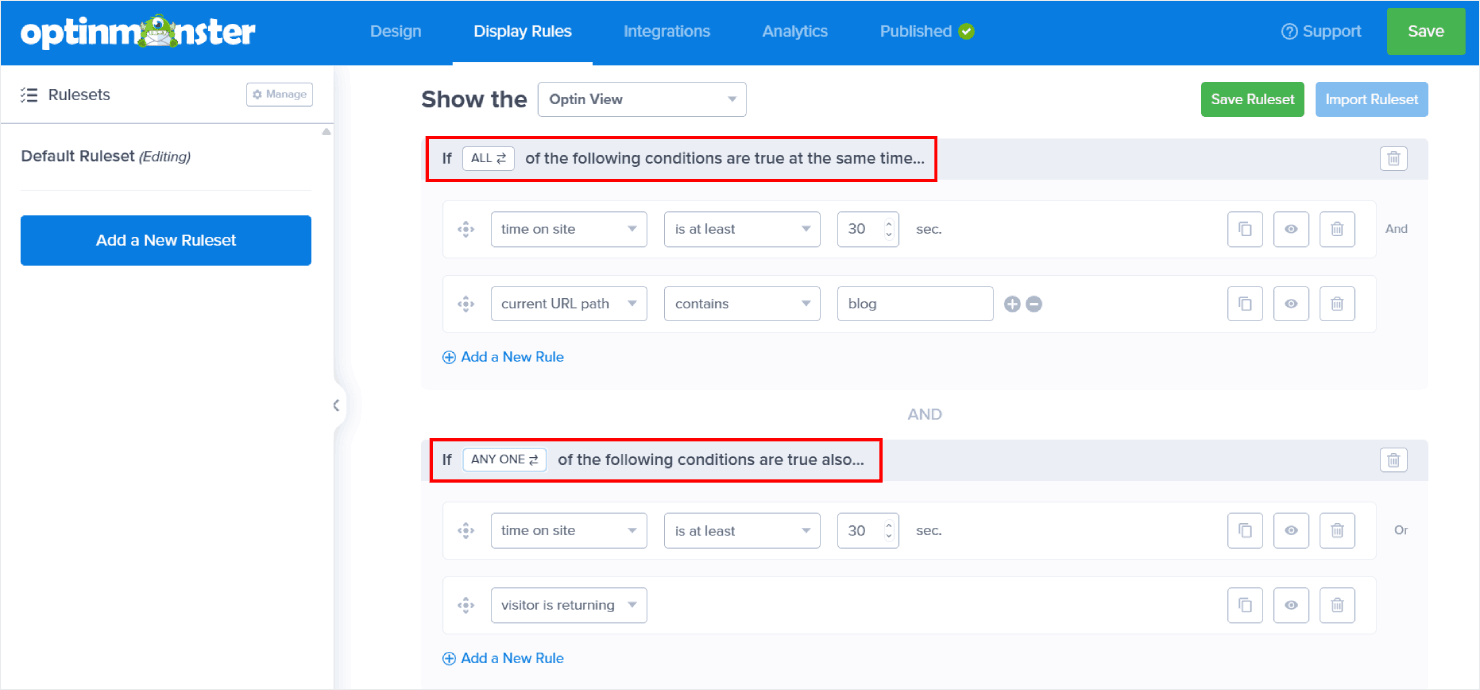
Created a targeting combination that works well? Save it as a ruleset to use again later. This is especially helpful when you launch similar campaigns across different pages, test different designs with the same targeting rules, or just want to use proven targeting settings.
Bloom offers targeting and display features, too. However, based on our experience, the options are a lot more limited.
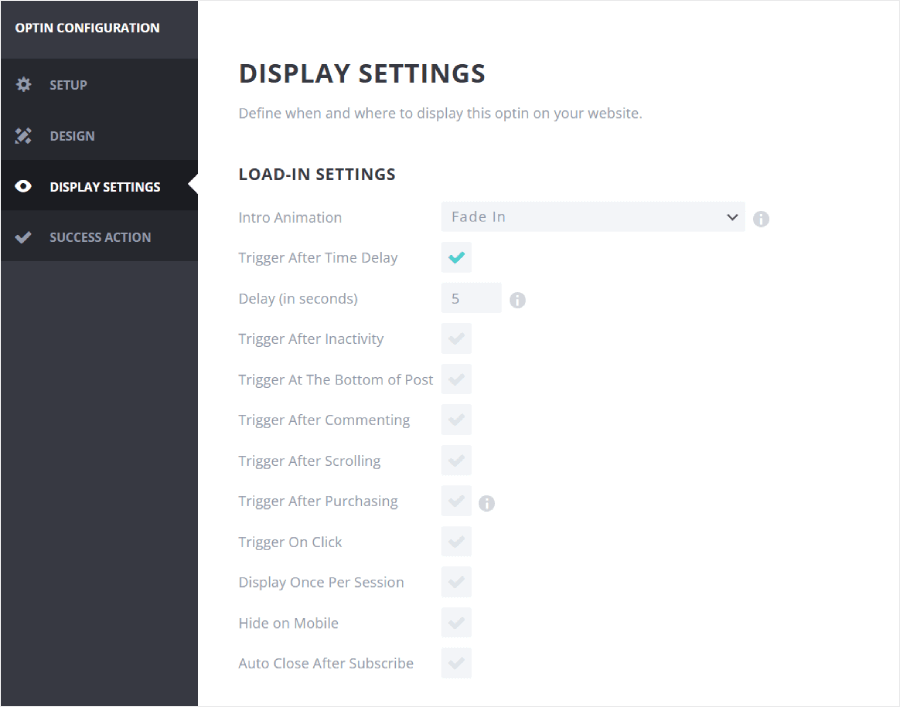
In comparison, Bloom’s targeting and display rules feel very limited. You can control where your forms appear by:
- Showing them across your entire site
- Displaying them on specific posts or pages
- Targeting certain categories
- Excluding particular areas of your site
You also get trigger options like:
- Show the campaign after a time delay.
- Display when someone reaches the bottom of a post.
- Appear after a visitor scrolls down.
- Show after someone leaves a comment.
- Appear when someone clicks on a link or a button.
- Display once per session.
- Close the campaign automatically after a successful optin.
While these cover the basics, Bloom lacks advanced features like exit-intent detection, geo-location targeting, and eCommerce-specific rules.
And although Bloom lets you combine targeting rules, it doesn’t match OptinMonster’s visual rule builder for creating complex targeting scenarios.
You can only check boxes to activate rules. There’s no way to create sophisticated combinations like ‘show this campaign to visitors from California OR New York who have spent at least 2 minutes on the site AND viewed 3 products.’
🏆 Winner: OptinMonster
OptinMonster is the clear winner for targeting and display rules because:
- ✓ More sophisticated targeting options, including Exit-Intent®, InactivitySensor™, geo-location, and eCommerce-specific rules
- ✓ Visual rule builder makes it easy to create complex targeting combinations
- ✓ Ability to save and reuse successful targeting rulesets across campaigns
OptinMonster vs Bloom: Analytics & Testing
Making decisions based on gut feeling is risky business. You need clear data to know what’s working and what needs improvement. Let’s compare how OptinMonster and Bloom help you track and optimize your campaigns’ performance.
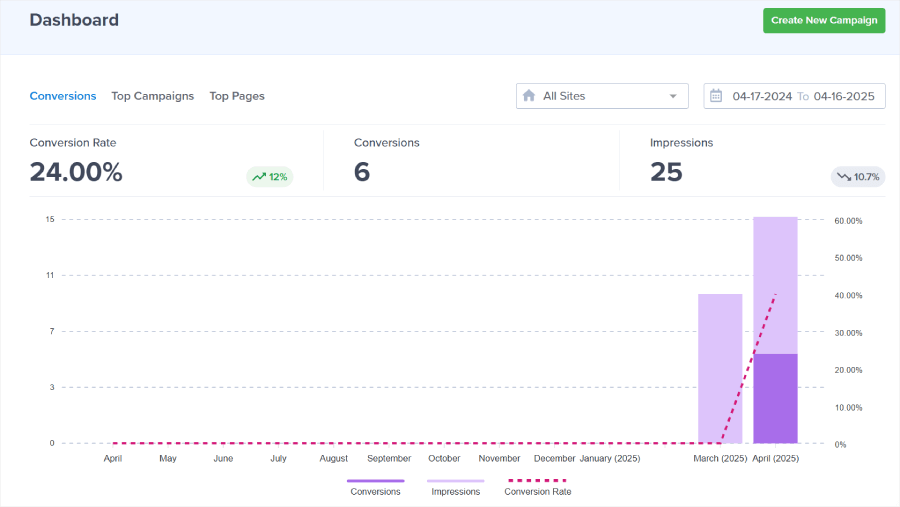
OptinMonster makes analytics and testing intuitive, even if you’ve never looked at marketing data before. Every time you log in, you’ll see a clear overview of:
- How many people saw your campaigns (impressions)
- How many took action (conversions)
- What percentage of visitors converted (conversion rates)
- Which campaigns are performing best
- Which pages have the best conversions
You can filter the data by website and date to focus on exactly what you want to analyze. Looking at last month’s performance for your store’s holiday campaign? Just a couple of clicks and you’ll have those numbers ready.
Other than that, you can dig deeper into any campaign’s analytics to uncover valuable insights. This is where you can see which pages convert best and track performance from the minute the campaign was launched, within the last 30 days, or other date ranges.
For online stores, our Revenue Attribution feature can show you exactly how much money each campaign makes.
This is important for any eCommerce business. After all, how can you make informed decisions if you can’t measure the direct impact on your bottom line?
Revenue Attribution lets you track sales impact, calculate ROI, and pinpoint your highest-performing lead generation strategies. No more guesswork, as you’ll know precisely which campaigns turn browsers into buyers.
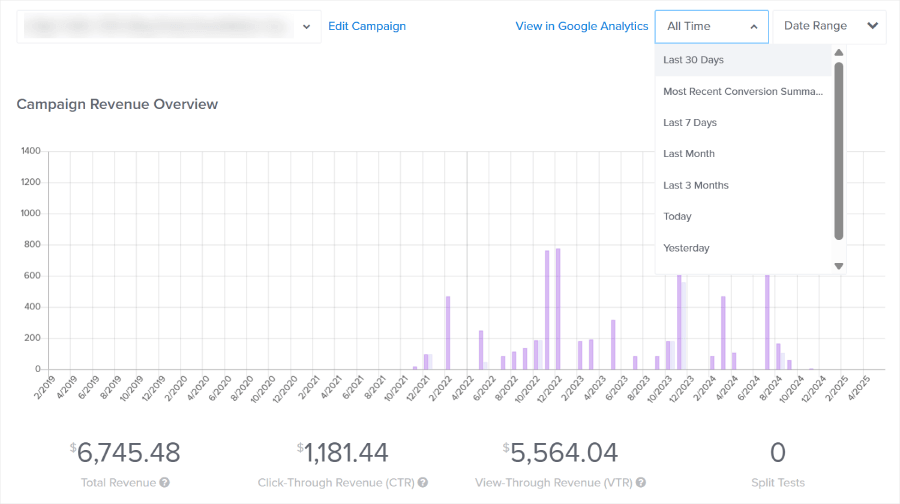
Need more detailed insights? Our Google Analytics integration lets you dive even deeper into your campaign performance.
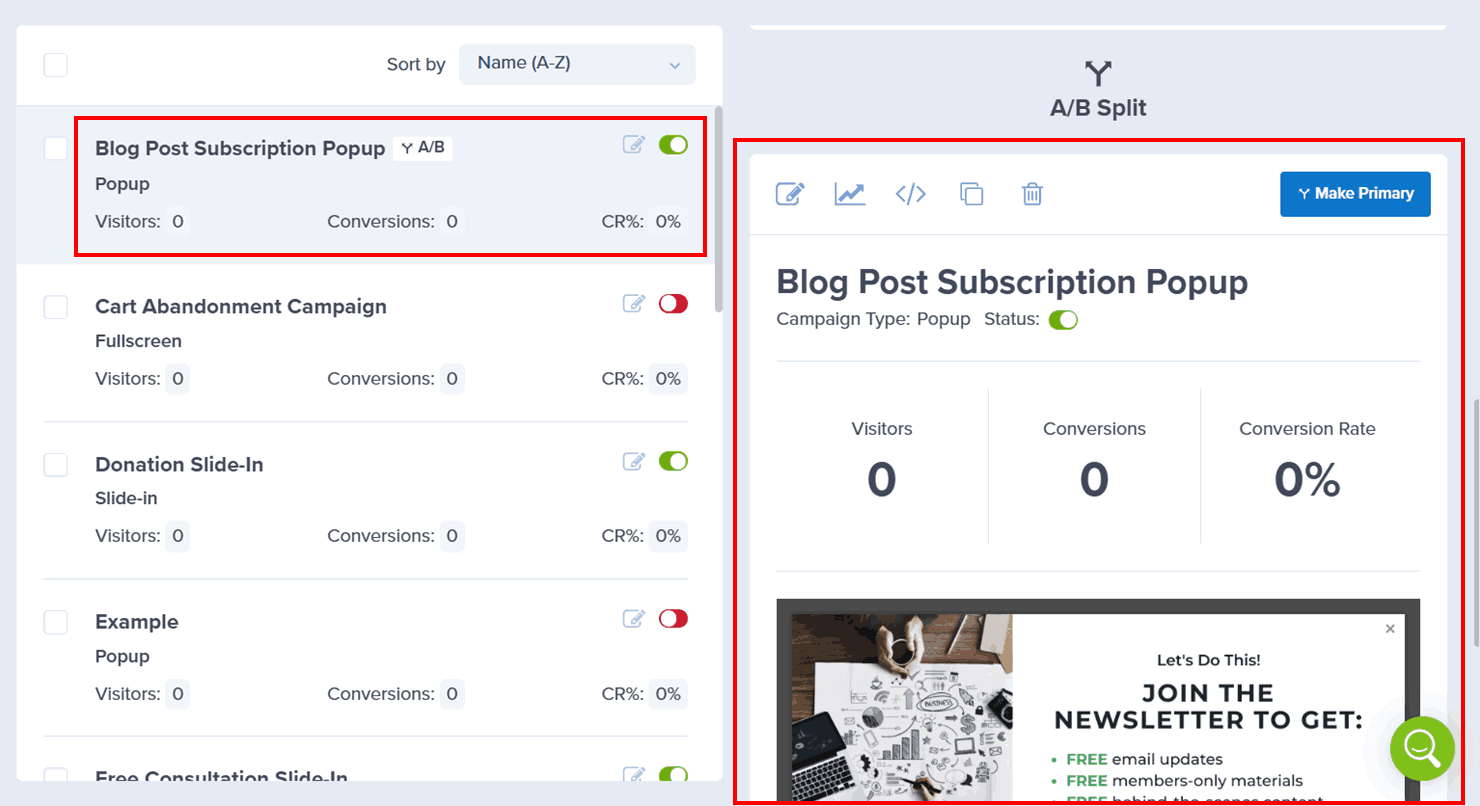
Next, we also have A/B testing tools that make it easy to experiment and improve your results. All you need to do is click ‘Create Split Test’ on any campaign and make your changes.
With OptinMonster’s A/B testing, you can experiment with any element of your campaigns:
- Headlines and message copy to find what resonates with your audience
- Images, videos, and other media that catch attention
- Button colors and text that drive more clicks
- Form fields and layouts that reduce friction
- Timing and trigger rules that hit the sweet spot
- Different targeting settings to reach the right people
OptinMonster will automatically show different versions to different visitors and track which one performs better. You can just create multiple variations and watch the real-time results roll in.
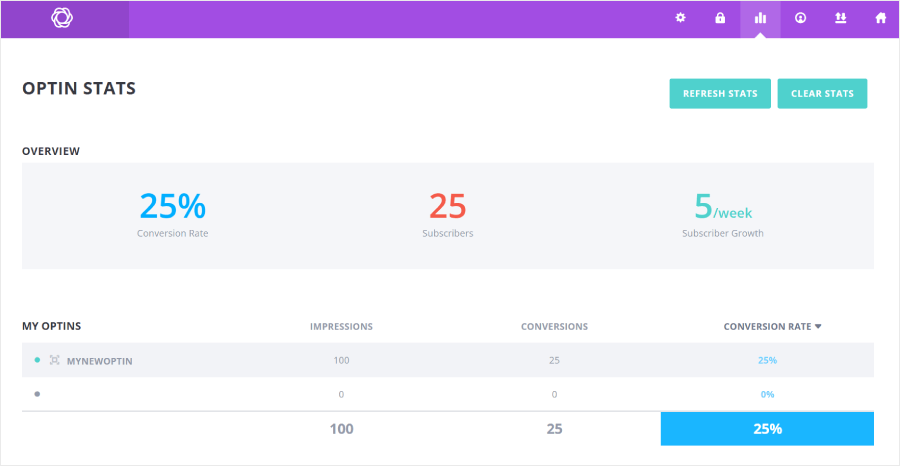
With Bloom, you get some basic analytics through your WordPress dashboard. The dedicated Stats page shows you essential metrics like total impressions, number of conversions, and conversion rates for each optin form.
Here’s what you can do with Bloom’s analytics:
- See the overall list growth statistics.
- Monitor each form’s basic performance.
- View historical growth trends in a simple graph.
- Identify your highest-performing pages.
- Check new signup numbers for the last 30 days or 12 months.
When it comes to A/B testing, Bloom’s process works like this: create a copy of your existing form, make your changes, and Bloom will split traffic between the variations.
Each version shows its conversion rate, helping you identify which performs better. Once you’re satisfied with the results, you can end the test and select the winning version.
🏆 Winner: OptinMonster
OptinMonster stands out with features like:
- ✓ Comprehensive analytics dashboard that’s easy to understand and use
- ✓ Easy-to-use A/B testing tools with unlimited variations
- ✓ Google Analytics integration for advanced tracking and custom reporting
- ✓ Built-in revenue tracking shows exactly how much money your campaigns make (not available in Bloom)
OptinMonster vs Bloom: Customer Support
Having powerful analytics is great, but what happens when you need help making sense of it all? Or when you’re stuck trying to set up that perfect campaign? Let’s see how OptinMonster and Bloom support you when you need assistance.
OptinMonster believes in providing comprehensive support that gets you answers fast. Our multi-layered support system ensures you’re never left wondering what to do next.
Need immediate help? Our support team is ready to assist you with these channels:
- Live chat with our experts (Monday–Friday, 9 AM–5 PM EST)
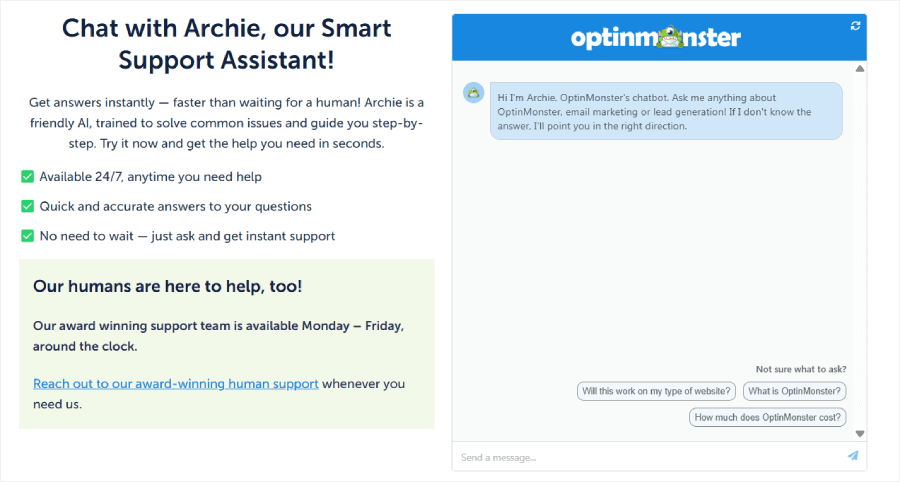
- Chat with Archie, our AI assistant, available 24/7 for instant answers
- Click the in-app support button while building campaigns to get quick help
- Submit a support ticket for detailed technical questions
- Get help on WordPress.org forums, where our team actively responds to WordPress users
But we don’t just wait for you to ask for help. Every OptinMonster plan includes these learning resources:
- OptinMonster University, which is our library of expert-led video courses teaching you everything from basic setup to advanced conversion strategies
- Comprehensive documentation with step-by-step guides and best practices
- Regular blog updates with proven marketing tactics and success stories
- Regular webinars where you can learn new strategies and ask questions directly
- Inner Circle Facebook group to share success stories and exchange strategies with fellow marketers
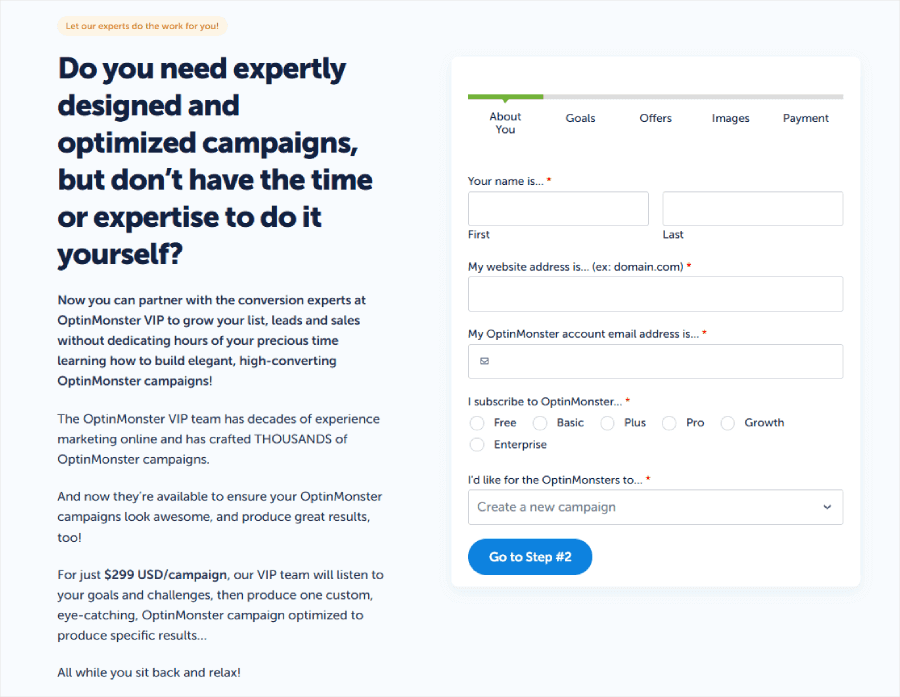
- VIP Done-For-You Campaign Setup (a $297 value), where our experts will create a custom campaign for your business, optimized for conversions right from the start
Bloom’s support comes as part of the Elegant Themes membership. That means you’ll get access to their 24/7 chat support.
You’ll also find a support center right in your WordPress dashboard where you can:
- View your system status and compatibility.
- Enable Safe Mode to troubleshoot plugin compatibility issues.
- Access their documentation.
- Chat with their support team.
- Post questions in the Elegant Themes forum.
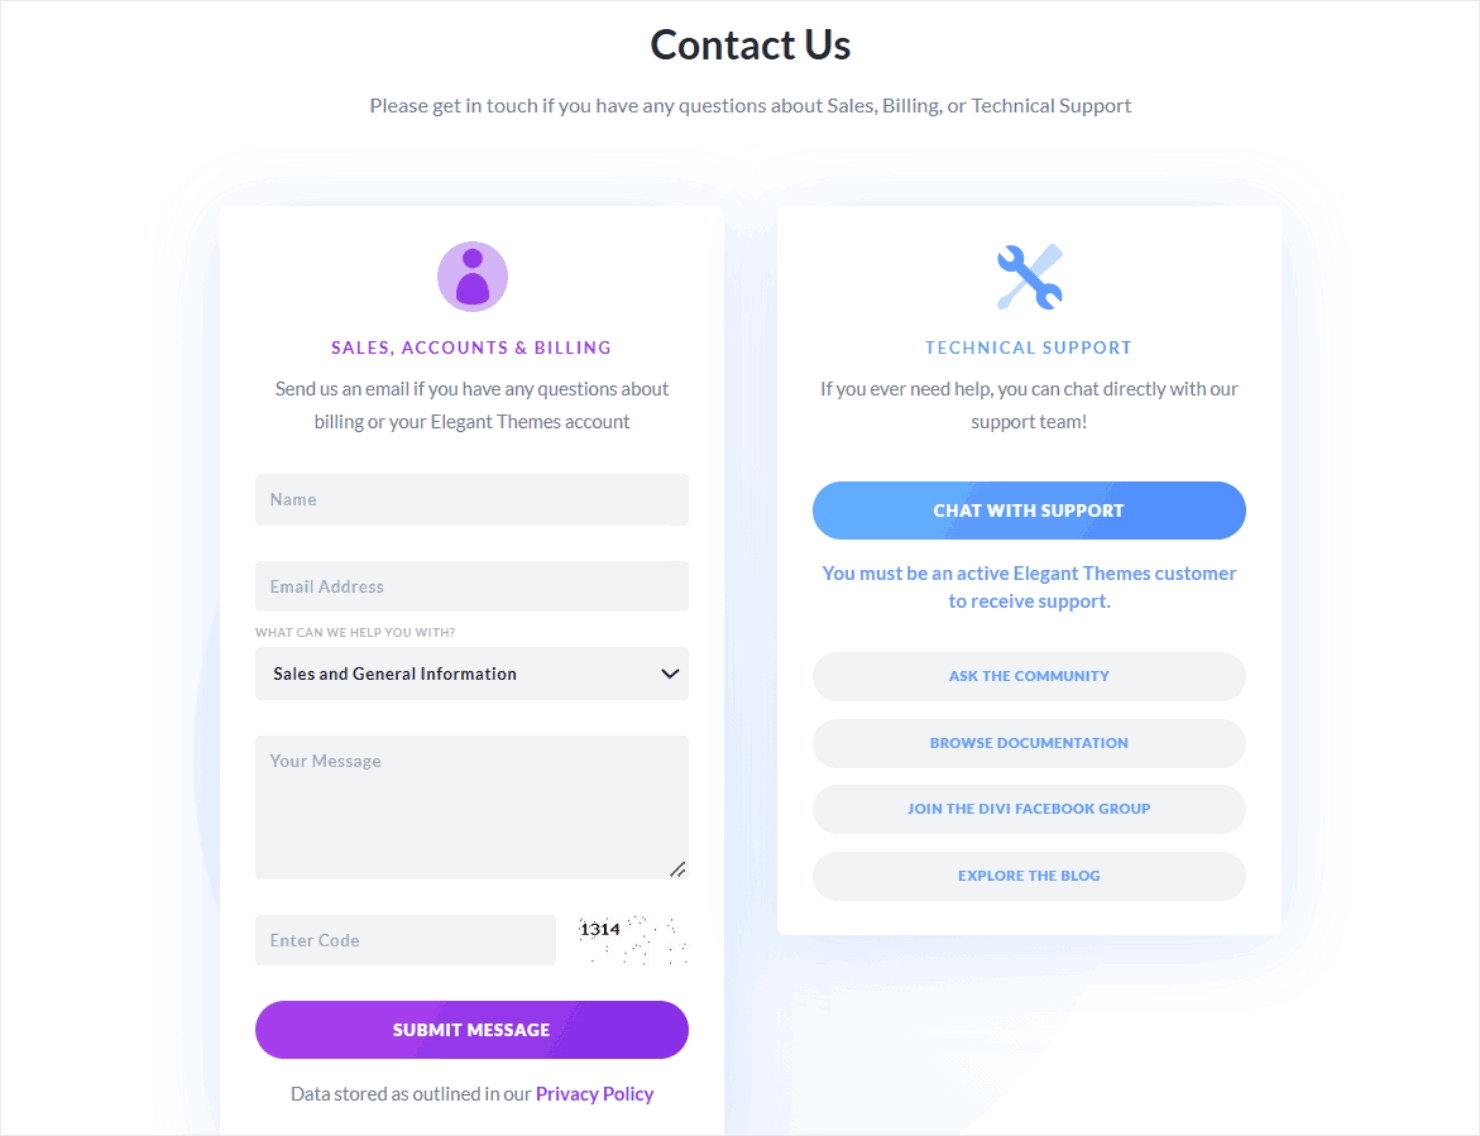
While these cover the basics, we found some limitations during our testing. For example, their documentation seems outdated in places. When we tried connecting with an email provider, the instructions didn’t match the current interface.
If you’re looking for community support, Bloom users can join the Divi Facebook group. However, since Bloom is just one of many Elegant Themes products, you’ll need to filter through discussions about their other tools to find Bloom-specific help.
🏆 Winner: OptinMonster
Although OptinMonster doesn’t have 24/7 live support like Bloom does, it still stands out with features like:
- ✓ Multiple support channels including live chat, AI assistance, and in-app help
- ✓ Comprehensive learning resources through OptinMonster University and regular webinars
- ✓ VIP Done-For-You Campaign Setup included with every plan, something that’s not available in Bloom
- ✓ Up-to-date documentation and step-by-step guides
OptinMonster vs Bloom: Value for Money
You’ve seen how both tools compare in features and support. Now let’s talk about what matters to many businesses: the investment required and what you get in return.
OptinMonster’s pricing is uniquely fair and transparent. Unlike our competitors, who charge based on your total website traffic, we only count campaign pageviews, meaning you only pay for times when someone actually sees your campaign.
This can save you a lot of money, especially if you only want to show campaigns on specific pages.
For example, if your site gets 100,000 monthly visitors but you only show campaigns on your pricing page that gets 2,500 views, you’d only need our Basic subscription ($7/month).
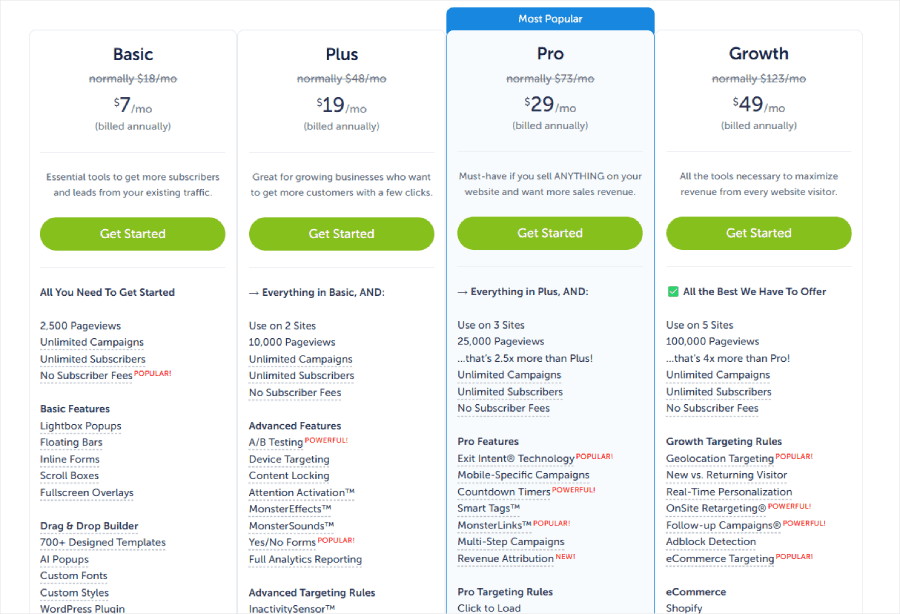
Here’s what you’ll get with the Basic subscription:
- Perfect for getting started
- 1 site with 2,500 campaign views
- Unlimited campaigns and subscribers
- All basic campaign types
- 700+ templates
- Standard support
Upgrading to Plus ($19/month) will get you access to more advanced features:
- 2 sites with 10,000 campaign views
- Everything in Basic, plus:
- A/B testing for optimizing your campaigns
- Yes/No forms to boost engagement
- Full analytics reporting
- Device-based targeting
- Content locking feature
🎉 Whole Whale doubled their email list and achieved a 21.42% conversion rate using OptinMonster Plus’s Content Locking feature.
Head to our case study to learn their secrets.
If you need more powerful conversion tools, our Pro subscription ($29/month) includes:
- 3 sites with 25,000 campaign views
- Everything in Plus, plus:
- Exit-Intent® Technology
- Mobile-specific campaigns
- Countdown timers
- Revenue attribution
- Priority support with live chat
- Advanced targeting rules
To unlock our most advanced features, the Growth subscription ($49/month) gives you:
- 5 sites with 100,000 campaign views
- Everything in Pro, plus:
- Coupon wheel campaigns
- Advanced eCommerce features
- Premium support
- Geo-location targeting
- AdBlock detection
- MonsterChains™
Every subscription includes a 14-day money-back guarantee, so you can try OptinMonster risk-free even without a free trial. If you don’t see positive results within your first two weeks, we’ll refund your purchase. No questions asked.
Now, let’s look at what you’ll pay for Bloom. Instead of being available as a standalone tool, Bloom comes as part of an Elegant Themes membership.
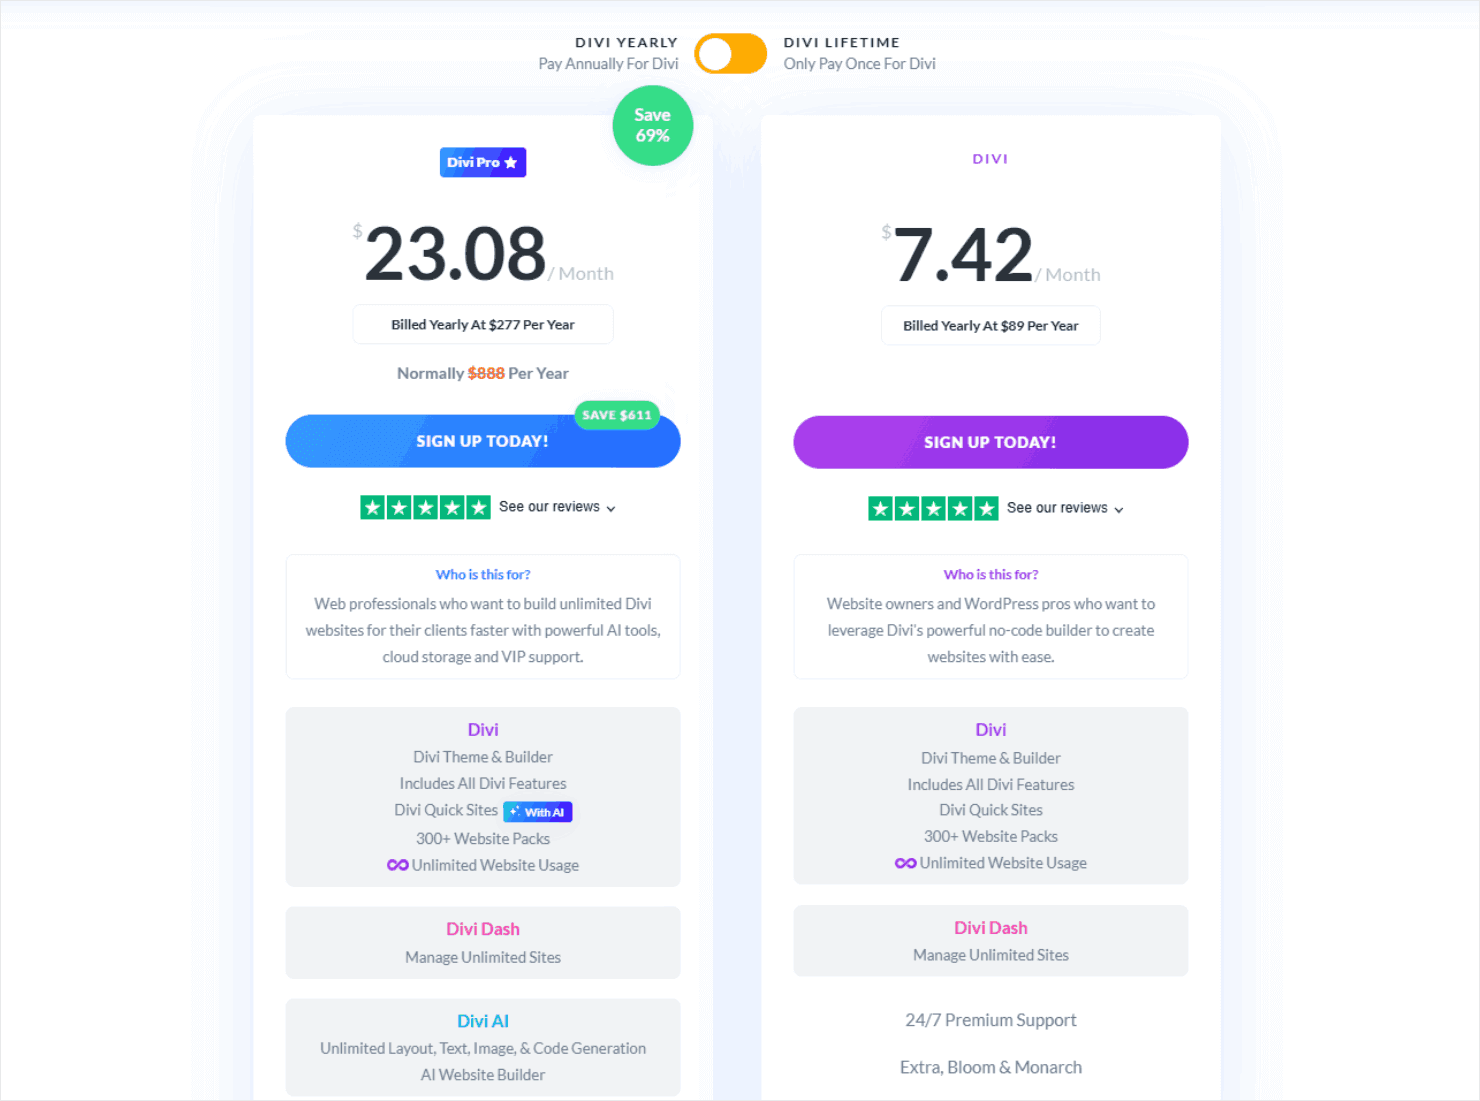
You have four options:
Divi Plan ($7.42/month):
- Access to Bloom and other Elegant Themes products
- Unlimited website usage
- Basic support
- Divi theme and builder
- Monarch social sharing plugin
Divi Pro Plan ($23.08/month):
- Everything in the Divi plan
- VIP support
- Divi AI features
- Divi Cloud access
Lifetime Access ($249 one-time payment):
- All Elegant Themes products forever
- Unlimited website usage
- Lifetime updates and support
- One-time payment, no renewals
Lifetime + Pro Services (initial payment of $297, then $212 per year)
- Everything in the Lifetime plan
- Additional Pro features like Divi AI and Cloud
- VIP support
- Cancel Pro Services anytime while keeping lifetime access
Bloom’s pricing through Elegant Themes might seem attractive, especially with unlimited sites and lifetime options.
However, remember that you’re paying for an entire suite of WordPress tools, many of which you might not need if you’re just looking for a conversion optimization solution.
Better yet? If you want both a great WordPress theme and powerful conversion tools, here’s a smart way to maximize your investment:
- Get Divi’s basic plan ($89/year) for their excellent theme builder.
- Add OptinMonster Basic ($84/year) for conversion-optimized campaigns.
- Total: $173/year or just $14.42/month.
That’s incredible value when you consider Divi Pro alone costs $23.08/month. and includes Bloom’s limited campaign features. With our suggested combination, you’ll spend less while getting:
- Divi’s premium theme-building capabilities
- OptinMonster’s superior conversion tools
- The flexibility to upgrade either tool separately as needed
- Best-in-class features for both design AND conversions
🏆 Winner: OptinMonster
While Bloom might seem attractive as part of the Elegant Themes bundle, OptinMonster offers better value for businesses serious about conversion optimization.
You get exactly what you need without paying for extra tools you might never use:
- ✓ Fair pricing based only on campaign views, not total site traffic (Bloom charges based on your website’s total traffic, not specifically for how many times your Bloom campaigns were viewed)
- ✓ More features at each price point than Bloom offers
- ✓ Flexible subscriptions that grow with your business
- ✓ 14-day risk-free money-back guarantee
Why Choose OptinMonster Over Bloom
After comparing these tools side by side, it’s clear that OptinMonster offers better value for businesses serious about converting their traffic.
Our platform is specifically designed to help you capture and convert more leads, while Bloom offers more basic functionality as part of a larger WordPress theme package.
Build Better Campaigns, Faster
- 700+ pre-built templates compared to Bloom’s 100 basic designs
- Intuitive drag-and-drop builder with real-time preview
- Advanced features like multi-step forms and gamified wheels
- Done-for-You Campaign Setup included with every plan
Target the Right Visitors at the Perfect Time
- Industry-leading Exit-Intent® Technology
- Advanced targeting rules like geo-location and device-based display
- eCommerce-specific features for online stores
- Visual rule builder for creating powerful targeting combinations
Get More Value for Your Investment
- Fair pricing based on campaign views, not total site traffic
- No need to buy additional WordPress plugins or themes
- Comprehensive support and training resources
- 14-day money-back guarantee for risk-free testing
Try OptinMonster risk-free today and see why over 1.2 million websites trust us to grow their email lists and boost sales.
Ready to start converting more visitors?


