Do you want to create a quote calculator in WordPress to improve user experience (UX) and boost sales on your site?
A quote calculator can be a great addition to your website. It helps users understand how much they’ll pay for your products or services before it’s time to checkout.
This means fewer unexpected “surprises” when the customer sees their sub-total, which also means less cart abandonment on your site.
But how do you go about making a quote calculator, especially when you have no coding or “tech skills” to fall back on?
Today, we’re going to answer that question with a step-by-step guide to creating a quote calculator in WordPress. Then we’ll share a concrete strategy you can use to get new leads and boost sales across your site.
First, though, let’s clarify what a quote calculator is and why it’s such a valuable addition to your online store.
What Is a Quote Calculator (& Why You Need One)
A quote calculator is exactly what it sounds like: a calculator on your website that’s specifically designed to help users add up the total cost of the items they want to purchase.
With this feature on your site, customers will be able to create complex order forms, add as many items to their cart as they’d like, and have a clear understanding of what costs will be involved.
Why does this matter? Because one of the main reasons for cart abandonment is unexpected costs at checkout.
That makes quote calculators an excellent way to reduce cart abandonment on your site. But there are other reasons that a quote calculator can help your brand, particularly with how it improves UX on your site.
With a quote calculator, you can help customers:
- Create complex order forms that are easier for customers to understand
- Build trust with your audience by displaying prices upfront
- Find the items they love (but can also afford)
- And much more…
At the end of the day, there’s no downside to adding a quote calculator to your WordPress store. So, now, let’s look at how anyone can add a quote calculator to their WordPress store in a matter of minutes.
Creating a Quote Calculator for WordPress
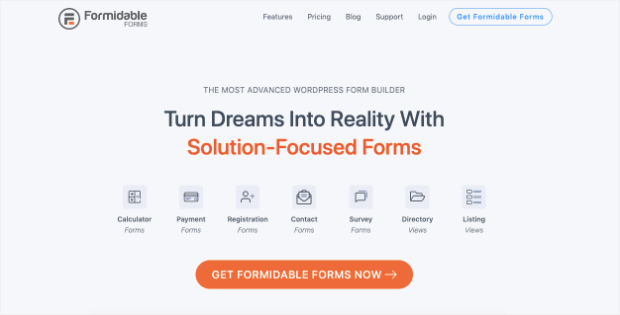
For this tutorial, we’ll be using Formidable Forms:
Formidable Forms is hands down your best option for quickly and easily adding a quote calculator to your WordPress store. It’s a form builder plugin that allows you to build complex order forms in minutes.
Plus, it comes with tons of useful templates that you can use to save hours of time, energy, and headaches in the form building process.
You also have the option to create a custom form from scratch. There’s practically no learning curve, either, because Formidable Forms has a drag and drop builder that anyone can use.
So, now, let’s get started creating a quote calculator.
Before diving into the tutorial, however, you’ll need to install and activate the Formidable Forms plugin. You can do so just like you’d download any other WordPress plugin on the market.
Never installed a plugin before? No worries. Check out this helpful resource: How to Install a WordPress Plugin: 3 Easy Methods.
Once Formidable Forms Pro is activated, you’re ready to create your quote cost calculator.
Step 1) Create a Quote Form
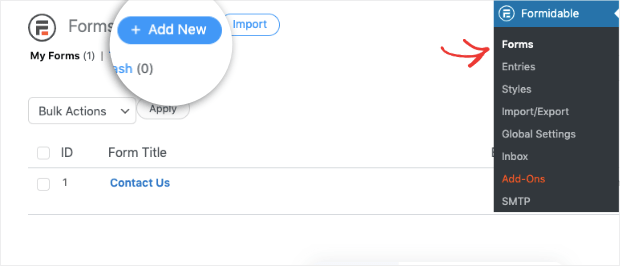
From your WordPress dashboard, click Formidable Forms » Forms. Then click + Add New:
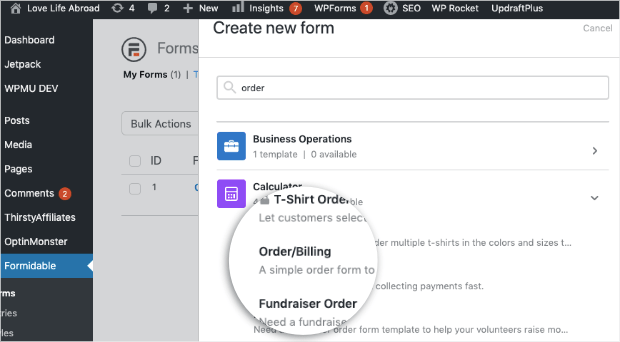
This will make a popup appear asking what kind of form you would like to build. In the search bar, type Order to pull up the Order/Billing templates (it’s under the main category Calculator):
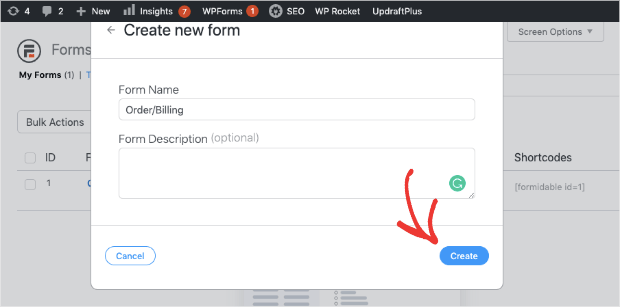
Now you’ll need to name your form, add a description to keep yourself organized, and click Create:
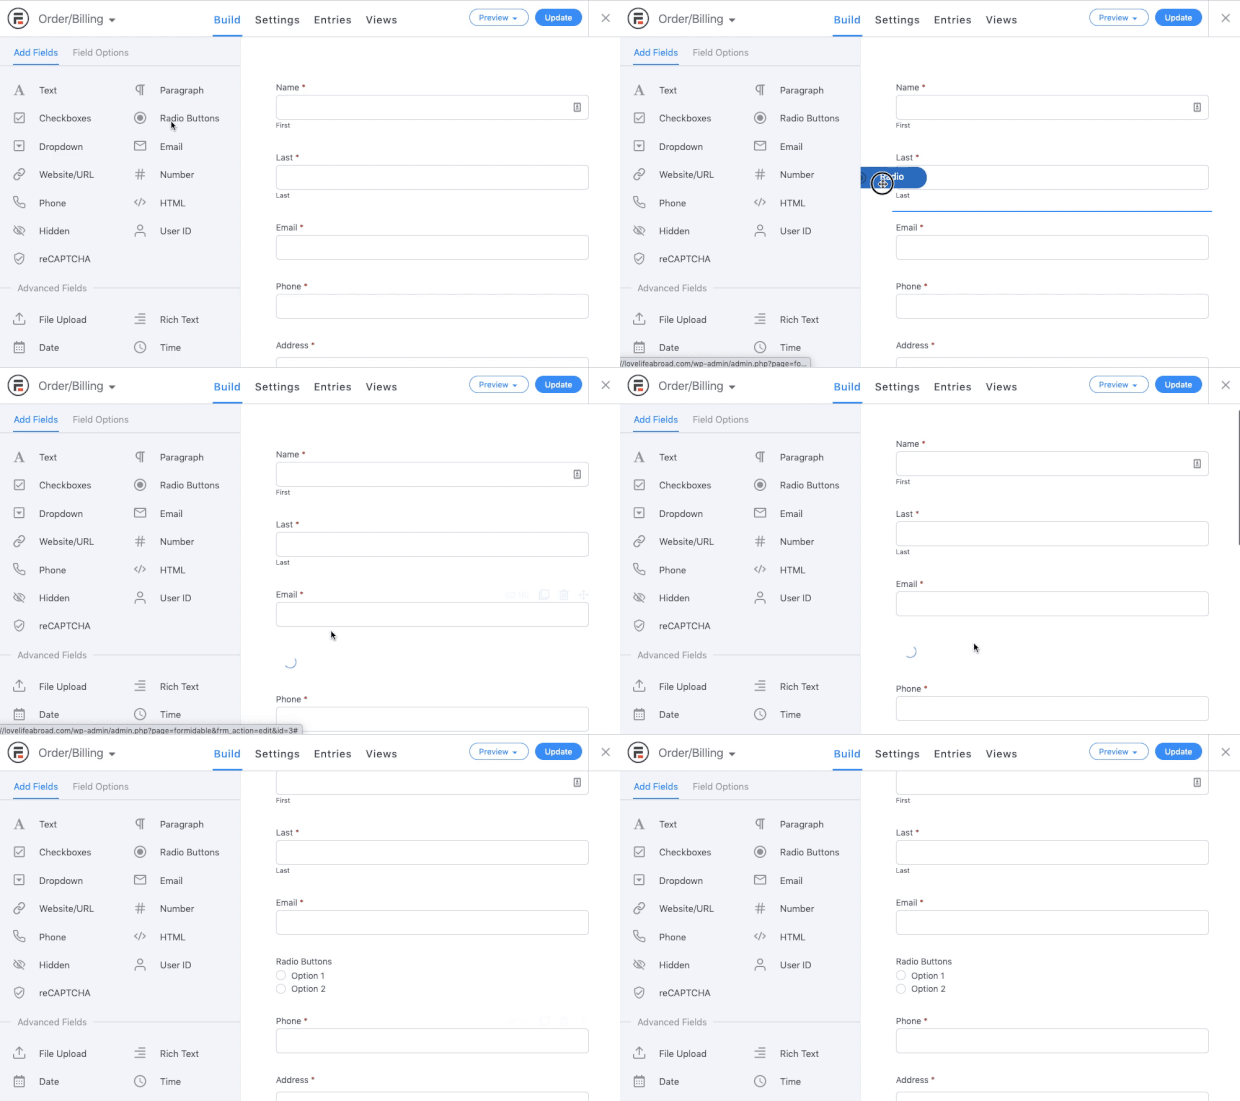
From here, you’ll be taken to your form. The first thing you need to do is add the option Radio Buttons to your form.
With the drag and drop builder, this is easy. Simply click Radio Buttons. Then drag and drop it into your form where you’d like your products to appear:
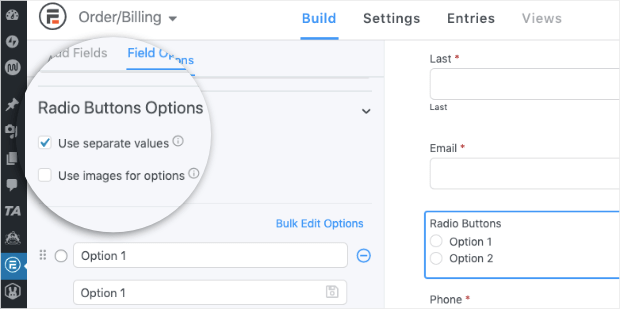
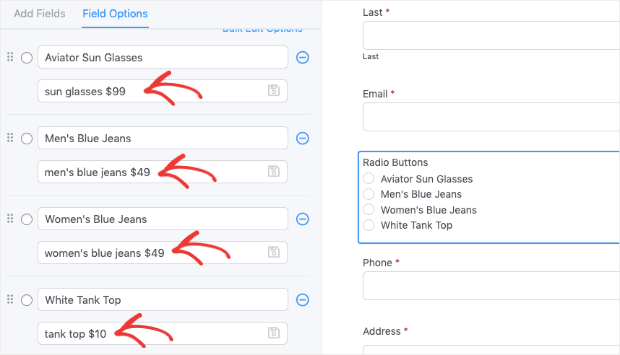
Then click on the new section you just added. The first thing you need to do is click Use Separate Values:
This will allow you to give a unique price for each product you add to your store:
You can now add as many products as you want to your order form along with the corresponding prices.
Before heading over to step 2, though, there’s one last thing you need to do.
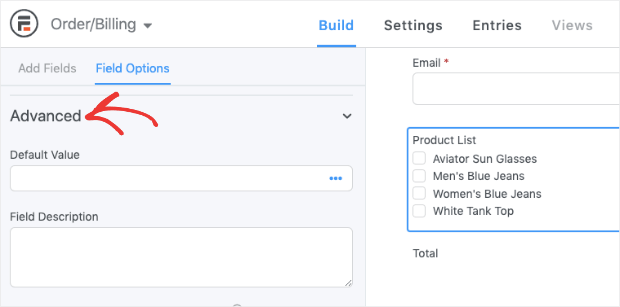
Go to the Advanced section of your editing options:
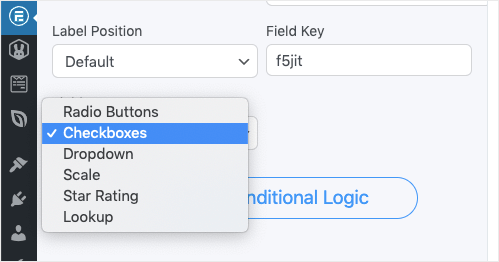
Then find the drop-down menu labeled Field Type and select the option Checkboxes:
This will allow your customers to select more than one product at a time.
Next, you’re ready to add the calculation field underneath. That way, your customers can always have the most accurate price quote for products they want.
Step 2) Add a Read-Only Number Field to Your Form
Now you’ll need to add a new field to your form. But this isn’t a field that your customers can modify.
Instead, it’ll be a Number field to calculate the price of your customer’s order.
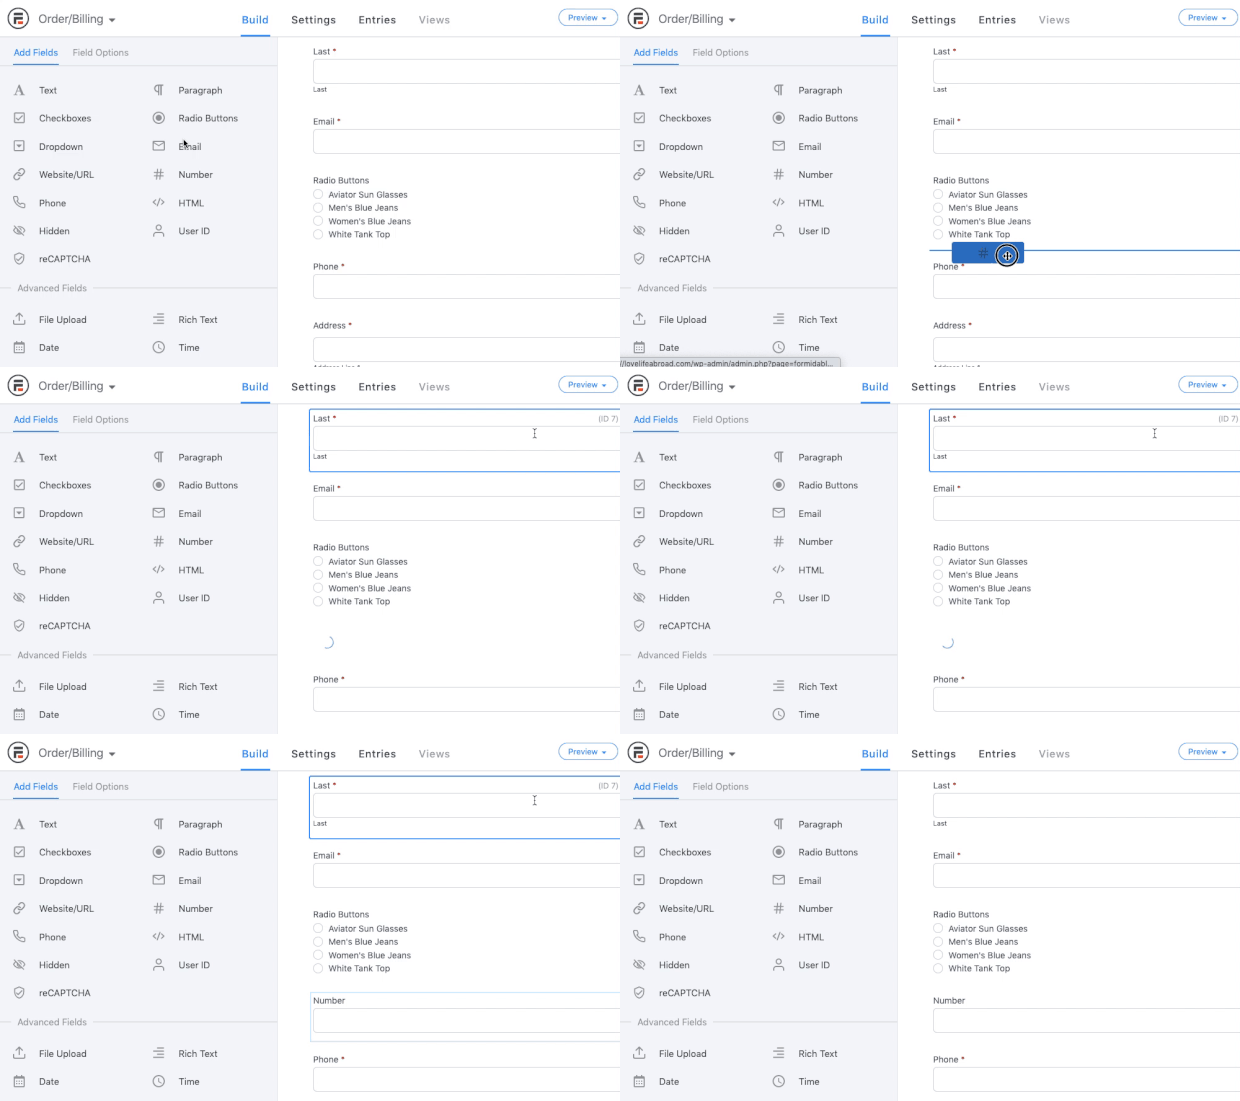
Go back to your main Add Fields menu in Formidable Forms, locate the Number field, and drag it directly under your form’s new product options:
This will pull up the editing tools on the left-hand side. Go to your Advanced options and locate the Default Value field box. Then click on the little calculator icon and the 3 little dots to pull up the other editing settings:
Now you’ll be able to modify a few things about this Number field box.
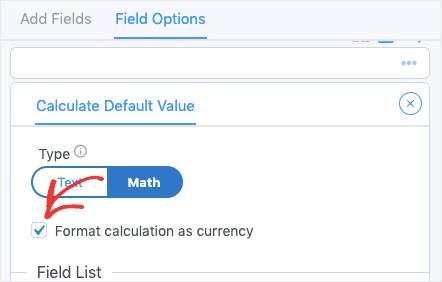
First, you’ll want to check the box that says Format calculation as currency:
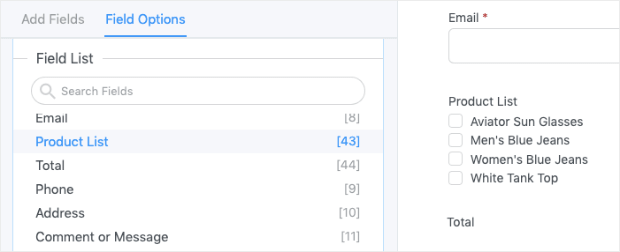
Next, in the field’s list, select the field boxes you want to add to your calculated Number field.
For this tutorial, that would be the products list you added in step 1:
And that’s it! You now have an order form that calculates and updates a quote of your products or services depending on what customers select:
In today’s tutorial, we used a small example for an eCommerce store selling clothes like sunglasses or jeans.
But you can easily see how the same methods described here can create custom quote forms for any of your products or services. You could build forms to give quotes for:
- Group consulting
- Online courses
- 1:1 Strategy sessions
- Digital goods
- Physical goods
Or just about any other product you can think of to sell online.
But now that we know how to create a quote calculator in WordPress, let’s check out how you can combine this feature with OptinMonster to increase sales and conversions across your site.
How to Increase Sales and Conversions
For this section of the tutorial, we’re going to use OptinMonster:
OptinMonster is the world’s #1 lead generation tool. It helps you create professional “optin campaigns” like popups, floating bars, fullscreen welcome mats, and more.
These optin campaigns can be built in a matter of minutes with no coding skills required.
And once you load these campaigns with compelling copy or a lead magnet, you’ll be able to get better leads in less amount of time. How?
OptinMonster’s advanced targeting features allow you to present your campaigns to the right people, in the right places, and at just the right time in your customer journey.
Want to see it in action? Click below to start your 100% risk-free OptinMonster trial today:
Now, let’s check out how to use OptinMonster and your new quote calculator form to get even more conversions from your WordPress site.
Capture Abandoning Visitors With Exit-Intent
One of the best ways to grow your email list is with OptinMonster’s Exit-Intent® Technology.
Exit-Intent® Technology allows you to create popups to display to users who are actively leaving your website.
This works for people coming to your site from both desktop and mobile devices. Here’s an example of what an exit-intent popup might look like:
And exit-intent popups are an incredibly powerful strategy. In fact, check out some of the following success stories on how customers used exit-intent popups to get more conversions:
- Crossrope explodes its email list by 900%
- How Fastrack recovers 53% of its abandoning visitors
- Christmas Lite Show converted 30% of its visitors
You can use exit-intent popups to have the same success on your site, too.
How to Use for Your Quote Form
Once your quote form is live, you can create a page for it.
Sometimes when users start filling out their forms, the price quote may be more expensive than they’d planned for.
But before leaving your site forever, you can present them with a coupon or other lead magnet to keep them on your site.
By presenting a coupon, you’ll not only capture their email address, but you’ll also motivate the user to go through with checkout.
To do this, you’ll want to use OptinMonster to build an exit-intent popup.
We won’t get into how to create and design a campaign with OptinMonster in this tutorial. For that, you can check out this resource: How to Create Your First OptinMonster Campaign.
But don’t worry. Building your first campaign is super easy and takes just a few minutes.
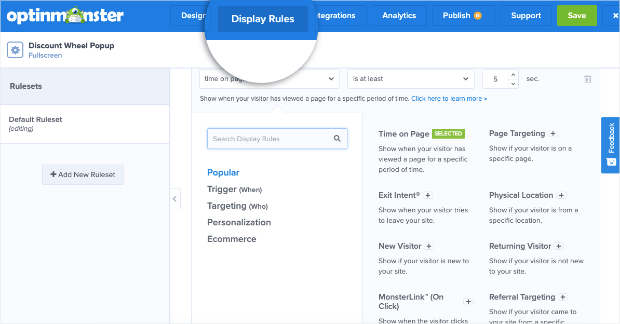
To set your exit-intent rule, simply go to your Display Rules at the top of your OptinMonster editor:
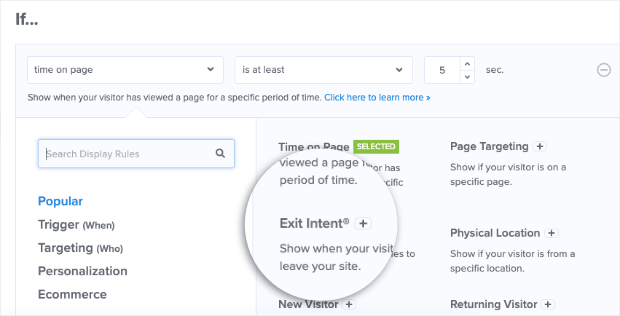
Search for and click Exit Intent®:
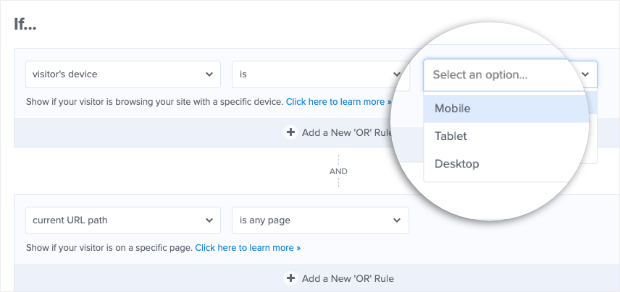
Then you can select which device you want to use your exit-intent popup for:
- Desktop
- Tablet
- Mobile
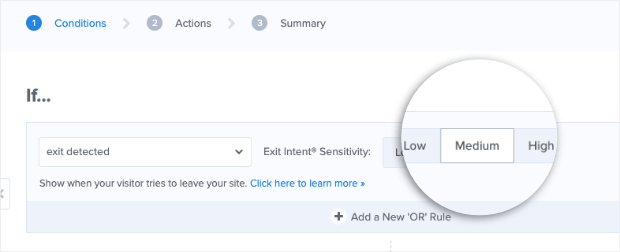
Then you can select your sensitivity level:
This will change how fast or slow your popups appear as users leave the browser page.
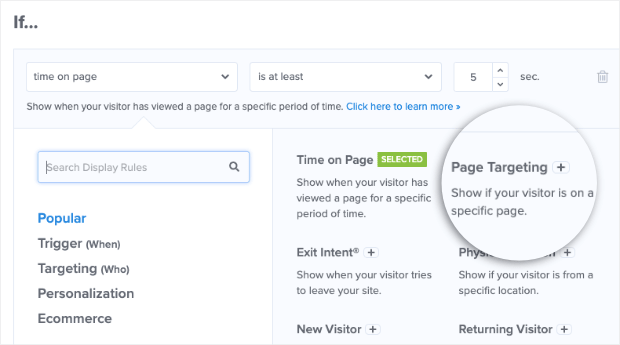
Then you’ll want to target your form’s URL. For that, search for the rule Page-Level Targeting:
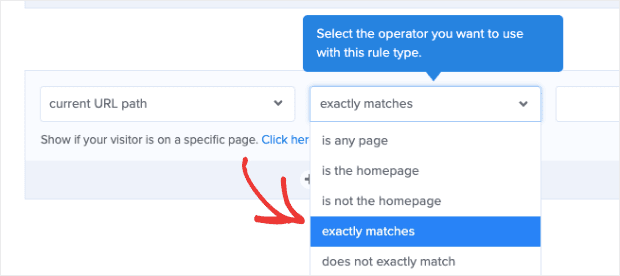
Then change the field to Current URL Path exactly matches:
Then you can insert the URL slug of your quote calculator form:
When you’re done, you can Save and Publish your campaign.
And that’s it! You’ve now built a quote calculator in WordPress.
Plus, you’ve created a powerful campaign to keep users from abandoning your site by adding an exit-intent rule to your form’s specific page.
We hope you found this post helpful. If you did, you might want to check out the following resources:
- How to Create a WordPress Contact Form (the Easy Way)
- How to Create a Popup With Contact Form 7
- 40 Exit-Intent Hacks to Grow Your Subscribers & Revenue
These posts will have everything you need to get more leads and sales from your WordPress forms.
Ready to try it for yourself? Start your risk-free OptinMonster account today!
Disclosure: Our content is reader-supported. This means if you click on some of our links, then we may earn a commission. We only recommend products that we believe will add value to our readers.
