OptinMonster offers seamless integration with SendPulse email marketing service. Connecting OptinMonster to your SendPulse email list is very easy.
In this article, you’ll learn how to connect SendPulse with OptinMonster.
All subscription plans can add custom forms using the Form Embed block.
Before you start, as a best practice we recommend you also connect your campaigns to Monster Leads as a backup.
Connect SendPulse
When you create a campaign in OptinMonster that you intend to collect leads with, you’ll want to integrate with one or more services to send those leads to.
To send leads to SendPulse, follow these steps:
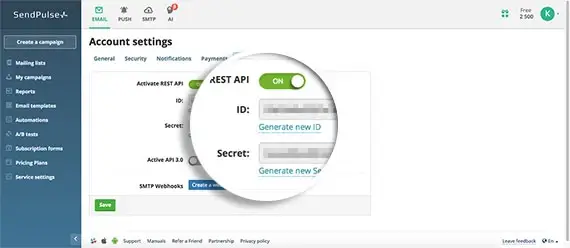
- Before you start, you’ll need a SendPulse API Key. You can create and copy an API Key from your SendPulse account following these steps:
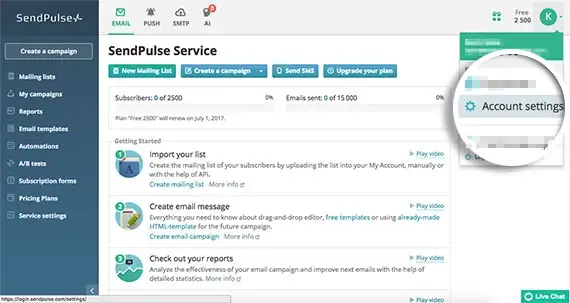
- Log in to your SendPulse dashboard and navigate to your Account Settings option from the dropdown menu next to your name and avatar.

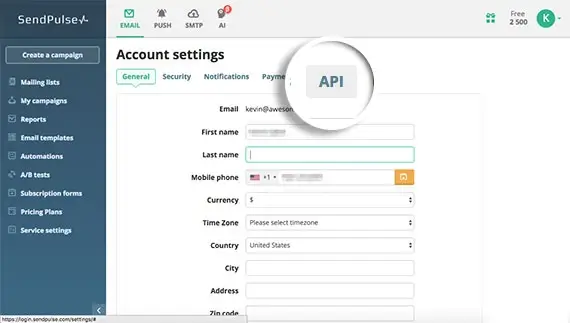
- On the next page, select the API tab from the Account Settings Menu.

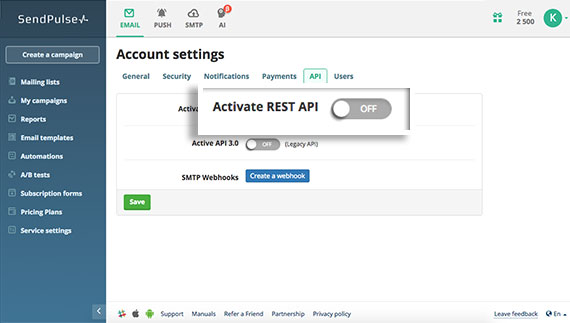
- On the next page, you need to Activate the REST API.
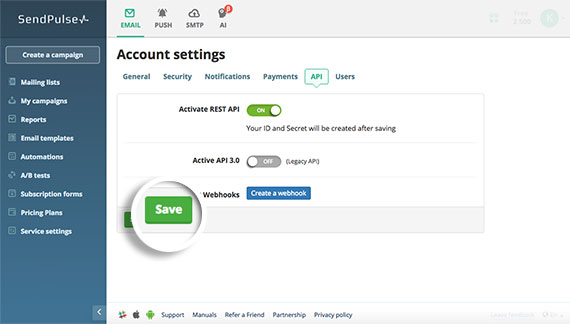
- Next, click Save so that you can then see your API ID and Secret code.

- After saving, you see the API ID and the API Secret. You will need to copy these values for their appropriate fields in the next step.

- Log in to your SendPulse dashboard and navigate to your Account Settings option from the dropdown menu next to your name and avatar.
- Returning to OptinMonster, navigate to the Integrations view in the campaign builder, search for and select SendPulse.

- Enter a SendPulse Account Name (*internal use only), the SendPulse Rest API ID and SendPulse Rest API Secret in the appropriate fields, then select the Connect to SendPulse button.

*The SendPulse Account Name can be anything that helps you identify the specific integration within OptinMonster. It’s possible to add more than one SendPulse integration to your account and this is an easy way to differentiate between them when assigning integrations to individual campaigns. - Required: Once the SendPulse integration has been connected select the SendPulse List you wish to send leads to from the Provider Lists field.

- Optional: You can also configure Double Opt-in for your leads.

- When you are finished, Save your campaign.


Enable Double Opt-in
By default, single opt-in is enabled when you integrate with SendPulse.
To enable single opt-in, follow these steps:
- From the Integrations view in the campaign builder, select your SendPulse integration.

- Toggle the Enable Double Opt-in? option on.

- Next, enter an email address into the *Sender Email field you wish to use for the confirmation emails.

*The email address you enter here must be activated in your SendPulse account. - When you’re finished, Save the campaign.


Add Extra Fields
Our native SendPulse integration supports the following fields:
- Email (required)
- Name
- Phone
- Privacy Checkbox (display only, no data sent)
To add more fields to your campaign you’ll want to build the form as you wish it to appear using the SendPulse form builder, and add it to your campaign using our Form Embed block.
Get started adding a custom form to your campaign.
Email Automations
To send emails automatically to new leads you’ll want to configure email automations within your SendPulse account.
The following guides from SendPulse may be helpful to get started:
- How to send automated emails
- How to create an automation that starts when a subscriber is added to a mailing list
Testing
We strongly recommend you test the optin form before publishing your campaign to ensure it is working as you expect.
Before you begin, please be aware of the following details when testing SendPulse integrations:
- Previously submitted or already subscribed leads may be treated differently by SendPulse than new leads. For this reason, we recommend using a completely unique email address each time you test submit your campaign’s form. You can use a free tool like TempMail.io or learn how to create unlimited unique email addresses from a single Gmail account.
- If the lead is captured in SendPulse but you do not receive any automated emails it indicates the integration from OptinMonster to SendPulse is correct, and the issue is with the automated email configuration. SendPulse controls email automation exclusively. If you require assistance in troubleshooting email automations we recommend reaching out to SendPulse support directly.
Get started testing with the Live Site Inspector tool.
Spin-a-Wheel Support
If you are configuring a Gamified spin-to-win campaign, spin-a-wheel support is not available at this time to send the coupon data to SendPulse.
If you’re serious about jumpstarting your website business growth, then get started with OptinMonster today!
Our conversion experts will design 1 free campaign for you to get maximum results – absolutely FREE! Click here to get started →
FAQs
Can I send leads to more than one Campaign?
Yes! See our Lead Sharing guide to accomplish this.
How do I configure single or double opt-in?
See our guide on single vs. double opt-in.
Is it possible for me to add a phone field to my campaign?
Yes! You can add a phone field. Learn how to capture phone numbers with OptinMonster.
Troubleshooting
The campaign is capturing leads but shows 0 conversions in analytics.
Confirm that conversion tracking is turned on for the submit button in your campaign. See our guide on How to Enable Conversion Tracking.